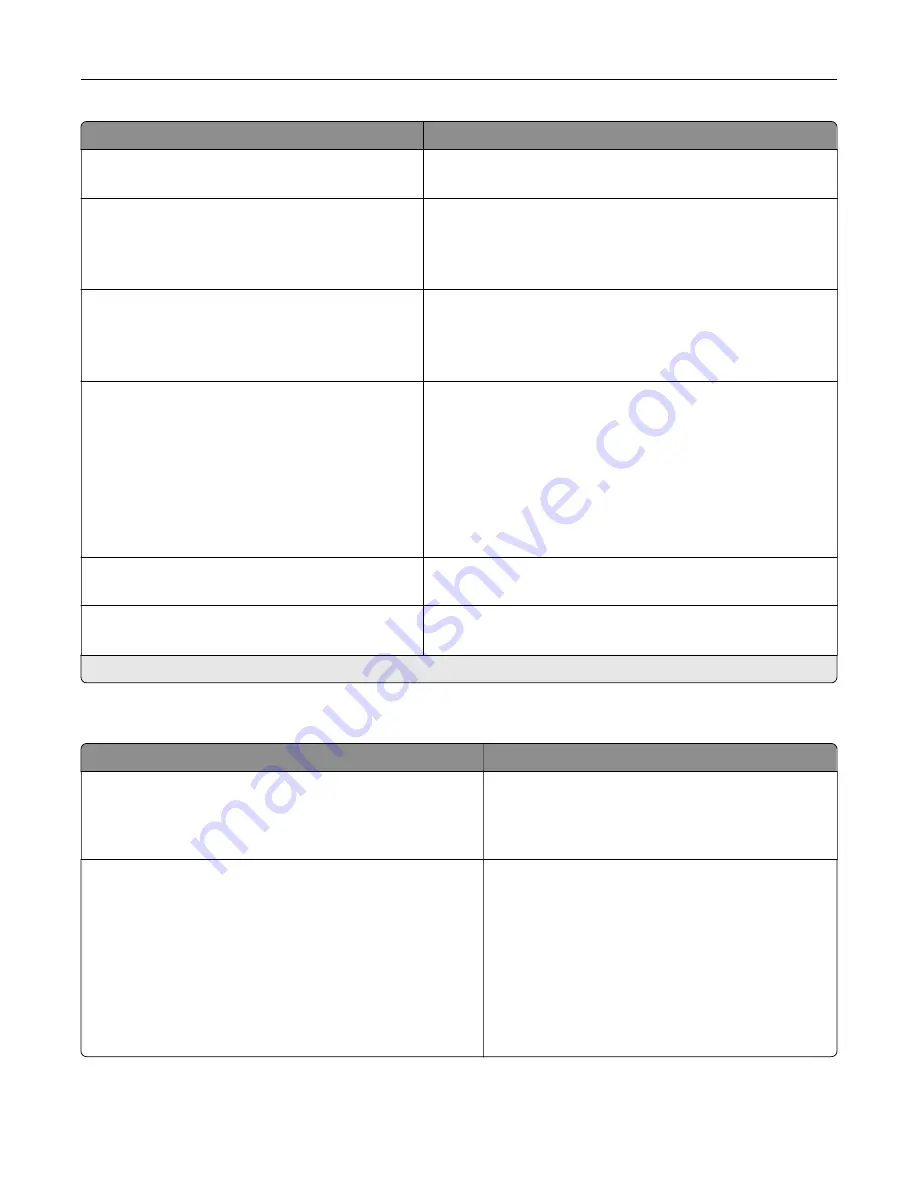
Menu item
Description
Device Operations
Clear all remotely
‑
installed messages
Erase messages that were remotely installed.
Device Operations
Automatically Display Error Screens
Off
On*
Show existing error messages on the display after the printer
remains inactive on the home screen for a length of time equal
to the Screen Timeout setting.
Device Operations
Automatic Media Type Detection
Off*
On
Set the printer to detect the paper type of a page being loaded.
Toner patch sensor setup
Calibration frequency preference
Disabled
Fewest color adjustments
Fewer color adjustments
Normal*
Better color accuracy
Best color accuracy
Set the printer to put down the correct amount of toner to
maintain color consistency.
Toner patch sensor setup
Full calibration
Run the full color calibration.
Toner patch sensor setup
Print TPS information page
Print a diagnostic page that contains information on toner
patch sensor calibration.
Note:
An asterisk (*) next to a value indicates the factory default setting.
Out of Service Erase
Menu item
Description
Out of Service Erase
Memory Last Sanitized
Hard Disk Last Sanitized
Show information on when the printer memory or
hard disk was last sanitized.
Note:
Hard Disk Last Sanitized appears only when a
hard disk is installed.
Out of Service Erase
Sanitize all information on nonvolatile memory
Erase all printer and network settings
Erase all apps and app settings
Erase all shortcuts and shortcut settings
Sanitize all information on hard disk
Erase downloads (Erase all macros, fonts, PPOs, etc.)
Erase buffered jobs
Erase Held jobs
Clear all information on non
‑
volatile memory and
information on the hard disk.
Note:
Sanitize all information on hard disk appears
only when a hard disk is installed.
Understanding the printer menus
44
Содержание MX-C507P
Страница 1: ...DIGITAL FULL COLOR PRINTER MX C507P User s Guide September 2021 Machine type 5028 Model 6AH ...
Страница 89: ...2 Remove the waste toner bottle 3 Remove the imaging kit Maintaining the printer 89 ...
Страница 91: ...8 Insert the black toner cartridge 9 Insert the imaging kit Maintaining the printer 91 ...
Страница 93: ...2 Remove the waste toner bottle 3 Remove the imaging kit Maintaining the printer 93 ...
Страница 95: ...8 Insert the toner cartridges 9 Insert the new imaging kit Maintaining the printer 95 ...
Страница 102: ...3 Remove the pick roller 4 Unpack the new pick roller Maintaining the printer 102 ...
Страница 114: ...Jam locations 1 Standard bin 2 Fuser 3 Trays 4 Duplex unit 5 Multipurpose feeder Clearing jams 114 ...
Страница 155: ...5 ISP extended cable 4 Install the ISP into its housing Upgrading and migrating 155 ...
Страница 156: ...5 Attach the housing to the controller board access cover Upgrading and migrating 156 ...
Страница 162: ...5 Open door B 6 Open door C Upgrading and migrating 162 ...


