3-56
PRINTER
Contents
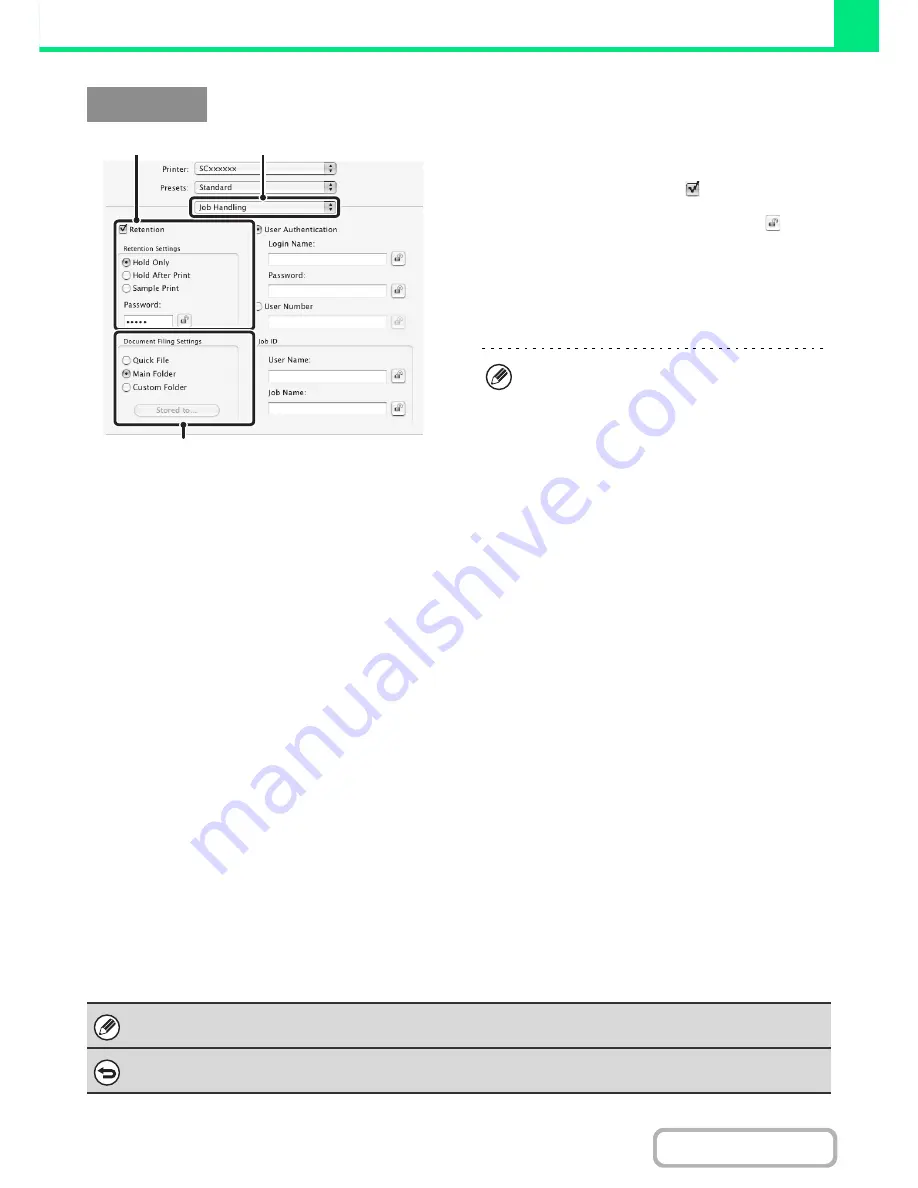
(1) Select [Job Handling].
(2) Select the retention setting.
Click the [Retention] checkbox
. Select the retention
method in "Retention Settings". To simplify operation the
next time the same password is set, click the
(lock)
button after entering the password (5 to 8 digit number).
(3) Select document filing settings.
Select the folder for storing the file in "Document Filing
Settings". If you selected [Custom Folder], click the
[Stored to] button to select the folder.
Automatically print all stored data
When user authentication is enabled in the system settings (administrator), all retained (stored) print jobs of a user who
logs in can be printed automatically after log in.
After all jobs are printed, the files are deleted.
To use the print all function, the following steps are necessary:
• "Automatically print stored jobs after login" must be enabled in the system settings (administrator) of the machine.
• At the time of retention print, in addition to user authentication information,
the user name stored in the machine
must be entered in "User Name" of the job ID in the printer driver.
☞
Windows:
PRINTING WHEN THE USER AUTHENTICATION FUNCTION IS ENABLED
(page 3-8)
☞
Macintosh:
PRINTING WHEN THE USER AUTHENTICATION FUNCTION IS ENABLED
(page 3-22)
(1) Log into the machine.
Enter your user number or login name and password in the user authentication screen of the machine.
(2) Perform print all.
A confirmation prompt will appear. Touch the [OK] key. The print files stored in the quick file folder, main folder, and custom
folder will be printed automatically and then deleted.
Macintosh
(3)
(1)
(2)
• When [Quick File] is selected, "Retention Settings"
will be set to [Hold After Print] only.
• When [Quick File] is selected, the password entered
in "Retention Settings" is cleared and cannot be
used.
• To store a file in a custom folder, the custom folder
must first be created using "Document Filing
Control" in the system settings (administrator). If a
password has been established for a custom folder,
enter the "Folder Password" in the folder selection
screen.
• In Mac OS X v10.5 to 10.5.8 and v10.6 to 10.6.2, if
you wish to store document filing settings in a
custom folder, click the [Custom Folder] tab.
• In Mac OS 9, select [Job Handling] and then select
the retention setting. (The document filing function
cannot be used.)
Files with a password and files that are protected by the document filing function of the machine will not be printed. Files in a
folder (excluding My Folder) that has a password will also not be printed.
If you do not wish to "print all"...
Touch the [Cancel] key in step (2).
Содержание MX-C382SC
Страница 4: ...Reduce copy mistakes Print one set of copies for proofing ...
Страница 6: ...Make a copy on this type of paper Envelopes and other special media Transparency film ...
Страница 11: ...Conserve Print on both sides of the paper Print multiple pages on one side of the paper ...
Страница 34: ...Search for a file abc Search for a file using a keyword Search by checking the contents of files ...
Страница 35: ...Organize my files Delete a file Delete all files Periodically delete files Change the folder ...
Страница 244: ...2 86 COPIER Contents To cancel an RGB adjust setting Touch the Cancel key in the screen of step 3 ...
Страница 246: ...2 88 COPIER Contents To cancel the sharpness setting Touch the Cancel key in the screen of step 3 ...
Страница 253: ...2 95 COPIER Contents To cancel an intensity setting Touch the Cancel key in the screen of step 3 ...
Страница 296: ...3 19 PRINTER Contents 4 Click the Print button Printing begins ...
Страница 831: ...MXC382SC EX ZZ Operation Guide MX C382SC MODEL ...


