background image

77

GB

D

F

Italiano

E

Descrizione del prodotto

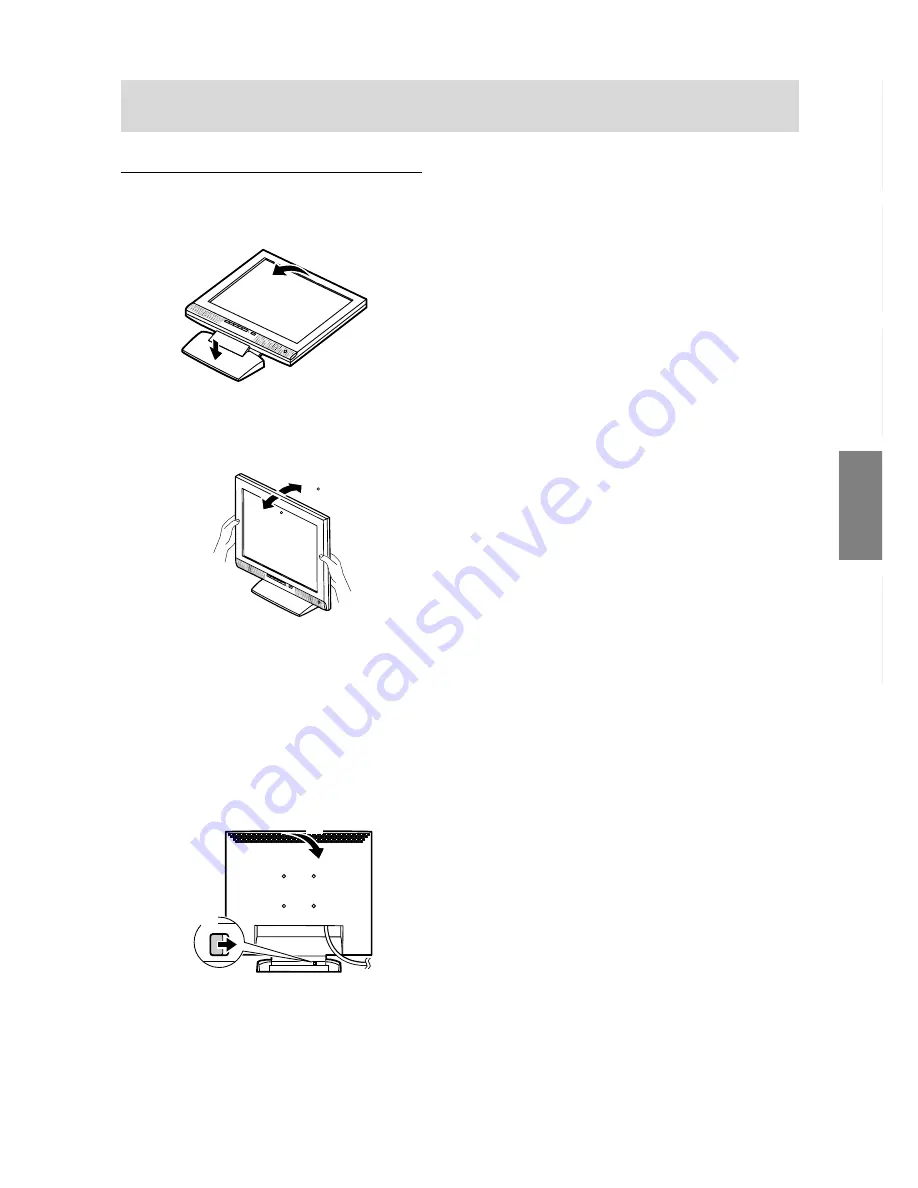
Collocare il monitor verticalmente e regolarlo

Mettere su il monitor
Premete verso il basso sul supporto ed alzate la sezione
superiore del monitor.

Regolazione del monitor
Tenendo delicatamente da entrambi i lati del monitor,
regolatelo su un angolo visivo adatto.

Ripiegare il monitor (quando lo si imballa)
-

Non ripiegate verso il basso il monitor, fatta eccezio-
ne per il caso in cui ripiegate il monito per trasportar-
lo. Piegare e ripiegare inutilmente il monitor può
dare luoga a disturbi al funzionamento.

1. Rimuovete l’adattatore AC (per la corrente alternata)
2. Se eseguite delle regolazioni sul monitor, disponete-

lo verticalmente.

3. Mentre premete il pulsante per disattivare lo

sbloccaggio posteriore 

1

, ripiegate delicatamente

indietro il monitor 

2

.

25

3

(2)

(1)

Содержание LL-T15S1 - 15" LCD Monitor

Страница 1: ... D EMPLOI MANUALE D USO MANUAL DE FUNCIONAMIENTO This operation manual is made using recycled paper Diese Bedienungsanleitung ist auf Recycling Papier gedruckt Ce mode d emploi a été imprimé sur du papier recyclé Questo manuale operativo è prodotto con carta riciclata Este manual de uso está impreso en papel reciclado ...

Страница 2: ...Table of Contents Inhaltsverzeichnis Table des matières Indice Índice English 3 Deutsch 25 Français 47 Italiano 69 Español 91 2 ...

Страница 3: ...er PC etc 12 Connecting the monitor to headphones and a microphone 12 Connecting the monitor to a power source 12 Turning the power on 13 Turning the power off 13 Adjusting the screen display and speaker volume 15 Adjusting the screen display 15 Automatic screen adjustment 15 Adjusting the backlight 16 Manual screen adjustment 17 Adjusting the speaker volume 19 Monitor care and repair 20 Monitor c...

Страница 4: ...Reorientorrelocatethereceivingantenna Increasethedistancebetweentheequipmentandreceiver Connect the equipment into an outlet on a circuit different from that to which the receiver is connected Consultthedealeroranexperiencedradio TVtechnicianforhelp Use nothing but the included cables and AC cord to insure compliance with FCC regulation for Class B computing equipment Declaration of Conformity SHA...

Страница 5: ...volve This product meets the requirements for the TCO 99 scheme which provides for international and environmental labelling of personal computers The labelling scheme was developed as a joint effort by the TCO The Swedish Confederation of Professional Employees Svenska Naturskyddsforeningen The Swedish Society for Nature Conservation and Statens Energimyndighet The Swedish National Energy Adminis...

Страница 6: ...ystem and is toxic in high doses The relevant TCO 99 requirement states that batteries the colour generating layers of display screens and the electrical or electronics components must not contain any cadmium Mercury Mercury is sometimes found in batteries relays and switches It damages the nervous system and is toxic in high doses The relevant TCO 99 requirement states that batteries may not cont...

Страница 7: ...δηγια 93 68 ΕΟΚ Este equipamento obedece às exigências das directivas 89 336 CEE e 73 23 CEE na sua versão corrigida pela directiva 93 68 CEE Este aparato satisface las exigencias de las Directivas 89 336 CEE y 73 23 CEE modificadas por medio de la 93 68 CEE Denna utrustning uppfyller kraven enligt riktlinjerna 89 336 EEC och 73 23 EEC så som komplette ras av 93 68 EEC Dette produktet oppfyller be...

Страница 8: ...letter E or by the safety earth or coloured green or green and yellow The wire which is coloured BLUE must be connected to the terminal which is marked with the letter N or coloured black The wire which is coloured BROWN must be connected to the terminal which is marked with the letter L or coloured red Ensure that your equipment is connected correctly if you are in any doubt consult a qualified e...

Страница 9: ...direct sunlight near heating equipment or anywhere else where there is likelihood of high temperature as this may lead to generation of excessive heat and outbreak of fire The Power Cord Do not damage the power cord or place heavy objects on it stretch it or overly bend it Also do not add extension cords Damage to the cord may result in fire or electric shock Use only the AC adapter supplied with ...

Страница 10: ...utton turns the power on After turning the power on it may take a little time before the screen displays Press the button again to turn the power off 7 Speakers Audio entering via the monitor and the external device connected to the monitor can be heard 8 Brightness sensor Measures the brightness of the surrounding environment 9 Microphone terminal A microphone to be purchased separately can be co...

Страница 11: ...onitor adjust it to a suitable viewing angle 25 3 Folding up the monitor when packing it away Except when folding away the monitor to transport it do not fold down the monitor Unnecessarily folding and unfolding the monitor could lead to malfunction 1 Remove the AC adapter 2 If carrying out adjustments to the monitor place it upright 3 While pressing the rear lock disable button 1 gently fold back...

Страница 12: ...i D sub 15 pin with 3 rows then tighten the screws each side Connecting the monitor to headphones and a microphone Headphones and a microphone both to be purchase separately can be connected here Note Do not overly bend the cable or add extension cords as this could lead to malfunction Note DO only connect cables less than 3m to the LL T15S1 When the headphones are connected no sound can be heard ...

Страница 13: ... are displayed then click Apply 8 Click OK and close the window 9 Remove the Utility Disk from the A drive ForWindows98 Installing monitor set up information into Windows98 This explanation assumes that the floppy disk drive is A drive If the Add new Hardware Wizard has appeared 1 Place the Utility Disk provided into the computer s A drive 2 Click Next 3 Check Display a list of all the drivers in ...

Страница 14: ...ed 1 Place the Utility Disk provided into the computer s A drive 2 Check Specify the location of the driver Advanced and click Next 3 Check Display a list of all the drivers in a specific location so you can select the driver you want then click Next 4 When Models is displayed click on Have disk confirm that Copy manufacturer s files from is A and click OK 5 Select the monitor details from the lis...

Страница 15: ...yed on the screen and OSD Menu contents can be changed to the following languages English German French Italian Spanish 1 Turn off the monitor 2 Pressing the SELECT and buttons simultaneously press the power button i e turn the power on The Language Selection Menu LANGUAGE will be displayed on the screen 3 Use the SELECT button to choose a language 4 Press the MENU button The setting is complete F...

Страница 16: ...r the backlight will become darker The brightness sensor measures the brightness of the surrounding environment Never place anything in front of the brightness sensor Use the BRIGHT button to switch between automatic brightness adjustment or no automatic brightness adjustment Automatic brightness adjustment AUTO BRIGHTNESS ON Press BRIGHT button No automatic brightness adjustment BRIGHT AUTO BRIGH...

Страница 17: ... disappears Notes The OSD Menu automatically disappears several seconds after the last command This explanation is based on using the Adjustment Pattern for Windows to make adjustments MENU 1 ADJUSTMENT A A A A A C C D E H V H H J K L M M N N L O O O P P S S S T T T U U U 8 V 1 2 4 6 4 H 6 7 0 8 0 5 6 0 1 0 0 5 z 0 x O P S k 4 H z E MANUAL Individual menu options are manually adjusted AUTO Every m...

Страница 18: ... can be adjusted while watching the color pattern buttons CONTRAST While watching the color pattern adjustments can be made so that all graduations appear buttons DISPLAY COLORS Maximum display colors can be set buttons 260K 260 000 and 16M 16 19 million MENU 3 WHITE BALANCE WHITE BALANCE color tone can be adjusted as necessary As adjustments are made before shipment there is no real necessity for...

Страница 19: ...sition The position of the OSD display can be moved up and down buttons 400 LINES degree of resolution You can specify the horizontal resolution of a 400 line screen when using US text etc buttons 640 640 X 400 dot mode 720 720 X 400 dot mode US text etc Note As the resolution input for other than 400 lines is done automatically there is no need to set it SCALING Level of scaling The sharpness of ...

Страница 20: ...chased the monitor or your nearest Sharp authorized Service Center No image appears on the monitor Power LED is not lit Are the AC adapter and the power cord connected properly p 12 No image appears on the monitor Power LED is lit Is the computer connected properly p 12 Is the computer turned on Does the computer s signal timing correspond to monitor specifications p 22 Is the computer in power sa...

Страница 21: ...tor Plug Play VESA DDC1 DDC2B Power management VESA DPMS based Microphone terminal Mini stereo jack Headphone terminal Mini stereo jack Audio input terminal Mini stereo jack Microphone output terminal Mini stereo jack Screen tilt Upward 0 25 Downward 0 3 Temperature of operating environment 5 35 C Power supply AC100 240V 50 60Hz use special AC adapter tipe NL A53J of Sharp Corporation Power consum...

Страница 22: ...2Hz 31 5MHz 37 5kHz 75Hz 31 5MHz VESA 35 1kHz 56Hz 36 0MHz 800x600 37 9kHz 60Hz 40 0MHz 48 1kHz 72Hz 50 0MHz 46 9kHz 75Hz 49 5MHz 48 4kHz 60Hz 65 0MHz 1024x768 56 5kHz 70Hz 75 0MHz 60 0kHz 75Hz 78 75MHz US text 720x400 31 5kHz 70Hz 28 3MHz Power Macintosh 640x480 35 0kHz 66 7Hz 30 5MHz series 832x624 49 7kHz 74 6Hz 57 3MHz 1024x768 60 2kHz 75Hz 80 0MHz Mini D sub connector with 15 pins Number Func...

Страница 23: ...l standard for carrying out Plug Play functions on the monitor or PC It transfers information such as degree of resolution between the monitor and PC You can use this function if your PC is DDC compli ant and if it is set so that it can detect the Plug Play monitor There are many varieties of DDC due to the differences between systems This monitor works with DDC1 and DDC2B Specifications DPMS mode...

Страница 24: ...ould be compatible with the VESA standard and there must be a gap of 75 mm x 75 mm between the screw holes on the section to be attached The arm must not fall off or break off after being attached to the monitor Note Do not bend the RGB signal cable or the AC adapter cable nor place weight on them Doing so could lead to damage 1 Turn off the power switch and remove the AC adapter from the monitor ...

Страница 25: ... Monitors mit einem Kopfhörer und Mikrofon 34 Anschließen des Monitors an eine Stromquelle 34 Einschalten des Monitors 35 Ausschalten des Monitors 35 Einstellen der Bildschirmanzeige und der Lautsprecher Lautstärke 37 Einstellen der Bildschirmanzeige 37 Automatische Bildschirmeinstellung 37 Einstellen der Hintergrundbeleuchtung 38 Manuelle Bildschirmeinstellung 39 Einstellen der Lautsprecher Lauts...

Страница 26: ...demGerätunddemEmpfängervergrößern DasGerätaneineandereSteckdoseanschließen dienichtzumStromkreisdesEmpfängersgehört DenHändlerodereinenerfahrenenRundfunk FernsehtechnikerzuRateziehen Nur die mitgelieferten Kabel und das Netzkabel verwenden um eine Einhaltung der FCC Richtlinien für Computer Geräte der Klasse B sicherzustellen Konformitätserklärung SHARP LCD Farbmonitor LL T15S1 Dieses Gerät entspr...

Страница 27: ...ung Dieses Produkt entspricht den Anforderungen der TCO 99 Verordnung die sich mit internationalen Kenn zeichnungen und Umweltzeichen für PCs befaßt Die Kennzeichnungen wurden gemeinsam von der TCO Schwedische Zentralorganisation für Angestellte und Beamte Svenska Naturskyddsforeningen Schwedi sche Gesellschaft für Naturschutz und Statens Energimyndighet Schwedische Nationale Energiebehörde entwic...

Страница 28: ...g giftig Die relevante TCO 99 Anforderung verlangt daß Batterien die farberzeugenden Schichten von Anzeigebildschirmen und elektrische oder elektronische Komponenten kein Cadmium enthalten dürfen Quecksilber Quecksilber kommt manchmal in Batterien Relais und Schaltern vor Es schädigt das Nervensystem und ist in hoher Dosierung giftig Die relevante TCO 99 Anforderung verlangt daß Batterien kein Que...

Страница 29: ...ó την οδηγια 93 68 ΕΟΚ Este equipamento obedece às exigências das directivas 89 336 CEE e 73 23 CEE na sua versão corrigida pela directiva 93 68 CEE Este aparato satisface las exigencias de las Directivas 89 336 CEE y 73 23 CEE modificadas por medio de la 93 68 CEE Denna utrustning uppfyller kraven enligt riktlinjerna 89 336 EEC och 73 23 EEC så som komplette ras av 93 68 EEC Dette produktet oppfy...

Страница 30: ...hnet ist oder grün oder grün gelb ist Der BLAUE Draht muß mit dem Anschluß verbunden werden der mit dem Buchstaben N gekennzeich net oder schwarz ist Der BRAUNE Draht muß mit dem Anschluß verbunden werden der mit dem Buchstaben L gekenn zeichnet oder rot ist Ein ordnungsgemäßer Anschluß des Gerätes muß sichergestellt werden Im Zweifelsfall wenden Sie sich an einen Elektrofachmann WARNUNG DIESES GE...

Страница 31: ...einstrahlung ausgesetzt sind und nicht in der Nähe von Heizungen oder an anderen Stellen an denen hohe Temperaturen auftreten da dies zu einer übermäßig starken Erhitzung mit der Folge eines Brandes führen könnte Das Netzkabel Beschädigen Sie das Netzkabel nicht stellen Sie keine schweren Gegenstände darauf und überdeh nen oder knicken Sie es nicht Verwenden Sie keine Verlängerungskabel Ein beschä...

Страница 32: ...em Einschalten des Monitors kann es kurze Zeit dauern bis auf dem Bildschirm etwas angezeigt wird Schalten Sie den Monitor über den Netzschalter wieder aus 7 Lautsprecher Töne die über den Monitor und das an den Monitor angeschlossene externe Gerät eingehen sind hörbar 8 Helligkeitssensor Mißt die Helligkeit der Umgebung 9 Mikrofonanschluß Hier kann ein separat erhältliches Mikrofon angeschlossen ...

Страница 33: ... den Monitor auf einen angenehmen Blickwinkel ein Zusammenklappen des Monitors zum Einpacken Klappen Sie den Monitor nur für Transportzwecke zusammen Ein unnötiges Zusammen und Aufklappen des Monitors kann Funktionsstörungen hervorrufen 1 Trennen Sie das Netzteil ab 2 Wenn Sie Einstellungen am Monitor vornehmen stellen Sie ihn aufrecht hin 3 Drücken Sie die hintere Entriegelungstaste 1 und klappen...

Страница 34: ...geschlossen werden Hinweis Schließen Sie am LL T15S1 nur Kabel mit einer Länge von höchstens 3 m an Verbinden des Monitors mit einem Kopfhörer und Mikrofon Hier können Kopfhörer oder ein Mikrofon beide separat erhältlich angeschlossen werden Hinweis Überdehnen Sie das Kabel nicht und schließen Sie kein Verlängerungskabel an da dies Funktionsstö rungen hervorrufen kann Hinweis Schließen Sie am LL T...

Страница 35: ...ity Disk aus Laufwerk A FürWindows 98 Installieren der Monitor Setup Informationen unter Win dows 98 und Festlegen des Monitor ICC Profils als vorbestimmter Wert Die in den nachstehenden Bedi enungshinweisen erwähnten Windows Meldungen ba sieren auf der englischen Windows Version Bei dieser Beschreibung wird als Laufwerksbuchstabe für das Diskettenlaufwerk Laufwerk A angenommen Wenn der Add new Ha...

Страница 36: ...der englischen Windows Version Bei dieser Beschreibung wird als Laufwerksbuchstabe für das Diskettenlaufwerk Laufwerk A angenommen Wenn der Add new Hardware Wizard angezeigt wird 1 Legen Sie die mitgelieferte Utility Disk in Laufwerk A des Computers ein 2 Aktivieren Sie Specify the location of the driver Ad vanced und klicken Sie auf Next 3 Aktivieren Sie Display a list of all the drivers in a spe...

Страница 37: ... UNLOCKED wird auf dem Bild schirm angezeigt und die Sperre wird aufgehoben Hinweis Wenn die Sperrfunktion aktiviert ist können nur der Netzschalter und der Lautstärkeregler für die Lautsprecher betätigt werden Auswählen einer Meldungssprache Die Bildschirmmeldungen und der Inhalt des OSD Menüs lassen sich in folgenden Sprachen anzeigen Englisch Deutsch Französisch Italienisch Spanisch 1 Schalten ...

Страница 38: ...llung daß entweder das Einstellmuster verwendet wird oder versuchen Sie ein Bild anzuzeigen das den gesamten Bildschirm sehr hell erscheinen läßt Einstellen der Hintergrundbeleuchtung Die Helligkeit der Hintergrundbeleuchtung kann so ein gestellt werden daß sie sich automatisch an die unter schiedlichen Umgebungsbedingungen anpaßt Auto matische Helligkeitseinstellung Wenn die Umgebung heller wird ...

Страница 39: ...rnehmen der Einstellungen Einstellen der Bildschirmanzeige und der Lautsprecher Lautstärke A A A A A C C D E H V H H J K L M M N N L O O O P P S S S T T T U U U 8 V 1 2 4 6 4 H 6 7 0 8 0 5 6 0 1 0 0 5 z 0 x O P S k 4 H z E BRIGHT AUTO BRIGHTNESS OFF 31 MENU 1 ADJUSTMENT MANUAL Einzelne Menüoptionen werden manuell eingestellt AUTO Alle Menüoptionen werden automatisch eingestellt Hinweise Drücken Si...

Страница 40: ... alle Abstufungen angezeigt werden Tasten DISPLAY COLORS Es können maximale Anzeigefarben eingestellt werden Tasten 260K 260 000 und 16M 16 19 Millionen A A A GA I L M O N T O T C RO L U U N 1 2 3 4 4 6 7 8 0 0 6 2 0K 16M 0 x N H V 6 0 H z 8 H z k 4 BLACK LEVEL CONTRAST DISPLAY COLORS Farbmuster Einstellen der Bildschirmanzeige und der Lautsprecher Lautstärke MENU 3 WHITE BALANCE WHITE BALANCE Far...

Страница 41: ...nweis Da die Auflösungseingabe für einen anderen Wert als 400 Zeilen automatisch erfolgt muß diese Auflösung nicht eingestellt werden SCALING Skalierungsgrad Die Bildschärfe läßt sich einstellen Tasten Hinweis Wenn der Anzeigemodus auf weniger als 1024 x 768 Pixel gesetzt ist wird die Anzeige so vergrößert daß sie den gesamten Bildschirm einnimmt d h das Seitenverhältnis der Anzeige kann sich ände...

Страница 42: ... beheben läßt wenden Sie sich an das Geschäft in dem Sie den Monitor gekauft haben oder an die nächstgelegene autorisierte Sharp Kundendienstzentrale Auf dem Monitor wird nichts angezeigt Betriebsanzeige leuchtet nicht Sind der Netzadapter und das Netzkabel richtig angeschlossen S 34 Auf dem Monitor wird nichts angezeigt Betriebsanzeige leuchtet Ist der Computer richtig angeschlossen S 34 Ist der ...

Страница 43: ...ync TTL Pegel Computersignal Eingangsanschluß 15poliger Mini D Sub Stecker Plug Play VESA DDC1 DDC2B Power Management VESA DPMS basiert Mikrofonanschluß Mini Stereobuchse Kopfhöreranschluß Mini Stereobuchse Audioanschluß Mini Stereobuchse Umgebungstemperatur 5 35 C Stromversorgung 100 240 VAC 50 60Hz mit Spezialnetzadapter Typ NL A53J von Sharp Corporation Leistungsaufnahme 31W 5 W im Energiesparm...

Страница 44: ...ngang 4 nicht belegt 5 nicht belegt 6 Für rotes Videosignal GND 7 Für grünes Videosignal GND 8 Für blaues Videosignal GND 9 DDC 5 V 10 nicht belegt 11 GND 12 DDC Daten 13 Für H Sync Signaleingang 14 Für V Sync Signaleingang 15 DDC Takt Technische Daten Anzeigemodus Hsync kHz Vsync Hz Punktfrequenz MHz 31 5 kHz 60 Hz 25 175 MHz 640x480 37 9 kHz 72 Hz 31 5 MHz 37 5 kHz 75 Hz 31 5 MHz VESA 35 1 kHz 5...

Страница 45: ...andard zum Ausführen von Plug Play Funktionen am Monitor oder PC Er überträgt Informationen beispielsweise den Auflösungsgrad zwischen dem Monitor und dem PC Sie können diese Funktion anwenden wenn Ihr PC DDC kompatibel und so gesetzt ist daß er den Plug Play Monitor erkennen kann Aufgrund der vielen verschiedenen Systeme gibt es viele Varianten von DDC Dieser Monitor arbeitet mit DDC1 und DDC2B T...

Страница 46: ... des Monitors an dem der Arm befestigt wird Anweisungen zum Anbringen eines VESA kompatiblen Monitorarms Ein Arm basierend auf dem VESA Standard kann am Monitor angebracht werden Der Arm ist separat erhältlich Falls Sie sich dafür entscheiden einen Arm zu installie ren müssen Sie folgende Punkte beachten Der Arm muß mit dem VESA Standard kompatibel sein und zwischen den Schraubenbohrungen und dem ...

Страница 47: ...niteur à une microphone et casques audio 56 Raccordement du moniteur à une source d alimentation 56 Activation de l alimentation 57 Désactivation de l alimentation 57 Réglage de l image au moniteur et volume des haut parleurs 59 Réglage de l image au moniteur 59 Réglage automatique du moniteur 59 Réglage du rétro éclairage 60 Réglage manuel du moniteur 61 Réglage du volume des haut parleurs 63 Ent...

Страница 48: ...réceptrice Augmenterladistanceentrel équipementetlerécepteur Brancherl équipementàunepriseélectriquesituéesuruncircuitdifférentdeceluiauquellerécepteurestconnecté ConsulterlerevendeurouuntechnicienspécialiséenTV radio N utilisez que les câbles et le cordon secteur joints avec l appareil afin de garantir la conformité à la réglementation FCC relative aux équipements de calcul de classe B Déclaratio...

Страница 49: ...rtaine quantité d énergie Qu implique la labellisation Ce produit répond aux critères exigés par le programme TCO 99 qui assure la labellisation internationale et environnementale des ordinateurs personnels Le programme de labellisation a été développé sous la forme d une initiative conjointe mise sur pied par la TCO Confédération suédoise des employés professionnels Svenska Naturskyddsforeningen ...

Страница 50: ...ème nerveux et est toxique à doses élevées La normeTCO 99 correspondant stipule que les batteries les couches génératrices de couleur des écrans d affichage ainsi que les éléments électriques ou électroniques ne peuvent contenir de cadmium Mercury On trouve parfois du mercure dans les batteries les relais et les commutateurs Il affecte le système ner veux et est toxique à doses élevées La norme TC...

Страница 51: ...ó την οδηγια 93 68 ΕΟΚ Este equipamento obedece às exigências das directivas 89 336 CEE e 73 23 CEE na sua versão corrigida pela directiva 93 68 CEE Este aparato satisface las exigencias de las Directivas 89 336 CEE y 73 23 CEE modificadas por medio de la 93 68 CEE Denna utrustning uppfyller kraven enligt riktlinjerna 89 336 EEC och 73 23 EEC så som komplette ras av 93 68 EEC Dette produktet oppfy...

Страница 52: ...u colorée en vert ou en vert jaune Le fil BLEU doit être connecté à la borne marquée de la lettre N ou colorée en noir Le fil MARRON doit être connecté à la borne marquée de la lettre L ou colorée en rouge Assurez vous que votre appareil est correctement connecté si vous avez le moindre doute consultez un électricien qualifié ATTENTION CET APPAREIL DOIT ÊTRE CONNECTÉ A UNE PRISETERRE Avis aux util...

Страница 53: ...leil à proximité d une source de chaleur ou partout ailleurs où il risque d être soumis à des températures élevées cela peut mener à des dégagements excessifs de chaleur et conduire à un début d incendie Le cordon d alimentation électrique Ne pas endommager le cordon d alimentation ne pas déposer d objets lourds sur le cordon ne pas l étendre ni le plier de manière excessive Ne pas y ajouter de ra...

Страница 54: ...er ce bouton met le moniteur sous tension Après avoir activé l alimentation il se peut que l allumage du moniteur nécessite un peu de temps Presser à nouveau ce bouton pour désactiver l alimentation 7 Haut parleurs Les signaux audio entrant via le moniteur et via un appareil extérieur connecté au moniteur peuvent être écoutés 8 Capteur de luminosité Mesure la luminosité de l environnement de trava...

Страница 55: ...usqu à obtenir un angle de visualisation adéquat Repliement du moniteur pour l emmener Ne pas replier le moniteur excepté s il va être transporté Le fait de replier et de relever le moniteur inutilement peut provoquer un dysfonctionnement 1 Enlever l adaptateur secteur 2 Si des réglages sont apportés au moniteur il convient de placer celui ci à la verticale 3 Tout en enfonçant le bouton arrière de...

Страница 56: ...re émis à partir des haut parleurs du moniteur Raccordement du moniteur à une source d alimentation Avant tout raccordement d abord mettre l interrupteur principal du moniteur en position OFF Remarque Ne pas courber le câble de manière excessive ni y ajouter de rallonge car cela peut conduire à un dysfonctionnement 1 Connecter l adaptateur secteur à la borne d alimen tation du moniteur 2 Brancher ...

Страница 57: ...r sur OK et refermer la fenêtre 9 Enlever la disquette utilitaire du lecteur A PourWindows 98 Installation des fichiers relatifs au paramétrage du moniteur sous Windows 98 et au réglage du profil ICC du moniteur en tant que valeur par défaut Les messages Windows mentionnés dans le mode d emploi suivant se réfèrent à la version anglaise de Windows Les explications qui suivent considèrent que le lec...

Страница 58: ... de Windows Les explications qui suivent considèrent que le lecteur de disquettes est le lecteur A Si la boîte de dialogue Add New Hardware Wizard est apparue 1 Placer la disquette utilitaire fournie dans le lecteur A de l ordinateur 2 Cocher la case Specify the location of the driver Advanced et cliquer Next 3 Cocher la case Display a list of all the drivers in a specific location so you can sele...

Страница 59: ...CKED apparaîtra à l écran du moniteur et le verrouillage sera désactivé Remarque Lorsque la fonction de verrouillage est activée seuls le bouton de mise sous tension et les boutons de réglage du volume sont encore opérationnels Choix de la langue Les messages affichés à l écran du moniteur et le contenu du Menu OSD peuvent être diffusés dans les langues suivantes Anglais allemand français italien ...

Страница 60: ...s ait l air colorée Ceci est dû aux caractéristiques techniques du signal d entrée il ne s agit pas d un dysfonctionnement Réglage du rétro éclairage La luminosité du rétro éclairage peut être réglée pour changer automatiquement en fonction du lieu de travail Réglage automatique de la luminosité Si la luminosité du lieu de travail devient plus claire le rétro éclairage deviendra aussi plus clair S...

Страница 61: ...isation du modèle de réglage pour Windows en vue de réaliser des réglages BRIGHT AUTO BRIGHTNESS OFF 31 MENU 1 ADJUSTMENT RÉGLAGE MANUEL Les options individuelles du menu sont réglées manuellement AUTO Chaque option du menu est réglée automatiquement Remarques Presser le bouton pour sélectionner AUTO Pour choisir une option du menu bouton SELECT Pour passer au MENU 2 bouton MENU CLOCK HORLOGE L il...

Страница 62: ...ges peuvent être effectués de manière à ce que toutes les graduations apparaissent Boutons DISPLAY COLORS AFFICHAGE DES COULEURS Le nombre de couleurs affichées peut être défini Boutons 260K 260 000 et 16M 16 19 millions A A A GA I L M O N T O T C RO L U U N 1 2 3 4 4 6 7 8 0 0 6 2 0K 16M 0 x N H V 6 0 H z 8 H z k 4 BLACK LEVEL CONTRAST DISPLAY COLORS MENU 3 WHITE BALANCE BALANCE DES BLANCS La BAL...

Страница 63: ...ode 720 x 400 points saisie de texte US etc Remarque Étant donné que la résolution du signal d entrée pour les moniteurs autres que les 400 lignes se règle automatiquement il n y a aucune raison de la définir SCALING Niveau de cadrage La netteté de l image peut être réglée boutons Remarque Lorsque le mode d affichage est réglé à un niveau inférieur à 1024 x 768 pixels l image est étendue de manièr...

Страница 64: ...nteneur agréé Sharp le plus proche Aucune image n apparaît à l écran du moniteur La diode d alimentation ne s éclaire pas L adaptateur en secteur et le cordon d alimentation sont ils connectés correctement p 56 Aucune image n apparaît à l écran du moniteur La diode est éclairée L ordinateur est il branché correctement p 56 L ordinateur est il sous tension La fréquence du signal de l ordinateur cor...

Страница 65: ...ni connecteur 15 broches de type D sub Plug Play VESA DDC1 DDC2B Gestion de l alimentation Type VESA DPMS Fiche pour microphone Mini prise stéréo Fiche pour casque audio Mini prise stéréo Fiche audio Mini prise stéréo Température recommandée du lieu d utilisation 5 35 C Alimentation secteur 100 240V 50 60Hz utiliser un adaptateur secteur spécial type NL A53J de Sharp Corporation Consommation d éle...

Страница 66: ...ée du signal vidéo rouge 2 Entrée du signal vidéo vert 3 Entrée du signal vidéo bleu 4 N C 5 N C 6 Pour mise à la terre du signal vidéo rouge 7 Pour mise à la terre du signal vidéo vert 8 Pour mise à la terre du signal vidéo bleu 9 DDC 5V 10 N C 11 Mise à la terre 12 Données DDC 13 Pour entrée signal H sync 14 Pour entrée signal V sync 15 Horloge DDC Mode affichage Hsync kHz Vsync Hz Bande passant...

Страница 67: ...Plug Play sur un moniteur ou un ordinateur Il transfère des informations telles que le degré de résolution entre le moniteur et l ordinateur Il est possible d utiliser cette fonction si l ordinateur utilisé est conforme à la norme DDC et s il est réglé de manière à pourvoir détecté un moniteur Plug Play Il existe de nombreuses variétés de DDC en raison des différences entre les systèmes Ce moniteu...

Страница 68: ...it rester un écart d au moins 75 mm x 75 mm entre les trouves prévus pour les vis sur la section à attacher Le bras ne doit ni tomber ni se rompre après l installation du moniteur Remarque Veillez à ne pas plier le câble de signal RVB ni le câble de l adaptateur en c a et veillez à ne pas déposer d objets lourds sur ces câbles Cela pourrait les endommager 1 Mettre hors tension et enlever l adaptat...

Страница 69: ... un cuffie e microfono 78 Collegamento del monitor ad una sorgente di alimentazione elettrica 78 Accensione 79 Spegnimento 79 Regolazione della visualizzazione sullo schermo e volume dell altoparlante 81 Regolazione della visualizzazione sullo schermo 81 Regolazione automatica dello schermo 81 Regolazione della retroilluminazione 82 Regolazione manuale dello schermo 83 Regolazione del volume dell ...

Страница 70: ...vitore Collegarel apparecchiaturaadunapresadicorrentepostasuuncircuitodiversodaquelloalqualeilricevitoreècollegato Consultareilrivenditoreoppureuntecnicoradio TVconesperienzaperricevereunaiuto Non usate nulla di diverso dai cavi e dal cordone rete in alternata acclusi per assicurare la conformità con i regolamenti FCC per apparecchiature di elaborazione dati di classe B Dichiarazione di conformità...

Страница 71: ...gnificato del marchio Il marchio indica la conformità del prodotto ai requisiti del progetto TCO 99 che prevede l attribuzione di un marchio internazionale e ambientale ai personal computer Il progetto di attribuzione del marchio è frutto della collaborazione tra la Confederazione svedese dei lavoratori professionisti TCO The Swedish Confederation of Professional Employees la Società svedese per l...

Страница 72: ...voso ed è tossico se consumato ad alte dosi Il proget to TCO 99 contiene un importante norma che stabilisce che le batterie gli strati di generazione del colore presenti nei monitor e i componenti elettrici o elettronici non devono contenere cadmio Mercurio Il mercurio è talvolta presente nelle batterie nei relè e nei commutatori Questa sostanza danneggia il sistema nervoso ed è tossica se present...

Страница 73: ...rrigida pela directiva 93 68 CEE Este aparato satisface las exigencias de las Directivas 89 336 CEE y 73 23 CEE modificadas por medio de la 93 68 CEE Denna utrustning uppfyller kraven enligt riktlinjerna 89 336 EEC och 73 23 EEC så som komplette ras av 93 68 EEC Dette produktet oppfyller betingelsene i direktivene 89 336 EEC og 73 23 EEC i endringen 93 68 EEC Tämä laite täyttää direktiivien 89 336...

Страница 74: ...duttore che è colorato in BLU deve essere collegato al terminale che è contrassegnato con la lettera N oppure colorato in nero Il conduttore che è colorato in MARRONE deve essere collegato al terminale che è contrassegnato con la lettera L oppure colorato in rosso Assicuratevi che il vostro apparecchio sia collegato correttamente Se avete dei dubbi consultate un elettricista qualificato AVVERTIMEN...

Страница 75: ...parecchi di riscaldamento oppure in qualsiasi altro luogo nel quale un alta temperatura è probabile in quanto ciò può dare luogo ad un ecces siva generazione di calore ed allo scoppio di un incendio Il cavo di alimentazione rete Non danneggiate il cavo alimentazione rete e non mettete degli oggetti pesanti su di esso non tiratelo e non piegatelo eccessivamente Non aggiungete inoltre dei cavi di pr...

Страница 76: ...aver acceso l ali mentazione potrà trascorrere un breve tempo prima che lo schermo visualizzi Premete il tasto ancora una volta per spegnere l alimentazione 7 Altoparlanti l entrata dell audio attraverso il monitor ed il dispositivo esterno collegato al monitor si può sentire 8 Sensore delle luminosità Misura la luminosità dell ambiente circostante 9 Terminale microfono Un microfono da acquistare ...

Страница 77: ... adatto Ripiegare il monitor quando lo si imballa Non ripiegate verso il basso il monitor fatta eccezio ne per il caso in cui ripiegate il monito per trasportar lo Piegare e ripiegare inutilmente il monitor può dare luoga a disturbi al funzionamento 1 Rimuovete l adattatore AC per la corrente alternata 2 Se eseguite delle regolazioni sul monitor disponete lo verticalmente 3 Mentre premete il pulsa...

Страница 78: ...rminale di microfono Nota Collegate solo cavi minori di 3m all LL T15S1 Collegamento del monitor ad un cuffie e microfono Cuffie o microfono entrambi da acquistare separatamente si possono collegare qui Nota Non curvate eccessivamente il cavo e non aggiun gete delle prolunghe in quanto ciò può dar luogo a difetti di funzionamento Note Collegate solo cavi minori di 3m all LL T15S1 Quando le cuffie ...

Страница 79: ...vete il Disco delle Utilità dal drive A Per Windows98 Installazione delle informazioni di setup del monitor in Windows98 e impostazione del profilo ICC del monitor come valore predeterminato I messaggi di Windows citati nelle istruzioni per l uso che seguono si basano sulla versione inglese di Windows In questa spiegazione si parte dall ipotesi che l unità per dischetti floppy sia A Se è apparsa l...

Страница 80: ...e seguono si basano sulla versione inglese di Windows In questa spiegazione si parte dall ipotesi che l unità per dischetti floppy sia A Se è apparsa la schermata Add new Hardware Wizard 1 Inserite il Disco delle Utilità fornito nel drive A del computer 2 Spuntate Specify the location of the driver Advanced e fate clic su Next 3 Spuntate Display a list of all the drivers in a specific location so ...

Страница 81: ... è bloccato sullo schermo apparirà ADJUSTMENT UNLOCKED ed il blocco verrà disattivato Nota Quando l impostazione del bloccaggio è on è possibile far funzionare solo il tasto dell alimentazio ne e la regolazione del volume dell altoparlante Selezione di una lingua per i messaggi I messaggi visualizzati sullo schermo ed il contenuto del menu OSD si possono impostare sulle seguenti lingue Inglese Ted...

Страница 82: ... dovuto alle specifiche del segnale di ingresso e non ad un difetto del funzionamento Schermata di regolazione Regolazione della retroilluminazione La luminosità della retroilluminazione si può impostare in modo da variare automaticamente per l uso in am bienti circostanti differenti Regolazione automatica del la luminosità Se l ambiente circostante diventa più luminoso la retroilluminazione diven...

Страница 83: ...AUTO BRIGHTNESS OFF 31 A A A A A C C D E H V H H J K L M M N N L O O O P P S S S T T T U U U 8 V 1 2 4 6 4 H 6 7 0 8 0 5 6 0 1 0 0 5 z 0 x O P S k 4 H z E MENU 1 ADJUSTMENT REGOLAZIONE MANUAL Le singole opzioni del menu vengono regolate manualmente AUTO Ogni opzione di menu è regolata automaticamente Note Premete il tasto per selezionare AUTO Per selezionare un opzione di menu tasto SELECT Per pas...

Страница 84: ... si posso no eseguire le regolazioni in modo che tutte le gradazio ni appaiano Tasti DISPLAY COLORS COLORI DEL DISPLAY Si può impostare il numero massimo dei colori del display Tasti 260K 260 000 e 16M 16 19 milioni Tracciato del colore A A A GA I L M O N T O T C RO L U U N 1 2 3 4 4 6 7 8 0 0 6 2 0K 16M 0 x N H V 6 0 H z 8 H z k 4 BLACK LEVEL CONTRAST DISPLAY COLORS MENU 3 WHITE BALANCE BILANCIAM...

Страница 85: ...c Tasti 640 Modo 640 X 400 pixel 720 modo 720 X 400 pixel testo US ecc Nota Dato che l input della risoluzione in casi diversi dalle 400 righe è eseguito automaticamente non vi è l esigenza di impostarlo SCALING livello della scala Si può regolare la definizione dell immagine Tasti Nota Quando la modalità del display è impostata su meno di 1024 x 768 pixel il display è ingrandito per coprire l int...

Страница 86: ... zato del Servizio Tecnico Assistenza Clienti della Sharp Nel monitor non appare nessun immagine il LED del l alimentazione non è acceso L adattaore AC ed il cavo di alimentazione rete sono collegati correttamente p 78 Nel monitor non appare nessun immagine il LED del l alimentazione è acceso Il computer è collegato correttamente p 78 Il computer è acceso La sincronizzazione del segnale del comput...

Страница 87: ...le livello TTL Terminale di ingresso del segnale del computer Connettore mini D sub a 15 pin Plug Play VESA DDC1 DDC2B Gestione dell energia Basata su VESA DPMS Terminale microfono Jack stereo mini Terminale per le cuffie Jack stereo mini Terminale audio Jack stereo mini Temperatura dell ambiente operativo 5 35 C Alimentazione AC100 240V 50 60Hz usate l adattatore AC specia le tipo NL A53J della S...

Страница 88: ...n ingresso 3 Segnale video blu in ingresso 4 N C 5 N C 6 GND massa per il segnale video rosso 7 GND massa per il segnale video verde 8 GND massa per il segnale video blu 9 DDC 5V 10 N C 11 GND massa 12 Dati DDC 13 Per l ingresso segnale Sing orizzontale 14 Per l ingresso segnale Sinc verticale 15 clock DDC Specifiche Modalità di visualizzazione Sincronizzazione Sincronismo Frequenza dei orizzontal...

Страница 89: ...lay Data Channel DDC è uno standard per i segnali per eseguire le fun zioni Plug Play sul monitor o sul PC Esso trasferisce delle informazioni come il grado di risoluzione tra il monitor ed il PC Potete utilizzare questa funzione se il vostro PC è conforme al DDC e se è impostato in modo da rilevare il monitor Plug Play Vi sono molte varietà di DDC dovute alle differenze tra i sistemi Questo monit...

Страница 90: ... 75 mm tra i fori delle viti sulla parte da collegare Il braccio non deve cadere o rompersi dopo che è stato collegato al monitor Nota Non piegate il cavo segnali RGB oppure il cavo del l adattatore AC e non appoggiate dei pesi su di essi Facendolo potreste provocare dei danni 1 Spegnete con l interruttore di accensione e rimuove te l adattatore AC dal terminale di alimentazione del monitor 2 Rimu...

Страница 91: ...n del monitor a un auriculares y micrófono 100 Conexión del monitor a una toma de corriente 100 Encendido 101 Apagado 101 Ajuste de la pantalla y volumen del altavoz 103 Ajuste de la pantalla 103 Ajuste automático de la pantalla 103 Regulación de la retroiluminación 104 Ajuste manual de la pantalla 105 Ajuste del volumen del altavoz 107 Conservación y reparación del monitor 108 Conservación del mo...

Страница 92: ...r relocate the receiving antenna Increase the distance between the equipment and receiver Connect the equipment into an outlet on a circuit different from that to which the receiver is connected Consult the dealer or an experienced radio TV technician for help Use nothing but the included cables and AC cord to insure compliance with FCC regulation for Class B computing equipment Declaration of Con...

Страница 93: ...nvolve This product meets the requirements for the TCO 99 scheme which provides for international and environmental labelling of personal computers The labelling scheme was developed as a joint effort by the TCO The Swedish Confederation of Professional Employees Svenska Naturskyddsforeningen The Swedish Society for Nature Conservation and Statens Energimyndighet The Swedish National Energy Admini...

Страница 94: ...ystem and is toxic in high doses The relevant TCO 99 requirement states that batteries the colour generating layers of display screens and the electrical or electronics components must not contain any cadmium Mercury Mercury is sometimes found in batteries relays and switches It damages the nervous system and is toxic in high doses The relevant TCO 99 requirement states that batteries may not cont...

Страница 95: ...οδηγια 93 68 ΕΟΚ Este equipamento obedece às exigências das directivas 89 336 CEE e 73 23 CEE na sua versão corrigida pela directiva 93 68 CEE Este aparato satisface las exigencias de las Directivas 89 336 CEE y 73 23 CEE modificadas por medio de la 93 68 CEE Denna utrustning uppfyller kraven enligt riktlinjerna 89 336 EEC och 73 23 EEC så som komplette ras av 93 68 EEC Dette produktet oppfyller b...

Страница 96: ... letter E or by the safety earth or coloured green or green and yellow The wire which is coloured BLUE must be connected to the terminal which is marked with the letter N or coloured black The wire which is coloured BROWN must be connected to the terminal which is marked with the letter L or coloured red Ensure that your equipment is connected correctly if you are in any doubt consult a qualified ...

Страница 97: ...de se puedan alcanzar altas temperaturas ya que ello puede llevar a un calentamiento excesivo y provocar un incendio El cable de alimentación No deteriore el cable de alimentación ni coloque objetos pesados sobre el mismo ni lo estire o doble excesivamente No utilice tampoco cables de prolongación Si el cable de alimentación se daña puede provocar un incendio o una descarga eléctrica Utilice única...

Страница 98: ... se enciende el monitor Tras encenderlo la pantalla puede tardar un poco en activarse Pulse de nuevo el botón para apagar el monitor 7 Altavoces El audio entra a través del monitor y se puede oír el dispositivo externo conectado al monitor 8 Sensor de luminosidad Mide la luminosidad del entorno 9 Terminal de micrófono Aquí se puede conectar un micrófono debe comprarse por separado 10 Terminal de a...

Страница 99: ...a sección verde y ajústelo hasta que el ángulo de visión sea el adecuado Bajada del monitor para embalarlo No baje el monitor a menos que quiera transportarlo El levantamiento y bajada innecesarios del monitor podrían llevar a un funcionamiento anómalo 1 Retire el adaptador de CA 2 Si va a ajustar el monitor colóquelo en posición vertical 3 Al tiempo que presiona el botón de desbloqueo posterior 1...

Страница 100: ... de alimentación Borne de alimentación Adaptador de CA Conexión del monitor a un ordenador PC etc Antes de realizar la conexión asegúrese de que tanto el monitor como el ordenador están apagados Nota No doble excesivamente el cable ni utilice cables de prolongación ya que ello podría llevar a un funcionamiento anómalo Se puede conectar aquí el terminal de salida de audio de un ordenador o el termi...

Страница 101: ...na 9 Retire el Disquete de utilidades de la unidad A Para Windows98 Instalación de la información de configuración del moni tor en Windows98 y configuración del perfil ICC del mo nitor como valor predeterminado Los mensajes de Windows mencionados a continuación se refieren a la versión inglesa En la explicación se da por supuesto que la unidad de disquetes es la A Si ya ha aparecido el Add new Har...

Страница 102: ...ersión inglesa En la explicación se da por supuesto que la unidad de disquetes es la A Si ya ha aparecido Add new Hardware Wizard 1 Introduzca el Disquete de utilidades proporcionado en la unidad A del ordenador 2 Compruebe Specify the location of the driver Advanced y haga clic sobre Next 3 Compruebe Display a list of all the drivers in a specific location so you can select the driver you want y ...

Страница 103: ...eado ADJUSTMENT LOCKED aparecerá en la pantalla y se activará el bloqueo Cuando el menú esté bloqueado ADJUSTMENT UNLOCKED aparecerá en la pantalla y el bloqueo se desactivará Nota Cuando el bloqueo está activado sólo se puede operar el botón de encendido y el ajuste de volumen del altavoz Elección del idioma de los mensajes Puede seleccionar uno de los idiomas siguientes para los mensajes y el me...

Страница 104: ... o la escala de grises puede aparecer coloreada Esto se debe a la especificación de la señal de entrada y no se trata de una anomalía Carta de ajuste Regulación de la retroiluminación La luminosidad de la retroiluminación se puede progra mar de modo que cambie automáticamente para su uso en diferentes entornos Ajuste automático de la luminosidad Si el entorno se vuelve más brillante la retroilumin...

Страница 105: ...a la Carta de ajuste para Windows para realizar los ajustes BRIGHT AUTO BRIGHTNESS OFF 31 A A A A A C C D E H V H H J K L M M N N L O O O P P S S S T T T U U U 8 V 1 2 4 6 4 H 6 7 0 8 0 5 6 0 1 0 0 5 z 0 x O P S k 4 H z E MENU 1 ADJUSTMENT MANUAL Las diferentes opciones del menú se ajustan manualmente AUTO Cada opción del menú se ajusta automáticamente Notas Pulse el botón para seleccionar AUTO Pa...

Страница 106: ...RAST Mientras se observa la carta de colores pueden realizar se ajustes de modo que aparezcan todos los colores Botones DISPLAY COLORS Se puede configurar el máximo de colores a visualizar Botones 260K 260 000 y 16M 16 19 millones A A A GA I L M O N T O T C RO L U U N 1 2 3 4 4 6 7 8 0 0 6 2 0K 16M 0 x N H V 6 0 H z 8 H z k 4 BLACK LEVEL CONTRAST DISPLAY COLORS Carta de colores MENU 3 WHITE BALANC...

Страница 107: ...a y hacia abajo Botones 400 LINES grado de resolución Puede programar la resolución horizontal de una panta lla de 400 líneas si utiliza US text etc Botones 640 640 X 400 dot mode 720 720 X 400 dot mode US text etc Nota Puesto que la entrada de resolución diferente a la de 400 líneas se realiza automáticamente no hay necesidad de programarla SCALING nivel de graduación La nitidez de la imagen pued...

Страница 108: ...cano Si no se ve ninguna imagen en el monitor el LED indi cador de conexión no se enciende Están conectados correctamente el adaptador de CA y el cable de alimentación p 100 Si no se ve ninguna imagen en el monitor el LED indi cador de conexión está encendido Está el ordenador conectado correctamente p 100 Está el ordenador encendido Se corresponde la sincronización de la señal del ordenador con l...

Страница 109: ...les del ordenador Conector Mini D sub de 15 vías Plug Play VESA DDC1 DDC2B Gestión de energía Basada en VESA DPMS Terminal de micrófono Clavija estéreo mini Terminal de auriculares Clavija estéreo mini Terminal de audio Clavija estéreo mini Temperatura ambiental 5 35 C Suministro eléctrico AC100 240V 50 60Hz uso de un adaptador de CA especial tipo NL A53J de Sharp Corporation Consumo eléctrico 31W...

Страница 110: ...A 35 1kHz 56Hz 36 0MHz 800x600 37 9kHz 60Hz 40 0MHz IBM AT compatible 48 1kHz 72Hz 50 0MHz Series PC 9800 46 9kHz 75Hz 49 5MHz 48 4kHz 60Hz 65 0MHz 1024x768 56 5kHz 70Hz 75 0MHz 60 0kHz 75Hz 78 75MHz Series PC 9800 640x480 24 8kHz 56Hz 21 053MHz 31 5kHz 70Hz 25 175MHz US text 720x400 31 5kHz 70Hz 28 3MHz Series Power 640x480 35 0kHz 66 7Hz 30 5MHz Macintosh 832x624 49 7kHz 74 6Hz 57 3MHz 1024x768 ...

Страница 111: ...lización para la ejecución de las funciones Plug Play en el monitor o PC Transmite información tal como el grado de resolución entre el monitor y el PC Puede utilizar esta función si su ordenador tiene compatibilidad DDC y si está configurado de modo que pueda detectar el monitor Plug Play Existen numerosas variedades de DDC debido a las diferencias entre los sistemas El presente monitor opera con...

Страница 112: ...SA y en la sección a acoplar debe haber una separación de 75 mm x 75 mm como mínimo entre los orificios para los tornillos El brazo no debe caerse ni romperse una vez acoplado al monitor Notas No doble el cable de señal RGB ni el cable del adaptador de CA ni coloque objetos de peso sobre los mismos Si lo hace podría dañarlos 1 Apague el monitor y desenchufe el adaptador de CA del borne de alimenta...

Страница 113: ...R SHARP CORPORATION 2001SHARPCORPORATION Printed in China 624315160002 0LTHG15160002 1 ...

Отзывы: