background image

17

Teletext function

What is Teletext?

Teletext broadcasts pages of information and
entertainment to specially equipped television sets.
Your TV receives Teletext signals broadcast by a TV
network, and decodes them into graphical format for
viewing. News, weather and sports information, stock
exchange prices and programme previews are among
the many services available.

Turning on and off Teletext

1

Select a TV channel or external input source
providing the Teletext programme.

2

Press 

m

 to display the Teletext.

3

Press 

m

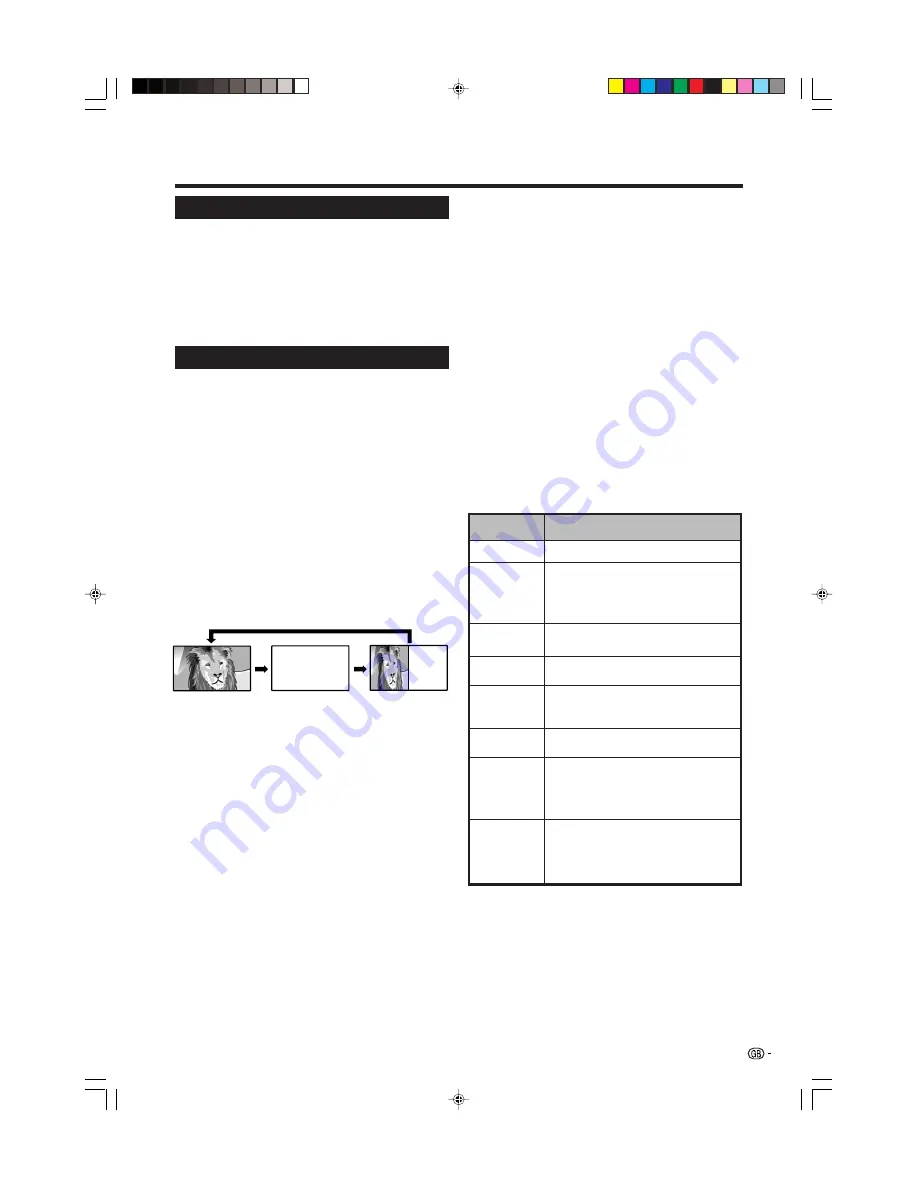
 again to display the Teletext on the right

screen and normal image on the left screen.

• Each time you press 

m

, the screen switches as

shown below.

• If you select a programme with no Teletext signal,

“No Teletext available.” displays.

• The same message displays during other modes if

no Teletext signal is available.

TELETEXT

TELETEXT

Time display

You can display the time information included in the
Teletext broadcasts.

1

Select a TV channel providing Teletext information.
(The time information is automatically captured.)

2

Press 

p

. The channel display will appear on the

TV.

3

Press 

p

 again within the three-second interval

the channel display is on the screen.
Time information will display on the lower left of
the screen for about three seconds.

4

Even when you change the TV channel, you can
display the time information with steps 2 and 3
above.

NOTE

• The time display cannot be stored once the power is

turned off. When you turn on the power, perform steps 1
to 4 again.

• If acquired successfully, the time information will appear

in the upper-right corner of the screen by pressing 

MENU

.

Still image

You can freeze a motion picture on the screen.

1

Press 

3

.

2

Press 

3

 again to exit still image.

NOTE

• When this function is not available, “No still image display

available.” will display.

• The still image automatically goes out after 30 minutes.

Useful features

Description

Increase or decrease the page number.

Select a group or block of pages displayed
in the coloured  brackets at the bottom of the
screen by pressing the corresponding

Colour (Red/Green/Yellow/Blue)

 on the

remote control unit.

Directly select any page from 100 to 899 by
using 

0–9

.

Switch the Teletext image to Full, Upper half
or Lower half.

Reveal or hide hidden information such as
an answer to a quiz.

Stop updating Teletext pages automatically
or release the hold mode.

Display the subtitle or exit the subtitle
screen.
• Subtitle will not be displayed when the

service does not contain the subtitle
information.

Reveal or hide subpages.
• Red button: Move to the previous subpage.
• Green button: Move to the following subpage.
• These two buttons are shown on the screen

by the signs 

l

 and 

k

.

Buttons

P (

r

/

s

)

Colour (Red/
Green/Yellow/
Blue)

0–9

f

 (WIDE

MODE)

k

 (Reveal

hidden
Teletext)

3

 (Freeze/

Hold)

[

 (Subtitle

for Teletext)

(Subpage)

Button functions

LC-26P50E_GB_c

05.6.13, 8:01 AM

17

Содержание AQUOS LC-26P50E

Страница 1: ...d in Spain Gedruckt in Spanien Imprimé en Espagne Stampato in Spagna Gedrukt in Spanje Impreso en España TINS B845WJZZ OPERATION MANUAL BEDIENUNGSANLEITUNG MODE D EMPLOI MANUALE DI ISTRUZIONI GEBRUIKSAANWIJZING MANUAL DE MANEJO LC 26P50E LC 32P50E LC 37P50E B845WJZZ 1 ENGLISH FRANÇAIS DEUTSCH ITALIANO NEDERLANDS ESPAÑOL 05P06 SP NG PIN Printed on environmentally friendly paper Auf ökologischem Pap...

Страница 2: ... Control menu 12 No Signal Off 12 No Operation Off 12 Setup menu 12 Auto Installation 12 Programme Setup 12 Auto Search 12 Manual Adjust 13 Fine 13 Colour sys 13 Sound sys Broadcasting system 13 Label 13 Skip 13 Decoder 13 Lock 13 Sort 13 Erase Programme 13 Child Lock 14 Input Label 14 Position 14 WSS Wide Screen Signalling 14 4 3 Mode 15 Rotate 15 Language 15 Option menu 15 Audio Only 15 DNR Digi...

Страница 3: ...uct on a bed sofa rug or other similar surface since they can block ventilation openings This product is not designed for built in installation do not place the product in an enclosed place such as a bookcase or rack unless proper ventilation is provided or the manufacturer s instructions are followed The LCD panel used in this product is made of glass Therefore it can break when the product is dr...

Страница 4: ...ibility for improper mounting or mounting that results in accident or injury You can ask a qualified service personnel about using an optional bracket to mount the TV to the wall Standard DIN45325 plug IEC 169 2 75 ohm coaxial cable Removing the terminal cover Press down the hooks to remove the cover toward you or the left of TV TV Rear view AC cord Product shape varies in some countries Cable cla...

Страница 5: ...orresponding to the e and f indications in the battery compartment 3 Close the battery cover Inserting the batteries Before using the TV for the first time insert two AAA size batteries supplied When the batteries become depleted and the remote control unit fails to operate replace the batteries with new AAA size batteries Using the remote control unit Use the remote control unit by pointing it to...

Страница 6: ...ect the sound multiplex mode SURROUND Switch the surround effects on and off 1 Subpage See page 17 SLEEP Set the sleep timer in units of 30 min up to max 2hr 30min k Reveal hidden Teletext See page 17 p Display information See page 17 RETURN Return to the previous menu screen e Mute Switch the sound on and off b INPUT SOURCE Select an input source TV EXT1 EXT2 EXT3 EXT4 See page 7 f WIDE MODE Chan...

Страница 7: ...indicator OPC indicator a Power button b Input button i l k Volume buttons P s r Programme channel buttons SLEEP indicator EXT 1 RGB terminal EXT 3 terminals SYSTEM RESET Headphone jack RESET EXT 2 RGB terminal EXT 4 HDMI AUDIO terminals AC INPUT terminal AUDIO OUTPUT terminals LC 26P50E_GB_a 05 6 13 7 59 AM 6 ...

Страница 8: ...mme Setup make sure to set Decoder to EXT2 in the Programme Setup Manual Adjust menu See page 13 Connecting a decoder You can use the EXT 1 terminal when connecting a decoder and other audiovisual equipment NOTE In cases when the decoder needs to receive signal from the TV make sure to set Decoder to EXT1 in the Programme Setup Manual Adjust menu See page 13 A game console camcorder and some other...

Страница 9: ...p menu See page 12 The initial auto installation stops by pressing RETURN Standby mode Press B on the remote control unit The TV enters standby mode and the image on the screen disappears The B indicator on the TV changes from green to red Turning off the power Press a on the TV The B indicator on the TV gradually turns off When the TV is turned off by a you cannot turn on the power by pressing B ...

Страница 10: ...go to the next step or complete the setting RETURN Press to return to the previous step Common operations Menu Operation A MENU Picture Picture Audio Contrast OPC AV Mode STANDARD Off Brightness Colour Tint Sharpness Advanced Reset 30 0 0 0 0 0 30 30 30 10 40 30 30 30 10 Backlight 6 8 8 Menu Operation B 1 Press MENU and the MENU screen displays 2 Press c d to select the desired menu 3 Press a b to...

Страница 11: ...e gives you five viewing options to choose from to best match the system environment which can vary due to factors like room brightness type of programme watched or the type of image input from external equipment Advanced Colour Temp Adjust the colour temperature to give the best white image High White with bluish tone Mid High Intermediate tone between High and Middle Middle Natural tone Mid Low ...

Страница 12: ... quality I P Setting Adjust the image and input signal can give you a more beautiful picture Interlace Display finely detailed images for TV or video etc Progressive Display smooth images for still images or graphics etc NOTE I P Setting is set to Progressive when Film Mode is On Audio menu Audio adjustments Menu Operation B page 9 You can adjust the sound quality to your preference with the follo...

Страница 13: ...e procedure below This is the same function as from programme auto search to preset download in Auto Installation 1 Repeat steps 1 to 4 in Programme Setup 2 Press c d to select Yes and then press OK 1 Programme auto search 2 Auto labelling 3 Auto sorting 4 Preset download NOTE See page 8 for details 1 Press MENU and the MENU screen displays 2 Press c d to select Setup 3 Press a b to select Program...

Страница 14: ...r to the unit you need to assign the terminal input NOTE Off is factory preset value EXT1 is the recommended selection Lock You can block the viewing of any channel NOTE See page 14 for setting PIN When Lock is set to On for a channel Child lock has been activated displays and the image and sound of the channel are blocked When pressing OK while Child lock has been activated displays PIN input men...

Страница 15: ...ry preset values See page 18 Menu operations Position For adjusting a picture s horizontal and vertical position 1 Press MENU and the MENU screen displays 2 Press c d to select Setup 3 Press a b to select Position and then press OK 4 Press a b to select H Pos or V Pos 5 Press c d to adjust the item to your desired position WSS Wide Screen Signalling Menu Operation A Page 9 WSS allows a television ...

Страница 16: ...NU and the MENU screen displays 3 Press c d to select Option 4 Press a b to select HDMI Setup and then press OK The HDMI Setup menu is displayed only when EXT4 is selected from the INPUT SOURCE menu MENU Option HDMI Setup Option Audio Only DNR HDMI Setup Quick Shoot On Off Demo 5 Press a b to select the desired item or setting and then press OK NOTE Refer to your external equipment operation manua...

Страница 17: ...type of signal received 4 3 Mode set to Panorama Normal For 4 3 standard pictures A side bar appears on each side Zoom 14 9 For 14 9 letterbox pictures A thin side bar appears on each side and you may see bars on the top and bottom with some programmes Panorama In this mode the picture is progressively stretched toward each side of the screen Full For 16 9 squeeze pictures Cinema 16 9 For 16 9 let...

Страница 18: ... time information with steps 2 and 3 above NOTE The time display cannot be stored once the power is turned off When you turn on the power perform steps 1 to 4 again If acquired successfully the time information will appear in the upper right corner of the screen by pressing MENU Still image You can freeze a motion picture on the screen 1 Press 3 2 Press 3 again to exit still image NOTE When this f...

Страница 19: ... See page 7 Is picture adjustment correct See pages 10 and 11 Is the antenna connected properly See page 3 Is On selected in Audio Only See page 15 Is the volume too low See page 5 and 6 Make sure that headphones are not connected See page 6 Troubleshooting Appendix HOW TO SET THE FACTORY PRESETS Turn off the TV by pressing a Press and hold down RESET and press a on the TV to turn it on All settin...

Страница 20: ...75q Din type SCART AV input output Y C input RGB input AV Link Antenna input EXT 4 HDMI Ø 3 5 mm jack Audio input OSD language English German French Italian Spanish Dutch Swedish Portuguese Finnish Turkish Greek Russian Polish Power Requirement AC 220 240 V 50 Hz Power Consumption 110 W 0 8 W Standby Method IEC60107 Weight 12 kg Display only 15 5 kg Display with stand Appendix 32o LCD COLOUR TV Mo...

Страница 21: ... Disposal for Business Users 1 In the European Union If the product is used for business purposes and you want to discard it Please contact your SHARP dealer who will inform you about the take back of the product You might be charged for the costs arising from take back and recycling Small products and small amounts might be taken back by your local collection facilities For Spain Please contact t...

Отзывы: