background image

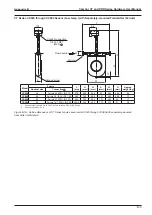
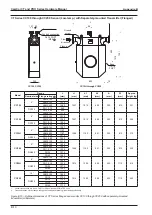
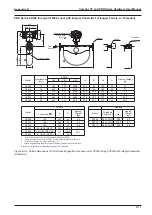
B-10

CamCor CT and PRO Series Hardware Manual

Appendix B

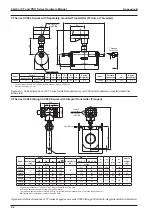
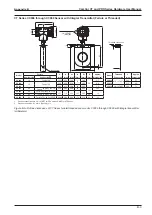
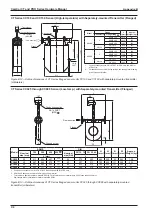
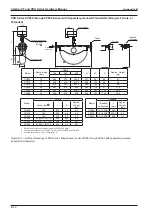
CT Series CC100 through CC250 Sensor (Low-temp.) with Separately-mounted Transmitter (Flanged)

300

125

1

101

5

66

0

800

98

L

Conduit connection

3/4-14 FNPT

(M25)

Terminal box

15

Flow 

direction

Flange

Ground 

screw

Boss

1/4-18

FNPT

80

107


CC100, CC150 

CC15H through CC250

Model

Flange

(mm)

(mm)

h1 

(mm)

h2 

(mm)

(mm)

(mm)

Approx. 

Weight (kg)

Nominal size Flange rating 

CC100

  4″

ASME 150

1018

1387

1015

660

300

810

231

ASME 300

1036

ASME 600

1082

DN100

PN 10, 16

968

PN 25, 40

994

CC150

 6″

ASME 150

1318

1387

1015

660

300

810

246

ASME 300

1338

ASME 600

1388

DN150

PN 10, 16

1250

PN 25, 40

1290

CC15H

 6″

ASME 150

1087

1588

1190

851

320

810

310

ASME 300

1107

ASME 600

1157

DN150

PN 10, 16

1019

PN 25, 40

1059

CC200

 8″

ASME 150

1418

1588

1190

851

320

810

340

ASME 300

1438

ASME 600

1494

DN200

PN 10, 16

1338

PN 25

1374

PN 40

1390

CC20H

 8″

ASME 150

1418

1814

1390

960

420

1110

610

ASME 300

1438

DN200

PN 10, 16

1338

PN 25

1374

PN 40

1390

CC250

 10″

ASME 150

1773

1814

1390

960

420

1110

650

ASME 300

1805

DN250

PN 10

1705

PN 16

1709

PN 25

1745

PN 40

1779

1.  Conduit connections are 3/4-14 FNPT for CSA units and M25 for ATEX units.

2.  For specifications of other flange ratings, see the approval drawing (or delivery specification).

Figure B.15—Outline dimensions of CT Series flanged sensor units CC100 throgh CC250 with separately-mounted 

transmitter (millimeters)

Содержание CamCor CC001

Страница 1: ...uct is fabricated tested and inspected under stringent quality control before it leaves the factory Please review the information and instructions in this manual before placing your CamCor flow meter into service and store the document in an easy to access location for quick reference Manual No 50283755 Rev 02 Separately mounted transmitter PA0K CT Series CC100 to CC250 CT Series CC00A CC001 CT Se...

Страница 2: ...e instrument or connected equipment Important Important statements Indicate actions or procedures which may affect instrument operation or may lead to an instrument response which is not planned Symbols Marked on Equipment Attention Refer to manual Protective earth ground Global headquarters Sensia LLC 200 Westlake Park Blvd Houston TX 77079 CamCor is a trademark of Sensia Modbus is a registered t...

Страница 3: ...100 through CC250 Sensor with Integral Transmitter Flanged 28 CT Series CC006 through CC080 Sensor with Separately mounted Transmitter Flanged 29 CT Series CC006 through CC080 Sensor with Separately mounted Transmitter Ferrule or Threaded 29 CT Series CC100 through CC250 Sensor with Separately mounted Transmitter Flanged 30 CT Series CC025 through CC080 Sensor High temp with Separately mounted Tra...

Страница 4: ...utput Wiring 57 Status Input Wiring 58 Line Wiring of Optional Communications 58 Recommended Cable 58 Recommended Cable for Modbus Communications 58 Applicable Rubber Packing Size by Wire Gauge and Number of Conductors 58 Terminal Identification of Separately mounted Transmitter 58 Wiring Diagram 59 Transmitter Power and Output Signal Wiring 59 Transmitter Identification and Description 59 Separat...

Страница 5: ...02 Bidirectional Flow Direction Output 102 H L Alarm Output 103 Drive Output Alarm for Maintenance Purposes 103 No Function Assignment 103 Status Input Function 104 0 Fixed Pulse Analog Output 104 Zero Adjustment Auto Zero 104 Totalizer 1 and Totalizer 2 Reset 104 Totalizer 1 Reset 105 Totalizer 2 Reset 105 High Low Alarm Function 105 Configuring a High Low Alarm 105 Gas Mixed Flow Slug Flow Alarm...

Страница 6: ...0 Sensor with Integral Transmitter Flanged B 4 CT Series CC006 through CC080 Sensor with Separately mounted Transmitter Flanged B 5 CT Series CC006 through CC080 Sensor with Separately mounted Transmitter Ferrule or Threaded B 5 CT Series CC100 through CC250 Sensor with Separately mounted Transmitter Flanged B 6 CT Series CC025 through CC080 Sensor High temp with Separately mounted Transmitter Fla...

Страница 7: ...ill vary depending upon the certifica tion standard selected when you placed your order CC Sensor Series Type PA0K C1 2 Ex d ib IIC T4 Gb CP Sensor Series Type PA0K C1 2 Ex d ib IIB T4 Gb Type PA0K C1 2 Ex d ib IIC T6 Gb CERT No DEKRA 11ATEX 0171X IECEx DEK 12 0053X MANUFACTURED BY OVAL CORPORATION 1 9 5 FUKUURA KANAZAWA KU YOKOHAMA KANAGAWA 236 8645 JAPAN II 2G 0344 HOUSTON TX USA RATING POWER AC...

Страница 8: ... number indicates remaining warm up time in minutes STORAGE If this product is to be stored for long periods of time before installation take the following precautions 1 Store your product in the manufacturer s original packing used for shipping if possible 2 Storage location should conform to the following requirements Free from rain and water Free from vibration and impact shock At room temperat...

Страница 9: ...utput Signal Connections Integrally and Separately mounted Transmitter Models page 55 2 To confirm that power is connected properly turn on the device and verify that the backlight and green LED light up 3 Power down the unit BAUD RATE FOR OPTIONAL COMMUNICATIONS CamCor meters with optional communications are shipped ready to be wired Communication wiring must be custom er provided See Line Wiring...

Страница 10: ...Terminal Cover B Device Body Figure 2 2 Terminal cover B being separated from device body c Lift terminal cover B off to expose the black plastic cap Figure 2 3 Terminal Cover B Black Plastic Cap Figure 2 3 Black plastic cap located underneath Terminal cover B d Unscrew and remove the two M3 10mm screws holding the black plastic cap in place Figure 2 4 Set screws aside for reassembly Position Arro...

Страница 11: ...circuit boards ensure that the spacers are in place before reinstalling the black plastic cap Maintenance Board Spacer Blind Board Figure 2 5 Maintenance and blind boards showing location of shock absorbing spacer 1 of 2 4 To retain the spacers in the proper position insert the screws from the black plastic cap into the screw holes on the Maintenance Blind board assembly Do not lift the board asse...

Страница 12: ... power to the device and access the Maintenance board using Steps 1 through 3 of Using the Default Baud Rate 2 Locate SW3 on the Maintenance board Figure 2 6 page 11 and change the SW3 1 and SW3 2 positions Figure 2 7 to set the desired baud rate See the Baud Rate Switch Settings table below for switch positions Note Switches 3 3 SW3 3 and 3 4 SW3 4 are not required for Modbus communications Figur...

Страница 13: ...address register Write Quantity 1 Slave Address to Be Set 1 to 255 3 Verify communications with the slave device by sending the following message Slave Address established above 1 to 255 Register 167 slave address register Function Code 3 read command Write Quantity 1 You should receive a valid response if communications have been successfully established If you do not repeat Steps 2 and 3 Note Re...

Страница 14: ...14 CamCor CT and PRO Series Hardware Manual Section 3 This page is left blank intentionally ...

Страница 15: ...be achieved with the high temperature models Only available with separately mounted transmitter and interconnect cable ordered separately 10 meter minimum available in 5 meter increments thereafter For products conforming to the high pressure gas safety regulations and CE marking consult Cameron Standard Models CC006 through CC080 Item Description Model CC006 CC010 CC015 CC025 CC040 CC050 CC080 No...

Страница 16: ... or the data obtained from FEA analysis whichever is lower Distorted enclosures do not constitute a failure of the test For products conforming to the high pressure gas safety regulations and CE mark ing consult Cameron High Temperature Models CC025 through CC150 Item Description Model CC025 CC040 CC050 CC080 CC100 CC150 Nominal size 25 mm 1 DN25 40 mm 1 1 2 DN40 50 mm 2 DN50 80 mm 3 DN80 100 mm 4...

Страница 17: ...with foods this product does not comply with CE marking 5 This pressure does not represent the rated test pressure of a pressure vessel It represents 1 4 of the factory tested breakdown pressure or the data obtained from FEA analysis whichever is lower Distorted enclosures do not constitute a failure of the test Only available with separately mounted transmitter and interconnect cable ordered sepa...

Страница 18: ...7 Bell 202 Modbus Optional RS 485 Baud rate 9600 19200 38400 RTU Response time 25 to 50 ms Damping default Flow rate 0 8 sec Density 4 0 sec Temperature 2 5 sec Low flow cutoff default Less than 0 6 of maximum service flow rate Pulse output Open drain equivalent to open collector 10 V to 30 V 50 mADC ON resistance 0 6 Ω OR Voltage 1 5 V maximum low level to 13 V minimum high level output impedance...

Страница 19: ...nty of 0 1 of reading is required consult Cameron 5 Above maximum service flow rate the uncertainty is 0 3 of reading ZS If you request volume flow measurement for the purpose of fiscal transactions or weights and measurements transactions contact Cameron In gas measurement the maximum permissible flow velocity varies with the type of gas and some may be beyond the bounds of measurement If so cont...

Страница 20: ...0 106 0 338 0 846 2 54 8 46 8 46 Minimum setting rate gal min 0 264 0 846 2 12 6 35 21 2 21 2 Maximum service rate gal min 2 64 8 46 21 2 63 5 212 212 Maximum allowable rate gal min 5 29 16 9 42 3 127 423 423 1 Calculations based on water specific gravity of 1 at 59 F mass 62 37 lb ft3 Actual flow ranges vary with media density To determine the flow range for your fluid divide the values above by ...

Страница 21: ...0 0001 0 00001 0 000001 Flow rate g min Flow rate g min Flow rate kg h Flow rate kg h Flow rate kg h Flow rate kg h Flow rate kg h CA040 CA050 100 10000 100000 1000 10 1 0 1 0 01 0 001 0 0001 0 00001 0 000001 Flow rate kg h Pressure loss coeff C Pressure loss coeff C Pressure loss coeff C Pressure loss coeff C Pressure loss coeff C Pressure loss coeff C Pressure loss coeff C Pressure loss coeff C ...

Страница 22: ...1 CA20H CA250 1000 10000 100000 1000000 10000000 10 1 0 1 0 01 0 001 0 0001 0 00001 0 000001 Flow rate kg h Pressure loss coeff C CA15H CA200 1000 10000 100000 1000000 10000000 10 1 0 1 0 01 0 001 0 0001 0 00001 0 000001 Flowrate kg h Pressure loss coeff C 10mPa s 1mPa s 0 01mPa s 10mPa s 100mPa s 1000mPa s 1mPa s 0 01mPa s 10mPa s 100mPa s 1000mPa s 1mPa s 0 01mPa s 10mPa s 100mPa s 1000mPa s 1mP...

Страница 23: ...kg h Flow rate kg h Flow rate kg h 0 01 mPa s 10 mPa s 100 mPa s 1000 mPa s 1000 mPa s 1000 mPa s 1000 mPa s 100 mPa s 10 mPa s 1 mPa s 0 01 mPa s 100 mPa s 10 mPa s 1 mPa s 0 01 mPa s 100 mPa s 10 mPa s 1 mPa s 0 01 mPa s Determining Pressure Loss Find the pressure loss factor C for a given parameter from its flow rate kg h or g min and viscosity mPa s then divide C by specific gravity d 1 for wa...

Страница 24: ...24 CamCor CT and PRO Series Hardware Manual Section 3 This page is left blank intentionally ...

Страница 25: ...igure 4 1 Outline dimensions of CT Series sensor units CC00A and CC001 inches CT Series CC003 Sensor with Separately mounted Transmitter Flanged L A W 98 H h1 Ground screw Conduit connection 3 4 14 FNPT M25 3 86 4 21 4 29 0 39 Model ASME DIN H in h1 in A in W in Approx Weight lb Nominal size in 150 300 600 900 Nominal size DN PN 10 16 PN 25 40 L in L CC003 1 2 11 9 12 2 12 7 13 3 15 10 8 11 1 9 06...

Страница 26: ...3 4 14 FNPT M25 9 06 2 52 5 0 2 36 Flow direction Model ASME DIN H in h1 in A in W in Approx Weight lb Nominal size in 150 300 600 900 Nominal size DN PN 10 16 PN 25 40 L in L CC006 1 2 10 6 10 9 11 4 12 1 15 9 49 9 72 16 7 7 09 2 09 5 83 15 4 CC010 11 1 11 5 11 9 12 6 10 1 10 3 18 2 8 58 6 42 17 2 CC015 12 8 13 1 13 7 14 3 11 8 12 20 2 10 6 2 56 8 07 19 4 CC025 1 16 2 16 7 17 2 18 1 25 14 8 15 22...

Страница 27: ...le 10A 9 11 17 1 7 09 2 09 5 83 1 34 12 6 CC006 1 2 14 FNPT 11 7 12 6 CC010 15 Ferrule 15A 10 1 18 2 8 58 6 42 13 9 CC010 12 3 13 9 CC015 Ferrule 15A 11 4 20 2 10 6 2 56 8 07 15 7 CC015 3 4 14 FNPT 15 15 7 CC025 25 Ferrule 25 ISO IDF 1S 14 6 22 8 13 3 27 10 3 1 99 23 6 CC040 40 Ferrule 38 ISO IDF 1 5S 19 4 28 17 8 4 76 15 2 41 9 CC050 50 Ferrule 51 ISO IDF 2S 2 52 CC080 80 Ferrule 76 1 ISO IDF 3S ...

Страница 28: ...ASME 150 40 1 55 2 40 26 11 8 31 9 509 ASME 300 40 8 ASME 600 42 6 DN100 PN 10 16 38 1 PN 25 40 39 1 CC150 6 ASME 150 51 9 55 2 40 26 11 8 31 9 542 ASME 300 52 7 ASME 600 54 6 DN150 PN 10 16 49 2 PN 25 40 50 8 CC15H 6 ASME 150 42 8 63 1 46 9 33 5 12 6 31 9 683 ASME 300 43 6 ASME 600 45 6 DN150 PN 10 16 40 1 PN 25 40 41 7 CC200 8 ASME 150 55 8 63 1 46 9 33 5 12 6 31 9 750 ASME 300 56 6 ASME 600 58 ...

Страница 29: ...E 900 flanges are only available in Alloy C22 material Figure 4 7 Outline dimensions of CT Series flanged sensor unit CC006 through CC080 with separately mounted transmitter inches CT Series CC006 through CC080 Sensor with Separately mounted Transmitter Ferrule or Threaded 4 21 H h1 W L 3 86 A 0 39 Ground screw Conduit connection 3 4 14 FNPT M25 L Threaded connection Terminal box D Model Ferrule L...

Страница 30: ...11 8 31 9 509 ASME 300 40 8 ASME 600 42 6 DN100 PN 10 16 38 1 PN 25 40 39 1 CC150 6 ASME 150 51 2 53 3 40 26 11 8 31 9 542 ASME 300 52 7 ASME 600 54 6 DN150 PN 10 16 49 2 PN 25 40 50 8 CC15H 6 ASME 150 42 8 61 2 46 9 33 5 12 6 31 9 683 ASME 300 43 6 ASME 600 45 6 DN150 PN 10 16 40 1 PN 25 40 41 7 CC200 8 ASME 150 55 8 61 2 46 9 33 5 12 6 31 9 750 ASME 300 56 6 ASME 600 58 8 DN200 PN 10 16 52 7 PN ...

Страница 31: ...are only available with Alloy C22 material DIN flanges are only available for meter material SUS316L Figure 4 10 Outline dimensions of CT Series flanged sensor units CC025 through CC080 with separately mounted transmitter inches CT Series CC025 through CC080 Sensor with Heat Tracer and Separately mounted Transmitter Flanged Ah Wh h2 A1 Lh Heat retention fluid inlet 0 39 stainless pipe Heat retenti...

Страница 32: ...ith separately mounted transmitter inches CT Series CC025 through CC080 Sensor Low temp with Separately mounted Transmitter Flanged Conduit connection 3 4 14 FNPT M25 A W h1 0 39 H Ground screw 4 21 3 86 L Flow direction Flange Model ASME DIN H in h1 in A in W in Approx Weight lb Nominal size in 150 300 600 900 Nominal size DN PN 10 16 PN 25 40 L in L CC025 1 16 2 9 53 17 2 18 1 25 14 8 15 26 13 3...

Страница 33: ...rox weight lb Nominal size Connection CC025 25 Ferrule 25 ISO IDF 1S 14 6 26 13 3 27 10 3 1 99 18 3 CC040 40 Ferrule 38 ISO IDF 1 5S 19 4 31 1 17 8 4 76 15 2 37 5 CC050 50 Ferrule 51 ISO IDF 2S 2 52 CC080 80 Ferrule 76 1 ISO IDF 3S 25 9 37 8 23 7 6 85 20 1 3 58 105 8 1 Conduit connections are 3 4 14 FNPT for CSA units and M25 for ATEX units 2 Process connection S in Figure 4 14 Outline dimensions ...

Страница 34: ...6 ASME 150 51 2 54 6 40 26 11 8 31 9 542 ASME 300 52 7 ASME 600 54 6 DN150 PN 10 16 49 2 PN 25 40 50 8 CC15H 6 ASME 150 42 8 62 5 46 9 33 5 12 6 31 9 683 ASME 300 43 6 ASME 600 45 6 DN150 PN 10 16 40 1 PN 25 40 41 7 CC200 8 ASME 150 55 8 62 5 46 9 33 5 12 6 31 9 750 ASME 300 56 6 ASME 600 58 8 DN200 PN 10 16 52 7 PN 25 54 1 PN 40 54 7 CC20H 8 ASME 150 55 8 71 4 54 7 37 8 16 5 43 7 1345 ASME 300 56...

Страница 35: ... 4 22 8 12 7 7 76 4 92 73 2 Model Ferrule Model Threaded Connection L D Approx Weight lb Connection L in Approx Weight lb CP006 10A 13 1 1 34 11 5 CP006 1 2 14 FNPT 15 7 11 5 CP010 15A 15 1 34 13 4 CP010 1 2 14 FNPT 17 2 13 4 CP015 15A 18 7 1 34 21 8 CP015 3 4 14 FNPT 22 4 21 8 CP025 25 ISO IDF 1S 22 1 99 24 5 CP040 38 ISO IDF 1 5S 23 9 1 99 64 6 CP050 51 ISO IDF 2S 23 9 2 52 64 6 1 Dotted lines s...

Страница 36: ...0 1 1 2 26 26 5 27 1 21 1 12 7 4 92 66 6 CP050 2 26 1 26 6 27 4 21 1 12 7 4 92 67 5 Model Ferrule Model Threaded Connection L D Approx Weight lb Connection L in Approx Weight lb CP006 10A 13 1 1 34 5 73 CP006 1 2 14 FNPT 15 7 5 73 CP010 15A 15 1 34 7 72 CP010 1 2 14 FNPT 17 2 7 72 CP015 15A 18 7 1 34 16 1 CP015 3 4 14 FNPT 22 4 16 1 CP025 25 ISO IDF 1S 22 1 99 18 7 CP040 38 ISO IDF 1 5S 23 9 1 99 ...

Страница 37: ... 6 3 4 88 13 5 2 76 Pipe U bolts 9 17 0 79 61 7 6 75 gal min Vol Flow Mass Flow Conduit connection 3 4 14 FNPT M25 Conduit connections are 3 4 14 FNPT for CSA units and M25 for ATEX units Pipe mounting hardware U bolts are furnished as standard accessories The pipe must be provided by the customer Figure 4 18 Outline dimensions in inches of separately mounted transmitter inches ...

Страница 38: ...38 CamCor CT and PRO Series Hardware Manual Section 4 38 This page is left blank intentionally ...

Страница 39: ...meter at least five meters away CT SERIES METER PHYSICAL ORIENTATION The sensor may be installed either in a horizontal run or vertical run The following physical orientations are suggested depending on the type of process fluid For example Figure 5 1 No 2 shows the typical orientation for liquids If the con duit connection points up make provisions for sealing off or keeping rainwater and other m...

Страница 40: ...TION The flow meter may be installed either in a horizontal line or a vertical line Where cleaning is required or air bubble en trapment is likely we suggest installation in a vertical run If a conduit connection points up take necessary measures to prevent rain and water from entering the meter In Out Out In Figure 5 4 Horizontal and vertical run installations Side view Bottom view Top view Figur...

Страница 41: ... as shown below Do not allow the following situations with a hydrostatic head Bubble entrapment in low liquid levels No valve must have pressure control full liquid control valve Air bubbles Dry orifice keep filled with liquid Figure 5 6 Common installation errors for CT and PRO Series meters INSTALLATION GUIDELINES Standard Piping Conditions A Coriolis mass flow meter is unaffected by the flow pa...

Страница 42: ...revention of Cavitation Gas Flash Off Cavitation can cause a loss in Coriolis meter measurement accuracy To prevent cavitation maintain line pressure upstream and downstream of the meter Avoid piping arrangements that open the line to the atmosphere immediately downstream of the meter Particular care must be taken in low pressure applications and with high vapor pressure liquids such as NGLs natur...

Страница 43: ...adjust to the required rate Even with the flow rate greater than 10 of the maximum service flow rate it will take approximately 40 seconds to completely fill the flow tube from its empty state with water used as the metered fluid CAUTION Expansion of the process fluid due to freezing may damage the measured pipe Ensure that process fluid does not freeze Bypass Loop To facilitate maintenance and se...

Страница 44: ...Models CC150 through CC250 500 lb or greater we recommend that installation be performed only by qualified personnel experienced in sling work and crane operation Note that center of gravity is shown to facilitate installation in a vertical run The eyebolts shown in this diagram may be removed after installation in the piping assembly If the eyebolts are retained they should be tightened periodica...

Страница 45: ...to the piping fit an O ring between the end of piping and the gland of sensor unit then tighten them firmly CAUTION Avoid damaging the gland flat and the protrusion of flow inlet outlet Do not overtighten the nut Overtightening it can damage the gland flat Sensor unit Gland union Gland union detail Piping Piping 1 4 14 FNPT Screw fitting O ring Gland union Inlet Outlet Gland flat Nut Figure 5 12 T...

Страница 46: ...intended for the absorption of shock and vibration While the clamps supporting upstream and downstream piping pedestal floor etc that hold individual supporting members must be rigid sturdy enough to bear their weight it is more important to secure and maintain the rigidity of the entire structure Changes in the spring elements inside the area marked with dotted lines in Figure 5 15 page 47 can ca...

Страница 47: ...aining or cold retaining material within a distance of 0 79 in from the mounting tube so that the terminal box is protected against heat or cold see Figure 5 18 page 48 For easy maintenance a simplified heat retaining system is recommended on the sensor unit When covering the heat insulating material with an outer sheath for heat retention or cold retention if the natural frequency of the outer sh...

Страница 48: ... If ambient temperature around the transmitter is expected to exceed 131 F a separately mounted transmitter is recommended Copper tubing Copper tubing Spot weld Piping Steam Pipe retainer material SUS316L strip CC00A CC001 CC003 Sensor unit Sensor unit Figure 5 17 Heat and cold retention via copper tubing and pipe retainers CT Series CC00A CC001 and CC003 meters Do not apply heat retention to term...

Страница 49: ... erosion Figure 5 21 page 50 Because the maximum pressure the sensor housing can withstand is lower than that of the tube the sensor housing can be damaged if a tube ruptures and no pressure relief device is installed depending on the process conditions A hex socket head plug 1 4 in is screwed into the female taper pipe thread 1 4 18 FNPT of the boss WARNING Do not remove the hex socket unless ins...

Страница 50: ...rovided horizontal or vertical 2 in steel pipe using the U bolts furnished with the transmitter CAUTION Do not install in locations that are difficult to access for maintenance and servicing or in locations that are prone to excessive temperature changes vibration or immersion in water 1 4 18 FNPT bolts 4 Mounting bracket 2 in U bolts 2 Pipe 2 in U bolts 2 Mounting bracket Pipe Transmitter Install...

Страница 51: ... of the transmitter Do not remove the set screws or attempt to separate the transmitter from the sensor unit 3 Rotate the transmitter to the desired position and secure it with set screws four places Never loosen the screws located on the transmitter body 5 16 18 FNPT set screw 4 Transmitter Maximum Rotation 180º Figure 5 23 Changing the transmitter orientation CAUTION The transmitter may be rotat...

Страница 52: ...e Figure 5 for locations Do not remove screws set washers on the back of the display will prevent the screws from falling out Remove the fitting screws and washers as shown in the diagram to the left adjust the LCD display to the desired orientation and replace the fitting screws and washers in the appropriate holes using the diagrams below Remove the display assembly Set washers 3 M2 6 LCD fittin...

Страница 53: ...display assembly Tighten the three screws in the holes determined in Step 5 Reinstall the display assembly in its original position replace the faceplate and tighten the transmitter display lid Male connector pins Female through holes to display Figure 5 25 Procedure for changing the transmitter display orientation Part 2 of 2 ...

Страница 54: ...54 CamCor CT and PRO Series Hardware Manual Section 5 This page is left blank intentionally ...

Страница 55: ...he loosened lid by hand Using customer supplied crimp style terminals see below for specifications connect the power and signal output wiring as shown in the diagram above Power terminal block M4 screws Round 8 1 mm maximum O D Output signal terminal block M3 screws Round 7 2 mm maximum O D Acceptable wire size AWG 22 to 16 Status Input Output and Modbus RS 485 terminal blocks are screwless and do...

Страница 56: ...and wire the transmitter to the sensor unit C1 J2 NOL J1 1 J1 2 COUP Do not move jumpers J1 1 or J1 2 from their default positions Figure 6 2 Wiring procedure for separately mounted transmitter to sensor unit POWER SUPPLY LINES AND GROUND TERMINAL Power source primary lines are connected to terminals L and N Over voltage Category II Pollution Degree 2 Connect an earth ground only to GND on the ter...

Страница 57: ...n Figure 6 4 below Pulse Output 1 Jumper OPEN Open collector pulse CLOSED Voltage pulse JP3 Pulse Output 2 Jumper OPEN Open collector pulse CLOSED Voltage pulse JP4 Figure 6 4 Jumper positions for switching between voltage pulse and open collector pulse For pulse output setup instructions see Pulse Output Function page 97 STATUS OUTPUT WIRING Status output appears across terminals S O and S O For ...

Страница 58: ...mm 1 Select the cable size to be used with the number of signals 2 If the ambient temperature is 113 F or higher use a cable resistant to 158 F or higher Recommended Cable for Modbus Communications For Modbus communications use a 0 75 mm2 twisted pair cable with a maximum cable length of 1200 m depending on operation environment Applicable Rubber Packing Size by Wire Gauge and Number of Conductors...

Страница 59: ...A2 P1 Pulse Output 1 voltage open drain Maximum pulse output voltage open drain transmission length 10 m 10 kHz 100 m 1 kHz 1 km 100 Hz Minimum conductor size 18 AWG P1 P2 Pulse Output 2 voltage open drain P2 SI Status Input contact SI SO Status Output open drain SO I O Expanded Input Output Modbus communication etc For Modbus communications Maximum transmission length 1200 m Minimum conductor siz...

Страница 60: ...Yellow Orange Shielded wires Green White Grey Yellow Blue Orange Black Purple Red Brown Figure 6 7 Sensor and transmitter terminal box wiring per Wiring Diagram 20140217 Use dedicated interconnect cable and prepare shielded wire as follows Transmitter End 1 Bundle shielded wires colored in BRN RED GRN WHT BLU GRY and PUR YEL ORG and cover the wires with a black tube 2 Connect only one wire to the ...

Страница 61: ...D should show the following information Mass Flow Vol Flow oz s gal min 1 Corporate logo appears 2 Self diagnostics begin If nothing unusual is found OK appears to the right of each item If NG appears a check of item is required Refer to the Transmitter Check section of this manual correct the condition and turn on the power again 3 The variable view screen appears and measurement begins Figure 7 ...

Страница 62: ...62 CamCor CT and PRO Series Hardware Manual Section 7 This page is left blank intentionally ...

Страница 63: ...indicate the status of the flow meter During normal opera tions the red LED stays off while the green LED remains on A red LED that is on or a green LED that is off indicates erratic behavior For assistance with troubleshooting see Error Messages page 109 and Status Messages page 110 SEL and ENT Switches These infrared switches respond when a finger is held to the glass in front of the switch The ...

Страница 64: ... the last figure and the display will advance to the next screen Holding your finger over the ENT switch allows you to scroll rapidly through the screens Figure 8 2 ENT operation SEL Operation This switch is used to reverse variable display direction adjust variable values select parameters etc In the following ex ample SEL is used to switch the variable display direction Density g mL deg F Temp M...

Страница 65: ...n appears Mass Flow Vol Flow lb min gal min Density g mL deg F Temp Counter1 Counter2 Pulse Pulse Mass Flow Instant mass flow rate Decimal point placement and units of measure can be configured see Transition Chart 1 No 1 3 4 1 and Transition Chart 2 No 2 1 1 Vol Flow Vol Flow s Instant volume flow rate Decimal point placement and units of measure can be configured see Transition Chart 1 No 1 3 4 ...

Страница 66: ...screen Touching the ENT switch from the Mode Select screen returns you to the initial screen Totalizer1 Total flow of Pulse Output 1 Totalizer2 Total flow of Pulse Output 2 When a Pulse Ouput 2 related parameter is changed the counter resets to zero For both the counter resets to zero with the next count after the reading exceeds the maximum value Decimal point placement can be configured see Tran...

Страница 67: ...low Vol Flow oz s gal min P a s s w o r d E X T S E T S3 Touch SEL3 Press ENT 4 times Press SEL1 Password is not set Password is set Hold your finger over the ENT switch until the Mode Select screen appears Touch SEL3 to advance to the next screen If a password is enabled the Password Setup screen will appear If no password is enabled the Mode Select menu screen will appear From the Mode Select me...

Страница 68: ...word Set 2 Password 3 Process Var 1 Var Priority 2 Refresh LCD 3 Font 4 Decimal Place 1 Mass Flow 2 Vol Flow indicates SEL1 function indicates SEL3 function see SEL3 Operation page 65 for additional information indicates ENT function Exit Exit Exit 3 Diag Service 4 Maintenance 4 Back Light 3 Density 4 Totalizer1 5 Totalizer2 Exit ...

Страница 69: ...1 Mass Flow Change displayed instant mass flow rate decimal point position to match the instant mass rate used Select from Auto automatic from 0 to 5 decimal places Integer no fractions or 1 2 3 or 4 decimal places Auto 1 3 4 2 Vol Flow Change displayed instant volume flow rate decimal point position to match the instant mass rate used Select from Auto automatic Integer no fractions or 1 2 3 or 4 ...

Страница 70: ... Compen 2 Std Temp Exit Exit 3 Diag Service 4 Maintenance 6 H L Alarm 3 Exp Coef 4 Settled Dens 5 Dens Value Exit 5 Flow Direct Exit 1 Dens Unit 2 Dens Damp 3 Slug Low 4 Slug High 5 Slug Duration Exit 6 Special Dens 1 Temp Unit 2 Temp Damp Exit 5 Status Input 4 Outputs 3 Temp Param indicates SEL1 function indicates SEL3 function see SEL3 Operation page 65 for additional information indicates ENT f...

Страница 71: ...ion Set a value larger than expected flow density 10 2 2 5 Slug Duration Set the slug flow detection duration During the preset duration if a measured density falls below the lower limit density No 2 2 3 or exceeds the higher limit density No 2 2 4 it is identified as slug flow to indicate an alarm 0 2 2 6 1 Dens Compen Enable disable reference temperature conversion function on density On referen...

Страница 72: ...e 3 Diag Service 7 Error Output 6 Status Output 2 Den Param 3 Temp Param 4 Outputs 1 Assign 2 URV 3 LRV 4 Lowcut 5 Added Damp Exit 1 Assign 2 URV 3 LRV 4 Lowcut 5 Added Damp Exit 1 Assign 2 Freq Factor 3 Rate Factor 4 Lowcut Exit 3 Pls Output1 1 Assign 2 Pulse Weight Exit 5 Pls OpeMode 1 Assign 2 Freq Factor 3 Rate Factor 4 Lowcut Exit 4 Pls Output2 1 Assign 2 Pulse Weight Exit 1 Weight 2 Frequenc...

Страница 73: ...se Operating Mode to Weighted pulse output Selecting a Parameter page 81 Weight 2 4 5 2 Frequency Change the Pulse Operating Mode to Frequency pulse output 2 4 3 1 Assign Change Pulse Output 1 assignment see Pulse Output Function page 97 If assignment is changed reconfigure pulse weight No 2 4 3 2 for optimum settings Selecting a Parameter page 81 Volume Flow 2 4 3 2 Pulse Weight Change the flow r...

Страница 74: ...Fail 2 Txr Fail 3 Cal Fail 4 Satura Alm 5 Param Alm 6 Txr Alm 7 Slug Alm 8 Cal in prog 9 Fix Output Exit 4 Mode Exit 1 Analog 2 Pulse Exit Exit 7 Error Output 1 Function 2 Mode Exit 1 Assign 2 H L Alm Type 3 High Alm Po 4 Low Alm Po 5 H L Alm hys Exit Exit 4 Maintenance 3 Diag Service 5 Status Input 6 H L Alarm Exit 3 Drive Out Po indicates SEL1 function indicates SEL3 function see SEL3 Operation ...

Страница 75: ... status output No output will appear unless Out is selected For information about fix output see Error Messages page 109 Off 2 4 5 3 Drive Out Po Configure the threshold value of a drive output 100 2 4 5 4 Mode Select N C When the status output condition is met the status output is deactivated or N O When the status output condition is met the status output is enabled N C 2 4 6 1 Analog Select ana...

Страница 76: ...ht 2 LED 3 LCD Exit Exit Exit 1 Fix Analog1 2 Fix Analog2 Exit 1 Auto Zero Exit Exit 4 Maintenance 2 Loop Test 3 Calibration Exit 3 Txr Condition 4 LCD Test 1 Static 2 Dynamic Exit 3 Fix Pulse1 4 Fix Pulse2 5 Status Output 6 Status Input 4 Trim Analog 5 Cnt Ttl Reset 3 Diag Service indicates SEL1 function indicates SEL3 function see SEL3 Operation page 65 for additional information indicates ENT f...

Страница 77: ...e test the LCDs are switched in and out The performance test lasts 12 seconds and twice alternates between all dots lit 3 sec and all dots unlit 3 sec Normal LCD illumination is restored upon test completion 3 1 2 1 Static Run a stability check on the sensor signal at zero flow Pipeline Vibration Check at Zero Flow page 86 3 1 2 2 Dynamic Run a stability check on the sensor signal while fluid is f...

Страница 78: ...log2 1 4mA 2 20mA Exit Exit Exit 4 Maintenance 5 Cnt Ttl Reset Exit 3 Diag Service 1 4mA 2 20mA Exit 1 Count Total1 2 Count Total2 Exit 2 Loop Test 3 Calibration 4 Trim Analog 1 Input Signals 2 View History Exit 3 Telop Info 4 Soft Version indicates SEL1 function indicates SEL3 function see SEL3 Operation page 65 for additional information indicates ENT function ...

Страница 79: ...rated and does not normally require further adjustment 3 5 1 Count Total1 Reset Counter 1 and Totalizer 1 to zero Reset Function page 95 3 5 2 Count Total2 Reset Counter 2 and Totalizer 2 to zero 4 1 Input Signals This screen is used for maintenance view only 4 2 View History Displays the transmitter s running hours This setting can be switched to calendar view Note The internal clock is maintenan...

Страница 80: ...and space until the desired value is reached In the example the temperature damping factor is changing from 4 0 to 4 2 so the cursor is on the 0 the first decimal place to be changed c Touch SEL1 twice to select 2 d Touch ENT to move to the next screen where you will save your selection e Verify the selection then touch SEL1 to accept it To exit without making any changes touch ENT twice then touc...

Страница 81: ...tion Charts for more information about viewing menu items In this example the Temperature parameter is selected b Scroll to the desired menu item and touch SEL 1 to select the Temp Unit setup screen Touch SEL1 Touch SEL3 Touch ENT Touch ENT Touch SEL3 Touch ENT Touch ENT Touch ENT Touch ENT Touch ENT Touch SEL3 Determine whether or not to change the parameter To change the parameter touch SEL3 to ...

Страница 82: ...the four character spaces Note that the password must be four numbers long 1234 in the example to the left Holding ENT will move the cursor to the far right position then wrap the cursor back to the lefthand position b Touch SEL1 to indicate that you are finished c Verify that the password is correct If so touch SEL3 to save the password If the password is valid you will be returned to the Mode Se...

Страница 83: ...the green LED will blink on and off If possible errors with the probe were detected NG will appear to the right of the items with potential issues If NG appears next to an item refer to the descriptions and recommended actions below DSP Voltage Potential fault in internal power supply Contact the factory Input Freq Potential fault in frequency counter Run a Drive Coil Check as described in this ma...

Страница 84: ...running a drive coil check touch ENT then touch SEL3 You will be returned to the Self Diag screen The Drive Coil Check screen will appear The check lasts approximately 30 seconds during which the green LED will blink on and off If the resistance value is NG an error with the drive coil was detected If so verify the sensor connections If sensor connections appear OK but erratic performance persists...

Страница 85: ... but erratic performance persists an open sensor is possible Contact Cameron Temp Connect Potential fault in temperature sensor connections P O Connect Potential fault in pick off sensor connections Drive coil Potential fault in drive coil sensor connections Run a Drive Coil check as described in this manual If no drive coil errors are identified and the connections are OK contact Cameron EEPROM E...

Страница 86: ... which the green LED will blink on and off When the check is complete one of four possible results will be displayed onscreen Best Condition Top rated condition allowing accurate measurement Use the meter in this state Touch SEL3 to exit the vibration check and return to the Installation screen Good Condition Condition is sufficient for flow measurement Use the meter in this state Touch SEL3 to ex...

Страница 87: ... then touch SEL3 You will be returned to the Installation screen The Dynamic Installation screen will appear The check lasts approximately 30 seconds during which the green LED will blink on and off When the check is complete one of three possible results will be displayed onscreen Stable Flow Flow conditions are stable and satisfactory for flow measurement Use the meter in this state Touch SEL3 t...

Страница 88: ...ough the selections 0 through 9 and and space until the desired value is reached In the example the simulated output is changing from 4 0 to 12 0 so the cursor is on the 4 the number to be changed c After entering the desired value touch ENT to move to the next screen where you will save your selection d Verify the selection then touch SEL1 to accept it Touch ENT To set up the Analog Output 1 simu...

Страница 89: ... output is changing from 10000 0 to 2100 0 so the cursor is on the 1 the number to be changed c After entering the desired value touch ENT to move to the next screen where you will save your selection d Verify the selection then touch SEL1 to accept it Touch ENT To set up the Pulse Output 1 simulation touch SEL3 The Fix Pulse 1 entry screen will appear To exit without setting up the simulation tou...

Страница 90: ...art the simulated output Touch ENT To set up the Status Output simulation touch SEL3 The Status Output selection screen will appear To exit without setting up the simulation touch ENT then touch SEL3 You will be returned to the Loop Test screen Touch SEL3 Touch ENT Touch SEL3 The simulated Status Output is fixed at N O The simulated data remains unaffected by obtained measurements error processing...

Страница 91: ...g ZEROING FUNCTION This feature detects errors in zeroing and reduces offset flow rate drift to minimum At the stage of installation and in cases where flow conditions significantly change zeroing is an essential part of the routines required for maintaining accurate and consistent measurement During the zeroing fill the sensor unit completely with the fluid the temperature of which is within 50 F...

Страница 92: ... then SEL3 to abort auto zeroing You will be returned to the Calibration screen Touch SEL3 Touch ENT Touch SEL3 The auto zeroing process will begin As a warning the red backlight will appear for 1 second at the start and end of auto zeroing Note that the green LED will blink on and off during the process and the Auto Zero screen will display a Sensor Input stabilizing message Auto zeroing will las...

Страница 93: ...Set working output of status output For setup details see Status Input Function page 104 and Transition Chart 4 page 74 No 2 4 5 1 No 2 4 5 2 8 and No 2 4 5 3 3 During the zeroing fill the sensor unit completely with the fluid the temperature of which is within 10 C from the temperature at which it operates CAUTION 1 Fluid liquid or gas must completely fill the sensor unit and be absolutely at zer...

Страница 94: ...nt 4 1 mA in the example below Refer to the Parameter Value Setup section of this manual for additional information about the setup procedure Touch ENT The Trim Analog 1 4mA screen will appear To perform a 4 mA trim of Analog Output 1 touch SEL3 to proceed to the next step To exit without performing the analog output trim procedure touch ENT then touch SEL3 You will be returned to the Trim Analog ...

Страница 95: ...cedure applies to Counter Totalizer 2 Navigate to the Cnt Ttl Reset screen as described in the Transition Charts in this manual Highlight Count Total 1 and touch SEL1 to display the current counter reading on the Count Total 1 screen Touch SEL1 Touch SEL3 Touch ENT Touch ENT Touch SEL3 To reset the counter to 0 again touch SEL3 To exit without resetting the counter touch ENT then touch SEL3 You wi...

Страница 96: ... Instant mass flow rate Vol Flow Instant volume rate or instant volume rate fixed density Density Density Temp Temperature Counter1 Counter reading of Pulse Output 1 Counter2 Counter reading of Pulse Output 2 Totalizer1 Total flow of Pulse Output 1 Totalizer2 Total flow of Pulse Output 2 Ana Out1 reading of Analog Output 1 Ana Out2 reading of Analog Output 2 To finalize the variable priority list ...

Страница 97: ...g factor 0 to 999999 for Pulse Output 1 see Transition Chart 3 page 72 No 2 4 3 2 Pulse Output 1 Frequency To use Pulse Output 1 in Frequency Mode configure as follows For bidirectional pulse output or double pulse output con figure the parameters as follows 1 Set the Pulse Output 1 assignment see Transition Chart 3 page 72 No 2 4 3 1 and select the flow type from the following Mass Flow Mass flow...

Страница 98: ...4 4 2 Pulse Output 2 Frequency To use Pulse Output 2 in Frequency Mode configure as follows For bidirectional pulse output configure the parameters as follows For double pulse output set only the Pulse Output 2 assignment see Double Pulse Output page 100 for more information All other parameters will use Pulse Output 1 Frequency settings 1 Set the Pulse Output 2 assignment see Transition Chart 3 p...

Страница 99: ... No 2 4 5 3 N C Output is Closed in the forward fluid flow N O Output is Open in the forward fluid flow In the example below the following settings and assignments were made Status output function assignment Bi Direction Pulse Output 1 active mode N C Pulse Output 1 assignment Mass Flow Pulse Output 1 frequency factor 1000 Hz Pulse Output 1 rate factor 100 0 kg min Pulse Output 1 low flow cutoff 1...

Страница 100: ... lag within 1 4 of the period Double pulse 180 Double pulse output 180 Pulse Output 2 is activated and the polarity of the Pulse Output 1 wave form is inverted Double pulse 90 Double pulse output 90 When active Pulse Output 1 lags Pulse Output 2 by 90 1 4 of the peri od The maximum lag is 1 msec above which is a lag within 1 4 of the period The following diagram illustrates the behavior of the pul...

Страница 101: ...e see table below or be larger than the upper limit value c Low flow cutoff see Transition Chart 3 page 72 No 2 4 1 4 and No 2 4 2 4 When the low flow cutoff value is larger than the proportion of analog output where the upper limit is set to 100 and the lower limit is set to 0 the analog output becomes 4 mA Available setting range is from 0 to 10 d Damping factor see Transition Chart 3 page 72 No...

Страница 102: ...disable them See Transition Chart 4 page 74 No 2 4 5 2 1 through No 2 4 5 2 9 3 Configure the active output see Transition Chart 4 page 74 No 2 4 5 3 The following outputs become available based on the selections made above N C Output is Closed when the preset state is reached N O Output is Open when the preset state is reached When the settings above take effect the functions are ready for use Bi...

Страница 103: ... output alarm to the status output allows an alarm to be activated when the drive output exceeds the us er established threshold Configuring a Drive Output Alarm 1 Select Drive O Alm as the status output function assignment see Transition Chart 4 page 74 No 2 4 5 1 2 Enter the threshold to indicate at what percentage of the drive output the alarm should be activated The default is 100 See Transiti...

Страница 104: ...put function assignment see Transition Chart 4 page 74 No 2 5 1 2 Configure the input mode for the status input see Transition Chart 4 page 74 No 2 5 2 With the setting activated the following input modes become enabled Closed Active Function is activated when status input terminals are closed for a minimum of 0 3 seconds Open Active Function is activated when status input terminals remain open fo...

Страница 105: ...e information see Reset Function page 95 Configuring the Totalizer 2 Reset 1 Select Reset C T 2 as the status input function assignment see Transition Chart 4 page 74 No 2 5 1 2 Configure the input mode for the status input see Transition Chart 4 page 74 No 2 5 2 With the setting activated the following input modes become enabled Closed Active Function is activated when status input terminals are ...

Страница 106: ...ng determines the dead or immunity zone following an alarm Select a larger value for measurements that fluctuate greatly Select a smaller value for rapid recovery from an alarmed condition High Low Alarm Example Status output assignment Function H L Alarm Active output of status output Mode Off Active H L alarm value assignment Assign Mass Flow Alarm type selection H LAlm Type H L Alarm High alarm...

Страница 107: ...l be reported as 0 Assigning the Slug Flow Alarm to a Status Output To assign the slug flow alarm to the status output function configure the status output as follows For more information see Status Output Function page 102 1 Set Error Status as the status output function assignment see Transition Chart 4 page 74 No 2 4 5 1 2 Set the slug flow error selection to On see Transition Chart 4 page 74 N...

Страница 108: ...hTon day St d Instant volume flow rate V 1 ml sec mL s V 2 ml min mL min V 3 ml hr mL h V 4 liter sec L s V 5 liter min L min V 6 liter hr L h V 7 liter day L d V 8 m3 sec Cm s V 9 m3 min Cm min V 10 m3 hr Cm h V 11 m3 day Cm d V 12 gal sec ga s V 13 gal min ga min V 14 ImpGal min Ig min V 15 ImpGal hr Ig h V 16 ImpGal day Ig d V 17 ft3 sec Cf s V 18 ft3 min Cf min V 19 ft3 hr Cf h V 20 bbl sec bl...

Страница 109: ...gnostics on drive coil connections see Drive Coil Check page 84 Transmitter Failure EEPROM Err Error in parameters inactive operation Contact Cameron Blink Off Orange 2 4 mA Stopped Off Data Update Err Fault in internal data or transmitter Contact Cameron On Off Orange Per error output setting Per error output setting Per status select Parameter Alarm Ana 1 Set Alm Parameter setting of Analog Outp...

Страница 110: ...s 0 Off On Off Powr OK A short duration power cycling has occurred more than once indicating possible poor power supply condition Check power supply condition Off On Off 1 If the backlight is set to sleep mode the white backlight will still illuminate after switch operation even if the operation is stopped 2 Regardless of the alarm state simulated output remains available Certain errors can disabl...

Страница 111: ...ter or if we find it difficult to ensure safety we may decline to accept and process the returned equipment at our discretion Important If residual metered fluid may be present in the housing consult the factory before returning the device CAMERON CAMCOR CORIOLIS FLOW METER Model Serial No Process Fluid Names List all chemicals and process fluids in contact with the equipment Health and Safety Haz...

Страница 112: ...rate Pulse output Mass Volume fixed Volume Pulse unit O C Voltage Pulse output Mass Volume fixed Volume Pulse unit Analog output Mass Volume fixed Temperature Density to Analog output Mass Volume fixed Temperature Density to Sensor conditions Tubes empty no obstacles Sensor empty no obstacles Tubes clogged contaminated Cleaning material used for sensor unit IMPORTANT If sensor tubes leak ensure th...

Страница 113: ...r hazardous area certification See the CT Series General Specification Doc No 50284154 Appendix B for product code selections Temperature Class describes T codes which define temperature limitations that apply if the meter is installed in a hazardous area per the CSA certification See the CT Series General Specification Doc No 50284154 Appendix B for product code selections If a meter will be used...

Страница 114: ...lass T2 40 to 392 40 to 140 3 High Temp 392 to 662 2 Separate 1 Class T1 4 to 662 4 to 122 4 Low Temp 328 to 122 2 Separate 5 Class T5 328 to 122 4 to 122 CC15H through CC250 2 Standard B 266 to 392 2 Separate 2 Class T2 40 to 392 40 to 140 4 Low Temp 328 to 122 2 Separate 5 Class T5 328 to 122 4 to 122 Temperature Category describes the nominal temperature rating of the meter with no consideratio...

Страница 115: ...nt and acceptable to the authorities where equip ment is sold Wiring providing power to the unit must be NRTL certified or listed for Canada and US type Field Wiring suitable for temperatures above 75 C and size AWG 14 16 The user replaceable mains fuse found within the equipment must be NRTL certified or listed for Canada and US acceptable to the authorities where the equipment is sold Units inst...

Страница 116: ...allation methods that minimize the potential for interfer ence from other electrical cabling nearby Meter Inspection and Maintenance Perform inspection and maintenance according to the following items Also make sure to check and inspect the flow meter while de energizing without hazardous gas in the surrounding area Check item Description Check General Is the CamCor interconnect cable in use and p...

Страница 117: ...bient temperature of 45 C Higher temperature limits can be achieved with the high temperature models Only available with separately mounted transmitter and interconnect cable ordered separately 10 meter minimum available in 5 meter increments thereafter For products conforming to the high pressure gas safety regulations and CE marking consult Cameron Standard Models CC006 through CC080 Item Descri...

Страница 118: ...d breakdown pressure or the data obtained from FEA analysis whichever is lower Distorted enclosures do not constitute a failure of the test For products conforming to the high pressure gas safety regulations and CE marking consult Cameron High Temperature Models CC025 to CC150 Item Description Model CC025 CC040 CC050 CC080 CC100 CC150 Nominal size 25 mm 1 DN25 40mm 1 1 2 DN40 50 mm 2 DN50 80 mm 3 ...

Страница 119: ...cation with foods this product does not comply with CE marking 5 This pressure does not represent the rated test pressure of a pressure vessel but 1 4 of the factory tested breakdown pressure or the data obtained from FEA analysis whichever is lower Distorted enclosures do not constitute a failure of the test Only available with separately mounted transmitter and interconnect cable ordered separat...

Страница 120: ...Modbus protocol Baud rate 9600 19200 38400 RTU Response time 25 to 50 ms Damping default Flow rate 0 8 sec Density 4 0 sec Temperature 2 5 sec Low flow cutoff default Less than 0 6 of maximum service flow rate Pulse output Select one Open drain equivalent to open collector 10V to 30V 50 mADC ON resistance 0 6 Ω or Voltage 1 5 V maximum low level to 13 V minimum high level Output impedance 2 2 kΩ F...

Страница 121: ...ainty of 0 1 of reading is required consult Cameron 5 Above maximum service flow rate the uncertainty is 0 3 of reading ZS If you request volume flow measurement for the purpose of fiscal transactions or weights and measurements transactions contact Cameron In gas measurement the maximum permissible flow velocity varies with the type of gas and some may be beyond the bounds of measurement If so co...

Страница 122: ... 3 20 9 61 32 0 32 0 Minimum setting rate l min 1 00 3 20 8 00 24 0 80 1 80 1 Maximum service rate l min 10 0 32 0 80 0 240 801 801 Maximum allowable rate l min 20 0 64 1 160 480 1601 1601 1 Calculations based on water specific gravity of 1 at 15 C mass 999 13 kg m3 Actual flow ranges vary with media density To determine the flow range for your fluid divide the values above by the fluid s specific...

Страница 123: ... 0 0001 0 00001 0 000001 Flow rate g min Flow rate g min Flow rate kg h Flow rate kg h Flow rate kg h Flow rate kg h Flow rate kg h CA040 CA050 100 10000 100000 1000 10 1 0 1 0 01 0 001 0 0001 0 00001 0 000001 Flow rate kg h Pressure loss coeff C Pressure loss coeff C Pressure loss coeff C Pressure loss coeff C Pressure loss coeff C Pressure loss coeff C Pressure loss coeff C Pressure loss coeff C...

Страница 124: ...01 CA20H CA250 1000 10000 100000 1000000 10000000 10 1 0 1 0 01 0 001 0 0001 0 00001 0 000001 Flow rate kg h Pressure loss coeff C CA15H CA200 1000 10000 100000 1000000 10000000 10 1 0 1 0 01 0 001 0 0001 0 00001 0 000001 Flowrate kg h Pressure loss coeff C 10mPa s 1mPa s 0 01mPa s 10mPa s 100mPa s 1000mPa s 1mPa s 0 01mPa s 10mPa s 100mPa s 1000mPa s 1mPa s 0 01mPa s 10mPa s 100mPa s 1000mPa s 1m...

Страница 125: ...g h Flow rate kg h Flow rate kg h 0 01 mPa s 10 mPa s 100 mPa s 1000 mPa s 1000 mPa s 1000 mPa s 1000 mPa s 100 mPa s 10 mPa s 1 mPa s 0 01 mPa s 100 mPa s 10 mPa s 1 mPa s 0 01 mPa s 100 mPa s 10 mPa s 1 mPa s 0 01 mPa s Determining Pressure Loss Find the pressure loss factor C for a given parameter from its flow rate kg h or g min and viscosity mPa s then divide C by specific gravity d 1 for wat...

Страница 126: ...A 10 CamCor CT and PRO Series Hardware Manual Appendix A This page is left blank intentionally ...

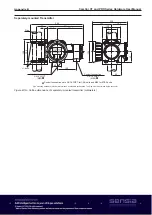
Страница 127: ... kg Figure B 1 Outline dimensions of CT Series sensor units CC00A and CC001 millimeters CT Series CC003 Sensor with Separately mounted Transmitter Flanged L A W 98 H h1 Ground screw Conduit connection 3 4 14 FNPT M25 98 107 109 10 Model ASME DIN H mm h1 mm A mm W mm Approx Weight kg Nominal size mm 150 300 600 900 Nominal size DN PN 10 16 PN 25 40 L mm L mm CC003 10 301 310 322 338 15 275 281 230 ...

Страница 128: ...nduit connections 3 4 14 FNPT M25 230 64 127 60 Flow direction Model ASME DIN H mm h1 mm A mm W mm Approx Weight kg Nominal size mm 150 300 600 900 Nominal size DN PN 10 16 PN 25 40 L mm L mm CC006 10 268 277 289 306 15 241 247 424 180 53 148 7 CC010 15 282 291 303 320 256 261 462 218 163 7 8 CC015 325 334 347 363 299 305 512 268 65 205 8 8 CC025 25 411 424 437 460 25 376 380 580 329 83 262 13 3 C...

Страница 129: ...34 180 53 148 34 5 7 CC006 1 2 14 FNPT 296 5 7 CC010 15 Ferrule 15A 256 462 218 163 6 3 CC010 312 6 3 CC015 289 512 268 65 205 7 1 CC015 3 4 14 FNPT 382 7 1 CC025 25 Ferrule 25 ISO IDF 1S 370 580 329 83 262 50 5 10 7 CC040 40 Ferrule 38 ISO IDF 1 5S 493 710 452 121 385 19 CC050 50 Ferrule 51 ISO IDF 2S 64 CC080 80 Ferrule 76 1 ISO IDF 3S 658 5 880 602 174 510 91 51 1 Conduit connections are 3 4 14...

Страница 130: ...150 1018 1403 1015 660 300 810 231 ASME 300 1036 ASME 600 1082 DN100 PN 10 16 968 PN 25 40 994 CC150 6 ASME 150 1318 1403 1015 660 300 810 246 ASME 300 1338 ASME 600 1388 DN150 PN 10 16 1250 PN 25 40 1290 CC15H 6 ASME 150 1087 1604 1190 851 320 810 310 ASME 300 1107 ASME 600 1157 DN150 PN 10 16 1019 PN 25 40 1059 CC200 8 ASME 150 1418 1604 1190 851 320 810 340 ASME 300 1438 ASME 600 1494 DN200 PN ...

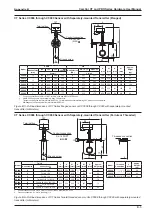
Страница 131: ... are only available for meter material SUS316L Figure B 7 Outline dimensions of CT Series flanged sensor unit CC006 through CC080 with separately mounted transmitter millimeters CT Series CC006 through CC080 Sensor with Separately mounted Transmitter Ferrule or Threaded 107 H h1 W L 98 A 10 Ground screw Conduit connection 3 4 14 FNPT M25 L Threaded connection Terminal box D Model Ferrule L mm H mm...

Страница 132: ...60 300 810 231 ASME 300 1036 ASME 600 1082 DN100 PN 10 16 968 PN 25 40 994 CC150 6 ASME 150 1318 1353 1015 660 300 810 246 ASME 300 1338 ASME 600 1388 DN150 PN 10 16 1250 PN 25 40 1290 CC15H 6 ASME 150 1087 1554 1190 851 320 810 310 ASME 300 1107 ASME 600 1157 DN150 PN 10 16 1019 PN 25 40 1059 CC200 8 ASME 150 1418 1554 1190 851 320 810 340 ASME 300 1438 ASME 600 1494 DN200 PN 10 16 1338 PN 25 137...

Страница 133: ...igure B 10 Outline dimensions of CT Series flanged sensor units CC025 through CC080 with separately mounted transmitter millimeters CT Series CC025 through CC080 Sensor with Heat Tracer and Separately mounted Transmitter Flanged A W h1 10 H 107 98 L Terminal box Ground screw Conduit connection 3 4 14 FNPT M25 Conduit connections are 3 4 14 FNPT for CSA units and M25 for ATEX units Ah Wh h2 A1 Lh H...

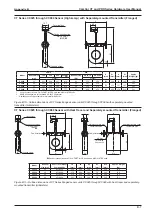
Страница 134: ...eparately mounted transmitter millimeters CT Series CC025 through CC080 Sensor Low temp with Separately mounted Transmitter Flanged Conduit connection 3 4 14 FNPT M25 A W h1 10 H Ground screw 107 98 L Flow direction Flange Model ASME DIN H mm h1 mm A mm W mm Approx Weight kg Nominal size mm 150 300 600 900 Nominal size DN PN 10 16 PN 25 40 L mm L CC025 25 411 424 437 460 25 376 380 660 329 83 262 ...

Страница 135: ...ght kg Nominal size Connection CC025 25 Ferrule 25 ISO IDF 1S 370 660 329 83 262 50 5 8 3 CC040 40 Ferrule 38 ISO IDF 1 5S 493 790 452 121 385 50 5 17 CC050 50 Ferrule 51 ISO IDF 2S 493 790 452 121 385 64 17 CC080 80 Ferrule 76 1 ISO IDF 3S 658 5 960 602 174 510 91 48 1 Conduit connections are 3 4 14 FNPT for CSA units and M25 for ATEX units 2 Process connection S in Figure B 14 Outline dimensions...

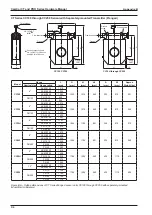
Страница 136: ...388 DN150 PN 10 16 1250 PN 25 40 1290 CC15H 6 ASME 150 1087 1588 1190 851 320 810 310 ASME 300 1107 ASME 600 1157 DN150 PN 10 16 1019 PN 25 40 1059 CC200 8 ASME 150 1418 1588 1190 851 320 810 340 ASME 300 1438 ASME 600 1494 DN200 PN 10 16 1338 PN 25 1374 PN 40 1390 CC20H 8 ASME 150 1418 1814 1390 960 420 1110 610 ASME 300 1438 DN200 PN 10 16 1338 PN 25 1374 PN 40 1390 CC250 10 ASME 150 1773 1814 1...

Страница 137: ...3 197 125 33 2 Model Ferrule Threaded Connection L D Approx Weight kg Model Threaded Connection L mm Approx Weight kg CP006 10A 333 34 5 2 CP006 1 2 14 FNPT 399 5 2 CP010 15A 380 34 6 1 CP010 1 2 14 FNPT 435 5 6 1 CP015 15A 476 34 9 9 CP015 3 4 14 FNPT 588 9 9 CP025 25 ISO IDF 1S 559 50 5 11 1 CP040 38 ISO IDF 1 5S 606 50 5 29 3 CP050 51 ISO IDF 2S 64 1 Dotted lines show the envelope of models CP0...

Страница 138: ...660 673 688 5 535 323 125 30 2 CP050 50 663 676 695 535 323 125 30 6 Model Ferrule Model Threaded Connection L D Approx Weight kg Threaded Connection L mm Approx Weight kg CP006 10A 333 34 2 6 CP006 1 2 14 FNPT 399 2 6 CP010 15A 380 34 3 5 CP010 1 2 14 FNPT 435 5 3 5 CP015 15A 476 34 7 3 CP015 3 4 14 FNPT 588 7 3 CP025 25 ISO IDF 1S 559 50 5 8 5 CP040 38 ISO IDF 1 5S 606 50 5 26 7 CP050 51 ISO IDF...

Страница 139: ... 60 160 124 344 70 Pipe U bolts 233 20 61 7 171 5 l min Vol Flow Mass Flow Conduit connection 3 4 14 FNPT M25 Conduit connections are 3 4 14 FNPT for CSA units and M25 for ATEX units Pipe mounting hardware U bolts are furnished as standard accessories The pipe must be provided by the customer Figure B 18 Outline dimensions of separately mounted transmitter millimeters ...

Отзывы: