


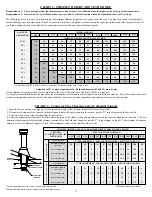

9
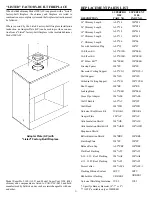
13"
4"
4"
6"
14" X 14"
7"
15" X 15"
8"
16" X 16"
The female end of the Elbows are
not
embossed, this ensures proper
alignment of the chimney system is maintained. Locking Bands must
be installed at all chimney joints forming an offset.
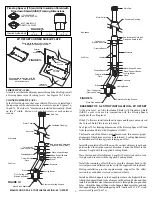
Install the insulated offset Elbow on the vertical chimney length and
position the Elbow in the required direction. Fasten the Elbow to the
chimney Length with the supplied Locking Band.
Place the required offset chimney Length(s) Turn it clockwise to lock
it in place and secure with the supplied Locking Band.
Install the remaining offset Elbow to turn the chimney back to the
vertical position and fasten in place with the supplied Locking Band.
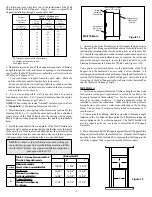
45° OFFSET CORNER SHIELD PLATE
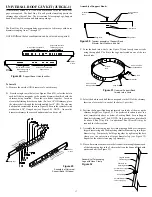
FIRESTOP SPACER:
At each level where the chimney passes through the dwelling, install
a Firestop Spacer at each ceiling levels. See Figures 7b, 7d & 7e.
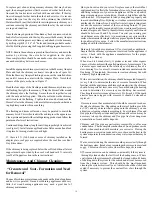
CORNER SHIELD PLATE:
In the Offset Enclosure, the Corner Shield Plate is to be installed at
the top corner of the enclosure where it comes to a point. Figures 7c,
7d and 7e. The wider 13" dimension is installed horizontally. Bend
on the 8" width. Fasten with supplied screws at each outmost
corners.
Storm Collar
Roof Joist
Attic space
Rain Cap
Attic Insulation Shield with
Dropdown Shield (AISD)
Elbow Support Bands
Ventilated Flashing
Elbow
Locking Bands
Elbow
Floor, Ceiling Joist
(Framed all 4 sides)
Enclosure
Corner Shield
Plate
Ceiling Joist
(Framed all 4 sides)
Elbow Support Straps
Firestop Spacer
MAIN FLOOR OF A 2 STORY INSTALLATION - 45° OFFSET
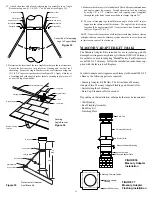
BASEMENT OF A 2 STORY INSTALLATION - 45° OFFSET
At the attic level, an Attic Insulation Shield with Dropdown Shield
(AISD) needs to be used in conjunction with the Firestop Spacer
insalled at the ceiling level.
If the 45° offset are installed in the attic space and they are not enclosed,
the Corner Shield Plate is not to be used.
2nd Floor
Stove Pipe Adaptor
Locking Bands
Decorative Ceiling Support
Storm Collar
Attic space
Rain Cap
Attic Insulation Shield with
Dropdown Shield (AISD)
Elbow Support Bands
Ventilated Flashing
Elbow
Locking Bands
Elbow
Floor, Ceiling Joist
(Framed all 4 sides)
Enclosure
Corner Shield
Plate
Ceiling Joist
(Framed all 4 sides)
Elbow Support Straps
Firestop Spacer
2nd Floor
Stove Pipe Adaptor
Locking Bands
Decorative Ceiling Support
Enclosure
Lengths
Firestop Spacer
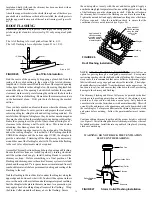
During installation provide supplementary support for the offset
section to avoid undue stress on connected elbows.
Install an Elbow Support on the Length just above the highest Elbow.
Attach the Support Band to the chimney with 4 nuts and bolts, and then
install four stainless steel sheet metal screws through the pre-punched
holes. Attach the Support Straps to the Support Band assembly and nail
the Support Straps to the framing using 6d (2”) nails or #8 x 1-1/2" wood
screws (see Figures 7d & 7e).
FIGURE 7d
FIGURE 7e
Bend plate so dimpled screw holes
are against framing material
Secure plate to framing with the
supplied #6 x 1" screws at each
outmost corners
Exterior
of
enclosure
Interior of
enclosure
#6 x 1"
Screws
FIGURE 7b
TOPVIEW OF
FIRESTOP SPACER
BOTTOMVIEW OF
FIRESTOP SPACER
Firestop Spacer (FS) and Attic Insulation Shield with
Dropdown Shield (AISD) Framing Dimensions
FRAMING DIMENSIONS
FIGURE 7c
Outmost
corners
See Figure 7b for framing dimensions of the Firestop Spacer (FS) and
Attic Insulation Shield with Dropdown (AISD).


