3
ALT / JM
05 / 12 / 20
Selkirk Canada CorporationStoney Creek, Ontario
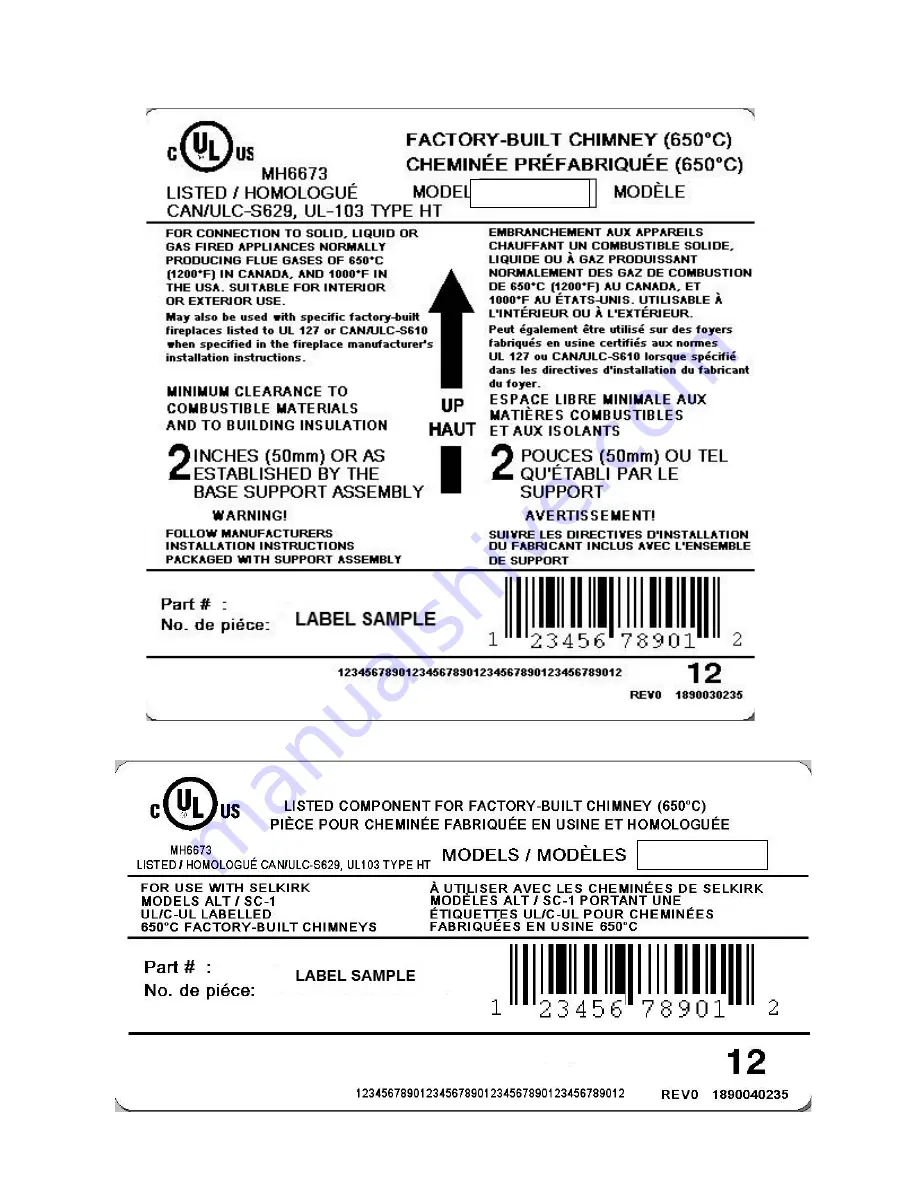
CERTIFICATION LABELS
Страница 1: ...SYSTEM BE INSTALLED ONLY IN ACCORDANCE WITH THESE INSTRUCTIONS PLEASE READ ALL INSTRUCTIONS BEFORE BEGINNING YOUR INSTALLATION FAILURE TO INSTALL THIS SYSTEM IN ACCORDANCE WITH THESE INSTRUCTIONS WIL...
Страница 2: ...BOWINSTALLATION WALL SUPPORT INSTALLATION AWS INTERMEDIATE WALL SUPPORT AIWS WALL SUPPORT INSTALLATION WS WALL BAND CATHEDRAL CEILING SUPPORT INSTALLATION ROOF SUPPORT INSTALLATION RAFTER RADIATION SH...
Страница 3: ...3 ALT JM 05 12 20 ALT JM 05 12 20 Selkirk Canada Corporation Stoney Creek Ontario Selkirk Canada Corporation Stoney Creek Ontario CERTIFICATION LABELS...
Страница 4: ...building codes for cold climate application YOUR CHIMNEY HAS BEEN TESTED AND LISTED USING ALL OF THE SUPPORTS SHIELDS ETC DESCRIBED HEREIN DELETION OR MODIFICATION OF ANY OF THE REQUIRED PARTS OR MAT...
Страница 5: ...tallation codes eg CAN CSAB149 CAN CSAB139 NFPA54andNFPA31 andappliance manufacturer instructions Plan the installation of your appliance andchimneyinsuchawaythatbothyourchimneyandfluepiperuns are as...
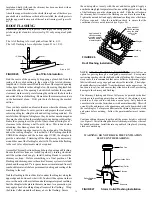
Страница 6: ...port will support up to 40 ft 13 m of chimney sections all of which must be installed above the support Figures 5 6 show the 2 most common types of Decorator Ceiling Support Installation Frame on all...
Страница 7: ...Framed all 4 sides Ceiling Joist Framed all 4 sides Two Story Installation Alternate Enclosed Attic with Firestop Spacer Enclosure Enclosed Attic Space Living Space Enclosure Ventilated Flashing Deco...
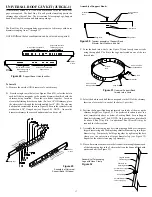
Страница 8: ...vide supplementary support for the offset section to avoid undue stress on connected elbows InstallanElbowSupportontheLengthjustabovethehighestElbow Attach the Support Band to the chimney with 4 nuts...
Страница 9: ...l an Attic Insulation Shield with Dropdown Shield AISD needs to be used in conjunction with the Firestop Spacer insalled at the ceiling level Ifthe45 offsetareinstalledintheatticspaceandtheyarenotencl...
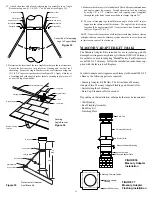
Страница 10: ...imble Inner Half Wall Thimble Outer Half Ventilated Flashing 8 Feet Max FIGURE 8 Tee Plug Female Coupler Down FIGURE 10 Nut Side Bracket Side Bracket Installtheinnerhalf withroundplate oftheWallThimbl...
Страница 11: ...tion Shield installed at the roof level and a Finishing Plate installed from below If the attic is open to the overhang close off the access with suitable buildingmaterialsensuringthata2 50mm airspace...
Страница 12: ...plate of the Wall Thimble into the inside wall opening ensuring that the shield slides over the shield of the outer half Once in place and flush against the wall install the black finishing trim plate...
Страница 13: ...s in Table 3 Section B and Figure 13 B below the prepared Wall Thimble opening For concrete block or poured foundation use suitable fasteners 12 Place the Insulated Tee on the support Plate ensuring t...
Страница 14: ...6 points to give an outline of the hole Remember that the hole will need 2 clearance to the chimney surface Install an Attic Insulation Shield if space permits on the under side of the overhang If it...
Страница 15: ...igure 22 NOTE The male end coupler of each chimney length must be pointing upwards as per the arrow on the chimney label The Cathedral Ceiling Support will support a total of 18 ft 5 5m of chimney sec...
Страница 16: ...now as they slide down the roof preventing damage to the chimney and flashing The chimney Flashing and Storm Collar may be painted with a heat resistance rust proofing paint when enclosing of the chim...
Страница 17: ...an be cut off Figure 30 Topview assembly of Support Band Elevator Bolt Washers and Nut Flanged Nut Flat Washers Support Band Halves Elevator Bolt Cage Nuts Figure 31 Universal Support Band formed into...
Страница 18: ...sher Flanged Nut Figure 33 Assembly of Telescoping Legs to Support Band Flat Washer Flat Washer J Makesurethechimneyislevelandplumb Checkallrequireddimensions and angles adjust if necessary For added...
Страница 19: ...low the paint manufacturer s instructions How you burn wood in your stove fireplace or any other solid fuel appliancedirectlyaffectstheformationofcreosote Goodoperating and firing techniques of your w...
Страница 20: ...this will permit the insertionofaproperlysizedplasticchimneycleaningbrush Ametal brush may scratch the liner and lead to premature corrosion The Insulated Tee Cap if so equipped can be removed by twi...
Страница 21: ...down Shield Rafter Radiation Shield Finishing Plate Deluxe Rain Cap Flat Roof Flashing 0 12 6 12 Roof Flashing 6 12 12 12 Roof Flashing Storm Collar Flashing Silicone Sealant Rubber Boot Flashing Univ...
Страница 22: ...e Thetwo 2 chartsbelowwillassistyouinselectingthepropercombination of elbow angle and chimney length s that will provide the necessary degree of offset within an available height CHART 1 OFFSET CHIMNE...
Страница 23: ...e locking bands at all joints for added safety and stability This will eliminate the risk of sections becoming undone below the roof line when the Rain Cap is removed when inspections and cleaning of...
Страница 24: ...___________________ INSTALLATION DATE __________________________________________________ DEALER INFO DEALER NAME _______________________________________________________ Address _______________________...
Страница 25: ...irectives d installation et guide d entretien dans un endroit s curitaire pour r f rence future LISEZ TOUTES LES DIRECTIVES AVANT DE PROC DER L INSTALLATION D FAUT D INSTALLEZ CE SYST ME SELON CES DIR...
Страница 26: ...INSTALLATION DU SUPPORT MURAL AWS INSTALLATION SUPPORT MURAL INTERM DIAIRE AIWS INSTALLATION DU SUPPORT MURAL WS BRIDE MURALE INSTALLATION DU SUPPORT DE PLAFOND CATH DRAL INSTALLATION DU SUPPORT DE T...
Страница 27: ...3 ALT JM 05 12 20 ALT JM 05 12 20 Selkirk Canada Corporation Stoney Creek Ontario Selkirk Canada Corporation Stoney Creek Ontario TIQUETTES DE CERTIFICATION...
Страница 28: ...ituation L endroit id al pour votre syst me de chemin e est dans l enveloppe du b timent En climats froids l utilisation de la chemin e externe peut avoir comme cons quence des probl mes op rationnels...
Страница 29: ...la m me taille que la sortie de l appareil L installation doit respecter les codes d installations appropri s eg CAN CSA B149 CAN CSA B139 NFPA 54 and NFPA 31 et le guided installationdufabricantdel a...
Страница 30: ...la buse de l appareil Ensemble de coude de chemin e de 15 o 30 ou 45 o Pour viter de couper les solives et de d gager d autres obstructions Contiens 2 coudes 1 support de coude et 4 colliers de fixati...
Страница 31: ...e 4 c t s Solive du plafond encadr e 4 c t s Installation pour deux tages Chemin e encadr e au grenier Enclos Espace de grenier Espace habit Coupe feu radiant Solin ventil Supprt de plafond d coratif...
Страница 32: ...le plus lev Fixez la bande de support la chemin e avec 4 boulons et crous puis installez quatre 4 vis en acier inoxydable travers les orifices pr perfor s Fixez les courroies de support l assemblage...
Страница 33: ...oint sch mas 7c 7d et 7e La plus grande dimension de 13 po est install e horizontalement Pliez sur le c t de 8po Collet de solin Solive de toit Grenier Chapeau de chemin e Pare feu pour grenier avec b...
Страница 34: ...ajustable pour plus de d tails Installation d un support mural AWS SCH MA 8 Installez la partie interne avec plaque ronde de la bague murale sur la surface du mur interne Assurez vous que l cran int r...
Страница 35: ...u pour grenier l ouverture devra tre encadr et un coupe feu radiant install au niveau de toit Si le grenier est ouvert au soffite fermez l acc s avec des mat riaux de construction appropri s en s assu...
Страница 36: ...tre ext rieur de la chemin e selon le tableau 3 N B Quand vous coupez la surface finie l int rieur de votre mur coupez un trou rond selon les dimension de l ouverture Cr er une petite ouverture pour...
Страница 37: ...tape 14 T isol Plaque de support M THODE B 11 Positionez le support mural de fa on ce que le t soit centr l int rieur de la bague murale Assurez vous que le support mural est plomb et de niveau et fi...
Страница 38: ...nnerie 18 L crou et le boulon fourni attacheront la bride murale autour de la chemin e V rifiez les d gagements et le plomb mesure que vous attachez les bandes murales au mur Employez un niveau contre...
Страница 39: ...ins 1 pouce de chemin e isol e doit d passer au dessous du support cath dral pour la stabilit voir le tableau 3 pour plus de d tails Ne pas trop serrer cela pourrait endommager l ext rieur de la chemi...
Страница 40: ...oitcarunajustement pourrait tre n cessaire N B Unensembledesolinencaoutchouc URBFK2 estoffertenoption pour passer une chemin e travers d un toit ondul ou de m tal Voir les directives emballer s par me...
Страница 41: ...sch mas 28 et 29 correspondant au diam tre ext rieur de la chemin e qui est install e Placez les deux moiti s ensemble Ins rez un boulon travers les trous choisis ex pour une chemin e de 10 po placez...
Страница 42: ...la jambe en angle Rondelle Rondelle crou Sch ma 33 Assemblage des jambes la bride de blocage J Assurez vous que la chemin e est de niveau et d aplomb V rifiez toutes dimensions et angles exig s ajust...
Страница 43: ...nt install s Si c est le cas elle devrait tre enlev e afin de r duire les risques d un feu de chemin e En fonction du taux d accumulation alors que vous apprenez ce qui se passe dans la chemin e vous...
Страница 44: ...assurez vous qu ils sont non corrosifs la chemin e Il est cependant vident que les produits de nettoyage chimiques incluant la b che de ramonage ne remplacent pas le besoin d unbonbrossagem caniqueave...
Страница 45: ...Coupe feu radiant Plaque de finition Chapeau deluxe Solin pour toit plat Solin pour toit 0 12 6 12 Solin pour toit 6 12 12 12 Collet de solin Calfeutrage de solin Solin en caoutchouc Isolant universe...
Страница 46: ...rieure Ne jamais installer une d viation dans une zone de solive Les sections de chemin es doivent passer verticalement par les zones de solive structur es Des colliers de fixation doivent tre utilise...
Страница 47: ...tiliser des colliers de fixation sur toutes les longueurs de chemin e pour une s ret et stabilit suppl mentaire lorsque expos s de forts vents au dessus du toit Ceci liminera aussi les risques de d bl...
Страница 48: ...______________________________________ INFORMATION DU D TAILLANT NOM DU D TAILLANT _________________________________________________ Adresse ___________________________________________________________...