manualshive.com logo in svg
background image

FR

KIT EVOLUTIF Sans fil :

Portier vidéo / CCTV

Téléphone DECT

S

E

N

T

I

N

E

L

V.06-2014 / Ind.A

Manuel d’utilisation 

FR

Содержание CL-3645

Страница 1: ...FR KIT EVOLUTIF Sans fil Portier vid o CCTV T l phone DECT S V 06 2014 Ind A Manuel d utilisation FR...

Страница 2: ...P 69 85130 Les Landes g nusson FRANCE par internet scs laboutique com S E N T I N E L votre produit nom code barre num ro 13 chiffres N lot indiqu dans la zone du code barre du packaging garantie 2 an...

Страница 3: ...re le risque de d lectrocution et de blessure suivez ces avertissements de s curit avant l emploi de l appareil 1 Lisez attentivement les instructions de ce manuel d utilisation 2 Respectez les averti...

Страница 4: ...de piles ordinaires ou de piles alcalines classiques au risque de provoquer des blessures ou d endommager l appareil 10 N associez pas des piles neuves avec des piles us es Les piles us es ne doivent...

Страница 5: ...ez que la bo te contient bien tous les l ments illustr s ci dessous Si vous constatez qu une pi ce est manquante ou endommag e contactez sans attendre votre revendeur Cam ra Pied MENU OK Unpacking Onc...

Страница 6: ...ntation Prise de photos et enregistrement Passez en mode cam ra 4 19 19 20 21 4 21 5 22 10 22 12 22 22 16 18 23 Instructions d installation 12 Fixation de la cam ra Installation du moniteur Installati...

Страница 7: ...atine Mode capture d image R glage luminosit 28 32 32 Description du menu 26 26 En mode menu En mode cam ra En mode d tection de mouvement 26 27 28 28 29 29 30 30 31 31 33 33 Programmation automatique...

Страница 8: ...in Passer un appel R ception d un appel Fonction secret R glage du volume Rappel du dernier num ro Journal d appels Verrouillage du clavier R ponse automatique Langue Nom du combin Bip de port e Reche...

Страница 9: ...avanc es Liste des caract ristiques Navigation dans le menu Options menu R pertoire R glages de la base R glages du combin R initialisation Double appel 60 73 60 61 62 65 67 71 Guide d pannage Descrip...

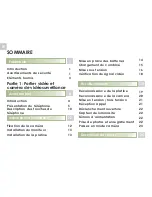
Страница 10: ...FR 1 re partie portier vid o et cam ra de vid o surveillance...

Страница 11: ...CT Le combin et l unit de base peuvent communiquer avec les visiteurs et d clencher l ouverture de la porte D tection de mouvement sur la cam ra Duplex enti rement num rique 4 images peuvent tre activ...

Страница 12: ...du kit 5 Moniteur Bouton enregistrer Alimentation Socle de chargement MENU OK Vue de face Vue arri re Base Bas changement de mode OK R pondre Fin Menu ouverture Droite Vol Haut Vid o Photo Gauche Vol...

Страница 13: ...FR FR 6 Bouton marche arr t Emplacement carte micro SD Vue de c t Vue de haut 6...

Страница 14: ...Contacts de charge Haut parleur Ecouteur Microphone Touche d appel Bas r pertoire Touche de fin Gauche int Haut journal Affichage Touche Touche droite Rappel 7 Touches alphanum riques Couvercle de log...

Страница 15: ...FR FR 8 Vue arri re Antenne Bouton de jumelage Prise antenne Capteur luminosit T moin de marche Vue de face Cam ra 8...

Страница 16: ...FR FR 9 Platine ext rieure Cam ra Led clairage Microphone Capteur luminosit Haut parleur 9 ff activer Bouton d appel quelle...

Страница 17: ...lectionner le mode menu Appuyez nouveau pour s lection ner le mode Quad Lorsque vous tes en mode menu appuyez nouveau pour retourner au pr c dent menu ou sortir Appuyez pour ouvrir la porte un visite...

Страница 18: ...e vid o appuyez nouveau pour arr ter En mode menu faites d filer vers le bas la liste des options du menu En mode image appuyez pour basculer de la cam ra n 1 jusqu n 4 En mode menu parcourez la liste...

Страница 19: ...z la cam ra dans la direction souhait e R glez la pose dans l angle correct puis serrez le boulon pour verrouiller la position Fixez la camera sur la vis de fixation et orientez la Desserrez le boulon...

Страница 20: ...Dans un endroit haut et central sans interf rences telles que les murs le four micro ondes ou le WIFI 1 Choisissez un endroit adapt pour la platine et prenez en compte la taille moyenne d un visiteur...

Страница 21: ...et retirez le 2 Ins rez les batteries neuves comme indiqu sur le sch ma en respectant les polarit s 3 Remettez le couvercle en place en le faisant glisser jusqu son enclenchement Inverser le sens peut...

Страница 22: ...s constaterez que le combin s allumera automatiquement Brancher la base Mise sous tension 1 2 Branchez l extr mit de l adaptateur secteur la prise d alimentation de la base puis branchez l adaptateur...

Страница 23: ...t s de l adaptateur secteur sur la fiche de l appareil puis branchez l adaptateur CA dans une prise secteur murale Mise en place des batteries suite Ins rez deux piles LR14 1 5V non fournies dans le c...

Страница 24: ...uverture fermeture g che Remarques 17 Les deux modes d alimentation batteries ou secteur ne peuvent tre utilis s en m me temps Pour activer certaines fonctions sp ciales telles que la surveillance r t...

Страница 25: ...de la cam ra La vid o diffus e sur l cran provident de la camera camera1 2 3 4 1 2 3 4 18 Le Visiophone diffusera sur l cran la vid o Le nombre de barre affich c t de l ic ne de l cran indique la puis...

Страница 26: ...s lectionner la camera de 1 4 puis Appuyez sur le bouton d appel de la platine puis maintenez appuyer la touche enregistre ment au dos de la platine jusqu ce que le t moin led clignote Une fois que l...

Страница 27: ...cer OK Reconnaissance de la cam ra Op rations 20 menu cam ra Puis appuyez sur ou pour s lectionner la cam ra de 1 4 puis confirmez 1 Appuyez sur la base puis s lectionnez le 2 Maintenez appuyer pendan...

Страница 28: ...K Fonctionnement Mise sous hors tension R ception appel 21 En mode standby appuyez le bouton d appel de la platine L interphone sonne et l image du visiteur apparait sur l cran L indication APPEL appa...

Страница 29: ...hotos ou filmer ins rez une microcarte SD Vous pouvez enregistrer la vid o partir de n importe quelle cam ra Lorsqu un visiteur appuie sur le bouton d appel de la platine les capteurs de luminosit s a...

Страница 30: ...sur pour quitter le mode cam ra OK MENU Remarque Pendant la surveillance appuyez sur ou pour r gler le volume Passez en mode cam ra 23 Fonctionnement Balayage entre les cam ras Vues partag es afficha...

Страница 31: ...enregistrement lorsque que quelque chose bouge devant Lecture Vid o Lecture photo Enregistrement cyclique D tection de mouvement Mode surveillance Enregistrement auto platine Mode capture photos de la...

Страница 32: ...mode balayage R glage de l heure Pour s lectionner la cam ra que vous souhaitez visionner Pour activer les r glages d usine Formater effacer les donn es de la carte micro SD Luminosit Volume Horloge...

Страница 33: ...image appuyez sur pour entrer dans le menu En mode menu pressez pour revenir au menu pr c dent Dans le menu pr c dent naviguez avec pour s lectionner les diff rentes options Pressez pour entrer dans...

Страница 34: ...t d tection mouvement puis 4 Appuyez ou pour choisir cam ra 1 2 3 4 Avec ou r glez le niveau de sensibilit arr t faible moyen lev 5 Appuyez pour enregistrer les r glages Lorsque le mode enregistreur e...

Страница 35: ...gl es pour que l horloge affich e sur le moniteur soit correcte Lorsque vous remplacez les batteries r glez nouveau la date et l heure MENU OK OK OK 5 niveaux de volume sont programmables pour r gler...

Страница 36: ...visionner Lecture Vid o 1 Pour afficher les options du menu 2 Avec s lectionnez puis 2 Avec ou pour choisir lecture photo puis 4 Avec ou s lectionnez la photo que vous souhaitez afficher l cran Lectu...

Страница 37: ...ur activer ou d sactiver la fonction Enregistrement cyclique 1 Pour afficher les options du menu 2 Avec s lectionnez puis 3 Avec ou choisissez mode enregistrement moniteur puis 4 Avec ou s lectionnez...

Страница 38: ...u s lectionnez le mode de pour sauvegarder les param tres 5 Faites Mode capture d image MENU OK MENU OK OK OK OK 31 Lorsque le visiteur appuie sur le bouton d appel de la platine la cam ra prend autom...

Страница 39: ...MENU OK OK OK Vous pouvez de fa on automatique alterner le visionnage des cam ras 1 4 Cette fonction vous permet de programmer la dur e de visionnage souhait e pour chaque cam ra 1 Faites pour affiche...

Страница 40: ...ous permet de r initialiser l appareil avec les r glages d usine 2 Avec s lectionnez puis 3 Avec ou s lectionnez r initialisation puis Avec les touches ou s lectionnez Oui ou Non pour activer ou non l...

Страница 41: ...pour activer ou d sactiver la fonction pour sauvegarder les r glages Formatage carte micro SD 1 2 Avec s lectionnez puis 3 Avec ou s lectionnez version du syst me puis pour consulter les informations...

Страница 42: ...ique D tection de mouvement Enregistrement moniteur Enregistrement platine Mode capture R glage luminosit R glage Volume R glage date et heure Temps automatique de visionnage 4 Syst me Information car...

Страница 43: ...50m Capteur d images 1 4 image couleur CMOS Balance des blancs Auto Optique 4 9mm F2 8 Angle de vue 50 9 12V DC 5 2 LR14 C 1 5V batteries Sensibilit minimale 1 LUX sans lumi re LED LED 6 LEDs Aliment...

Страница 44: ...2 400GH 2 4835GHz Moniteur 7 TFT LCD R solution 800 480 RGB Alimentation 5V DC Consommation d nergie 450mA Max Temp rature de fonctionnement Dimensions LXHXP 255x140x52mm Nombre d unit s ext rieures s...

Страница 45: ...rt e en champ libre Ext rieur 200m Int rieur 50m Capteur d images 1 4 image couleur CMOS Balance des blancs Auto Optique 3 6mm F2 4 Angle de vue 65 12V DC Sensibilit minimale 1 LUX sans lumi re LED LE...

Страница 46: ...FR 2 me partie T l phone DECT...

Страница 47: ...D placement gauche Prise chargement Couvercle de logement des piles Haut parleur Ecouteur Microphone Touche d appel Bas r pertoire Touche de fin Gauche int Haut journal Touches alphanum riques Ecran...

Страница 48: ...registreur Prise t l phonique Alimentation Socle de chargement MENU OK Vue de face Vue arri re 40 Fonctions du moniteur Base Gauche Vol Haut Vid o Photo Droite Vol Menu ouverture OK R pondre Fin Bas c...

Страница 49: ...menu Augmenter le volume de l couteur ou haut parleur pendant l appel Entrer dans le journal d appels Parcourir les options du menu Diminuer le volume de l couteur ou du haut parleur pendant l appel E...

Страница 50: ...Ins rer une pause Valide la fonction indiqu e juste au dessus du texte qui change en fonction de l option du menu Maintenez enfonc pour activer ou d sactiver les fonctions du clavier Mettre en place u...

Страница 51: ...s vocaux Indique que la fonction mains libres est activ e Indique le niveau de charge de la batterie T moin de signal T moin d alarme Verrouillage clavier Indique la pr sence du signal Si le combine e...

Страница 52: ...chargeables Nimh AAA size 1 2V 600mAh fournies avec l interphone avant son utilisation 1 Remarque Inverser le sens peut endommager le combin Branchez l extr mit de l adaptateur secteur la prise d alim...

Страница 53: ...capacit apr s recharge Utilisez toujours des batteries rechargeables Ni MH neuves de qualit N utilisez jamais des piles d un autre type Remarques Pour charger le combin le placer sur la base Importan...

Страница 54: ...ez le combin sur la base Le combin doit tre charg enti rement avant utilisation Searching Charging Quand le combin est teint il s allume automatiquement si vous le placez sur la base Pour allumer ou t...

Страница 55: ...correct appuyez pour lancer l appel 1 D crochez le combine et appuyez sur 3 Pour terminer l appel appuyez sur ou raccrocher le combin sur la base 2 Composez le num ro R sultat Le t moin apparait sur...

Страница 56: ...e Apr s cela appuyez sur la touche pour revenir en mode de veille Le combin doit tre enregistr dans la base Si la sonnerie polyphonique est r gl e la sonnerie peut continuer pendant 4 secondes apr s l...

Страница 57: ...muniquer avec une autre personne dans la pi ce mais vous ne souhaitez pas que la personne au bout du fil entende Pour couper le microphone appuyez sur la touche Mute Pour r activer microphone appuyez...

Страница 58: ...r choisir sonnerie Externe EXT Ring ou encore pour choisir le volume puis validez R sultat Une s lection de 10 m lodies vous est propos e avec 5 niveaux de volume 5 Appuyez la touche s lection pour co...

Страница 59: ...pels 1 Appuyez sur la touche Rappel 2 Faites d filer la liste avec ou jusqu au num ro souhait 3 Appuyez sur la touche Plus pour s lectionner l option souhait e Remarque R sultat l cran affiche le dern...

Страница 60: ...Supprimer permet d effacer le num ro s lectionn Effacer tout pour effacer tout le journal d appels Appuyez la touche S lection pour valider ou retour pour revenir au menu A l tape 3 lorsque vous s lec...

Страница 61: ...n Out Of Area Ce message s affichera lorsque l option pr sentation du num ro n est pas active Out Of Area Ce message s affiche si l appelant a masqu son num ro 2 Utilisez les touches s lection pour s...

Страница 62: ...Tout supprimer 4 En appuyant sur la touche S lection vous tes invit entrer un nom 5 Saisissez le nom et appuyez sur la touche Enregistrer vous pouvez ensuite modifier le num ro que vous souhaitez enre...

Страница 63: ...eau verrouill es Ce mode permet d viter d appuyer involontairement sur une touche Pour verrouiller les touches en mode standby maintenez appuy jusqu affichage de l indication HS locked et du t moin Po...

Страница 64: ...idez ou s lectionnez R ponse 4 Avec activer ou d sactiver la fonction Vous entendrez un bip de confirmation ou choisissez On Off pour Vous pouvez modifier la langue d affichage des menus en s lectionn...

Страница 65: ...sieurs combin s enregistr s la base Pour enregistrer un nom Durant un appel vous pourrez entendre un bip si le combin est hors de port e de la base 2 Avec ou s lectionnez l option R glage Combin puis...

Страница 66: ...es Tones 2 Avec ou s lectionnez R glages Base puis validez 3 Appuyez Pour choisir Mode de num rotation puis validez Pour stopper appuyez nouveau ou n importe quelle touche du combin 4 Appuyez sur ou p...

Страница 67: ...ous tes abonn au service de signal d appel ou de conf rence trois vous pouvez utiliser cette fonction Pour plus de d tails contactez votre op rateur t l phonique Pour d sactiver et revenir sur le mode...

Страница 68: ...s lection lorsque le menu souhait apparait l cran 4 R p tez si n cessaire ou Pour retourner en mode standby Pour retourner au mode standby appuyez sur Note En mode standby appuyez sur pour faire passe...

Страница 69: ...Dur e Flash Modification code PIN page 18 page 63 page 64 page 64 page 65 page 65 page 65 page 65 page 58 page 59 page 66 4 R glage Combin 5 Enregistrement Alarme Sonnerie Tonalit Langues Nom combin...

Страница 70: ...K L j k l 5 M N O m n o 6 P Q R S p q r s 7 T U V t u v 8 W X Y Z w x y z 9 Le r pertoire int gr votre t l phone vous permet d enregistrer les num ros que vous souhaitez appeler fr quemment Pour entre...

Страница 71: ...egistrez pour confirmer Num ro s affiche alors Entrez alors un num ro jusqu 24 caract res puis enregistrez 5 Tapez ou pour s lectionner la sonnerie que vous souhaitez associer au num ro puis validez 6...

Страница 72: ...lidez 3 Tapez ou pour choisir R pertoire puis validez 3 Tapez sur pour s l ctionner voir 1 Appuyez sur la touche Menu 2 Tapez sur pour choisir R pertoire puis validez 3 Tapez ou successivement pour af...

Страница 73: ...ne sera plus enregistr la base 1 Appuyez sur la touche Menu 3 Tapez ou pour choisir R glages Base puis validez Le statut du r pertoire indique le nombre d entr e enregistr es S lectionnez l option du...

Страница 74: ...validez Modifier le code Pin Cette fonction vous permet de modifier le code Pin Par d faut le code est 0000 66 1 Appuyez sur la touche Menu 2 Tapez ou pour choisir R glages Base puis validez 3 Tapez o...

Страница 75: ...e 6 Validez et l cran affichera Snooze On Off Tapez sur ou pour activer ou d sactiver Tapez sur Remarques A l tape 5 saisissez l heure au format 24h Tapez sur n importe quelle touche pour arr ter l al...

Страница 76: ...un Bip Vous pouvez d sactiver cette fonction pour un usage silencieux Toutefois un bip d avertissement sera mis en cas d erreur de saisie 1 Appuyez sur la touche Menu 2 Tapez ou pour choisir R glage...

Страница 77: ...u 24 H puis enregistrez 3 Tapez ou pour s lectionner R glage 4 Tapez ou successivement pour choisir parmi les 17 niveaux de contraste puis enregistrez 5 Appuyez pour retourner au mode standby R glage...

Страница 78: ...yez sur la touche Menu 2 Tapez ou pour choisir R glages Combin puis validez 3 Tapez ou pour choisir l option Base BS puis validez 4 Tapez ou pour s lectionner la base que vous souhaitez puis validez S...

Страница 79: ...iques erreurs de symboles affich s l cran erreur d affectation de touche etc cela peut tre d des perturbations dans l alimentation lectrique ou des pointes lectrostatiques susceptibles d alt rer tempo...

Страница 80: ...appel 2 1 Lorsque vous tes en ligne l cran affiche automatiquement le num ro du deuxi me appelant 2 Appuyez la touche Flash pour r pondre au deuxi me appel 3 Lorsque vous avez termin appuyez nouveau l...

Страница 81: ...de port e Haut parleur pour fonction mains libres Volume micro et couteur ajustable Mode num rotation TONE PULSE Dur e FLASH r glable R glage Date heure Verrouillage clavier 11 langues de menu Fonctio...

Страница 82: ...ne s affiche V rifiez que les batteries soient bien install es V rifiez que Les batteries du combin soient bien recharg es V rifiez que le combin soit bien allum Le niveau de charge de la batterie est...

Страница 83: ...Temps de recharge 15 hours Temp rature de fonctionnement Normal 15 C 35 C Extr me 0 C 40 C Humidit 0 90 Dimensions mm Base 102 x 100 x 105 Combin 160 x 48 x 28 Alimentation Entr e Base 7 5V 300mA Ent...

Страница 84: ...it Ajoutez un filtre de bruit contactez votre fournisseur de service DSL sur la ligne t l phonique entre le socle et la prise de la ligne t l phonique dans le cas de ce qui suit On entend du bruit pen...

Страница 85: ...FR FR 77...

Страница 86: ...Hotline assistance technique au 0 892 350 490 0 34 TTC la minute horaire hotline voir sur le site internet scs laboutique com FR...

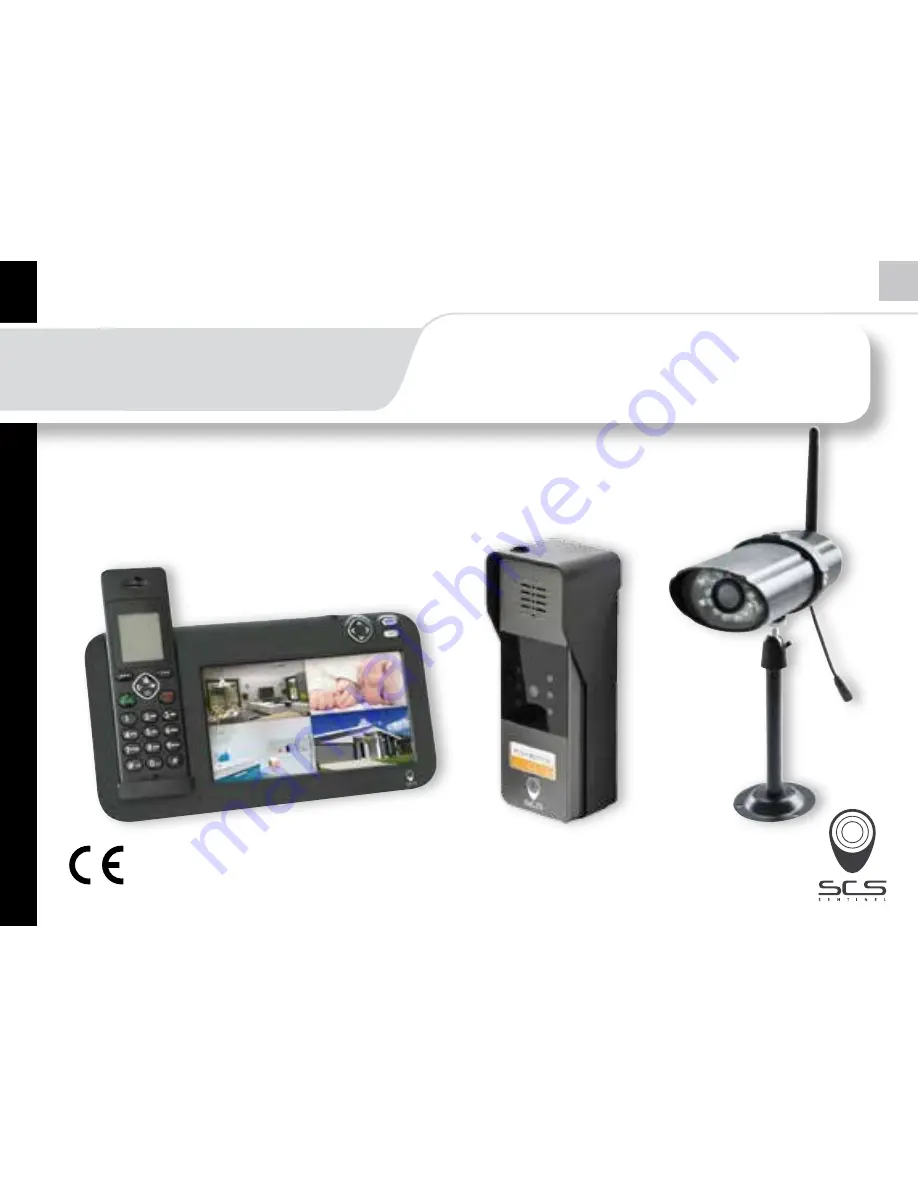
Страница 87: ...S V 06 2014 Ind A EN KIT EVOLUTIF Wireless Video intercom CCTV DECT phone User s manual...

Страница 88: ...ons To reduce the risk of electrical shock and injury please follow these basic safety precautions before using the product 1 Carefully read and observe the instructions in this manual 2 Follow all wa...

Страница 89: ...ction 9 Use only the batteries indicaded in the User s Manual Never use other ordinary batteries or conventional alkaline batteries Otherwise this may not only cause personal injuries but also damage...

Страница 90: ...hat all the parts shown below are avai lable If any pieces are missing or broken please promptly call your dealer Camera Stand MENU OK Unpacking Once you have unpacked your phone make sure that all th...

Страница 91: ...r Power Indicator Taking photos and Recording Switching the Camera Mode 4 19 19 20 21 4 21 5 22 10 22 12 22 22 16 18 23 Installation Instruction 12 Attaching the Camera Installing the Indoor phone Ins...

Страница 92: ...er Mode Doorbell Auto Recorder Doorbell Snapshot Mode Brightness 28 32 32 Mode Description 26 26 The Menu Mode The Camera Mode The Motion Detection Recorder Mode 26 27 28 28 29 29 30 30 31 31 33 33 Au...

Страница 93: ...Charging Handset Turning Handset On Off Making a call Receiving a call Muting the Microphone Adjusting Voice Volume Last Number Redial CID Book Key Lock Auto Answer Selecting a Language HS Name Range...

Страница 94: ...vanced Functions Feature List Menu Navigation Menu Map Phone Book BS Settings HS Settings Registration Default Caller ID on call waiting 60 76 60 61 62 65 67 71 72 Troubleshooting Technical Specificat...

Страница 95: ...EN PART 1 Doorbell...

Страница 96: ...ns Both handset and the base unit can talk with visitors and unlock the door Motion detection Full digital duplex intercom 4 images can be automatically and manually switched DC 9 4 I nt r oduct ion B...

Страница 97: ...and Keys Function 5 Indoor Phone Register button Power jack Charging pins MENU OK Front view Rear view Base Down Switch key OK Answer End key Menu Unlock key Right Vol key Up Video Photo key Left Vol...

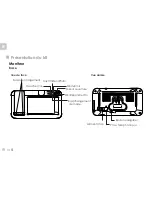
Страница 98: ...EN 6 EN Power on off key micro SD card slot Side view Top view 6...

Страница 99: ...y Right soft key Handset Charging contacts Battery compartment cover Speaker Earpiece Microphone Dial Speaker key Down Phonebook key End key Left Int key Up CID key Alph numeric keys a Display key key...

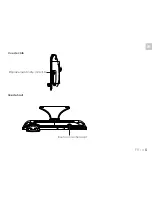
Страница 100: ...EN 8 EN Rear view Antenna Pair button Antenna jack Sensor light Power indicator Front view Camera 8...

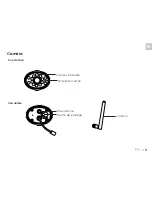
Страница 101: ...EN EN 9 Outdoor Phone Camera LED light Microphone Call button Sensor light Speaker 9 ds or rm o ll m o...

Страница 102: ...er the menu mode press again to enter the Quad view In menu mode press to return to the previous menu or exit If someone visits press to unlock the door Handset Base Indoor Phone Keys Description In m...

Страница 103: ...press and hold to record video press again to stop In menu mode scroll down through lists and menu options In image mode In menu mode cycle through lists and menu options In image mode press to decre...

Страница 104: ...to secure it in place Adjust the post to the correct a n g l e t h e n t i g h t e n t h e wingnut to lock the post into place Loosen the wingnut t o u n l o c k t h e mounting post Attach the antenna...

Страница 105: ...gn 1 2 3 4 1 Choose a proper location for the outdoor phone Be sure to consider the average height of visitors 2 Align the rain cover and screws with the holes in the wall 3 Install the outdoor phone...

Страница 106: ...Install the batteries before use 2 1 Note Reversing the orientation may damage the handset 3 To replace the battery cover slide the cover up until it snaps in place The batteries need to be replaced i...

Страница 107: ...ace the handset on the base the handset automatically turns on MENU OK Connect the indoor phone Connecting the Power Connect the modular end of the AC power adapter to the power jack of the base then...

Страница 108: ...nstall two C size batterie LR 14 1 5V not supplied into the battery Drill four screws to fix the battery up compartment cover 2 1 Outdoor phone 1 Connect one end of an AC adapter to the camera s powe...

Страница 109: ...batteries or AC modes may be used simultaneously To activate special functions such as monitoring backlight on the call button and unlocking connect a power transformer available on scs shop scs labou...

Страница 110: ...phone The table below shows the different status icons and what they mean Since the icons appear based on the state of the camera and Indoor phone you won t see all of these icons at the same time Ic...

Страница 111: ...r phone then hold the key on the back of the Outdoor phone until the LED light blinks Once the screen displays the the Outdoor phone has been registered to the Indoor phone successfully If the screen...

Страница 112: ...ress key 2 Press and hold the button 3s on the back of the camera Once the screen displays the the camera has been registered to the Indoor phone successfully If the screen displays the registration w...

Страница 113: ...upper left of the screen 1 If the master does not want to answer press to cancel the ringer key on the base or key on the handset phone key on the base or on the handset or Call key 2 After the master...

Страница 114: ...s key on the base or key on the handset When someone presses the button on the Outdoor phone all the LED lights will light on if the ambient environment gets too dim All the LED lights the camera auto...

Страница 115: ...era input Scan between cameras Quad view camera1 4 display Full view 1 camera display on full screen Press key to exit the camera mode OK MENU Note During the monitor You can use key or key to monitor...

Страница 116: ...ode The n automatically record by your setting doorbell ca Allow you select the doorbell snapshot mode Playback the videos Main Screen Sub Screen What it Does Records when something moves in front of...

Страница 117: ...the anto switch time of the image scan mode Set the current time Select and register the camera that you like Set the default settings On or Off Formats erases all the data on the micro SD card Brigh...

Страница 118: ...age mode press key to enter the menu In menu mode press key to back to the previous menu In the previous menu press key to select different menu Press key to enter the next menu Press or key to select...

Страница 119: ...to choose press key 4 Press or key to choose 1 2 3 4 You can press or to set the motion detect sensitivity level to Off Low Middle High 5 Press key to save the settings Monitor Recorder Mode On Motio...

Страница 120: ...at the time displayed on the monitoring photos are correct When you replace batteries you must set the time and date again MENU OK OK OK This function allows you to adjust the volume 5 levels are adju...

Страница 121: ...back display the main menu items Video Playback 1 Press key to 2 Press to choose then press key 3 Press or key to choose press key 4 Press or key to choose the photo you want to view It displays on th...

Страница 122: ...te or deactivate the feature No Yes Cyclic Recorder 1 Press key to 2 Press key to choose then press key 3 Press or to choose press key 4 Press or to choose the monitor recorder mode that you like You...

Страница 123: ...o choose the doorbell snapshot mode that you like You can choose from 1 photo 3 photos 5 photos key to save the setting Doorbell Snapshot Mode 5 Press Doorbell Snapshot Mode Note MENU OK MENU OK OK OK...

Страница 124: ...r key key to save the setting Brightness Set Brightness MENU OK OK OK You can have the Indoor phone automatically cycle through the camera 1 4 This function allows you to select the amount of time you...

Страница 125: ...allows you to reset the indoor phone settings to the factory default 1 Press key to 2 Press to choose then press key 3 Press or key to choose press key Then Default settings display the main menu item...

Страница 126: ...Then Format SD key to save the setting display the main menu items press or key to select or to activate or deactivate the feature No Yes 4 Press Format micro SD 1 Press key to 2 Press to choose then...

Страница 127: ...ne Playback Cyclic Recorder Motion Detect Sensitivity Monitor Recorder Mode Doorbell Auto Recorder Doorbell Snapshot Mode Brightness Set Volume Set Time Set Auto Switch Time 4 System SD Information Ca...

Страница 128: ...Viewing Angle Diagonal 50 9 12V DC 5 2 LR14 C 1 5V batteries LED 6 LEDs Power Requirement 185x68x50mm Transmitting Distance Outdoor 200m Indoor 50m Image Sensor Type 1 4 Color CMOS Image Sensor Power...

Страница 129: ...itor 7 TFT LCD Resolution 800 480 RGB Alimentation 5V DC Power Requirement 450mA Max 10 C 40 C Size WXHXD 255x140x52mm Max 4 Indoor phone Base Receiving Frequency Range Operating Temperature No of out...

Страница 130: ...ing Angle Diagonal 65 12V DC Minimum Illumination 1 LUX without LED illumination LED 16 IR LEDs Power Requirement Power Consumption 450mA 12V DC Operating Temperature Size WXHXD 147x71x54mm Camera Tra...

Страница 131: ...EN Part2 Dect Phone...

Страница 132: ...nction Left soft key Right soft key Handset Charging contacts Battery compartment cover Speaker Earpiece Microphone Dial Speaker key Down Phonebook key End key Left Int key Up CID key Alph numeric key...

Страница 133: ...EN EN 40 Page Button Phone Line Jack Power Jack Charging pins MENU OK Front view Rear view 40 Phone Layout and Keys Function continued Base...

Страница 134: ...the earpiece speakerphone volume during a call Enter the CID book as described in page 18 Scroll down through lists and menu options Decrease the earpiece speakerphone volume during a call Enter the...

Страница 135: ...16 Insert a pause when pre dialing a number Perform the functions indicated by the text immediately over it on the bottom line of the display which changes time by time Press and hold to turn on off k...

Страница 136: ...ou have one or more voice messages Indicates the handsfree function is enabled Indicates battery charge level Signal Icon Alarm Icon Keypad lock Indicates whether the current signal exists or not If t...

Страница 137: ...600mAh come with your phone Install the batteries before use 2 1 Note Reversing the orientation may damage the handset Connect the modular end of the AC power adapter to the power jack of the base the...

Страница 138: ...recharging When replacing the batteries always use good quality Ni MH re chargeable batteries Never use other batteries or conventional alkaline batteries Notes Y L L U F D L U O H S U O Y e t o N t n...

Страница 139: ...ound the base it will enter the standby mode the display will show handset number or the handset name if you have one saved as described on page 22 signal icon battery icon and current time If the han...

Страница 140: ...ther press the 2 Dial a telephone number key or replace the handset on the base Result The icon appears on the LCD Basic Functions Note Redial To make a call to the last number you dialed use the feat...

Страница 141: ...hown on the LCD 2 To end the call either press the key or replace the handset on the base New Call New Call MSG WTG ON Result After you hang up the LCD displays the call duration Notes You can select...

Страница 142: ...u To mute your microphone press the soft key during the conversation The appears on the LCD Mute Call Muted To unmute the microphone press the soft key again You will restore the normal condition Mute...

Страница 143: ...oose or press the key to choose or press the key to choose press the soft key Menu HS Settings Select Ring Setup Select T N I t c e l e S T X E g n i R Ring Volume Select Result You can select the rin...

Страница 144: ...press repeatedly until you find out the number you want to dial 3 Press the key to dial out the number Redial or key Use Redial Book options Using the redial book options you can add a number to phone...

Страница 145: ...obviously you will find the number already entered in the appropriate field allows you to delete the selected number allows you to delete the whole redial book 4 To return to standby mode press the ke...

Страница 146: ...will flash on the LCD This message will display when someone calls from an area where the telephone company is not offering the caller identification services or is not yet providing number delivery...

Страница 147: ...press the soft key to confirm You hear a beep and the phone returns to the standby mode after clearing all the CID numbers Menu D I C t c e l e S Book More Delete All Select Confirm Select Result or...

Страница 148: ...s useful to avoid pressing keys by mistake To lock the keys in the standby mode just keep the key pressed till the display shows then the icon appears HS Locked To unlock the keys keep the key pressed...

Страница 149: ...ages English German French Dutch Swedish Polish Italian Turkish Spanish Portuguese and Slovak You can change the language used to display the menu messages soft HS Settings Select 1 Press the soft key...

Страница 150: ...acters then press the soft key to confirm and exit The handset name will be displayed above your handset number in standby mode HS Name Select Erase Save or key A beep will sound during a call when th...

Страница 151: ...he dial mode by the following steps 1 Press the soft key 2 Press repeatedly to choose and press the soft key 3 Press the to choose then press the soft key Menu BS Settings Select Dial Mode Select or k...

Страница 152: ...y again The icon will disappear Handsfree Notes Before putting the handset near your ears be sure you have turned the speakerphone off To adjust the speakerphone volume see page 49 When the line is en...

Страница 153: ...t key when the desired menu appears on the LCD 4 Repeat if necessary or key To return to standby mode Back If you press the soft key from any menu the phone returns to the previous screen To return to...

Страница 154: ...page 64 see page 64 see page 65 see page 65 see page 65 see page 65 see page 58 see page 59 see page 66 4 HS Settings 5 Registration Alarm Ring Setup Tone Setup Language HS Name LCD Contrast Date Time...

Страница 155: ...acter Map To enter a specific alphanumeric character press one or more times the relevant key for the required character according to the following table once for the first character twice for the sec...

Страница 156: ...u access an interactive voice response system such as an automated banking system A pause provides a delay of 3 seconds If you want to insert a pause when you dial a number in standby mode or store a...

Страница 157: ...ssociate with the number press the soft key to confirm 1 Press the soft key 2 Press to choose the press the key Menu the key or key the key or key Viewing the detail of Phone book Entries Phonebook Se...

Страница 158: ...on the LCD press the soft key to enter it 1 Press the soft key 2 Press to choose the press the key Menu the key or key or key 65 BS Settings Delete HS This function allows you to delete a handset reg...

Страница 159: ...er of the currently active Base The default PIN is 0000 3 Use to choose menu press the soft key 4 The display shows Enter the current PIN then press the key If the old PIN code is correct you will be...

Страница 160: ...t c e l e S On Off Select On HH MM S Settings Select soft key 6 Press the soft key a beep sounds and the display shows you can press or key to enable or disable the snooze function on the alarm and pr...

Страница 161: ...I 3 Press to choose menu press the soft key 4 Press the soft key again to choose 5 You can use to choose or to enable or disable the function 6 Press the soft key Tone Setup Select Select Key Tone On...

Страница 162: ...to choose or press the soft key 5 You can use or key to choose the Date Format or the Time Format press the soft key to save 2 Press or key to choose or menu press the soft key 3 Enter the current da...

Страница 163: ...ess the soft key 4 You can use to select the base you want then press the soft key If you select a non existent base the handset will sound a warning tone 5 Selected BS Select Select 1 Press the soft...

Страница 164: ...be caused by an power supply noise or an electrostatic spike that can temporarily alter the memory of the internal microprocessor Resetting could solve the problem 1 Press the soft key 2 Press or key...

Страница 165: ...ller two s information is displayed Caller ID info displayed 1 When you are on the line the telephone will automatically display the name and number of the second caller 2 Press the soft key to answer...

Страница 166: ...phonebook entries Range alarm Full handsfree speakerphone Receiver Speaker volume adjustable Mute TONE PULSE dialing mode selectable FLASH time selectable Date Time setting Keypad lock 11 languages se...

Страница 167: ...on the display Check that the handset batteries are installed properly Check that the handset batteries in full power Check that the handset is on Handset seems to have very short battery life Caller...

Страница 168: ...SK 50 KHz Charging time 15 hours Ambient temperature Normal 15 C 35 C Extreme 0 C 40 C Humidity 0 90 Dimensions mm Base 102 x 100 x 105 Handset 160 x 48 x 28 Power Supply Base input 7 5V 300mA Handset...

Страница 169: ...ise filter contact your DSL provider to the telephone line between the base unit and the telephone line jack in the event of the following Noise is heard during conversations Caller ID features do not...

Страница 170: ...Hotline assistance technique au 0 892 350 490 0 34 TTC la minute horaire hotline voir sur le site internet scs laboutique com FR...

Отзывы: