Operation
18
03.00 | Clamping Device SVP-2 | Assembly and Operting Manual | en | 0289021
• Tool shanks with clearances, especially DIN 1835 shape E or DIN
6535 shape HE are often twisted and can therefore frequently
not be inserted into the TRIBOS toolholder or quickly lead to
poor run-out accuracy. The same is also true of tool shanks that
fall below h6 quality (no torque) or exceed it (not joinable).
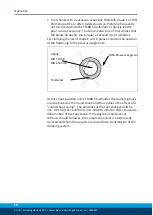
For clamping shanks of shape E or HE, please consider the position
of the flattening to the pressure segments:
SRE-Pressure segment
Toolholder
Shank
DIN 1835 E
DIN 6535 HE
At this shank position in the TRIBOS toolholder the clamping faces
are positioned at the round shank and thus achieve the effect of a
"round shank clamp". The hardness at the tool shank should be
min. HRC 50 (shank stiffness min. 1000 N/mm2) in order to avoid a
deformation of the tool shank. If the degree of hardness or
stiffness should be lower, the compression joint is not properly
covered and therefore results a reduced force transmission of the
clamping system.


