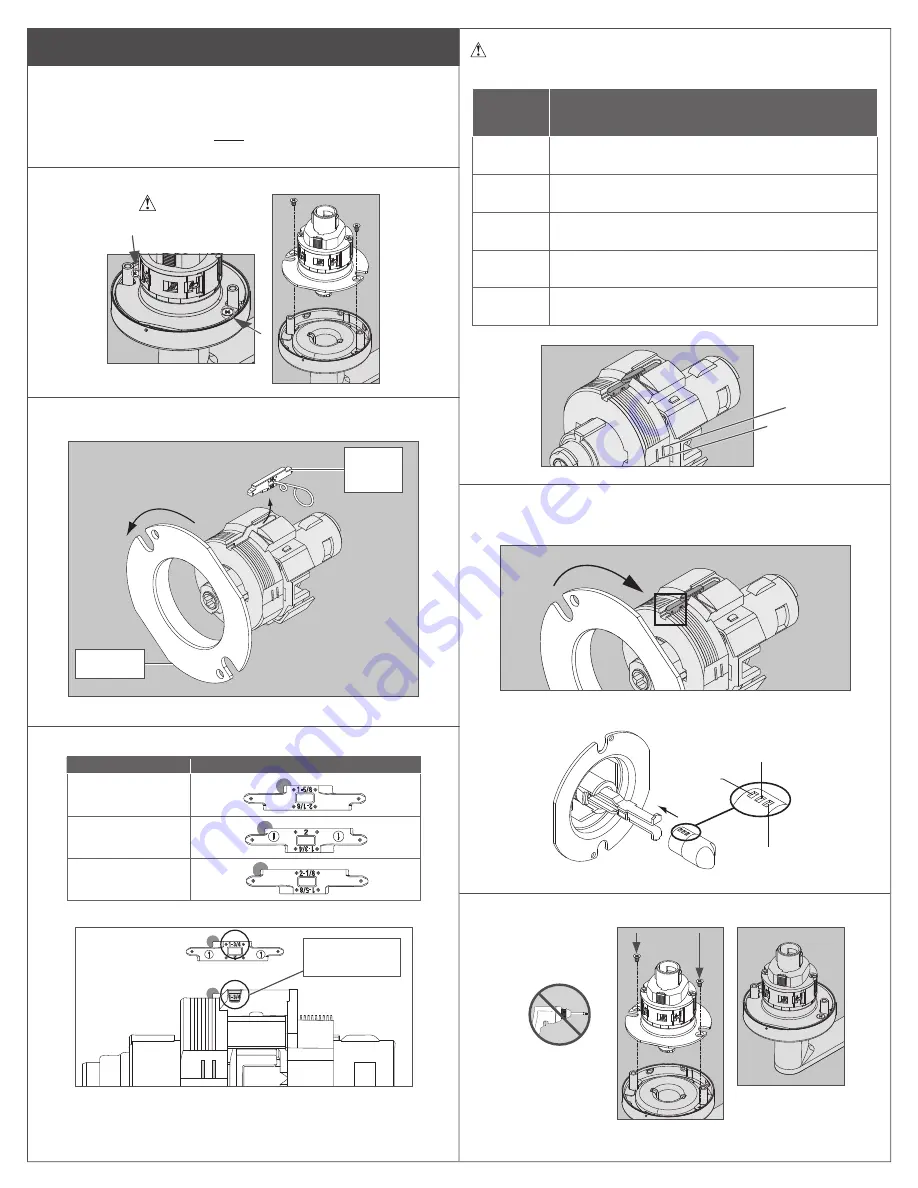
Door Thickness Adjustment
• For
1³⁄₄
”
thick doors, NO ADJUSTMENT IS REQUIRED. Continue to step 2.
• For
1
³⁄₈
” thick doors
, install the optional spacers (see steps 2 and 4).
No further adjustment is required. Continue to step 2.
• For 1
⁵⁄₈
”, 2”, or 2
¹⁄₈
” thick doors ONLY, complete the following door thickness
adjustment steps.
A
Remove outside lever assembly from chassis.
Requires #2
Phillips screwdriver
B
Remove adjustment plate by rotating counter‑clockwise.
Remove door thickness insert using pin wrench.
Door
thickness
insert
Adjustment
plate
C
Reorient and replace the door thickness insert.
Door Thickness
Door Thickness Insert
1
⁵⁄₈
”
2”
2
¹⁄₈
”
Chassis
side view
Door thickness
insert channel
NOTE: If door thickness insert is missing, align the
adjustment plate to marks on chassis:
Door
Thickness
Adjustment
1³⁄₈
”
Align adjustment plate with 1
³⁄₄
” mark. Use optional spacers.
For ND85 rotate additional half turn counterclockwise.
1⁵⁄₈
”
Tighten adjustment plate to bottom, then rotate a half turn
counterclockwise.
1³⁄₄
”
Align adjustment plate with 1
³⁄₄
” mark.
For ND85 rotate
additional half turn counterclockwise.
2
”
Align adjustment plate with 2” mark.
2¹⁄₈
”
Align adjustment plate with 2” mark, then rotate an
additional full turn counterclockwise.
2”
1
³⁄₄
”
D
Reinstall adjustment plate.
Tighten until door thickness insert enters notch in adjustment plate
(or align as described above).
If applicable, adjust turn button position.
1³⁄₄
" (44 mm)
1
³⁄₈
" (35 mm)
2
" (51 mm)
2¹⁄₈
" (54 mm)
1⁵⁄₈
" (41 mm)
E
Reattach the outside lever assembly to the chassis.
Tighten until snug
with #2 Phillips
screwdriver.


