background image

23

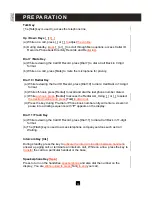
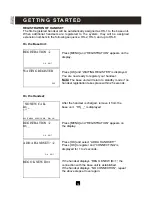
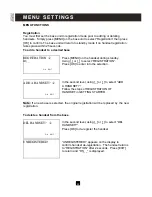
To delete all handsets from the base

In the second level, using [_] or [_] to select “DEL
ALL HANDSET”.
Press [OK] to de-register all handsets from the
base.

“DEL ALL HS OK!” appears on the display to confirm
global de-registration.  The handset returns to
“REGISTRATION” after 2 seconds.  Press [EXIT] to
return and “HS_ _” is displayed.

Note:

 In case of registration failure or “REG FAIL ID FULL” is displayed when

registering, simply delete all handsets from the base and restart all over again.

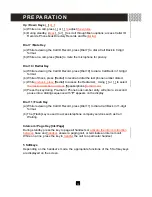
Dial Mode

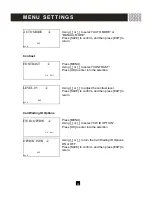
Press [MENU].
Using [_] or [_] to select “DIAL MODE”.
Press [OK] to enter into the selection.

Using [_] or [_]


to select the desired dial mode, then

press [SAVE] to confirm.  Press [EXIT] to return.

Language

Press [MENU].
Using [_] or [_] to select “LANGUAGE”.
Press [OK] to enter into the selection.

DEL ALL HANDSET 

OK     EXIT

DEL ALL HS OK!

DIAL MODE        

OK     EXIT

TONE MODE        

                               EXIT

SAVE

LANGUAGE          

OK     EXIT

M E N U   S E T T I N G S

Содержание SBC-368

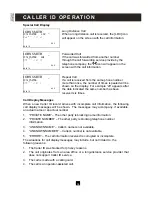
Страница 1: ...our reference CALLER ID CALLER ID CALL WAITING CALL WAITING ID OPTIONS COMPATIBLE Caller ID Caller ID Call Waiting and or Call Waiting ID Options Services where available are SBC s services After subs...

Страница 2: ...ANDSET VOLUME 29 USING HANDSET SPEAKERPHONE 29 PAGING FROM BASE TO HANDSETS 29 ADVANCED OPERATION 30 FLASH 30 PAUSE 30 DIALING MODE PULSE TO TONE 30 DIAL VOICE MAIL 31 DIAL BACK FROM CALLER ID LIST 31...

Страница 3: ...2 ADDITIONAL INFORMATION 44 CAPACITY 44 OUT OF RANGE 44 NO CONNECTION 44 TROUBLESHOOTING 45 CARE AND MAINTENANCE 46 FCC REQUIREMENTS 47 CONTENTS...

Страница 4: ...o a qualified service representative in any of the following situations a If liquid has been spilled into the telephone b If the telephone has been exposed to rain or water c If the telephone does not...

Страница 5: ...Directory Voicemail Optional features Dial Handsfree speakerphone on handset Two way intercom between handsets Caller ID Type I II and Call Waiting ID Options capability Backlit 7 Line Multi Function...

Страница 6: ...turn the handset to base to hang up or press Speakerphone if talking on the base unit 23 4 Redial last number 1 Press Talk or Spk on the handset or press Speakerphone on the base unit and listen for d...

Страница 7: ...Page 2 Press or 3 All handset s in range will ring 25 14 Intercom between handsets 1 Press Int 2 Press the desired handset number 3 Press EXIT to terminate the intercom 35 15 Intercom between handset...

Страница 8: ...e If you DO NOT recharge the handset battery will be on for certain period and then BACK TO CHARGER is displayed and the handset does not function when you press the keys Clean the Battery Contacts To...

Страница 9: ...ave message in your voicemail or new Caller ID in Call Log c Light when the handset is in use Speakerphone Light Light when speakerphone is in use Headset Jack The headset jack allows the use of a hea...

Страница 10: ...9...

Страница 11: ...dial to access the Redial List Using _ or _ to select the desired number and press Talk to dial it out d Press the key during Pre dial or Phone book number entry will enter a 2 second pause into a dia...

Страница 12: ...DIAL V M MENU Operation OK EXIT SERVICE Operation 411 RPT DIAL FWD ON FWD OFF CALL RTN DIAL V M Operation EDIT OK EXIT Off Hook SERVICE DIR DIAL V M Talk 3WAY SERVICE Caller ID Review SAVE EXIT DELET...

Страница 13: ...on the line is being used Speakerphone Light Light when speakerphone is in use Charge Light Light when handset is on the cradle and being charged Spare Battery Light Light when the spare battery is in...

Страница 14: ...ist Using _ or _ to select the desired number and press Speakerphone to dial it out d Press the key during Pre dial or Phone book number entry will enter a 2 second pause into a dialing sequence with...

Страница 15: ...name 2 Second row shows the caller s number 3 Third row shows the calling date time sequence number of the call log with new and repeated call ICONs 4 The fourth through seventh rows show the differe...

Страница 16: ...let which is not switch controlled 2 Keep the base and the handset away from sources of electrical noise such as TV personal computer or another cordless phone 3 In a HIGH and CENTRAL location with no...

Страница 17: ...the handset on the base unit Note 1 Use only the AC adapter supplied Do not use any others 2 Connect the AC adapter to a continuous power outlet 3 Place the base unit close to the AC outlet so that y...

Страница 18: ...E jack at the bottom of the base unit 4 Bring the free end of the telephone line cord through the opening between the upper and lower keyholes in the bracket 5 Place the wall mounting bracket on the b...

Страница 19: ...ndby mode if no handset registration takes place within 25 seconds On the Handset After the handset is charged remove it from the base unit HS_ _ is displayed Press MENU and REGISTRATION appears on th...

Страница 20: ...will be ready to use as soon as the battery is charged If you have a pulse rotary dialing system you will need to set the dialing mode as follows 1 Press MENU 2 Press _ or _ to select DIAL MODE 3 Pres...

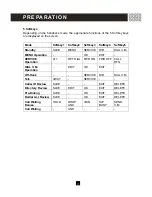
Страница 21: ...le on base unit Available on handset First Level Second Level Remarks 1 Yes Yes Registration Add a handset Delete handset Delete all handsets This aligns or quits the handset to a desired base 2 Yes Y...

Страница 22: ...s to activate or deactivate Call Waiting ID Options operation The default is On 8 Yes Yes PBX Mode PBX Prefix This sets to add the PBX Prefix number for outgoing calls 9 Yes Yes New Call Lamp On Off T...

Страница 23: ...nter into the selection In the second level using _ or _ to select ADD A HANDSET Follow the steps of REGISTRATION OF HANDSET in GETTING STARTED Note If a new base is selected the original registration...

Страница 24: ...ase of registration failure or REG FAIL ID FULL is displayed when registering simply delete all handsets from the base and restart all over again Dial Mode Press MENU Using _ or _ to select DIAL MODE...

Страница 25: ...ONE VOL is displayed to guide to use _ or _ to adjust ringer volume The ringer of the corresponding volume level will be played for a few seconds Press SAVE to confirm and then press EXIT to return No...

Страница 26: ...djust the contrast level Press SAVE to confirm and then press EXIT to return Call Waiting ID Options Press MENU Using _ or _ to select CW ID OPTION Press OK to enter into the selection Using _ or _ to...

Страница 27: ...Lamp ON or OFF Press SAVE to confirm and then press EXIT to return Time and Date Setting Press MENU Using _ or _ to select SET DATE TIME Press OK to enter into the selection Press _ or _ to set time a...

Страница 28: ...amp This mode is available only when there is new or non viewed message in your voicemail Press MENU Using _ or _ to select DELETE MESSAGE Press OK to confirm clearing of the message waiting lamp LAST...

Страница 29: ...ss Speakerphone on the base unit or Talk Spk on the handset to call the number The call timer will start counting Press Speakerphone on the base unit or Talk on the handset to end your call TO ANSWER...

Страница 30: ...l the number Note You may delete an individual record from the Redial List or copy the record to the Phone book directory Scroll to the number you want Press DELETE once and DELETED is displayed to co...

Страница 31: ...one Light comes ON when the speakerphone is in use PAGING FROM BASE TO HANDSET To locate the handset while it is not on the base unit press Int Page on the base unit and EXTENSION will appear on the s...

Страница 32: ...e number sequence during pre dialing or storing number in the Phone Book Directory Enter a Pause in Dialing Sequence To add a 2 second pause press Redial at the desired position when you are creating...

Страница 33: ...two pauses 3 Press the to enter your mailbox then another Redial pause 4 Enter your 4 digit password then another Redial pause 5 Press 1 to access your messages 6 Press SAVE to confirm setting Import...

Страница 34: ...one allows using of an optional headset for handsfree operation If you choose to use the headset option simply plug any standard 2 5 mm headset into the headset jack Your phone is ready for handsfree...

Страница 35: ...ming call history When a new Caller ID record arrives it is assigned a number from 1 to 50 The most recent record will have the lowest number When the Caller ID List is full the oldest record is delet...

Страница 36: ...ayed number by pressing Dial 7 Dial 10 or Dial 11 in the correct format directly For instance if a 10 digit phone number is displayed and you want to call back in a 7 digit format you can simply press...

Страница 37: ...splay messages will be shown The messages may accompany if available an actual name or an actual number 1 PRIVATE NAME The other party is blocking name information 2 PRIVATE NUMBER The other party is...

Страница 38: ...Options features will be automatically shown at the bottom of the display When you hear the Call Waiting tone press the corresponding softkey to apply a disposition to the call Note You must dispositi...

Страница 39: ...o view the Directory in alphabetical order Tip To quickly find a name and phone number press DIR in standby mode Key in the first letter of the name and scroll to the name you want ADDING A PHONE BOOK...

Страница 40: ...L to add a two second delay pause in the number field and P is displayed 2 Pressing FLASH to add a flash in the number field and F is displayed After finished number entry press OK and _NAME is displa...

Страница 41: ...n edit the number Press DELETE to remove the error and enter the correction as needed Press OK to confirm the edited number Then press DELETE to remove the error and re enter the correct name as neede...

Страница 42: ...hone number and DELETE is displayed to confirm the deletion Press EXIT to return to standby mode DIALING FROM PHONE BOOK DIRECTORY During standby mode on hook or off hook press DIR and find the entry...

Страница 43: ...ce if Handset 2 is being paged LCD display shows PAGING 2 The handset being called will ring and the display shows PAGING FROM 1 Press Int on the called handset to answer the intercom Press EXIT to te...

Страница 44: ...en engaging an external line press Talk or Spk on another handset or press Speakerphone on the base unit to enter a conference call CONFERENCE appears on the display of the base unit Press Talk on one...

Страница 45: ...press _ _ if you want to return to standby mode For instance if you want to activate Repeat Dialing function press RPT DIAL The dial code will be shown on the display When you can hear a second dialin...

Страница 46: ...e Call Repeat number is seven maximum OUT OF RANGE If the handset cannot communicate with the base unit or the handset is too far away from the base during a conversation and the RF signal is not pres...

Страница 47: ...tery on the base unit for about 15 hours The phone does not ring Check the RINGER setting Cannot dial Do you have touch tone service Check the TONE PULSE setting The audio sounds scratchy Is the base...

Страница 48: ...c parts Handle the system gently and carefully Dropping it can damage circuit boards and cases and can cause the system to work improperly Keep the system away from excessive dust and dirt which can c...

Страница 49: ...advance written notice is not possible the telephone company may temporarily discontinue service without notice if such action is necessary under the circumstances The telephone company may make chan...

Страница 50: ...ce will not occur in a particular installation If this equipment does cause harmful interference to radio or television reception which can be determined by turning the equipment off and on the user i...

Страница 51: ...50 NOTES...

Страница 52: ...51 NOTES...

Страница 53: ...52 SBC3681HS 20030913...

Отзывы: