background image

Optional Equipment 


52

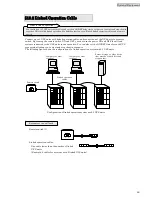
Connecting an outlet box to the UPS provides three output lines: OUTPUT0, 1, and 2.   
You can set ON/OFF delay times for OUTPUT1 and 2, allowing you to control output start and stop. Operation that 

utilizes of this function is called “Output line control”. 

Ensure that the total capacity of all load devices connected to the system control box does not exceed 1kVA (0.7 kW). 

For details, see §10. “Load Devices Connection”. 


§

§

1

1

8

8

.

.

3

3


O

O

u

u

t

t

l

l

e

e

t

t


B

B

o

o

x

x


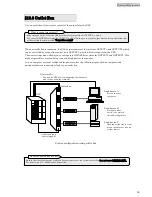
Use an outlet box if you want to control of the output from the UPS. 


When an outlet box is connected, the UPS output consists of the two lines OUTPUT1 and OUTPUT2, which 

can be controlled by output line control, and OUTPUT0, which is direct output from the UPS. 
The user settings menu allows you to set separate ON/OFF delay times for OUTPUT1 and OUTPUT2. This 
makes it possible to start and stop connected load devices in sequence. 

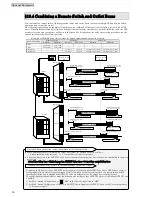
As an example of a system configured for power control, the following figure shows a computer and 

peripheral devices connected as loads to an outlet box. 


System configuration using outlet box 


Load device B 

Storage or other 
device to be started 

first and stopped last 

Load device C 

Network peripheral or other 

device that does not require 
system control 

Load device A 

Server or other 

computer 

Connection cable 

(control signals) 

Network cable 

Connect for UPS power management by computer,   

and to shut down the computer 

Outlet box 

OUTPUT0

OUTPUT1

OUTPUT2

UPS 

What is output line control? 

About connected load devices 

Содержание SANUPS A11H

Страница 1: ...Instruction Manual 100V Model 1kVA Uninterruptible Power Supply M0007864 ...

Страница 2: ...ions 6 3 3 Usage Precautions 6 4 Checking the Contents of the Package 7 5 External Dimensions and Part Names 8 5 1 Front and Back Panels of UPS 8 5 2 Control Panel and Indicators 9 5 3 External Interfaces 10 6 Installation 14 6 1 Installation Environment Check 14 6 2 Installation Space Check 14 6 3 Installation 15 7 Wiring 16 7 1 Battery Connector Connection 16 7 2 Connecting Optional Equipment 17...

Страница 3: ... Remote Switch 47 18 2 Linked Operation Cable 48 18 2 1 Wiring and Settings for Linked Operation 49 18 2 2 Linked Operation ON Procedure 50 18 2 3 Linked Operation OFF Procedure 50 18 2 4 Linked Operation System Configuration 51 18 3 Outlet Box 52 18 3 1 Outlet Box Wiring and Settings 53 18 3 2 Configuration of an Output line Control System 54 18 4 Combining a Remote Switch and Outlet Boxes 55 18 ...

Страница 4: ...e simulation test pages 22 to 23 Connect the load devices page 24 Start up the UPS page 25 Turn the load device power on page 26 Charge the UPS page 21 Check the UPS daily by user page 33 UPS is malfunctioning battery needs to be replaced etc Contact your supplier for maintenance page 32 Maintenance by technically qualified personnel pages 36 to 37 Connecting Optional Equipment pages 46 to 58 When...

Страница 5: ...es immediate hazards which WILL probably cause severe bodily injury or death as a result incorrect operation CAUTION Denotes hazards which COULD cause bodily injury and product or property damage as a result incorrect operation Additionally even those hazards denoted by CAUTION could lead to a serious accident so the instructions should be strictly followed The following labels indicate particular...

Страница 6: ...PS If the air intake or exhaust vent is blocked the internal temperature of the UPS rises which could cause battery deterioration resulting in a fire For maintenance the UPS requires at least 1 m 39 4 inches space at the front and 50 cm 20 inches at the back The space around the UPS must be ventilated Unless the ventilation airflow is maintained gas produced by battery charging could result in rup...

Страница 7: ...yone other than qualified service personnel All such repairs and modifications will void the warranty CAUTION The following table shows the UPS states resulting from operation of the MAIN SW and ON OFF switches Check the indicators before and after operating Do not touch the MAIN SW and ON OFF switches unless necessary If power is supplied incorrectly an electric shock or bodily injury could resul...

Страница 8: ...ng Contact with any part of a grounded battery can result in electric shock Do not attempt to open or disassemble batteries The electrolyte is harmful to the skin and eyes The battery contains diluted sulfuric acid which is extremely toxic If a battery leaks take appropriate measures to prevent any battery fluid contacting your skin or clothing Diluted sulfuric acid may cause blindness if it gets ...

Страница 9: ...t 2 Unsuitable load devices Do not connect laser printers plain paper fax machines copy machines or overhead projectors as load devices Such devices typically include heating elements that draw high current This may cause an overload that could prevent battery backup operation when an outage occurs and could damage the UPS 3 Power supply environment If the UPS is used in an environment subject to ...

Страница 10: ...nt te en nt ts s o of f t th he e P Pa ac ck ka ag ge e After opening the package carton check to be sure that it contains all of the following items Are UPS and all accessories in Is there no visible damage on the UPS Check and put the mark in If any item is missing contact your supplier or SANYO DENKI A11H 1 Instruction Manual 1 Network cable 1 Power Management Software disc CD ROM 1 Note about ...

Страница 11: ...rface card 2 slot External control terminals AUX OUTPUT Connect an optional system control box 2 or an emergency power off EPO switch Remote switch connectors REMOTE Connect an optional remote switch 2 or optional linked operation cables Battery connector EXT BATT Battery connector for external battery optional 2 Forced bypass switch 1 Forced Bypass Switch to bypass power supply during maintenance...

Страница 12: ...0 1 LOAD O L Overload display Load 105 or more Load under 105 ALARM Alarm Failure detected No failure ON OFF Operation status Output power supply OFF Power supply bypassing During ON OFF delay operation of Linked operation 3 ON OFF UPS ON OFF switch BATT TEST Battery test Result Normal Testing Blinking speed changes Result Error BATT TEST Battery test operation CLEAR Stop buzzer clear result of ba...

Страница 13: ...or more information about the power management software see 16 How to Use Power Management Software or the User Guide on the supplied CD ROM 2 Interface setting Standalone Select this setting when you want to shut down the UPS automatically using the standard UPS service provided by the operating system NetWare Windows NT etc Signal names External view MAIN SW OFF ON 2 RXD 3 TXD 5 GND 4 DTR 6 DSR ...

Страница 14: ...a fault occurs in the UPS main unit Active transistor conduction state External transmission signal electrical characteristics Interface Transistor open collector output Maximum rating DC 35V 100mA Normal state Open high impedance Active state Conduction When connecting inductive or capacitive loads do not exceed the maximum rating When connecting a voltage load connect minus polarity to the COM c...

Страница 15: ... in the User Settings Guide for details on the setting procedure REMOTE connector terminal names External view There are 2 REMOTE connectors each with the same functions For remote control of one UPS unit connect either of the connectors to a remote switch For control of multiple UPS units connect as follows Connect one of the REMOTE connectors on one UPS unit to a remote switch Connect a linked o...

Страница 16: ...ncy Power Off of UPS output When the switch is pressed in an emergency the EPO terminals are shorted and UPS output stops For details see 18 7 Connecting the Emergency Power Off EPO Terminals The switch to connect to the EPO terminals is not provided as a standard option for the UPS Check the following specifications and use a switch that complies with the specifications or connect to compliant co...

Страница 17: ...environment Ambient temperature 0 to 40 C 32 to 104 F Relative humidity 20 to 90 Do not install the UPS in the following locations Where the ambient temperature exceeds 40 C 104 F Where high humidity may occur Where corrosive gas or salt spray may be present Where it may be subject to vibration and shock Where dust may accumulate 6 6 2 2 I In ns st ta al ll la at ti io on n S Sp pa ac ce e C Ch he...

Страница 18: ...aining your lower back when moving and installing the UPS Be careful not to get your hands caught when installing the stand Relocate the UPS to the installation location Always install the UPS vertically with the control panel on the top Do not install horizontally Do not place other objects on top of the UPS Doing so can damage the UPS This completes UPS installation Control panel Do not attempt ...

Страница 19: ... of the UPS Remove the screw on the bottom side of the battery cover and then remove the battery cover Remove the insulation tape from the battery connector of the battery pack side Connect the battery connector Verify that Forced Bypass is set to Inverter Attach the battery cover Attach the front panel This completes the battery connector connection Insert the tabs on the left and right sides of ...

Страница 20: ... in 16 How to Use Power Management Software and 18 Using Optional Equipment and the instruction manual supplied with the optional equipment Contact your supplier or a SANYO DENKI representative for more information about optional equipment MAIN SW OFF ON Using a LAN interface card page 56 Using a contact interface card page 57 Connecting an outlet box and performing output line control pages 52 to...

Страница 21: ...s follows if the utility power outlet is a 2 prong type with no ground terminal Connection to the outlet with ground terminal Insert the adapter to the outlet in the correct direction as shown in the figure Connect the grounding wire to the ground terminal Insert the input power plug of the UPS to the adapter Connection to the outlet without the ground terminal When the ground terminal is not on t...

Страница 22: ...e power outage simulation test page 22 Start up the UPS page 25 The backup function is available during power outage Test result OK Test result NG See If power outage simulation test does not finish properly check the following points to perform countermeasure page 23 Configure the user setting User settings Guide Charge the UPS page 21 Connect the load devices page 24 Turn on the load device powe...

Страница 23: ... S Se et tt ti in ng gs s C Ch he ec ck k See 12 2 Setup Menu List to check the setting value The factory default settings of the UPS are indicated by the mark in the Default Setting column in the Setup Menu List MAIN SW OFF ON MAIN SW ON OFF When the load specification requirement or your environments do not configurate with the default setting of the UPS change the user setting When you use the ...

Страница 24: ...t Charge the UPS for at least 12 hours 2 The UPS should be charged for at least 12 hours to ensure backup in the event of a power outage but load devices can be connected for use when the UPS is first activated even if there is insufficient charge because the battery will be charged during operation of the UPS However if a power outage occurs at that stage the full capacity of the backup function ...

Страница 25: ...d and LED state will be as indicated in steps and MAIN SW OFF ON MAIN SW ON OFF Hold for 1 second Set MAIN SW on the back panel of the UPS to ON Set to ON Set MAIN SW to OFF Step is not necessary if the procedure in 9 2 UPS Charge was performed beforehand Tip Press and hold for at least 1 second Set to OFF Buzzer 2 beeps 2 beeps repeated LEDs Orange BACK UP Lit Green ON OFF Lit Green OUTPUT Lit Gr...

Страница 26: ...ep in 7 1 Battery Connector Connection Green OUTPUT does not light Press and hold for 1 second See the step in 9 3 Outage Simulation Test Red ALARM lights Contact your supplier Contact your supplier or SANYO DENKI when the Red ALARM lights or when the UPS does not operate properly even if you perform the countermeasure above Press and hold for at least 1 second Set to ON This completes outage simu...

Страница 27: ...projectors Cleaner and so on Since such devices are subject to high transient current surges the UPS will detect the excess current and backup will not be possible when there is a power outage There is also the risk of the UPS malfunctioning Medical equipment control equipment for elevators and the like computer systems of public importance Special considerations such as system redundancy installa...

Страница 28: ...oceed to step Red BATT LOW will light depending on the battery charge level MAIN SW ON OFF Hold for 1 second Set MAIN SW on the back panel of the UPS to ON Set to ON Press and hold for at least 1 second Buzzer Musical trill LEDs Green ON OFF Lit Green OUTPUT Lit Green INVERTER Lit The switches are indicated by a frame Example MAIN SW The LEDs on the control panel are described as Green ON OFF or R...

Страница 29: ...o the using load devices if needed See 3 3 Setting Output Frequency in the User Settings Guide for details However the setting cannot be changed if MAIN SW is not set to ON so preset this setting when there is a normal AC input power supply during UPS operation Green LOAD 25 100 will light depending on the connected load capacities If the Red O L lights and the buzzer sound is emitted four short b...

Страница 30: ...oad devices prior to shutting down the UPS Operation varies depending on the user setting of Shutdown operation See 3 8 Setting UPS Shutdown Operation in the User Settings Guide for details Hold for 1 second Do not touch MAIN SW when you perform a daily shutdown Leave it set to ON Note Press and hold for at least 1 second Buzzer Musical trill LEDs All of the LEDs go off ...

Страница 31: ...peration See 3 8 Setting UPS Shutdown Operation in the User Settings Guide for details MAIN SW OFF ON Hold for 1 second If input power is shut off while the UPS is operating the batteries are discharged as if a power outage occurred Be aware that when the input supply is restored the full capacity of the backup function will not be available until the batteries have had time to recharge Note Set t...

Страница 32: ...Setting Remarks 1 4 3 1 Output voltage 120V 1 3 2 5 3 2 Frequency sync range RESTART 5 When you change the setting of the menus indicated by RESTART in the Menu column its changes do not take effect until you restart the UPS If a restart is required be sure to power off the load devices before resetting See 11 3 UPS Shutdown If Not to Be Used for More Than a Week for information about how to shut ...

Страница 33: ...turn Auto recovery when a certain period of time has elapsed 9 12 3 9 Overload recovery operation Bypass Fixed as bypass power supply on overload Set the UPS operation after switching to the bypass power supply because of overload OFF The UPS stays off 10 13 3 10 UPS operation at OFF RESTART Bypass Bypass power supply Specify the UPS power supply conditions when is off Battery voltage When low bat...

Страница 34: ...inutes 23 26 3 23 Outlet box OUTPUT2 OFF delay time 5 minutes Set the OFF delay times for the OUTPUT1 and OUTPUT2 terminals of the outlet box The delay times are not enabled unless item 3 19 Enabling and Disabling Output line Control in the User Settings Guide is set to Enabled Until batteries exhausted 0 seconds 30 seconds 1 minute 3 minutes 24 27 3 24 Outlet box OUTPUT1 power outage output time ...

Страница 35: ...e not replaced at the end of the service life the UPS may not function properly There are routine checks to be performed by the user and maintenance to be performed by service personnel Some maintenance items are not able to be performed by the user so be sure to submit a request for such work to your supplier when maintenance is required Parts replacement should not be attempted by customers Cont...

Страница 36: ... of the UPS If the air intake or exhaust vent is blocked the internal temperature of the UPS rises which could result in a damage of the UPS See 6 2 Installation Space Check Remove any dust or dirt adhering to the intake and exhaust vents Dust or dirt adhering to parts inside the UPS may cause it to malfunction Perform the battery backup time test periodically When the UPS is shipped from the fact...

Страница 37: ...rly is recommended Contact SANYO DENKI The Green BATT TEST indicator goes off and returns to its normal indication Hold for 2 seconds Press and hold it for at least 2 seconds After the battery test has finished and the Green BATT TEST indicator lights or blinking press The results of the test are only an approximate guide If the batteries have reached their replacement interval an early replacemen...

Страница 38: ...op the UPS by setting MAIN SW to OFF Examine if there are neither a problem nor a trouble in the equipment of the load Press the bypass breaker on the back panel of the UPS Set MAIN MCCB to ON and then start the UPS by pressing and holding it for 1 second For details about UPS startup see 11 1 UPS Startup Normal Operation UPS back panel This completes the bypass breaker reset If you reset the bypa...

Страница 39: ...ble because the UPS will be unable to provide backup power in the event of a power outage CAUTION The battery pack weighs about 6 kg 13 23 lbs Be careful not to drop it on your feet Bodily injury can result Wear insulated gloves and take other precautions when replacing the batteries Otherwise electric shock can result There is a constant voltage max approx 24 V approx 12 V 2 at the battery termin...

Страница 40: ...hear a click CAUTION The battery connector cannot be inserted in the wrong orientation If it does not go in do not try to force it Doing so can damage the connector and result in electric shock Be careful not to get your hands caught when securing the cover This completes the battery exchange The batteries used in this product are lead type batteries which are a reusable resource Please cooperate ...

Страница 41: ...g a battery check Wait for the battery check to end You can stop the battery check by pressing and holding it for at least 2 seconds Continuous beeps Red BATT LOW lit The battery voltage is low Verify that the input voltage and input frequency are within the rated range Refer to 19 4 Specifications MAIN SW may be set to OFF If MAIN SW is OFF set it to ON 1 sec 2 sec Red O L lit The load devices co...

Страница 42: ...t the input voltage and input frequency are within the rated range See 19 4 Specifications No output power is supplied from the outlet of the UPS Red ALARM lit The bypass breaker may be tripped See 13 3 Bypass Breaker Reset Green OUTPUT lit must be pressed for at least 1 second See 11 2 UPS Shutdown Daily for the correct shutdown procedure However bypass power supply continues if bypass operation ...

Страница 43: ...ve Input voltage or input frequency is out of range Shutdown under remote control is in progress UPS is defective When using the power management software serial communication fails Check that Interface in the user setting menu is set to Workstation See 3 4 Setting PC Interface in the User Settings Guide and 5 3 External Interfaces The factory default setting is Workstation Check the setting of Se...

Страница 44: ...TANDALONE from the Windows Start menu to set up MAIN SW OFF ON The following is the minimum system configuration required for the setup and operation of the SANUPS SOFTWARE STANDALONE Computer AT compatible CPU PentiumⅢ 500MHz or greater Memory Minimum of 32 MB 64 MB or more recommended Available disk space Minimum of 64MB Display Minimum 640 x 480 pixel resolution Supported OS Windows NT 4 0 1 Wi...

Страница 45: ...ectly If the UPS is operated without the batteries Charge might show a value lower than the actual charge rate Moreover even if the battery connector is reconnected and operates the UPS the proper charge rate is not displayed immediately In this case Charge will be displayed properly if UPS is operated normally for 12 hours or more 4 Display of Charge is only an approximation An actual charge rate...

Страница 46: ...the UPS Characteristics section D Remote UPS Shutdown When this check box is checked the UPS shuts down 2 minutes after commencement of the OS shutdown A Registry setting change is required to change the shutdown time E Execute Command File Check this check box and enter a command file name if you want to execute a command file before starting the shutdown Only commands which finish executing with...

Страница 47: ...d then click Finish Select the Positive option before clearing the check from the UPS Shutdown check box No Item Description A Power Fail On Battery Specifies that a warning message should be displayed according to the settings in the UPS Service section B Low Battery Specifies that the OS shutdown should begin on reception of a UPS low battery signal C UPS Shutdown Clear this check box Even if yo...

Страница 48: ... number of minutes that should elapse after a power failure until the OS shutdown begins The minimum time is 2 minutes The OS shutdown begins after the specified time or after the battery power becomes low as specified in step whichever occurs earlier E When the alarm occurs run this program Check this check box and enter a command file name if you want to execute a command file before starting th...

Страница 49: ...s completely stopped If you need to connect optional equipment after operating the UPS completely stop the UPS and connected loads and disconnect their input power plugs from utility power sockets Failure to do so can result in electric shock Perform an operation test Connect load devices page 24 Start operation page 25 Make user settings User Settings Guide Connect and wire the UPS and optional e...

Страница 50: ... for the function you want to use See 3 4 Setting PC Interface in the User Settings Guide for details on the setting procedure 1 To perform UPS remote ON OFF Set the Interface to Standalone 2 To perform UPS remote ON and one touch system shutdown Set the Interface to Workstation You can connect up to 5 UPS units with linked operation cables and control them remotely from a remote switch This is ca...

Страница 51: ...ower ON and OFF for all load systems connected to the UPS units in one operation You can also set the ON OFF times for each UPS separately allowing you to start and stop them in sequence The following figure shows the configuration of a linked operation system with 3 UPS units Configuration of linked operation system with 3 UPS units Remote switch 1 Linked operation cables One cable fewer than the...

Страница 52: ...e user setting menu according to the procedure in 3 4 Setting PC Interface in the User Settings Guide The following two functions are available depending on the Interface setting Select the setting for the function you want to use Set the Interface setting for all connected UPS units See 3 4 Setting PC Interface in the User Settings Guide for details on the setting procedure 1 To perform UPS remot...

Страница 53: ...ration OFF delay sequence Be sure to keep the remote switch button pressed for at least 2 seconds Note Linked operation starts or stops on an ON OFF operation on the remote switch It does not start or stop on an ON OFF operation with the switch on the front panel Note about linked operation Press ON for at least 2 seconds LEDs Green ON OFF Blinking The Green ON OFF blinks during the linked operati...

Страница 54: ...es ON 2 You can use user setting 3 10 UPS Operation at OFF in the User Settings Guide to select whether UPS power supply after the UPS stops is OFF or Bypass When you select Bypass UPS output after the UPS stops is bypass power supply However the linked operation ON delay sequence starts at the point when UPS power supply changes from OFF to ON Even if you perform an ON operation in this state byp...

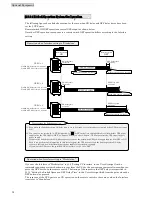
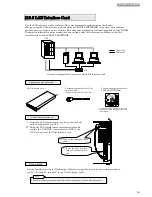
Страница 55: ...ed by output line control and OUTPUT0 which is direct output from the UPS The user settings menu allows you to set separate ON OFF delay times for OUTPUT1 and OUTPUT2 This makes it possible to start and stop connected load devices in sequence As an example of a system configured for power control the following figure shows a computer and peripheral devices connected as loads to an outlet box Syste...
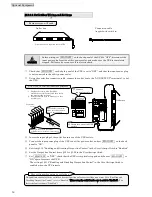
Страница 56: ...0 to 3 26 in the User Settings Guide Set MAIN SW to OFF check that the UPS is completely stopped and then set MAIN SW to ON again to restart the UPS The setting of 3 19 Enabling and Disabling Output line Control in the User Settings Guide is enabled when the UPS restarts MAIN SW ON OFF BATT EXT 15A Wire 9 10mm 1 Depress the lever with a flat blade screwdriver or similar tool and then insert the wi...

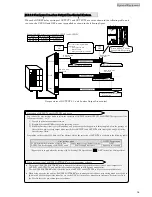
Страница 57: ...SOFTWARE allows the delay times of OUTPUT1 and OUTPUT2 to be set to user specified values When using an outlet box and the SANUPS SOFTWARE power management software user setting menu items 3 20 to 3 26 in the User Settings Guide cannot be set on the UPS Set in the power management software For details refer to the User Guide of the power management software User settings menu OUTPUT0 operation Pow...

Страница 58: ...ply may continue when OUTPUT1 and 2 are OFF because of power management software control or another reason In this state when the ON button is pressed on a remote switch linked operation ON delay time is disabled and OUTPUT1 and 2 are delayed only by the output line control delay time To enable linked operation ON delay make the following user settings so that OUTPUT0 also goes OFF when OUTPUT1 an...

Страница 59: ...slot on the back panel of the UPS Using the LAN interface card communications cable connect the CARD I F connector of the UPS to the UPS connector of the LAN interface card Set the Interface setting to Workstation default setting For details on the setting procedure see 3 4 Setting PC Interface in the User Settings Guide LAN interface card Communications cable for LAN interface card Supplied with ...

Страница 60: ...s Supplied with contact interface card The following signals are output Signal name Description AC input error This signal is output on a utility power outage or voltage error a contact b contact Battery voltage low This signal is output when the battery voltage drops below the specified level a contact AC output This signal is output when the UPS is supply AC power output to the load devices a co...

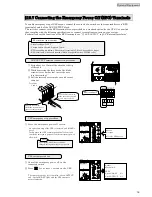
Страница 61: ...ewdriver or similar tool insert the wire into the terminal Pull the inserted wire to make sure it does not come out Depress lever with flat blade screwdriver to insert or remove wire Circuit voltage DC 5 V Current when shorted Approx 10 mA EPO operating conditions Short circuit terminals 5 6 for 0 2 seconds or longer EPO terminals One touch terminal block compatible wires AWG26 to 20 Buzzer No sou...

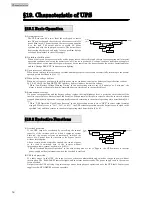
Страница 62: ...d the battery voltage reaches the final discharge level a protective circuit shuts off the inverter to prevent over discharging of the batteries When normal utility power recovers after the inverter has been stopped automatically operation is automatically resumed returning to the normal operating state described in 19 1 1 When UPS Operation Upon Power Recovery in the user setting menu is set to O...

Страница 63: ...al switch to bypass supply Input over voltage Battery operation Input over voltage prolonged Battery operation 3 Power outage Battery operation Power outage prolonged Battery operation 3 Input error frequency Battery operation Input error prolonged Stop rectifier and charger Inverter operation Battery operation 3 Battery failure Stop inverter Bypass supply 1 Buzzer sound patterns Continuous tone C...

Страница 64: ...load capability Bypass 800 2 cycles Type Small sealed lead battery Rated capacity 68 W 15 minute rate Number 2 12V per battery 2 in direct series Batteries Backup time 5 minutes 700 W 10 minutes 500 W At 25 C 77 F ambient temperature rated load with new battery Generated heat 125 W Input leakage current 3 mA or less Operating environment Ambient temperature 0 to 40 C 32 to 104 F Relative humidity ...

Страница 65: ...oes not apply to failures due to accidents improper use or use for other than the product s intended use 9 This warranty does not apply to defects or damages arising from fire earthquake storm or flood disaster lightning or other natural disasters including pollution salt disaster gas disaster chloride gas non standard voltage or incorrect power sources other than those specified 10 This warranty ...

Отзывы: