


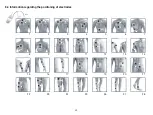


27
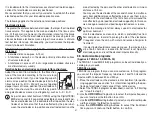
7. Initial use
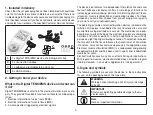
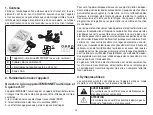
1. Remove the belt clip from the device (if attached).
2. Press the battery compartment cover on the rear
of the device and slide it downwards.
3. Insert the 3 alkaline AAA 1.5 V batteries. Make su-
re that the batteries are inserted the correct way
round in accordance with the markings.
4. Close the battery compartment lid again carefully
(Fig. 1).
5. Reattach the belt clip, if required.
6. Connect the connection cables with the electrodes
(Fig. 2).
The electrodes feature clip closures to make
connection particularly easy.
7. Guide the connection cable plugs into the socket
on the top of the device (Fig. 3).
8. Do not pull, twist or kink the cables (Fig. 4).
Please note that when the battery is replaced or
removed, all settings are restored to the factory
default settings.
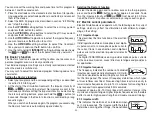
8. Usage
8.1 Notes on use
• The device switches itself off automatically if you do not use it for
2 minutes (automatic switch-off). When the device is switched on
again, the LCD screen displays the menu selection and the most
recently used menu flashes.
• A brief acoustic signal is output when a valid button is pressed. Two
brief acoustic signals are output when an invalid button is pressed.
• You can pause the stimulation at any time by briefly pressing the
ON/OFF button . To continue the stimulation, briefly press the ON/
OFF button again and set the desired impulse intensity again.
8.2 Starting use
Step 1:
Look for a suitable program from the program tables (see sec-
tion “8.3 Program overview”).
Step 2:
Place the electrodes on the desired area for treatment (for
positioning suggestions see section “8.4 Information regarding the
positioning of electrodes”) and connect them to the device.
Step 3:
Press the ON/OFF button to switch on the device.
Step 4:
Press the
M
button to navigate through the
/
/
menus and press the
E
button to confirm your
selection.
Step 5:
Use the
UP/DOWN
setting buttons to select the program num-
ber you want and press the
E
button to confirm your selection. At the
start of the stimulation treatment, the impulse intensity of
and
is set to 00 by default. No impulses are sent to the electrodes yet.
Step 6:
Use the intensity setting buttons for
and
to select
the impulse intensity you want. The indicator for impulse intensity in
the display changes accordingly. If the program is in a pause phase,
the intensity cannot be increased.
General information
If you wish to return to the previous selection menu, press the
M
button. By pressing and holding the
E
button, you can skip indivi-
dual setting steps and start directly with the stimulation treatment.
Keylock
Locks the buttons to avoid them being pressed
unintentionally.
1. To activate the keylock, hold down the
button until the
symbol is visible in the display (approx. 3 seconds).
2. To deactivate the keylock, hold down the
button until the
symbol disappears from the display (approx. 3 seconds).
Fig. 2
Fig. 3
Fig. 1
Fig. 4
Содержание SEM 43
Страница 74: ...74 1 A B C D A 1 TENS EMS B 2 C 4 45 x 45 D 3 2 TENS EMS TENS EMS 1 TENS 2 EMS 3 EMS 3...
Страница 77: ...77 TENS EMS 5 TENS EMS 39 C...
Страница 78: ...78 TENS EMS 8 1 9 2...
Страница 79: ...79 5 10 5 1 5 2...
Страница 80: ...80 5 3 6 1 2 E 3 4 5 UP DOWN 6 M 1 2 3 4 5 6 1 7 2 8 9 1 2 4 3 5 6 7 8 9 6 5 4 3 2 1...
Страница 81: ...81 7 1 2 3 3 AAA 1 5 4 1 5 6 2 7 3 8 4 8 8 1 2 8 2 1 8 3 2 8 4 3 4 M E 5 UP DOWN E 00 6 M E 2 3 1 4...
Страница 84: ...84 8 4 Ch1 Ch2 1 2 3 4 5 6 7 8 9 10 11 12 13 14 15 16 17 18 19 20 21 22 23 24 25 26 27 28...
Страница 88: ...88 8 7 8 7 1 TENS EMS 8 7 2 15 35 45 70 8 7 3 8 7 4 8 7 5 TENS EMS TENS EMS 6 9...
Страница 89: ...89 10 8 45 x 45 661 22 4 50 x 100 661 21 11 1 2 3 1 2 1 2 3 4 5 6...
Страница 91: ...91 93 42 EEC 13 Pb Cd Hg WEEE Waste Electrical and Elec tronic Equipment 14...