

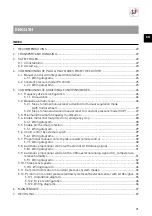


33
EN
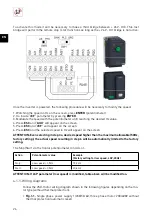
•
Fig.5.3.
Single phase power supply 1/230/50-60, three phase motor 230/400V with ther-
mal protection and 4-20mA signal.
IMPORTANT: Before wiring, read points 5.2. and 5.4. to determine type of reset and
terminal confi guration (NC).
•
Fig.5.4.
Three phase power supply 3/400/50-60, three phase motor 230/400V o 400V with
thermal protection and 4-20mA signal.
IMPORTANT: Before wiring, read points 5.2. and 5.4. to determine type of reset and
terminal confi guration (NC).
Check that the “
SW1
” switch is placed in the “
SOURCE
” position.
Make bridges indicated on the drive terminal block.
Power the frequency drive with the appropriate mains voltage depending on the inverter
model used.
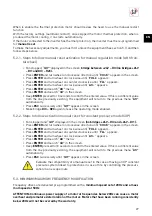
5.10. THREE PRESET SPEEDS
This function allows the arrangement of three preselected speeds by means of digital signals (po-
tential-free contacts).
To make necessary adjustment, you must fi rst inlock the equipment (see section 5.1) and then
follow the steps below:
1. PiD control deactivation:
• Fan stopped and
“rdY
” displayed in the screen
(no b24V – DI3 and +24V – DI1).
• Press
ENTER
and turn wheel on clock wise direction until
“COnF-”
appears in the screen.
• Press
ENTER
and turn wheel on clock wise until
“FULL”
appears.
• Press
ENTER
and turn wheel on clock wise until
“FUn-”
appears.
• Press
ENTER
and turn wheel on clock wise until
“PId-”
appears.
• Press
ENTER
and turn wheel on clock wise until
“PIF”
appears.
• Press
ENTER
and turn wheel on counter clock wise until “
nO
” appears.
• Press
ENTER
for 3 seconds to confi rm.
• Press
ESC
successively until
“FUn-”
appears in the screen.
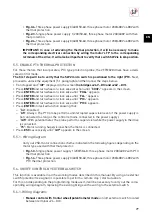
2. Enable logic input (DI2):
• Fan stopped and
“FUn-
” displayed in the screen
(no b24V – DI3 and +24V – DI1).
• Press
ENTER
and turn wheel on clock wise direction until
“PSS-”
appears in the screen.
• Press
ENTER
and turn wheel on clock wise until
“PS2”
appears.
• Press
ENTER
and turn wheel on clock wise until
“LI2”
appears.
• Press
ENTER
for 3 seconds to confi rm.
• Press
ESC
successively until
“PSS-”
appears in the screen.
3. Speed selection (Hz) to logic input (DI2):
• Fan stopped and
“PSS-”
displayed in the screen
(no b24V – DI3 and +24V – DI1).
• Press
ENTER
and turn wheel on clock wise direction until
“SP2”
appears in the screen.
• Press
ENTER
and turn the Wheel until the desired speed is displayed.
• Press
ENTER
to confi rm.
• Press
ESC
successively until
“rdY”
appears in the screen.


