background image

English _

65

•  Do not operate the power switch or remove the memory card while accessing the storage media. Doing so may damage 

the storage media or data on the storage.

•  You can not use a locked memory card for recording. You will see a message saying recording is disabled due to the lock.

•  Note that power failure during a recording such as disconnected DC power jack or exhausted battery may damage the file.

•  Pressing the 

Recording start/stop

 button in the video or photo thumbnail view or during photo playback switches the 

operation mode to STBY mode.

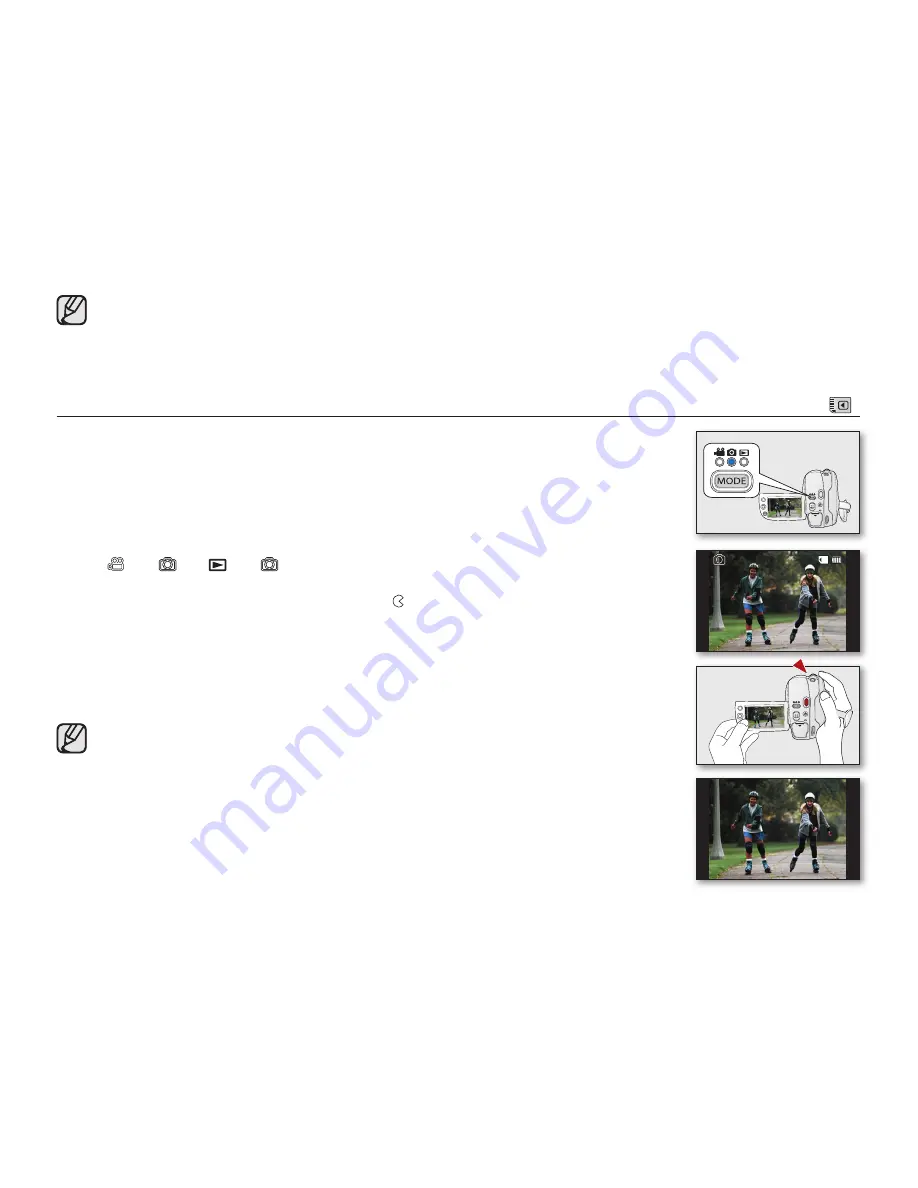
TAKING PHOTOS ONTO A MEMORY CARD 

(

)

•  This function is available in 

CARD Photo Record

 mode. 

page 26

•  You should set the 

Storage mode

 switch to 

CARD

 before recording onto a 

memory card.

1. 

Slide the 

POWER

 switch downwards to turn the DVD camcorder on.

•  Set the 

Storage mode

 switch to 

CARD

page 38

•  Press the 

MODE

 button to set the 

CARD Photo Record

 mode.

•  In the following case, you can simply use the 

PHOTO

 button to switch modes;

(

 (

) or (

 (

)

2. 

Check the subject on the LCD screen. (Lens and LCD)

•  Set the 

Lens open/close

 switch to open ( ). 

page 15

•  You can close-up the subject by using the zoom function. 

page 44

3. 

Press the 

PHOTO

 button to take a picture.

•  The photo has been captured with the shutter sound. 


The screen reviews the 

recorded image briefly (1 second)

 Returns to the STBY mode.

•  While saving the photo image on the memory card, you cannot proceed with the next 

recording.

•  The number of photos that can be stored depends on the quality and size of the image. 

page 63

•  The photo image is taken only in the 4:3 aspect ratio on the memory card.

•  Audio will not be recorded with the photo image on the memory card.

•  Please check the protection tab setting on your memory card before recording.

You may not be able to record when it is locked.

•  If focussing is difficult, use the manual focus function 

page 80

•  Do not operate the POWER switch or remove the memory card while accessing the storage 

media. It may damage the storage media or data.

•  Photos are actually wider than what appears on the LCD screen.

•  The recorded photo size is 800X600(VP-DX205(i)/DX2050 only)1152x864(VP-DX210(i) only).

•  Pressing the 

PHOTO

 button during video or photo playback or in the video or photo thumbnail 

view switches the operation mode to STBY mode.


3570 

(Photo Review)

Содержание VP-DX200

Страница 1: ... manual imagine the possibilities Thank you for purchasing this Samsung product To receive more complete service please register your product at www samsung com global register VP DX200 i VP DX205 i VP DX2050 VP DX210 i ...

Страница 2: ...tailed images for monitoring or playback and the widescreen format makes shooting in 16 9 mode and composing shots even easier Capture visions farther than the eye can see 34x optical power zoom VP DX200 i DX205 i DX2050 only 26x VP DX210 i only 42x intelli zoom VP DX200 i DX205 i DX2050 only 30x intelli zoom VP DX210 i only and 2200x digital zoom Samsung s powerful zoom lenses bring the world clo...

Страница 3: ...g format that achieves efficient coding of high quality video with less capacity Thanks to the high performance H 264 codec sharing your footage is faster and easier Time Lapse Recording VP DX205 i DX2050 DX210 i only The Time Lapse Recording features selective frame capture at a fixed interval so that you can see the effects of condensing a long term recording into shorter time scenes Imagine the...

Страница 4: ...2006 66 If batteries are not properly disposed of these substances can cause harm to human health or the environment To protect natural resources and to promote material reuse please separate batteries from other types of waste and recycle them through your local free battery return system Correct Disposal of This Product Waste Electrical Electronic Equipment Applicable in the European Union and o...

Страница 5: ...injury to you and others Please follow them explicitly After reading this section keep it in a safe place for future reference precautions Warning This camcorder should always be connected to an AC outlet with a protective grounding connection Batteries shall not be exposed to excessive heat such as sunshine fire or the like Caution Danger of explosion if battery is incorrectly replaced Replace on...

Страница 6: ...rotect your important recorded data by copying the files to a computer We also recommend you copy it from your computer to other recording media for storage Refer to the software installation and USB connection guide Copyright Please note that this DVD camcorder is intended for personal use only Data recorded on the card in this DVD camcorder using other digital analogue media or devices is protec...

Страница 7: ...th the function Refer to these marks and identify the functions and operation to match the memory card or disc you use NOTES REGARDING A TRADEMARK All the trade names and registered trademarks mentioned in this manual or other documentation provided with your Samsung product are trademarks or registered trademarks of their respective holders SD and SDHC Logo is a trademark Microsoft Windows Window...

Страница 8: ...eed all instructions carefully Unplug from the power supply Do not touch the product Prohibited action WARNING Means that death or serious personal injury is a risk This precaution must be kept Do not disassemble the product CAUTION Means that there is a potential risk for personal injury or material damage Do not force to bend the power cord or damage the AC power adaptor by pressing with a heavy...

Страница 9: ...ords or wires Doing so may cause fire or electric shock Do not use the AC adapter if it has damaged split or broken cords or wires Doing so may cause fire or electric shock Do not connect the AC adaptor unless the plug can be fully inserted with no part of the blades exposed Do not connect the AC adapter unless the plug can be fully inserted with no part of the blades exposed Keep the used lithium ...

Страница 10: ...electric shock Do not leave the camcorder in a closed vehicle where the temperature is very high for a long time Do not expose the camcorder to soot or steam Thick soot or steam could damage the camcorder case or cause a malfunction Do not use the camcorder near dense exhaust gas generated by gasoline or diesel engines or corrosive gas such as hydrogen sulphide Doing so may corrode the external or...

Страница 11: ...se the camcorder for a long time for the surveillance or business purpose Do not wipe the camcorder body with benzene or thinner The exterior coating could peel off or the case surface could deteriorate Do not expose the camcorder to sudden changed in temperature or a humid place There is also a risk of defect or electric shock when using outdoors during lightning storms Do not place the camcorder...

Страница 12: ...50 DX210 i only 38 Inserting and removing a DISC 38 Recordable time 40 Recording videos onto a DISC 41 Recording with ease for beginners EASY Q mode 43 Zooming 44 Playing videos on a DISC 45 DISC MODE EDITING VIDEO 48 Deleting images 48 Dividing a file 49 Playlist 51 DISC MODE DISC MANAGEMENT 55 Disc finalise 55 Playing back finalised disc directly 56 Disc unfinalise 57 Disc format 58 Disc informa...

Страница 13: ...to a DISC VP DX200i DX205i DX210i only 106 USING WITH WINDOWS COMPUTER VP DX205 i DX2050 DX210 i ONLY 107 Checking your computer type 107 System requirements 108 Installing CyberLink MediaShow4 For Windows only 109 Connecting the USB cable 111 Viewing the contents of storage media 112 Transferring videos or photos to your computer 114 Playing back your recordings on Windows 114 USING WITH MACINTOS...

Страница 14: ...ility but you CANNOT edit or delete recordings DVD R DL Best for Recording Time but you CANNOT edit or delete recordings DVD RW Best for Reusability and you CAN edit or delete recordings DVD R and DVD R DL discs can be recorded in VIDEO mode only Recording format of DVD RW disc DVD RW discs features two recording formats Video Video mode and VR VR mode When you first insert a brand new DVD RW disc...

Страница 15: ... format and format the disc on your camcorder Photos cannot be recorded onto a DVD disc Do you want to delete or edit videos on the DVD camcorder Do you want to reuse the disc after formatting DVD RW DVD R DL DVD RW DVD R YES NO When recording for a long time VR VIDEO NO YES ...

Страница 16: ...Press the Recording Start Stop button to record While recording the elapsed recording time and are displayed on the LCD screen 4 Press the Recording Start Stop button again to stop recording 0 00 00 30 Min Insert a disc page 38 Turn on the camcorder page 26 Set the Storage mode to DISC VP DX205 i DX2050 DX210 i only page 26 EASY 06_ English STEP2 Recording videos onto a disc EASY ...

Страница 17: ...07 STEP3 Playing back videos on a disc Finalise FINALIZE 1 Press the MODE button to select Play mode 2 Set the desired play mode Press the MENU button Move the Joystick up or down to select Play Mode Video or Playlist and then press the Joystick The thumbnail index view of the selected play mode appears 3 Use the Joystick to select the desired video clip and then press the Joystick You can adjust ...

Страница 18: ...D playback application may not run automatically In this case run the application by navigating on the start menu VIEWING ON A TV 1 Connect the camcorder to a TV page 102 2 Turn on the camcorder and the TV 3 Start the playback of the videos R R DL RW VIDEO RW VR Like commercially sold DVD this disc can be played back in most DVD devices after finalising The disc can be played back on a device comp...

Страница 19: ...rd or play back images on other storage media select media again Videos Photos Disc Memory Card MEDIA FOR YOUR CAMCORDER You can select a desired storage mode to record videos or photos separately To record videos you can select a disc or a memory card To take photos select the memory card Now enjoy with your camcorder STEP1 Selecting a suitable memory card You can use commercially available SDHC ...

Страница 20: ... switch is open 3 Press the Recording Start Stop button to record While recording the elapsed recording time and are displayed on the LCD screen 4 Press the Recording Start Stop button again to stop recording 0 00 00 30 Min STEP2 Recording videos onto a memory card Set the Storage mode to CARD page 26 DISC CARD Turn on the camcorder page 26 EASY EASY Insert a memory card page 60 ...

Страница 21: ...y mode Press the MENU button Move the Joystick to select Play Mode Video or Photo and then press the Joystick The thumbnail index view of the selected play mode appears 3 Use the Joystick to select the desired video or photo and then press the Joystick When playing videos you can adjust the audio volume with the zoom W T lever You can put photos on a memory card only DVD discs do not support photo...

Страница 22: ...omputer with a USB cable 2 Transfer videos or photos to a computer Select a folder file to copy then drag and drop it into the destination folder on your computer 3 Play videos or photos on the computer On a Windows computer you can use the CyberLink MediaShow4 application to playback recordings To use the CyberLink MediaShow4 refer to the next page STEP4 Viewing on other external devices 12_ Engl...

Страница 23: ...ur computer s hard disk drives are displayed on the screen 4 Select a desired folder or file in the Library menu Video or photo thumbnails appear on the right screen 5 Double click the recording you want to play Playback starts and playback controls appear 6 To upload your recordings to YouTube click the YouTube shortcut icon in the Share tab The log in or subscription dialog box appears Log into ...

Страница 24: ...A memory card is not included Refer to page 61 for memory cards compatible with your camcorder Your camcorder includes user manual CD and quick start guide printed For more detailed instructions refer to the user manual PDF on the provided CD getting to know your DVD camcorder Battery pack IA BP80WA AC power adaptor AA E9 type AV cable USB cable VP DX205 i DX2050 DX210 i only User manual CD Quick ...

Страница 25: ...ht view Lens open close switch Lens Remote sensor VP DX205 i DX2050 DX210 i only Light VP DX205 i DX2050 DX210 i only Internal microphone Grip belt hook Grip belt Disc cover CLOSE OPEN Illustrations of model VP DX205 i are used in this user manual ...

Страница 26: ... battery release switch Storage mode switch DISC CARD VP DX205 i DX2050 DX210 i only Battery pack LCD screen Recording start stop button Joystick OK W T MENU button Tripod receptacle Memory card slot VP DX205 i DX2050 DX210 i only getting to know your DVD camcorder Illustrations of model VP DX205 i are used in this user manual ...

Страница 27: ...ecord Photo Record VP DX205 i DX2050 DX210 i only Play mode MODE button Recording start stop button EASY Q button ACCESS CHG indicator Disc cover OPEN switch Jack cover USB jack VP DX205 i DX2050 DX210 i only DC IN jack POWER switch Illustrations of model VP DX205 i are used in this user manual PARTS IDENTIFICATION Rear and top view EASY lever Volume control EASY Q button ...

Страница 28: ... button Control buttons PHOTO button Zoom W T button Search button Slow playback button The buttons on the remote control function the same as those on DVD camcorder This section provides information on using this DVD camcorder such as how to use the provided accessories how to charge the battery how to setup the operation mode and initial setup preparation ...

Страница 29: ...l matching its mark with the mark on the remote control and turn the battery holder clockwise to lock it Precautions regarding the button type battery There is a danger of explosion if the button type battery is incorrectly replaced Replace only with the same or equivalent type Do not pick up the battery using tweezers or other metal tools This will cause a short circuit Do not recharge disassembl...

Страница 30: ...p the LCD screen 90 degrees with your finger 2 Slide the BATT battery release switch in the direction as shown in the figure and pull out the battery pack WARNING Insert the battery pack in the accurate direction as shown in the figure When the battery pack is wrongly inserted it may cause malfunction of the DVD camcorder and battery pack It is recommended that you purchase one or more additional ...

Страница 31: ...ry pack that is available from your Samsung retailer When the battery reaches the end of its life please contact your local dealer The batteries have to be treated as chemical waste Make sure that the battery pack is fully charged before starting to record When fully discharged a battery pack damages the internal cells The battery pack may be prone to leakage when fully discharged Remove the batte...

Страница 32: ...or lights up in orange and charging starts The ACCESS CHG charging indicator lights up in green when the battery is fully charged 6 Once charged disconnect the AC power adaptor from the DC IN jack on your DVD camcorder Even with the power switched off the battery pack will still discharge if it is left attached to the DVD camcorder It is recommended that you remove the battery pack from the DVD ca...

Страница 33: ...y charged 25 50 used 50 60 used 60 80 used 80 99 used Exhausted flickers The device will soon turn off Change the battery pack as soon as possible flickers The device will be forced to turn off after 3 seconds Low Battery Above figures are based on fully charged battery pack at a normal temperature Low ambient temperature may affect the use time STBY 0 00 00 30 Min ...

Страница 34: ...g on the selected quality resolution The time is only for reference Figures shown above are measured under Samsung s test environment and may differ from your actual use The charging time will vary depending on the remaining battery level The above figures are based on the model VP DX205 i We recommend using AC power adaptor when using the Time Lapse REC function Continuous recording time without ...

Страница 35: ...DVD camcorder malfunction Use a nearby wall outlet when using the AC power adaptor Disconnect the AC power adaptor from the wall outlet immediately if any malfunction occurs while using your DVD camcorder Do not use the AC power adaptor in a narrow space such as between a wall and furniture On charging the built in rechargeable battery The built in rechargeable battery on your camcorder retains in...

Страница 36: ...ly CARD Photo Record mode To record photos onto a memory card VP DX205 i DX2050 DX210 i only DISC Play mode To play videos on a DVD disc CARD Video Photo Play mode To play videos photos on a memory card VP DX205 i DX2050 DX210 i only When the DVD camcorder is turned on the self diagnosis function operates and a message may appear In this case refer to warning indicators and messages on pages 122 1...

Страница 37: ... Video Record mode Operating mode STBY standby or recording Warning indicators and messages Time counter movie recording time Remaining time Storage media disc type Battery info remaining battery level LCD enhancer Disc format type Video Quality Anti Shake HDIS Wind Cut Back Light AV Input VP DX200i DX205i DX210i only Fader Light VP DX205 i DX2050 DX210 i only Optical Zoom or Intelli Zoom indicato...

Страница 38: ... Play Pause Warning indicators and messages Time code elapsed time total recorded time Storage media disc type Battery info remaining battery level LCD enhancer Disc Format Video Quality Voice plus Chapter No Date Time Volume control 0 00 59 0 06 12 2 Activate Remote Control 001 01 JAN 2009 00 00 ...

Страница 39: ...Anti Shake HDIS Wind Cut Back Light Fader Light Optical Zoom or Intelli Zoom indicator Digital Zoom indicator Date Time Time Zone Digital Effect Manual Shutter C Nite Manual Exposure Focus Manual Face Detection White Balance iSCENE EASY Q Time Lapse Recording Recording and playback on a memory card is only available for models VP DX205 i DX2050 DX210 i The OSD indicators are based on memory capaci...

Страница 40: ... Time Time Zone Manual Exposure Manual Focus White Balance Recording and playback on a memory card is only available for models VP DX205 i DX2050 DX210 i The total number of recordable photos is counted based on available space on the storage media Little change to the remaining memory space may not change the photo counter after recording preparation Activate Remote Control Activate Remote Contro...

Страница 41: ...hotos on a memory card Photo play mode Slide Show Photo counter current photo total number of recorded photos Warning indicators and messages Storage media memory card Battery info remaining level LCD enhancer Erase Protection File Name folder file name Date Time Photo size Recording and playback on a memory card is only available for models VP DX205 i DX2050 DX210 i Activate Remote Control Activa...

Страница 42: ...as warning information a warning message will appear To enhance the contrast of the LCD screen You can obtain a clear and bright view on the LCD screen This effect also works outdoors in bright daylight 1 Press and hold the Display LCD enhancer button LCD adjust indicator appears and the LCD brightens 2 To cancel this function press and hold the LCD enhancer button again The LCD enhancer function ...

Страница 43: ... Photo Record mode Tele Zoom DISC Play CARD Video Play mode stops and then returns to thumbnail view CARD Photo Play mode returns to thumbnail view Select Access or exit the shortcut menu DISC Play CARD Video Photo Play mode playback pause Adjusting the LCD screen 1 Open up the LCD screen 90 with your finger 2 Rotate it to the best angle to record or play WARNING Do not lift the DVD camcorder by h...

Страница 44: ...ide is displayed 2 Move the Joystick up It displays the Auto Exposure guide menu where you can press the Joystick to set the exposure automatically 3 Move the Joystick up again It displays the Manual Exposure guide menu with a manual control bar where you can adjust the value by moving the Joystick left or right 4 Press the Joystick to confirm your selection Manual Exposure indicator will display ...

Страница 45: ...umbnail index view Shutter Auto Manual Search playback RPS Reverse Playback Search rate x2 x4 x8 x16 Previous Skip Playback Reverse Frame by frame Playback DISC Play mode only Reverse Slow Motion Playback rate x1 2 DISC Play mode only Fader Fader Off Fader In Fader Out Fader In Out Search playback FPS Forward Playback Search rate x2 x4 x8 x16 Next Skip Playback Forward Frame by frame Playback DISC...

Страница 46: ...etting is available in all operating modes page 26 To read the menus or messages in your desired language set the OSD language To store the date and time during recording set the time zone and date time Setting the time zone and date time for the first time Set the date and time of your local area when turning on this camcorder for the first time 1 Slide the POWER switch downward to turn on the ca...

Страница 47: ...he date time mode page 94 Simple setting of the clock by time difference You can easily set the clock to the local time by setting a time difference when using your camcorder abroad Select Time Zone on the menu then set the time difference page 92 93 Selecting the OSD language You can select the desired language to display the menu screen and the messages 1 Press the MENU button The menu will appe...

Страница 48: ...y excessive force It may cause a malfunction You cannot open the disc cover while loading You can use a new 8cm DVD RW DVD R or DVD R DL Dual Layer disc for video recording Photos cannot be recorded onto a DVD disc You can record only videos onto a DVD disc Inserting a disc 1 Slide the OPEN switch in the direction of the arrow The disc cover will partially open 2 Gently open the cover the rest of ...

Страница 49: ...ing may be required if a new disc is inserted Recognition of the disc will start For a DVD R R DL disc Formatting will automatically begin For a DVD RW disc The Format menu is offered Select the recording format Video mode or VR mode Format the disc in the Disc Format menu when you want to format again page 58 Differences between Video and VR mode Video Video Mode If the disc has been finalised yo...

Страница 50: ...th recording when the disc cover is open An icon and message are shown that recording is impossible with the disc cover open RECORDABLE TIME Recordable time for videos Storage DVD RW R DVD R DL Capacity Video Quality 1 4GB 2 6GB Super Fine Approx 20min Approx 37min Fine Approx 30min Approx 56min Normal Approx 60min Approx 112min The above figures are measured under Samsung s standard recording tes...

Страница 51: ... camcorder on Connect a power source to the DVD camcorder A battery pack or an AC power adaptor Slide the POWER switch downwards to turn the DVD camcorder on Set the Storage mode switch to DISC VP DX205 i DX2050 DX210 i only page 38 2 Check the subject on the LCD screen Lens and LCD Set the Lens open close switch to open page 15 3 Press the Recording start stop button The recording indicator will ...

Страница 52: ... storage media to DVD up to 250 videos chapters can be created on DVD R R DL RW You cannot proceed with recording when the disc cover is open An icon and message are shown that recording is impossible with the disc cover open If you press the Recording start stop button while a menu operation is in process the DVD camcorder starts to record If you turn the DVD camcorder off while recording turn it...

Страница 53: ...tart stop button To cancel EASY Q mode Press the EASY Q button once again The and Anti Shake HDIS indicators disappear from the screen Almost all the settings will return to the settings that were set prior to activating EASY Q mode You cannot cancel the EASY Q mode during recording Unavailable buttons during EASY Q operation The following controls are unavailable because the items are automatical...

Страница 54: ... Type to the desired value page 86 You can set the digital zoom up to 2200x during video recording If you operate the zoom W T lever during recording the sound of the lever may be recorded as well The minimum possible distance between camcorder and subject while maintaining sharp focus is about 1 cm about 0 39 inch for wide angle and 90cm about 35 43 inch for telephoto The focus changes when zoomi...

Страница 55: ...current play mode to Video Press the MENU button and use the Joystick to select Play Mode Video page 52 The thumbnail index view appears The thumbnail highlight is on the latest created or played file 3 Move the Joystick to select the desired video clip and then press the Joystick The selected file fills the screen and is played automatically To stop playback move the Joystick down Press Display L...

Страница 56: ...and Pause functions alternate when you press the Joystick Move the Joystick down to stop playback You can do the same operation by using the remote control VP DX205 i DX2050 DX210 i only Search playback Move the Joystick right or left and hold during playback RPS Reverse Playback Search rate x2 x4 x8 x16 x2 FPS Forward Playback Search rate x2 x4 x8 x16 x2 To resume normal playback press the Joysti...

Страница 57: ... the Joystick right Moving the Joystick right or left repeatedly advances the image frame by frame forward or reverse To resume normal playback press the Joystick Slow playback Pause the playback by pressing the Joystick then move the Joystick right or left and hold The video plays forward or reverse at the 1 2x speed To resume normal playback press the Joystick You can do the same operation by us...

Страница 58: ...lect Delete 5 Move the Joystick up or down to select the desired option Select Files or All Files then press the Joystick Select Files Deletes the individual image To delete the individual image use the Joystick to select the image to delete The indicator is displayed on the selected images Pressing the Joystick toggles between the thumbnail image being selected for deletion the indicator appears ...

Страница 59: ...elected video fills the screen with paused 6 Press the Joystick to play the video You can search a point of division by moving the Joystick Search and slow playback are useful when designating division points 7 Press the Joystick to pause at the point of division then press the MENU button The message Divide a file at this point appears 8 Move the Joystick left or right to select Yes then press th...

Страница 60: ...video are displayed side by side in the place of the original video clip A video shorter than 3 seconds cannot be divided The original videos will not be preserved Cannot divide the video You cannot edit or delete videos on a disc that was recorded in another digital device You cannot divide the video if there are already 250 videos on the disc One video chapter can be divided upto 99 videos chapt...

Страница 61: ...DVD RW disc VR mode You should format the DVD RW to VR mode before recording page 58 Example You have recorded a few scenes on a DVD disc You want to save the original recording but you also want to create a digest by putting your favourite scenes together In this case you can create a playlist by selecting your favourite scenes leaving the original recording as it is 12 JAN 2009 30 JAN 2009 Video...

Страница 62: ...essing the Joystick toggles between the video thumbnail image being selected for creating a playlist the indicator appears on image or not the indicator is removed from image 5 Press the MENU button to add the selected files The message Add selected files to Playlist appears 6 Move the Joystick right or left to select Yes then press the Joystick The selected files are added to the playlist You can...

Страница 63: ...nge The indicator is displayed on the selected video clips Pressing the Joystick toggles between the video thumbnail image being selected for arrangement within the the indicator appears on image or not the indicator is removed from image A bar will also appear next to the selected video 5 Move the Joystick to select the desired position then press the Joystick The selected file is arranged in the...

Страница 64: ...stick to select the image to delete The indicator is displayed on the selected video clip image Pressing the Joystick toggles between the video clip thumbnail image being selected for deleting from the playlist the indicator appears on image or not the indicator is removed from image Press the MENU button then go to step 4 All Files Deletes all images 4 The message according to the selected option...

Страница 65: ...k The message Finalise the disc appears 7 Move the Joystick right or left to select Yes then press the Joystick The message showing that the disc is being finalised will appear WARNING During finalising do not cause impact or vibration to your DVD camcorder This could cause a malfunction The finalise function is not available at the battery level under Disc Finalise menu item is grayed out when th...

Страница 66: ...ard disk drive Videos on a DVD disc cannot playback or edit using the provided software CyberLink MediaShow4 This provided software supports recordings on a memory card only VP DX205 i DX2050 DX210 i only In order to play the disc on a computer you need to have DVD playback software installed and running Also in order to play back a DVD R DL you must have a DVD drive capable of reading dual layere...

Страница 67: ...Storage mode switch to DISC VP DX205 i DX2050 DX210 i only page 38 3 Press the MENU button then move the Joystick right or left to select Settings 4 Move the Joystick up or down to select Disc Unfinalise then press the Joystick You can simply unfinalise the disc using the FINALIZE button on the DVD camcorder Disc information will appear 5 Move the Joystick to select Execute and then press the Joys...

Страница 68: ...AC power adaptor when formatting a disc so that the DVD camcorder does not turn off midway See pages 120 121 for more details on the disc format type DISC INFORMATION R R DL This function is available in DISC Record DISC Play mode page 26 It shows you disc information such as the disc type disc format free space etc NOTICE Make sure that you insert a disc page 38 1 Slide the POWER switch downwards...

Страница 69: ...rding mode recordings will be stored in video or photo thumbnail index view To switch between video and photo thumbnails in the CARD Video Photo Play mode press the MENU button and use the Joystick to select Play Mode Video or Photo Setting the Play Mode menu is available in thumbnail view only CARD Video Record Mode CARD Video Play Mode CARD Photo Record Mode CARD Photo Play Mode CARD Video Play ...

Страница 70: ...acturer and memory card type Inserting a memory card 1 Open the memory card cover 2 Insert the memory card into the slot until it softly clicks Make sure that the label pasting portion is facing up and the camcorder is placed as shown in the figure 3 Close the memory card cover Ejecting a memory card 1 Open the memory card cover 2 Slightly push the memory card inwards to pop it out 3 Pull the memo...

Страница 71: ... direction of terminals To set write protection move the switch down SDHC memory card SDHC memory card complies with new SD specification Ver 2 00 This latest specification was established by SD Card Association to realize data capacity over 2GB The SDHC memory card supports a mechanical write protection switch Setting the switch prevents accidental erasure of files recorded on the SDHC memory car...

Страница 72: ...sing a memory card case to avoid losing data from moving and static electricity After a period of use the memory card may become warm This is normal not a malfunction Photo image files recorded on a memory card by your DVD camcorder conform to the DCF Design rule for Camera File system universal standard established by the JEITA Japan Electronics and Information Technology Industries Association D...

Страница 73: ...resolution in the order of TV Super Fine TV Fine TV Normal Web Mobile The higher the compression rate is the picture resolution is more deteriorated but the recording time will be increased The compression rate automatically adjusts to the recording image and the recording time may vary accordingly You can use a SDHC or SD memory card on your camcorder Some cards may not compatible depending on th...

Страница 74: ...ording 4 When recording is finished turn the DVD camcorder off You can use the zoom function during recording page 44 You can select the resolution of videos to be recorded page 87 For on screen information display page 29 Eject the battery pack when you have finished recording to prevent unnecessary battery power consumption For approximate recording time page 63 For various functions available w...

Страница 75: ...e Lens open close switch to open page 15 You can close up the subject by using the zoom function page 44 3 Press the PHOTO button to take a picture The photo has been captured with the shutter sound The screen reviews the recorded image briefly 1 second Returns to the STBY mode While saving the photo image on the memory card you cannot proceed with the next recording The number of photos that can ...

Страница 76: ... appears The thumbnail highlight is on the latest created or played file 4 Use the Joystick to select a desired video clip and then press the Joystick The selected video clip fills the screen and is played automatically Shortcut menu for playback is displayed for a while You can playback the selected video in various ways pages 46 47 To stop playback and return to the thumbnail index view move the...

Страница 77: ...ayed for a while To view the previous next photo move the Joystick left or right To return to the thumbnail index view move the Joystick down Press Display LCD enhancer button to toggle the OSD On Screen Display function on and off Loading time may vary depending on the image size Photos created in the other devices cannot be played back in this camcorder Set the slide show function for continuous...

Страница 78: ...dual image To protect the individual image use the Joystick to select the image to protect The indicator is displayed on the selected images Pressing the Joystick toggles between the thumbnail image being selected for protection the indicator appears on image or not the indicator is removed from image Press the MENU button then go to step 7 All On Protects all images All Off Cancels protection for...

Страница 79: ...n press the Joystick Select Files Deletes the individual image To delete the individual image use the Joystick to select the image to delete The indicator is displayed on the selected images Pressing the Joystick toggles between the thumbnail image being selected for deletion the indicator appears on image or not the indicator is removed from image Press the MENU button then go to step 7 All Files...

Страница 80: ...Move the Joystick right or left to select Focus 6 Move the Joystick up or down to select the desired option then press the Joystick Move the Joystick right or left to adjust focus manually 7 To exit press the MENU button Accessible items in menu vary depending on the operation mode Before selecting a menu item set the appropriate mode first page 26 Selecting a menu item will display the indicator ...

Страница 81: ...e and storage mode VP DX205 i DX2050 DX210 i only If there is no storage inserted menu items such as Disc Format Card Info etc are grayed out Accessible items in menu vary depending on the operation mode Using the Joystick You can navigate menu items and access the Shortcut menu page 35 Button tips a MENU button Use it to enter or exit the menu b Joystick Use to move up down left right c Joystick ...

Страница 82: ... Digital Effect X Off 78 Fader X Off 85 Wind Cut X Off 83 Light VP DX205 i DX2050 DX210 i only X Off 85 Zoom Type X Intelli Zoom 86 Time Lapse REC VP DX205 i DX2050 DX210 i only X X Off 88 89 Guideline Off 86 Settings 90 99 possible X not possible Some items will not appear depending on the storage media type VP DX205 i DX2050 DX210 i only There are some functions you cannot activate simultaneousl...

Страница 83: ...X 91 File No VP DX205 i DX2050 DX210 i only X X Series 91 Time Zone Home 92 93 Date Time Set 01 JAN 2009 00 00 93 Date Type 01 JAN 2009 93 Time Type 24Hr 94 Date Time Display Off 94 LCD Brightness X X X 0 95 LCD Colour X X X 0 95 Menu Colour Midnight Blue 98 Transparency X X X 20 98 Beep Sound On 95 Shutter Sound VP DX205 i DX2050 DX210 i only X X On 96 Auto Power Off 6 Min 96 Remote VP DX205 i DX...

Страница 84: ...c when strong light strikes the subject as in a wedding or on stage Beach When recording seaside or lakeside scenes the blue water is clearly recorded Snow When recording a snowy scene that makes the screen all white this setting prevents sunken colours and record images clearly High Speed Reduces blurring when recording rapidly moving subjects such as in golf or tennis Food Records the color of s...

Страница 85: ...ion is used when you make a recording under white fluorescent lights Tungsten This option is for when there is less than 3200K of tungsten light being used Custom WB You can manually adjust white balance to match the light source or situation Setting white balance manually 1 Move the Joystick up or down to select Custom WB then press the Joystick The indicator and the message Set White Balance are...

Страница 86: ...nly page 26 The DVD camcorder usually adjusts the exposure automatically You can also manually adjust the exposure depending on the recording conditions Settings Contents On screen display Auto This option automatically adjusts image brightness according to the environmental light conditions None Manual You can adjust the brightness of an image manually Adjust the brightness when the subject is to...

Страница 87: ...nts On screen display Off Disables the function None On Compensates for unstable images caused by camcorder shake particularly at high magnification EASY Q mode automatically sets the Anti Shake HDIS to On When Anti Shake HDIS On is set there will be a slight difference between the actual movement and the movement on screen Gross camcorder shake may not be entirely corrected even if Anti Shake HDI...

Страница 88: ...tive This mode reverses the colours creating a negative image N Art This mode gives the images a coarse effect Emboss This mode creates a 3D effect embossing Mosaic This mode gives the images a mosaic effect Mirror This mode cuts the picture in half using a mirror effect Pastel This mode applies a pale pastel drawing effect to an image Cosmetic This mode helps adjust for facial imperfections Stepp...

Страница 89: ...elect Face Detection then press the Joystick Detects a face and shows a frame on it The detected face image is optimized automatically The Face Detection Indicator and Face Detection Frame are not recorded Framing a person s face while Face Detection is set will adjust focus and exposure to optimal values automatically Face Detection may not operate depending on recording conditions For example th...

Страница 90: ...e manual focus setting will be applied and indicator is displayed In the following situations you may obtain better results by adjusting the focus manually A picture containing several objects some close to the DVD camcorder others farther away A person enveloped in fog or surrounded by snow Very shiny or glossy surfaces like a car People or objects moving constantly or quickly like an athlete or ...

Страница 91: ...anual then press the Joystick The manual shutter adjustment indicators appear 2 Move the Joystick right or left to select the desired indicator to adjust shutter speed then press the Joystick The adjusted value is applied right after moving the Joystick right or left to adjust the shutter speed The manual shutter setting will be applied and 1 XX indicator is displayed Recommended shutter speed whe...

Страница 92: ...aspect ratio as your TV Settings Contents On screen display Off Records images to the full screen on a 4 3 TV screen None On Records images to the full screen on a 16 9 wide TV screen None In 16 9 Wide On mode you cannot use the following functions Digital Effect Mosaic Mirror Stepprinting The 16 9 wide mode is not available when the following function is set Resolution Web Mobile Quality This fun...

Страница 93: ...ilt in microphone Back Light This function is available in DISC Record CARD Video Record CARD Photo Record mode page 26 When subject is lit from behind this function will compensate for lighting so that the subject is not too dark Settings Contents On screen display Off Disables the function None On Backlight compensation is executed Backlight compensation brightens the subject quickly Back lighti...

Страница 94: ...ghter image brighter 1 25 1 13 Records a brighter image even in a dark place 1 13 When using the C Nite the focus adjusts slowly and white dots may appear on the screen this is not a defect When using the C Nite the following functions are not available iSCENE Manual Shutter Manual Exposure Manual Zoom Type Intelli Zoom Digital Zoom Digital Effect Mosaic Mirror Stepprinting Focus Face Detection Ba...

Страница 95: ... The range of the light is limited up to 6 6ft 2m This function will be set to Off in the EASY Q mode Fader This function is available in DISC Record CARD Video Record mode page 26 You can give your recording a professional look by using special effects such as fade in at the beginning of a sequence or fade out at the end of a sequence Settings Contents On screen display Off Disables the function ...

Страница 96: ...oss point of the guideline makes a balanced composition Guideline cannot be recorded on the images being recorded Zoom Type This function is available in DISC Record CARD Video Record mode page 26 The camcorder offers three types of zoom optical intelligent and digital zoom when recording videos This right side of the bar shows the digital zooming zone The zooming zone appears when you move the zo...

Страница 97: ...he aspect ratio of the video Resolution VP DX205 i DX2050 DX210 i only This function is available in CARD Video Record mode page 26 You can select the resolution of a video to be recorded on a memory card This camcorder can record in the TV Super Fine TV Fine Default TV Normal and Web Mobile modes Settings Contents On screen display TV Super Fine Videos recorded in the 720x576 50i resolution at su...

Страница 98: ... Hr hours 4 Set a desired recording interval Sec by moving the Joystick up or down 5 Move the Joystick right to set a total recording time Hr in the same way While you set the preparatory settings recording interval and total recording time the approximate time lapse recording time will be displayed on the menu screen 6 Press the Joystick to finish the setting and press the MENU button to exit the...

Страница 99: ...ew recording file is automatically started at that point When the battery is exhausted during Time Lapse Recording it saves recording up to the point and switches to standby mode After a while it displays a warning message of exhausted battery and then turns off automatically When the memory space of the storage media is insufficient during the Time Lapse Recording it switches to the standby mode ...

Страница 100: ...Playlist on a DVD RW disc VR mode only page 52 Photo VP DX205 i DX2050 DX210 i only Displays the thumbnail index view of photos taken on a memory card SETTING MENU ITEMS You can set up the date and time OSD language video output and display settings of the DVD camcorder Card Info VP DX205 i DX2050 DX210 i only This function is available in CARD Video Record CARD Photo Record CARD Video Play CARD P...

Страница 101: ... i only This function is available in CARD Video Record CARD Photo Record CARD Video Play CARD Photo Play mode page 26 File numbers are assigned to recorded files in the order they were recorded Settings Contents On screen display Series Assigns file numbers in sequence even if the memory card is replaced with another one or after formatting or after deleting all files The file number is reset whe...

Страница 102: ...fference between the two locations Setting the clock to the local time Visit You can easily set the clock to the local time zone when traveling 1 Move the Joystick up or down to select the Time Zone in the Settings mode and then press the Joystick 2 Select Visit by moving the Joystick up or down then press the Joystick The time zone map appears 3 Select your visiting area by moving the Joystick le...

Страница 103: ...angkok Buenos Aires Brasilia Sao Paulo Hong Kong Beijing Taipei Singapore Manila Fernando de Noronha Seoul Tokyo Pyongyang Azores Cape Verde Date Time Set This function is available in all operating modes Set the current date and time so that they can be recorded correctly page 36 37 Date Type This function is available in all operating modes You can select the date type to display Settings Conten...

Страница 104: ...y on the LCD screen Before you use the Date Time Display function you must set the date and time page 93 Settings Contents On screen display Off Current date and time information is not displayed None Date Displays the current date 01 JAN 2009 Time Displays the current time 00 00 Date Time Displays the current date and time 01 JAN 2009 00 00 The date time will be read 01 JAN 2009 00 00 in the foll...

Страница 105: ...hange the colour impression of the screen with a variety of colour options by adjusting the colour rate of red and blue When you set red and blue colour range the higher the figures the brighter the LCD monitor will be You can adjust the LCD colour red blue from 15 to 15 using the Joystick Setting the LCD colour does not affect recordings After adjusting the LCD colour you must press the Joystick ...

Страница 106: ...ttery pack You can set the DVD camcorder to turn off automatically when there is no operation for 6 minutes in the STBY mode and thumbnail index view Settings Contents On screen display Off The DVD camcorder does not turn off automatically The camcorder does not turn off the LCD screen even if 3 minutes go on without any button pressed None 6 Min If there is no operation for 3 minutes in STBY mode...

Страница 107: ...splay function works during recording and playback You can select the output path of the OSD On Screen Display This allows you to set the OSD for viewing on the viewfinder LCD screen or an external TV Settings Contents On screen display Off The OSD appears in the LCD screen and viewfinder only None On The OSD appears in the LCD screen viewfinder and TV None Only VP DX210 i model features the viewf...

Страница 108: ...does not affect recorded images Menu Colour This function is available in all operating modes You can select the desired menu colour to display the menu Midnight Blue Lovely Pink Mystic Purple Sunny Orange Oasis Green Transparency This function is available in DISC Record CARD Video Record CARD Photo Record mode page 26 You can select the desired transparency to display the menu 0 20 40 60 STBY 0 ...

Страница 109: ...f Disables the function None On Activates demonstration mode and shows various features None Demonstration starts in the following cases Right after Demo is set to On With Auto Power Off set to Off if there is no operation for about 6 minutes in the STBY mode Demonstration stops temporarily by pressing other buttons MENU Joystick Recording start stop etc Press and hold the MENU button in STBY mode...

Страница 110: ...switch to CARD 2 Set the USB Connect to PictBridge page 97 Press the MENU button Use the Joystick to select Settings USB Connect PictBridge 3 Connect your DVD camcorder to the printer using the provided USB cable 4 Turn your printer power on The PictBridge menu screen appears automatically after a short period To see the previous or next photo image move the Joystick left or right 5 Press the MENU...

Страница 111: ...nd back on Then connect the USB cable and set the DVD camcorder to PictBridge The date time option may not be supported by all printers Check with your printer manufacturer The Date Time menu cannot be set up if the printer does not support this option PictBridge is a registered trademark of CIPA Camera Imaging Products Association an image transfer standard developed by Canon Fuji HP Olympus Seik...

Страница 112: ...d down forgetting this may cause feedback from the TV speakers Carefully connect the input and output cables to the corresponding connections on the device the DVD camcorder is being used with Make sure to set AV In Out to Out before connecting to an external device VP DX200i DX205i DX210i only Viewing on TV screen 1 Turn on the TV and set the input selector to the Input connection the DVD camcord...

Страница 113: ...does not appear on the TV screen page 97 Information that the DVD camcorder is recording will appear on the TV screen Press the Display LCD enhancer button to switch the display status page 32 Howling may occur when the DVD camcorder is too close to the other devices or the volume is high Keep the DVD camcorder a reasonable distance away from the other connected devices Image display depending on ...

Страница 114: ...4 Use the Joystick to select the recorded dubbed image in the thumbnail index view then press the Joystick 5 Press the record button on the connected device The DVD camcorder will start playback and the recording device will dub it Refer to Editing chapter to create a playlist by selecting desired scenes from those recorded on this DVD camcorder pages 52 54 Audio is heard from the speaker If the v...

Страница 115: ...ice instead of copying the pre recorded sound on a disc 8 To cancel press the Recording start stop button again Voice Plus is available only when the AV cable is connected If a USB cable is connected the Voice Plus function may not operate properly VP DX205 i DX2050 DX210 i only If you perform Stop Play Pause REW or FF while the Voice Plus function is being executed the Voice Plus function will be...

Страница 116: ... the Joystick To record from a VCR or DVD HDD recorders 1 Insert the tape to be played in your VCR or DVD HDD recorders Pause at the starting point of playing 2 Start copying by pressing the Recording start stop button on your DVD camcorder 3 Press the PLAY button on your VCR or DVD HDD recorders to play the tape To record from a TV 1 Select a TV channel to be recorded 2 Start recording by pressin...

Страница 117: ...To play back or edit videos on Macintosh you may install and use QuickTime Player v7 5 5 or higher iMovie application not supplied Install the provided software CD CyberLink MediaShow 4 on Windows page 109 Refer to the software s installation guide Connect your camcorder to the computer using the USB cable pages 111 114 You can transfer data to a Macintosh computer using the USB cable page 116 Upl...

Страница 118: ..._drives jsp System requirements mentioned above are recommendations Even on a system that satisfies the requirements operation is not ensured depending on the system On a slower computer than recommended video playback may skip frames or operate unexpectedly If your OS is Windows XP Vista log in as the Administrator administrator of the computer or a user with the equivalent privileges to install ...

Страница 119: ...uTube page 115 Refer to the user s guide of the software PDF file for details on how to use it After the installation is complete you will be able to access the software s user guide Select Start All Programs Programs CyberLink MediaShow MediaShow User s Guide Before you begin Quit any other software you are using Check that there are no other application icons on the status bar 1 Load the provide...

Страница 120: ...h The icon of CyberLink MediaShow4 CyberLink MediaShow is created on the desktop If you perform installation of software that is already installed uninstallation will start In this case perform the installation again after uninstallation is finished This manual only refers to software installation and computer connection For more details on software refer to the Online help Read me on the CyberLin...

Страница 121: ...ata transmission you must disconnect the cable in the following way 1 Click the Unplug or eject hardware icon on the task tray 2 Select USB Mass Storage Device or USB Disk then click Stop 3 Click OK 4 Disconnect the USB cable from the DVD camcorder and computer We recommend using the AC power adaptor as the power supply instead of the battery pack When the USB cable is connected turning the camcor...

Страница 122: ...Double click the My Computer icon on the desktop The Removable Disk icon which represents the storage media in the DVD camcorder appears in the My Computer window b Double click the Removable Disk icon 4 The folders in the storage media appear Different file types are stored in different folders If the Removable Disk window does not appear confirm the connection page 111 or perform the steps 1 and...

Страница 123: ... to a PC and format the storage media and then reset file numbering from the menu We don t recommend you to modify the name of a file folder stored in the storage media using a computer If you modify it this camcorder may not recognise modified files You can use your camcorder as a mass storage device So you can store general data in the storage media memory card with your camcorder Video files H ...

Страница 124: ... ON WINDOWS You can use the CyberLink MediaShow4 to playback recorded videos and photos on Windows To play back or edit videos on Macintosh you may install and use QuickTime Player v7 5 5 or higher iMovie application not supplied Playing back the videos or photos Once you have finished transferring videos or photos from the camcorder you can play back the recordings conveniently using the CyberLin...

Страница 125: ...n be limited depending on your web access environment 3 In the Library menu click the desired folder or file to display your recordings Video or photo thumbnails appear on the screen according the the selected source 4 Select the video or photo that you want to play and then click Play icon Playback starts and playback controls appear You can also double click the video or photo thumbnail to start...

Страница 126: ...indows 2000 TRANSFERRING PHOTOS FROM THE CAMCORDER TO YOUR COMPUTER 1 Connect the camcorder to your computer with the supplied USB cable 2 Set the USB Connect to Mass Storage page 97 Press the MENU button Use the Joystick to select Settings USB Connect Mass Storage 3 Double click the NO_ NAME icon displayed on the desktop The folders in the storage media appear Different file types are stored in d...

Страница 127: ...inoperative It is recommended that you put the DVD camcorder in a box together with a small silica bag when storing it in a closet etc Do not store the DVD camcorder in a place subject to strong magnetism or intense vibration This could cause malfunctions Detach the battery pack from the DVD camcorder and store it in a cool and dry place Leaving the battery pack attached or storing it at high temp...

Страница 128: ...direct sunlight heating elements moisture or dust ADDITIONAL INFORMATION Storage media Be sure to follow the guidelines below to prevent corruption or damage to your recorded data Do not bend or drop the storage media or subject it to strong pressure jolts or vibrations Do not splash the storage media with water Do not use replace or store the storage media in locations that are exposed to strong ...

Страница 129: ...the terminals When transporting carry the battery in a plastic bag Do not modify or disassemble Do not expose the battery to temperatures exceeding 60 C 140 F as this may cause the battery to overheat explode or catch fire To prevent damage and prolong service life Do not subject to unnecessary shock Charge in an environment where temperatures are within the tolerances shown as below This is a che...

Страница 130: ...dditional recording after finalisation Unfinalise page 57 X X Editing pages 52 54 X X X Reusing a disc by formatting Format page 58 X X possible X not possible You must format a new disc before recording on it When loading a DVD RW disc you must format it in Video or VR mode We cannot guarantee that you will be able to play back in all other manufacturer s DVD camcorders DVD players recorders or c...

Страница 131: ...nge Use a commercially available AC plug adaptor if necessary depending on the design of the wall outlet On TV colour systems Your camcorder is a PAL system based camcorder If you want to view your recordings on a TV or to copy it to an external device it must be a PAL system based TV or an external device and have the appropriate Audio Video jacks Otherwise you may need to use a separate video fo...

Страница 132: ... only Finalised Disc The disc is finalised To record on a DVD RW disc unfinalise it Not Supported Disc The disc is not recognized in the DVD camcorder The disc has been finalised in a camcorder manufactured by another company The supported discs are DVD R DVD R DL DVD RW Use a new disc Disc Error File system does not match to the disc The disc is used on the computer The disc is damaged Use a new ...

Страница 133: ...cards VP DX205 i DX2050 DX210 i only Message Icon Informs that Action Insert Card There is no memory card inserted in the card slot Insert a memory card Use another storage media pages 38 Card Full There is not enough space to record in the memory card Delete unnecessary files on the memory card Use another storage media page 38 Not Supported Card The memory card is not supported in this camcorder...

Страница 134: ...re related to playback When this happens you temporarily may not use the record or play functions of the DVD camcorder Also using the camcorder while there is condensation may cause malfunction or damage What can I do Turn the power off and detach the battery pack and leave it in a dry area for 1 2 hours before using it When does the dew condensation occur When the device is relocated to a place w...

Страница 135: ...en magnetic material is near the left side of the DVD camcorder the LCD may be turned off but it is not a malfunction If there is no operation for 3 minutes in STBY mode or thumbnail view the LCD screen will turn off automatically sleep mode for power saving purpose If no operation continues for another 3 minutes the camcorder will power off completely Any operation during the sleep mode will retu...

Страница 136: ... tab of the memory card SD card if any page 61 You cannot delete images protected by another device Release the protection of the image on the device You cannot format the memory card Release the lock on the write protect tab of the memory card SD card if any page 61 The memory card is not supported on your camcorder or card has some problems The data file name is not indicated correctly The file ...

Страница 137: ...ears This is not a malfunction When the screen is exposed to direct sunlight during recording the screen becomes red or black for an instant This is not a malfunction During recording the date time does not display Date Time is set to Off Set the Date Time Display to on page 94 You cannot record a photo image VP DX205 i DX2050 DX210 i only Set your camcorder to CARD Photo Record mode page 26 Relea...

Страница 138: ...back Play Pause function does not start playing Press the MODE button to set to the Play mode Images recorded using another device may not be played on your DVD camcorder Select a proper storage media VP DX205 i DX2050 DX210 i only page 38 Check out the memory card compatibility page 61 The Skip or Search function does not work properly If the temperature inside the camcorder is too high it may no...

Страница 139: ...mcorder firmly Disconnect the cable from the computer and camcorder restart the computer Connect it again properly Videos on a memory card can be played back on a computer using the provided software The supplied software CD CyberLink MediaShow4 is not Macintosh compliant To play back or edit videos on Macintosh you may install and use QuickTime Player v7 5 5 or higher iMovie application not suppl...

Страница 140: ...e are some functions you cannot activate simultaneously The following list shows examples of unworkable combinations of functions and menu items Menu cannot be used in the EASY Q mode The following menu cannot be used during recording Cannot Use Because of the following setting Anti Shake HDIS Resolution Web Mobile Digital Effect Mirror Mosaic Stepprinting 16 9 Wide Anti Shake HDIS C NIte EASY Q 1...

Страница 141: ...T LCD Viewfinder VP DX210 i only Colour LCD Connectors Composite output 1Vp p 75 Ω terminated Audio output 7 5dBs 600 Ω terminated USB output Mini B type connector General Power source DC 8 4V Lithium ion battery pack 7 4V Power source type Lithium Ion battery pack Power supply 100V 240V 50 60Hz Power consumption Recording 3 0W VP DX200 i DX205 i DX2050 only 3 2W VP DX210 i only Operating temperat...

Страница 142: ...stance However if there is no alternative to cutting off the plug remove the fuse and then safely dispose of the plug Do NOT connect the plug to a mains socket as there is a risk of shock hazard from the bared flexible cord IMPORTANT The wires in the mains lead are coloured in accordance with the following code BLUE NEUTRAL BROWN LIVE As these colours may not correspond to the coloured markings id...

Страница 143: ...BURG 0035 0 2 261 03 710 www samsung com lu NETHERLANDS 0900 SAMSUNG 726 7864 0 10 Min www samsung com nl NORWAY 815 56 480 www samsung com no POLAND 0 801 801 881 022 607 93 33 www samsung com pl PORTUGAL 80820 SAMSUNG 726 7864 www samsung com pt SLOVAKIA 0800 SAMSUNG 726 7864 www samsung com sk SPAIN 902 1 SAMSU 72678 www samsung com es SWEDEN 0771 400 200 www samsung com se U K 0845 SAMSUNG 726...

Страница 144: ...the use of certain Hazardous Substances in electrical and electronic equipment and we do not use the 6 hazardous materials Cadmium Cd Lead Pb Mercury Hg Hexavalent Chromium Cr 6 Poly Brominated Biphenyls PBBs Poly Brominated Diphenyl Ethers PBDEs in our products ...

Отзывы: