English –
11
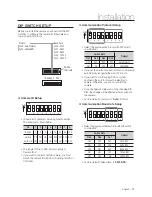
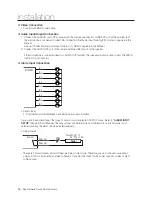
DIP SWITCH SETUP
Before you install the camera, you should set the DIP
switches to confi gure the camera ID, Baud rate and
communication protocol.
Camera ID Setup
ID number of camera is set using binary number.
The example is shown bellow.
Pin
1
2
3
4
5
6
7
8
ID Value
1
2
4
8
16
32
64
128
ex) ID=5
ex) ID=10
ON
OFF
OFF
ON
ON
OFF
OFF
ON
OFF
OFF
OFF
OFF
OFF
OFF
OFF
OFF
The range of ID is 0~255. Factory default of
Camera ID is 1.
If you want to control a certain camera, you must
match the camera ID with Cam ID setting of DVR or
Controller.
❖
•
•
•
Communication Protocol Setup
Select the appropriate Protocol with DIP switch
combination.
Switch State
Protocol
Pin1
Pin2
Pin3
Pin4
OFF
OFF
OFF
OFF
Auto Protocol
ON
ON
OFF
OFF
SAMSUNG
If you set the protocol as Auto Protocol, camera will
automatically recognize the kind of Protocol.
If you want to control using DVR or system
keyboard, their protocol must be identical to
camera. Otherwise, you can not control the
camera.
If you changed camera protocol by changing DIP
S/W, the change will be effective after you reboot
the camera.
Factory default of protocol is “
Auto
” Protocol.
Communication Baud rate Setup
Select the appropriate Baud rate with DIP switch
combination.
Switch State
Protocol
Pin5
Pin6
Pin7
OFF
OFF
OFF
2400 BPS
ON
OFF
OFF
4800 BPS
OFF
ON
OFF
9600 BPS
ON
ON
OFF
19200 BPS
OFF
OFF
ON
38400 BPS
Factory default of Baud rate is “
9600 BPS
”
❖
•
•
•
•
•
❖
•
•
Installation
1
2
3
4
5
6
ON
ON
7
8
1
2
3
4
5
6
ON
ON
7
8
1
2
3
4
5
6
ON
ON
7
8
pkGzGOX¥Y\\P
w
iGy
yzT[_\
{
WWWGaGY[WW
WWXGaG[_WW
WWYGaG`]WW
WWZGaGX`YWW
WW[GaGZ_[WW
WWWGaGhGw
WWZGaGzhtz|un
Protocol
Baud Rate
0x00 : Auto Protocol
0x03 : SAMSUNG
0x00 : 2400
0x01 : 4800
0x02 : 9600
0x03 : 19200
0x04 : 38400
RS-485
Terminate
ID Setting (1~255)

