background image

SAM1000 For Windows User's Manual v2.3 

Menu Functions  

  87 

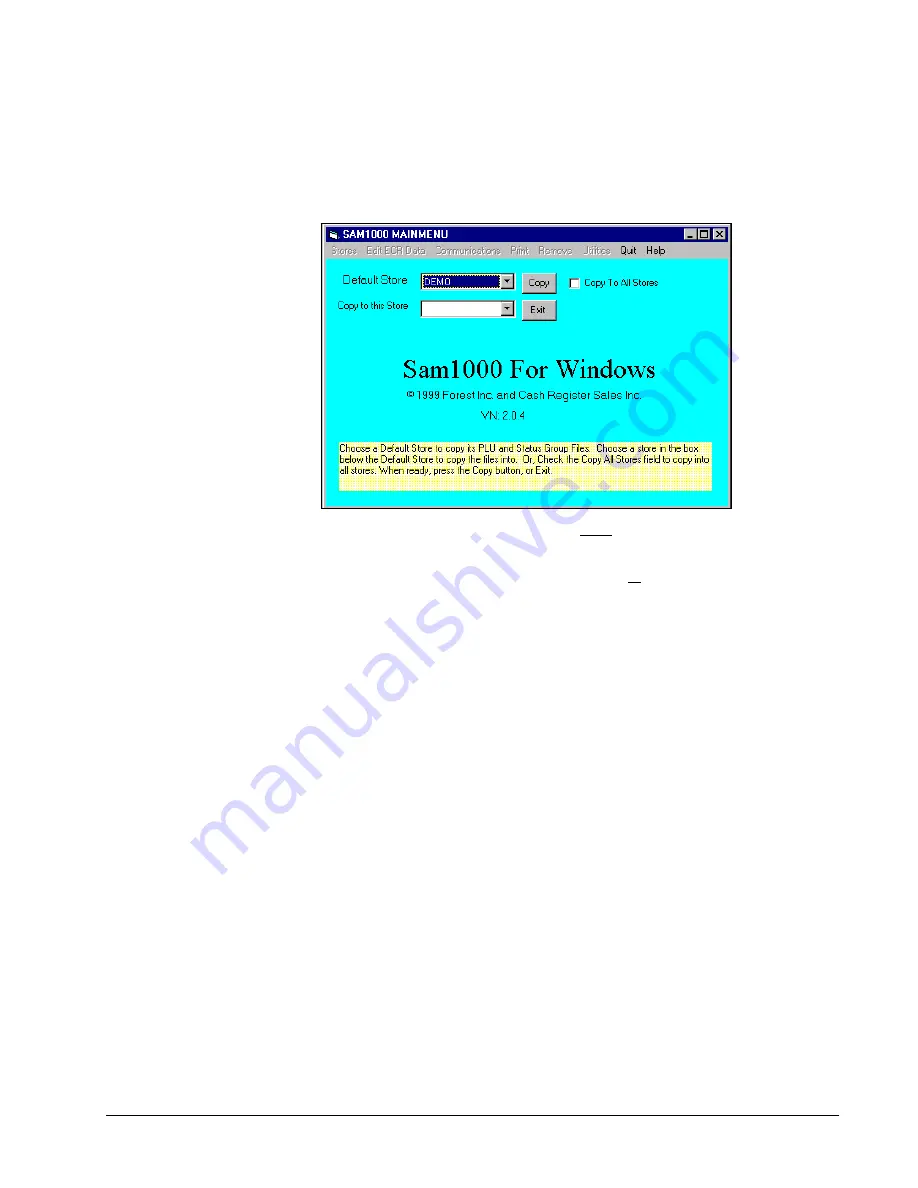
Copy PLU and Status Group Files 

Use the Copy a PLU File function to copy a PLU file to an individual store or all stores.   

1.


Choose 

Copy a PLU File

 from the 

Utilities 

menu. 


2.


Select the store that you wish to copy the PLU file from by clicking the Default Store 
field drop-down list box.   

3.


Select the name of the store you wish the PLU file copied to in the 

Copy PLU File to this 

Store 

field, or click the 

Copy To All Stores

 check box.   

4.


Click the 

Copy

 button to copy the PLU file to the selected store or all stores.    

5.


Click the 

Exit 

button to return to the main menu.   


Содержание SAM4S ECR SPS-1000

Страница 1: ...Samsung SPS 1000 SAM1000 For Windows User s Manual Version 2 3 All specifications are subject to change without notice 2013 CRS Inc ...

Страница 2: ...YOU WITH REGARD TO THE PRODUCT S TO WHICH THIS MANUAL APPLIES IT IS A WARRANTY FROM THE ENTITY OR INDIVIDUAL FROM WHOM YOU DIRECTLY PURCHASED THE PRODUCT S SUBJECT TO THE FOREGOING UNLESS YOU ARE A DIRECT END USER CUSTOMER OF CRS INC CRS INC DOES NOT EXTEND TO YOU ANY EXPRESS WARRANTY OR ANY IMPLIED WARRANTY AND EXPRESSLY DISCLAIMS ANY IMPLIED WARRANTY OF MERCHANTABILITY FITNESS FOR USE OR FITNESS...

Страница 3: ... Creating a New Store 12 Selecting the Default Store 13 Editing Store Information 14 Deleting a Store 15 Edit ECR Data 16 PLU File 18 PLU Status Group 27 Group 28 Function Keys 29 Options 30 Tax Tables 32 Messages 33 Time Periods 41 Employee 42 Authority Levels 46 Printer Tables and KV Routing 47 Ingredient Inventory 52 Time Activated Functions 54 Product Mix Groups 55 Custom Report 57 String Repo...

Страница 4: ...on 90 Inventory Comparison Procedure 90 Inventory Stock Totals 92 Program EPROM 93 Disable Upload of ECR Data 94 After Polling 95 Convert Polled File to Comma Delimited 96 Copy PLU Price Levels 97 Set the Number of Attempts in Polling 97 Backup Poll Data Files 97 Quit 99 Appendices 100 Structure of Stores 100 File Definitions 101 Structure of Polling Files 104 Sam1000 File Structures for PLU Infor...

Страница 5: ...SAM1000 For Windows User s Manual v2 3 Contents iii Software 113 Samsung SPS 1000 113 SAM 1000 113 Starting Operations 114 Cabling Diagrams 115 Cable Pinouts 116 Manual Revision Record 118 ...

Страница 6: ......

Страница 7: ... register programs Download program files to the register from the PC Poll reports from the register save display or print them at the PC Poll all stores or individual stores Poll unattended at a predetermined time Convert polled reports to ASCII files ready to be used by other PC applications Requirements To use this utility you must have Pentium 100 or faster CPU 32 MB RAM 150 MB minimum hard di...

Страница 8: ...ables and connections 1 Load the SAM1000 program CD into your CD drive 2 From the Windows Desktop double click the My Computer icon 3 Select your CD ROM drive usually drive D 4 Choose Setup The Welcome dialog displays 5 Click Next The Ready to Install dialog displays 6 Click Next The Install Directory dialog displays 7 Click Next The Select Shortcut Folder dialog displays 8 Click Next When all fil...

Страница 9: ...or polling and you must set the appropriate parameters for that port See Serial Port Device Selections in the Samsung SPS 1000 Program Manual to select the Polling option for the port to which you are connected See Define Serial Port Parameters in the Samsung SPS 1000 Program Manual to select the BAUD rate and other options for the port to which you are connected ...

Страница 10: ...ick SAM1000 exe 2 The SAM1000 For Windows main screen displays YOU MUST DO THIS FIRST 1 Before you can attempt communications or editing you must create at least one store Refer to Creating a New Store on page 12 2 After creating a store you must Receive Upload information from the ECR Refer to Receive Programs from ECR Upload on page 73 ...

Страница 11: ... Mouse and Keyboard You can choose a menu menu item or a command by clicking on it with your mouse Viewing Menus and Selecting Menu Items 1 Point at a menu item with your mouse 2 Point at your choice on the menu and click the left mouse button Menu Item Menu Choices ...

Страница 12: ...choices cascade from the first menu 2 Move the mouse pointer in the direction of the arrow to display additional choices 3 In some cases additional choices are available from a cascading menu Move the mouse pointer in the direction of the arrow to display additional choices Arrow Cascading Menu More Choices ...

Страница 13: ... your selection when the box is selected or click on the arrow to open the box and view your options Click on an item to select it If all the choices are not in view scroll bars are provided Scroll Boxes In some situations you select the object you are editing by using a scroll list box Move the scroll box to select the item you wish to work with Drag the scroll box or click the scroll arrows to f...

Страница 14: ...w cannot be edited Check Boxes The cursor changes to an arrow when it passes over a check box field Click on a check box to make a selection Click the check box again to deselect the item Drop Down List Boxes The cursor changes to an arrow when it passes over a drop down list box arrow Click on the arrow in the box to open the drop down list box and display a list of choices Click on an item to se...

Страница 15: ...9 Interface Specifications Communications Specifications Asynchronous Operation Communication Mode Half Duplex Baud Rate Select 9600 19 200 38 400 or 57 600 Signal Level RS 232C Character Bits 8 Parity Bits None Stop Bits 1 Error Detection Data sum check ...

Страница 16: ...10 Introduction SAM1000 For Windows User s Manual v2 3 ...

Страница 17: ...indows User s Manual v2 3 Menu Functions 11 Menu Functions Stores Choose Stores from the Main menu to edit create a new or delete as store A store must be created before any communications or editing can take place ...

Страница 18: ...th the register by modem The T is for TONE and the P is for PULSE If you communicate direct leave this field blank From To IRC Range R Enter the IRC range of registers from 1 32 If the register is standalone use from 1 to 1 Use PC Com Port 1 32 R Enter the PC Com port 1 32 that you are using for communications Download PLUs O Select the Download PLUs check box if you wish to download changed PLUs ...

Страница 19: ...a carrier If no carrier is detected within 60 seconds after you dial the modem will answer back with No Carrier Detect Do not put into this string any E Q or V values The software automatically handles these values Baud Rate R Select the communications speed for this store 3 Click Exit to save store information Selecting the Default Store Click the Default Store drop down list box to select the wo...

Страница 20: ... P if you intend to communicate with the register by modem The T is for TONE and the P is for PULSE If you communicate direct leave this field blank From To IRC Range R Enter the IRC range of registers from 1 32 If the register is standalone use from 1 to 1 Use PC Com Port 1 32 R Enter the PC Com port 1 32 that you are using for communications Download PLUs O Select the Download PLUs check box if ...

Страница 21: ...it would be good to initialize with the string S7 60 This value makes the modem wait for up to 60 seconds to detect a carrier If no carrier is detected within 60 seconds after you dial the modem will answer back with No Carrier Detect Do not put into this string any E Q or V values The software automatically handles these values 3 Click Exit to save store information Deleting a Store 1 Choose Dele...

Страница 22: ... register s keyboard Detailed questions about the meaning of the register options are best answered by referring to the Samsung SPS1000 Program Manual Note If you did not Upload programs from the ECR you will get a message The file does not exist if you attempt to select any of these options Note If you wish to create a program for a new store you can use the Copy a Store on page 86 and then edit ...

Страница 23: ...SAM1000 For Windows User s Manual v2 3 Menu Functions 17 Misc Program items ...

Страница 24: ...screen or refer to the Samsung SPS 1000 Program Manual for a complete description of your program options 1 Choose the Edit ECR Data menu then select P Mode Programming menu to open the P Mode Programming menu Select PLU to open the PLU menu Choose PLU The PLU Program screen displays with the first PLU in the store file displayed ...

Страница 25: ...scriptor in the box and press ENTER or open the Find by Descriptor drop down list box and click on the PLU you wish to edit If necessary use the scroll box to view the list of PLUs in the file Open the Find by Descriptor drop down list box Select the PLU you wish to edit With the list box open you can type the beginning letter or letters of a PLU descriptor and PLUs beginning with your entry will ...

Страница 26: ...ur mouse pointer to the field you wish to edit You can edit fields with numeric information by double clicking on the field then entering new data If you are entering price data you must use the decimal key You can edit fields with drop down list boxes such as the PLU STATUS LINK field by opening the list box and selecting from the available options You can edit fields with check boxes such as the...

Страница 27: ...anual v2 3 Menu Functions 21 Adding a PLU 1 Click the Add button A new PLU screen opens for entries 2 Enter the PLU number you wish to assign in the PLU field and then complete entries for the new PLU 3 Click Exit to save changes ...

Страница 28: ...ish to copy 2 Click the Copy button A new PLU screen opens for edits 3 Enter the new PLU Descriptor and change any other fields as necessary 4 Click Exit to save changes A confirmation dialog displays 5 Choose Yes to save the new PLU choose No to re edit or choose Cancel to exit without saving ...

Страница 29: ... To PLU fields 4 Click Create to complete the copy You will need to go to each PLU individually and edit the descriptor and other PLU attributes that are unique to the new PLUs You can condinue to create new PLU ranges as necessary click Exit when complete 5 Choose Yes to save the new PLU choose No to re edit or choose Cancel to exit without saving 6 Go to each individual PLU in the PLU range you ...

Страница 30: ...s Peripherals Division for more information 1 Select the Barcode tab from the PLU programming screen The screen displays a view of the barcode with the current barcode property settings 2 Click the Show Barcode Print Margins button 3 Set the margins as indicated for the SPR 770 printer loaded with 1 x 2 labels Adjust settings as necessary for other label printer combinations 4 Click the Show Barco...

Страница 31: ...ded with 1 x 2 labels Adjust settings as necessary for other label printer combinations 6 Click the Options tab and set the properties as indicated 7 Click the Font Colors tab Click the Change Font button and select the font size and style for the print of the bar code number 8 Click OK to accept the settings and view the bar code as specified ...

Страница 32: ...U 1 Select the PLU you wish to delete 2 Click the Delete button 3 A warning dialog displays asking if you are sure you wish to delete the PLU 4 Click Yes to delete the PLU click No to abort the delete process Note To delete a PLU all totals Z1 through Z5 for that PLU must first be cleared PLUs will not be deleted at the register unless there is no register activity and deleted PLUs are downloaded ...

Страница 33: ...n displays with the first status group in the store file displayed 2 Select the Status Group you wish to edit by typing a number in the box and pressing ENTER or open the Status Group drop down list box and click on the group you wish to edit If necessary use the scroll bar to view all of the groups 3 Edit fields as necessary by moving your mouse pointer to the field you wish to edit You can edit ...

Страница 34: ...on of your program options 1 Choose the Edit ECR Data menu then select P Mode Programming menu to open the P Mode Programming menu Select Group to display the Group Program screen for the selected store file 2 Use the scroll box at the right of the screen to select the group you wish to program 3 The options for the specific group are displayed Make selections or changes as necessary 4 Click Exit ...

Страница 35: ...t ECR Data menu then select P Mode Programming menu to open the P Mode Programming menu Select Function Keys to display the Function Keys screen 2 Use the scroll box at the bottom of the screen to select the function key you wish to program Note that the options vary from one function key to another 3 Make selections or changes as necessary 4 If needed use the scroll box to select additional funct...

Страница 36: ... menu to open the P Mode Programming menu Select Options 2 Choose one of the following option categories General Function Options Tax Options Cash Drawer Options Training Mode Options Level Modifier Options Tracking File Options Kitchen Printing Video Options Validation Subtotal Print Options General Printing Options Report Printing Options Report Options Time Keeping Options E J and Detail Printi...

Страница 37: ... numeric information by double clicking on the field then enter new data If you are entering data with a decimal you must use the decimal key You can edit fields with drop down list boxes by opening the list box and selecting from the available options You can edit fields with check boxes by clicking on the field to add or remove a check 6 Click Exit to save changes ...

Страница 38: ...n select either Tax Rates 1 5 or Tax Rate 6 to display the appropriate Tax Rate Program screen for the selected store file 2 If you are programming tax 1 5 select the tax from the Tax drop down box 3 Select the tax type option button 4 If the tax type you select is Add On or VAT the Rate Threshold and High Hold fields are activated if you select Table the Table fields are activated 5 Complete the ...

Страница 39: ...ssages then select Logo to display the Logo Messages screen for the selected store file 2 Use the scroll box at the right of the screen to find the message you wish to program 3 Select Left Right or Center justification from the Justify drop down box 4 Enter a new message or edit an existing message by double clicking on a field then typing a new message 5 Click Exit to save changes ...

Страница 40: ... open the P Mode Programming menu Select Messages then select Error Messages to display the Error Messages screen for the selected store file 2 Use the scroll box at the right of the screen to find the message you wish to program 3 Edit messages as necessary by double clicking on a field then typing a new message 4 Click Exit to save changes ...

Страница 41: ... the P Mode Programming menu Select Messages then select System Descriptors to display the System Descriptors screen for the selected store file 2 Use the scroll box at the right of the screen to find the message you wish to program 3 Edit descriptors as necessary by double clicking on a field then typing a new descriptor 4 Click Exit to save changes ...

Страница 42: ...P Mode Programming menu Select Messages then select Check Endorsement Messages to display the Check Endorsement Messages screen for the selected store file 2 Select Left Right or Center justification from the Justify drop down box 3 Enter a new message or edit an existing message by double clicking on a field then typing a new message 4 Click Exit to save changes ...

Страница 43: ... P Mode Programming menu Select Messages then select Guest Check Logo Message to display the Guest Check Logo Message screen for the selected store file 2 Select Left Right or Center justification from the Justify drop down box 3 Enter a new message or edit an existing message by double clicking on a field then typing a new message 4 Click Exit to save changes ...

Страница 44: ...the P Mode Programming menu Select Messages then select Validation Message to display the Validation Message screen for the selected store file 2 Select Left Right or Center justification from the Justify drop down box 3 Enter a new message or edit an existing message by double clicking on a field then typing a new message 4 Click Exit to save changes ...

Страница 45: ...hen select Financial Report Message to display the Financial Report Messages screen for the selected store file 2 Use the scroll box at the right of the screen to find the message you wish to program 3 Edit messages as necessary by double clicking on a field then typing a new message 4 Click the Print or Red check boxes to set the appropriate status for appearance on reports 5 Click Exit to save c...

Страница 46: ...hen select Employee Report Message to display the Employee Report Messages screen for the selected store file 2 Use the scroll box at the right of the screen to find the message you wish to program 3 Edit messages as necessary by double clicking on a field then typing a new message 4 Click the Print or Red check boxes to set the appropriate status for appearance on reports 5 Click Exit to save cha...

Страница 47: ...tivated so that they will not appear on reports To inactivate a period replace active for the period with an inactive All time units are based upon a 24 hour clock military time 1 Choose the Edit ECR Data menu then select P Mode Programming menu to open the P Mode Programming menu Select Time Periods to display the Time Period Program screen for the selected store file 2 Use the scroll box at the ...

Страница 48: ...then select Employee to display the Employee Program screen for the selected store file 2 Move the scroll box to select the employee you wish to work with Drag the scroll box or click the scroll arrows to find your selection 3 Use the scroll box at the right of the screen to find the field you wish to program 4 Edit fields as necessary by moving your mouse pointer to the field you wish to edit You...

Страница 49: ...here 1 Choose the Edit ECR Data menu then select P Mode Programming menu to open the P Mode Programming menu Select Employee then select Job Codes to display the Job Codes Program screen for the selected store file 2 Use the scroll box at the right of the screen to find the field you wish to program 3 Edit job codes as necessary by double clicking on a field then entering a new descriptor 4 Click ...

Страница 50: ...Mode Programming menu to open the P Mode Programming menu Select Employee then select Pay Rates to display the Pay Rates Program screen for the selected store file 2 Use the scroll box at the right of the screen to find the field you wish to program 3 Edit pay rates as necessary by double clicking on a field then entering a new rate Use the decimal key as necessary 4 Click Exit to save changes ...

Страница 51: ...et here determines the number that is read when the card is swiped 1 Choose the Edit ECR Data menu then select P Mode Programming menu to open the P Mode Programming menu Select Employee nad then select Card Read Format to display the Card Read Format Program screen for the selected store file 2 Click on the check boxes and fill in the numeric fields to program your magnetic card reader to work fo...

Страница 52: ...ority levels is determined in memory allocation 1 Choose the Edit ECR Data menu then select P Mode Programming menu to open the P Mode Programming menu Select Authority Levels to display the Authority Level Program screen for the selected store file 2 Use the scroll boxes at the right of the screen and the bottom of the screen to find the field you wish to program 3 Edit fields as necessary by cli...

Страница 53: ...he P Mode Programming menu Select Printer Tables and KV Routing then select System Printer Configuration to display the System Printer Configuration screen for the selected store file 2 Use the scroll box at the right of the screen to find the field you wish to program 3 Edit fields as necessary by moving your mouse pointer to the field you wish to edit You can edit fields with alpha numeric or nu...

Страница 54: ...en select P Mode Programming menu to open the P Mode Programming menu Select Printer Tables and KV Routing then select Kitchen Video Routing to display the Kitchen Video Routing screen for the selected store file 2 Use the scroll box at the right of the screen to find the field you wish to program 3 Edit fields as necessary by moving your mouse pointer to the field you wish to edit You can edit fi...

Страница 55: ...Routing then select Kitchen Printer Routing to display the Kitchen Printer Routing Programming screen for the selected store file 2 Use the scroll box at the right of the screen to find the field you wish to program 3 Edit the Printer field by selecting a printer from the Printer List drop down box then clicking on the appropriate cell 4 Edit fields as necessary by moving your mouse pointer to the...

Страница 56: ...ect Printer Tables and KV Routing then select Receipt Printer Routing to display the Receipt Printer Routing screen for the selected store file 2 Use the scroll box at the right of the screen to find the field you wish to program 3 Edit fields as necessary by moving your mouse pointer to the field you wish to edit Double click on the field then enter new data 4 Click Exit to save changes ...

Страница 57: ...ect Printer Tables and KV Routing then select Detail Printer Routing to display the Detail Printer Routing screen for the selected store file 2 Use the scroll box at the right of the screen to find the field you wish to program 3 Edit fields as necessary by moving your mouse pointer to the field you wish to edit Double click on the field then enter new data 4 Click Exit to save changes ...

Страница 58: ... Edit ECR Data menu then select P Mode Programming menu to open the P Mode Programming menu Select Ingredient Inventory then select Edit Ingredient to display the Ingredient Program screen for the selected store file 2 Use the scroll box at the right of the screen to find the field you wish to program 3 Edit fields as necessary by moving your mouse pointer to the field you wish to edit Double clic...

Страница 59: ...g menu Select Ingredient Inventory then select Recipe Table to display the Recipe Table screen for the selected store file 2 Use the scroll box at the right of the screen to find the field you wish to program 3 Edit fields as necessary by moving your mouse pointer to the field you wish to edit Double click on the field then enter new data 4 Click Exit to save changes ...

Страница 60: ...ls Price Levels Macros String Reports Shifts KP Time Period 3 The Time Activated Keyboard Levels screen is shown below 2 If necessary use the scroll box at the right of the screen to find the field you wish to program 3 Edit the Active Time fields as necessary by moving your mouse pointer to the field you wish to edit Double click on the field then enter new data 4 Edit the day of week fields by c...

Страница 61: ...The Product Projection report provides a history of each item s sales by day of week Product Mix Items 1 Choose the Edit ECR Data menu then select P Mode Programming menu to open the P Mode Programming menu Select Product Mix Groups then select Product Mix Items to display the Product Mix Item Programming screen for the selected store file 2 Use the scroll box at the right of the screen to find th...

Страница 62: ...oups then select Product Mix Group Time Periods to display the Product Time Period Programming screen for the selected store file 2 Use the scroll box at the right of the screen to find the time period you wish to program 3 Edit times as necessary by double clicking on a field then typing a new time 4 Select Active or Inactive from the drop down box to determine if the period is used 5 Click Exit ...

Страница 63: ...ustom Report Program screen for the selected store file 2 Use the scroll box at the right of the screen to find the total on the report you wish to program 3 Edit fields as necessary by moving your mouse pointer to the field you wish to edit You can edit fields with numeric information by double clicking on the field then entering new data You can edit fields with drop down list boxes such as the ...

Страница 64: ...wish to edit or select the string report at the String Report list box 3 Use the scroll box at the right of the screen to find the total on the report you wish to program 4 Edit fields as necessary by moving your mouse pointer to the field you wish to edit You can edit fields with numeric information by double clicking on the field then enter new data You can edit fields with drop down list boxes ...

Страница 65: ...amming menu Select Non PLU Code to display the Non PLU Code screen for the selected store file 2 Enter the Non PLU Code you wish to edit or select the number at the Non PLU list box 3 Edit fields as necessary by moving your mouse pointer to the field you wish to edit You can edit fields with numeric information by double clicking on the field then entering new data You can edit fields with drop do...

Страница 66: ...amming screen for the selected store file 2 Enter the Macro you wish to edit or select the macro at the Macro list box 3 Add a function to a macro line by first selecting the function you wish to add from the Function Key list box then click a cell adjacent to the line you wish to set 4 To remove a function from a macro sequence replace the existing function with Function Key 0 5 Click Exit to sav...

Страница 67: ... to select the WLU you wish to edit 3 If necessary edit the Description of Item Choices and Link to WLU fields then edit the option check boxes for the WLU 4 To add items to the WLU first select the item you wish to add from the PLU Condiment or Function Key drop down list box Then select the Type on the grid line where you want to add 5 To remove an item from the WLU select the grid line you wish...

Страница 68: ...ive materials 1 Choose the Edit ECR Data menu then select P Mode Programming menu to open the P Mode Programming menu Select Age Verification to display the Age Verification screen for the selected store file 2 Select the Value text box for the appropriate Age Verification Element number and type in the age at which sales will be allowed 3 Click on the Exit icon to return to the main menu and save...

Страница 69: ...e the Edit ECR Data menu then select P Mode Programming menu to open the P Mode Programming menu Select Mix and Match to display the Mix and Match screen for the selected store file 2 Enter descriptors trip level and prices as appropriate 3 Click on the Exit icon to return to the main menu and save your changes ...

Страница 70: ...amming screen for the selected store 2 Use the scroll box at the right of the screen to find the option you wish to program 3 Edit fields as necessary by moving your mouse pointer to the field you wish to edit You can edit fields with numeric information by double clicking on the field then entering new data You can edit fields with drop down list boxes by opening the list box and selecting from t...

Страница 71: ...ct S Mode to open the S Mode Programming menu Select Printer Drivers to display the Printer Drivers programming screen for the selected store 2 Select the printer you wish to edit from the Printer list box 3 Select the Start or Cancel field you wish to edit then type new command information 4 Click Exit to save changes ...

Страница 72: ...rom the Serial Port list box Then select the device you are connecting to the port from the Device list box 3 Edit fields as necessary by moving your mouse pointer to the field you wish to edit You can edit fields with numeric information by double clicking on the field then entering new data You can edit fields with drop down list boxes by opening the list box and selecting from the available opt...

Страница 73: ...he screen 4 Assign a new PLU WLU or function key to the location you have selected If you wish to assign a PLU to the selected location open the PLU List drop down box and select the PLU you wish to assign then click the Select PLU button at the bottom of the screen If you wish to assign a WLU to the selected location open the WLU List drop down box and select the WLU you wish to assign then click...

Страница 74: ...ck on the icon again to set the color of the text back to the original color 8 Select a key location or group of locations and click on the Bold On Off or Italics On Off to change the text to bold or italics Click on the icon again to reverse the selection 9 Select a key location or group of locations and use the Font Size scroll bar to select the text font size 10 Click on the Print Keyboard icon...

Страница 75: ... menu Select Tare Weights to display the Tare Weights programming screen for the selected store 2 Use the scroll bar on the right to view the tare you wish to program 3 Edit fields as necessary by moving your mouse pointer to the field you wish to edit double click on the field then enter new data using the decimal key when necessary 4 Click Exit to save changes ...

Страница 76: ...ose Communications from the Main menu to initiate communications with the Samsung SPS 1000 Polling 1 Choose Polling from the Communications menu to connect to the store to poll reports The SAM1000 Polling dialog box will display Note Polling setup file must be completed first ...

Страница 77: ...olling is manual and will begin immediately Poll All Stores O Select the Poll All Stores checkbox to poll all stores If not selected enter an individual store to poll in the List of Stores field List of Stores O Select an individual store to poll if the Poll All Stores check box is not selected Session R Select the polling session 1 6 Polling will proceed in consecutive order by session number Tim...

Страница 78: ...e downloaded 3 After memory allocation is successfully downloaded select the program components you wish to send to the ECR Check Check All for all components except memory allocation A check mark means the item is selected Use the scroll bar at the right to view all of the possible program components 4 Click the Download button to initiate the download to the ECR click Exit to exit the window The...

Страница 79: ...2 From the Upload Program dialog box select the program components you wish to get from the ECR Check Check All for all components A check mark means the item is selected Use the scroll bar at the right to view all of the possible program components 3 Click the Upload button to initiate the download to the ECR click Exit to exit the window The Status field will monitor the progress of the upload f...

Страница 80: ... necessary use the scroll bar on the bottom When you have located the field for the specific report you wish to edit open the list box by clicking on the appropriate arrow Select Print from the list box if you wish to print the report at the ECR when polling select the check box under No Print if you do not wish to print the report at the ECR when polling Select the blank position if you wish to r...

Страница 81: ...SAM1000 For Windows User s Manual v2 3 Menu Functions 75 Print Choose Print from the Main menu to access the printing utilities described below ...

Страница 82: ... totals with zero values skipped Report Type O Select the report type from the drop down list box If no report is chosen all reports will be loaded Keylock Mode O Select the mode of the report If nothing is selected all key lock modes will be displayed Grid Lines O Click the Grid Lines button to print display the selected report with or without grid lines White Gray O Click the White Gray button t...

Страница 83: ...le of a given day Uploads 1 Choose Log Files from the Print menu then choose Uploads to view and or print the uploads of a given day The Upload Log File Report dialog box for the selected store displays 2 Type or select a date from the File Date list box 3 Click the Load Table button to load the table for the selected file date 4 Click the Print Table button to print the table ...

Страница 84: ...choose Downloads to view and or print the uploads of a given day The Download Log File Report dialog box for the selected store displays 2 Type or select a date from the File Date list box 3 Click the Load Table button to load the table for the selected file date 4 Click the Print Table button to print the table ...

Страница 85: ...nt the polling activity of a given day The Polling Log File Report dialog box for the selected store displays 2 Select the polling date from the drop down list box 3 Click the Load Table button to view the selected file date log 4 With the report in view click the Print Table button to print the report 5 Click Exit to return to the main menu ...

Страница 86: ...nd print out the PLU file of the working store The PLU File dialog box displays 2 Click the Sort by PLU button to view the file sorted by PLU click the Sort by Descriptor button to view the file sorted alphabetically by descriptor 3 Click the Print File button to print the file 4 Click Exit to return to the main menu ...

Страница 87: ...rst and last PLU in the range from the drop down list boxes 3 Click on Load Grid to load the table with the selected range of PLUs 4 Click on the White Gray icon to toggle between white and gray background for the descriptors 5 Click on the Show Grid Lines to toggle between displaying the grid lines on the table and showing no lines 6 Click the Print PLU Range button to print the file 7 Click Exit...

Страница 88: ... drop down list for the reports you wish to consolidate 3 Chose the Report Type Financial PLU or Groups from the drop down list for your consolidated report 4 Click on Load Table to load the consolidated store report 5 Click on the Grid Lines icon to toggle between displaying grid lines on the table and not 6 Click on the White Gray icon to toggle between showing the descriptors in white or gray 7...

Страница 89: ...t Found PLU File 1 Choose Not Found PLU File from the Print menu to display and print out the Not Found PLUs for the selected store The Not Found PLU File dialog box displays 2 Click Print Grid to Print the Not Found PLUs 3 Chose Exit to return to the main menu ...

Страница 90: ...nt old poll files deleted The message FINISHED will display when completed 3 Click Exit to return to the main menu Log Files Upload Download Poll 1 Choose Remove Old Poll Log Files from the Utilities menu to delete unwanted poll log files The Remove Old Polling Log Files dialog box will display 2 Enter the date through which you want old poll log files deleted The message FINISHED will display whe...

Страница 91: ...ilities Choose Utilities from the Main menu to access the utilities described below Display Memory Allocation 1 Choose Display Memory Allocation from the Utilities menu to display the memory allocation of the store s ECR 2 Click Exit to return to the main menu ...

Страница 92: ...tion to create a new store with the identical attributes of an existing store 1 Choose Copy a Store from the Utilities menu 2 Select the store that you wish to copy from by clicking the Default Store field drop down list box 3 Enter the name of the store you wish to create in the New Copy Store field 4 Click the Copy button to create new store will identical attributes as the default store 5 Click...

Страница 93: ...the Utilities menu 2 Select the store that you wish to copy the PLU file from by clicking the Default Store field drop down list box 3 Select the name of the store you wish the PLU file copied to in the Copy PLU File to this Store field or click the Copy To All Stores check box 4 Click the Copy button to copy the PLU file to the selected store or all stores 5 Click the Exit button to return to the...

Страница 94: ...se Pause Between Stores In Poll from the Utilities menu The Pause In Polling dialog box displays 2 Enter the number of seconds you wish to pause in the field provided 3 Click the Exit button to save changes and return to the main menu Calculate Number of PLUs You can view the total number of PLUs in the database The number of changed and deleted PLUs are tracked 1 Choose Calculate Number of PLUs f...

Страница 95: ... close when polling is completed 1 Choose Set to Automatically Poll from the Utilities menu The Set to Automatically Poll dialog box displays 2 Select the first check box if you wish to automatically poll when Sam1000 is executed Select the second check box if you wish to close Sam1000 automatically when polling is completed 3 Click Exit 4 Close Sam1000 and then restart it for changes to take effe...

Страница 96: ...external file must have the following characteristics The name of the file must be COLLECT DAT The file COLLECT DAT must be in the same directory of the Store name If you collect data for the store KFC then the file COLLECT DAT must be in the path SAM1000 STORES KFC COLLECT DAT The file must be a comma delimited ASCII text file A PLU must be on its own line Every Line must end with a carriage retu...

Страница 97: ...ion will now display 6 Click the Print Grid Button to print the spreadsheet to your default printer Notes When you choose Set Computer Count to Physical Count you will have an Adjust row in the Inventory History Purchase History updating your inventory to the new physical inventory counts you entered into the portable data terminal Price corrections must be made manually in the PLU file or on the ...

Страница 98: ...ory Stock Totals This utility will calculate the total inventory of the Store PLU file 1 Choose Inventory Stock Totals from the Utilities menu The Inventory In Stock dialog box displays 2 Click the Print Grid Button to print the spreadsheet to your default printer ...

Страница 99: ...ogram EPROM This utility allows you to download a new EPROM to a SPS 1000 1 Rename the EPROM file to L G bin 2 Copy L G bin to the SAM1000 directory 3 Choose PROGRAM EPROM from the Utilites menu The EPROM DOWNLOAD dialog box displays 4 Click Erase and Download ...

Страница 100: ... integrity of you the register program stored by SAM 1000 by disabling the Receive Programs from ECR upload function on the Communications menu 1 Choose Disable Upload of ECR Data from the Utilities menu The Sam 1000 Upload Status dialog box displays 2 Click the check box to disable uploads 3 Click Exit ...

Страница 101: ...er polling 3 Select Your Internet Connection from the drop down list All connections set up in your PC should display for you to chose from 4 Type in your Outgoing Mail Host Name SMTP in the appropriate location If you have trouble locating the host name please contact your e mail provider The host names vary greatly depending on the provider 5 Type in your E mail Account Logon Name 6 Type in your...

Страница 102: ...e box will display the name of the converted file Click Exit Example of Converted Poll File GNG 244 02 11 2004 14 54 32 Z1 FINANCIAL 02 11 2004 14 54 COUNT TOTAL PLU TTL 75 68 80 66 PLU TTL 0 0 ADJST TTL 75 68 80 66 NONTAX 8 11 91 TAX1 SALE 0 42 75 TAX2 SALE 0 25 TAX3 SALE 0 1 TAX1 0 3 26 TAX2 0 1 78 NET SALE 20 85 7 GROSS SA 0 85 7 CASH SAL 21 85 7 NOSALE N 0 123 CASH IN D 0 85 7 DRWR TTL 0 85 7 ...

Страница 103: ...urn to the main menu Set the Number of Attempts in Polling You can set the number of attempts that SAM7000 will attempt to complete a successful poll for each store 1 Choose Set Number of Attempts in Polling from the Utilities menu The dialog box for the selected store displays 2 Enter a value of 1 to 9 Click Exit to return to the main menu Backup Poll Data Files This utility allows you to back up...

Страница 104: ...1000 For Windows User s Manual v2 3 2 Select a store to copy and a copy to drive from the appropriate list boxes Click Begin Copy 3 The dialog will notify you when the copy is complete Click Exit to return to the main menu ...

Страница 105: ...SAM1000 For Windows User s Manual v2 3 Menu Functions 99 Quit Choose Quit from the Main menu to exit SAM1000 For Windows ...

Страница 106: ...ew sub directory under the directory SAM1000 For Windows for the store If you create a store named BIGBOYS the following will be created 1 A directory named STORES BIGBOYS This directory holds all the programming files for this store 2 A directory named STORES BIGBOYS POLL This directory holds all the daily polling files for this store ...

Страница 107: ...12 REPORT PRINTING RPO 6 13 REPORT PRINTING RTO 6 14 TIMEKEEPING ETK 6 15 S MODE SYSTEM OPTIONS SMO 6 16 KEYBOARD LAYOUT KLP 6 17 NLU NLU 6 18 KP TIME PERIOD KPT 6 19 SYSTEM DESCRIPTORS SYD 6 20 ERROR MESSAGES ERR 6 21 FINANCIAL REPORT MESSAGES FIM 6 22 EMPLOYEE REPORT MESSAGES EPR 6 23 LOGO MESSAGE LOM 6 24 VALIDATION MESSAGE VLM 6 25 CHECK ENDORSEMENT MEESAGE CEM 6 26 GUEST CHECK MESSAGE GCM 6 2...

Страница 108: ...METERS SEP 6 45 SYSTEM PRINTER CONFIGURATION SPR 6 46 KP ROUTING KPR 6 47 KV ROUTING KVR 6 48 RECEIPT PRINTER ROUTING RPR 6 49 DETAIL PRINTER ROUTING DPR 6 50 EDIT FINANCIAL REPORT EFR 6 51 EDIT EMPLOYEE REPORT EER 6 52 6 53 6 54 6 55 6 56 6 57 WLU WLU 6 58 PRODUCT MIX GROUPS PMG 6 59 PRODUCT MIX TIME PMT 6 60 RECIPE RCP 6 61 INGREDIENT ING 6 62 6 63 EMPLOYEE EPY 6 64 TIME PERIOD TPD 6 65 PLU STAT...

Страница 109: ...anual v2 3 Appendices 103 6 00 Category Extension 6 74 CHECK TABLE FILE 3 CT3 6 75 CHECK TABLE FILE 4 CT4 6 76 6 77 6 78 6 79 6 80 6 81 PLU STOCK PSK 6 82 6 83 6 84 ELECTRONIC JOURNAL EJR 6 85 MEMORY ALLOCATION MEM 6 86 DATE TIME ...

Страница 110: ...This designates that this is the start of the polling session The name of the store follows a forward slash the date a forward slash and the time in hours minutes and seconds The last line of the entire session will be saved as SESSION END The last three characters of the line is ASCII character decimal 17 a left arrow This designates that this is the end of the polling session If you do not defin...

Страница 111: ...e of prepoll taken 53 65 forward slash used as a separator 53 66 Time of prepoll Structure of Line 3 Line 3 is the report column header Position 1 ASCII character decimal 16 a right arrow 53 64 Identifier This is usually the report type as in line 2 However for reports such as clerks groups by time period etc this will be the element of the report Example Employee 1 Employee 2 40 Balance of the li...

Страница 112: ...es SAM1000 For Windows User s Manual v2 3 REPORT END This line ends with 2 left arrow characters All data for the given element will appear between the 2 lines with 2 arrows Data lines do not start with any arrows ...

Страница 113: ...umeric 8 Recipe Table 44 3 Numeric 9 Inactive Option 47 1 Checkmark 10 Preset Option 48 1 Checkmark 11 Allow Price Override 49 1 Checkmark 12 Price HALO 1 50 8 Numeric 13 Price Level 1 58 2 Numeric 14 Price HALO 2 60 8 Numeric 15 Price Level 2 68 2 Numeric 16 Price HALO 3 70 8 Numeric 17 Price Level 3 78 2 Numeric 18 Price HALO 4 80 8 Numeric 19 Price Level 4 88 2 Numeric 20 Price HALO 5 90 8 Nume...

Страница 114: ...ext All records in a file are fixed length strings Every record ends with a CR LF In Basic you can use the Line Input command to read a record The first character of a record is the Status The Status must be a character A C or D A active This record can be edited C changed This record has been changed in edit D deleted This record has been deleted in edit If any file is edited outside of SAM1000 t...

Страница 115: ...w to down load them to the SPS 1000 register Bit Map File Specification 1 Maximum file size to be downloaded to the SPS 1000 is 12288 bytes 2 Image dimensional definition X 8 pels pixels Y 8 pels pixels 3 Possible values of X and Y and the product of X and Y 1 X 255 1 Y 48 HOWEVER the product of X and Y must be 1 X Y 1536 4 A good size to use is 432 pixels wide BY 144 pixels high ...

Страница 116: ...width and height of the bit map Values must be in multiples of 8 per above Bit Map file specifications 2 Design the Bit Map Image 3 Prior to saving the Bit Map Image a Select IMAGE b Select INVERT COLORS c Then d Select IMAGE e Select FLIP ROTATE f Select ROTATE BY ANGLE g Select 90 DEGREES repeat 2 more times to obtain a rotation of 270 degrees in total 4 Save the Bit Map Image Example Image to P...

Страница 117: ... the BIT MAP LOGO from the SEND TO ECR screen Downloading the Bit Map Image to the SPS 1000 with the Samsung Utility 1 Place the file in the same directory as the program spsdown exe 2 Execute the spsdown exe program with the following switches spsdown INFO INFO Switchs Sxxxxxx Where xxxxxx is a STORE Default is 000000 Rxx Where xx is a REGISTER Default is 1 Cx Where x is a com port no 1 for port1...

Страница 118: ... the printer is connected Printing the Bit Map Image 1 In the PRINTER DRIVER SELECTIONS screen in S mode select the printer you use 2 Delete INITIALIZE command 3 In the DEFINE SERIAL PORT PARAMETERS screen in S mode select the port number which the printer is connected 4 Select PRINT BITMAP to YES 5 Select LOGO SIZE 0 Normal 1 Double Wide 2 Double Height 3 Double Height and Width 6 Build PRINTER T...

Страница 119: ...ster Modems are recommended for remote connections for both PC and ECR sites Software Verify that register software and SAM 1000 versions are compatible Due to necessary changes in register program structures not all versions are compatible with all SAM 1000 versions Samsung SPS 1000 The register port in use must be set for polling in S Mode device selections Verify that the port settings at the S...

Страница 120: ...ly configured to communicate Starting Operations Verify that store files are uploaded in SAM1000 You must Receive Upload information from the ECR Refer to Receive Programs from ECR Upload on page 73 If you are having trouble downloading store files from SAM 1000 to a register Be sure to select memory allocation and download first Memory allocation is not selected when select all is selected If mem...

Страница 121: ...PC or Laptop that has no serial port you must use a USB to Serial adaptor as shown above CRS offers a USB to Serial adaptor from Perle that has been tested and is known to work with SAM polling software products Perle USB to Serial Adaptor Serial Com Cable see below USB Cable DB 9M DB 9F Serial Com Cable see below DB 9M SAM4s ECR SAM4s ECR DB 9F ...

Страница 122: ...D2 TXD3 DTR4 GND5 DSR6 RTS7 CTS8 VCC9 1DCD 2RXD 3TXD 4DTR 5GND 6DSR 7RTS 8CTS 9RI Part 522038 Samsung DB 9M PC DB 25F DCD1 RXD2 TXD3 DTR4 GND5 DSR6 RTS7 CTS8 VCC9 1ChGND 2TXD 3RXD 4RTS 5CTS 6DSR 7GND 8DCD 20DTR Part 522032 Samsung Modular RJ 45 PC DB 9F NC1 DSR2 TXD3 RXD4 RTS5 CTS6 GND7 DTR8 1DCD 2RXD 3TXD 4DTR 5GND 6DSR 7RTS 8CTS 9RI Part 522036 Samsung Modular RJ 45 PC DB 25F NC1 DSR2 TXD3 RXD4 ...

Страница 123: ...te Use only port 1 for off site communications using modems Samsung DB 9M Port 1s MODEM DB 25M DCD1 RXD2 TXD3 DTR4 GND5 DSR6 RTS7 CTS8 VCC9 1ChGND 2TXD 3RXD 4RTS 5CTS 6DSR 7GND 8DCD 20DTR PC Modem DB 25M DCD RXD TXD DTR GND DSR RTS CTS VCC 1ChGND 2TXD 3RXD 4RTS 5CTS 6DSR 7GND 8DCD 20DTR ...

Страница 124: ...al v2 3 Manual Revision Record Edition Date published Revison contents V2 0 05 04 2005 V2 1 8 26 2008 Updated to reflect version 4 1 2 V2 2 11 16 2009 Updated Installation and connection information V2 3 3 28 2013 Requires Windows XP or later operating system ...

Отзывы: