2. Product Specifications and Description
2.6. Fuser unit
This section describes the image fusing process used by the machine.
2.6.1. Fuser unit overview
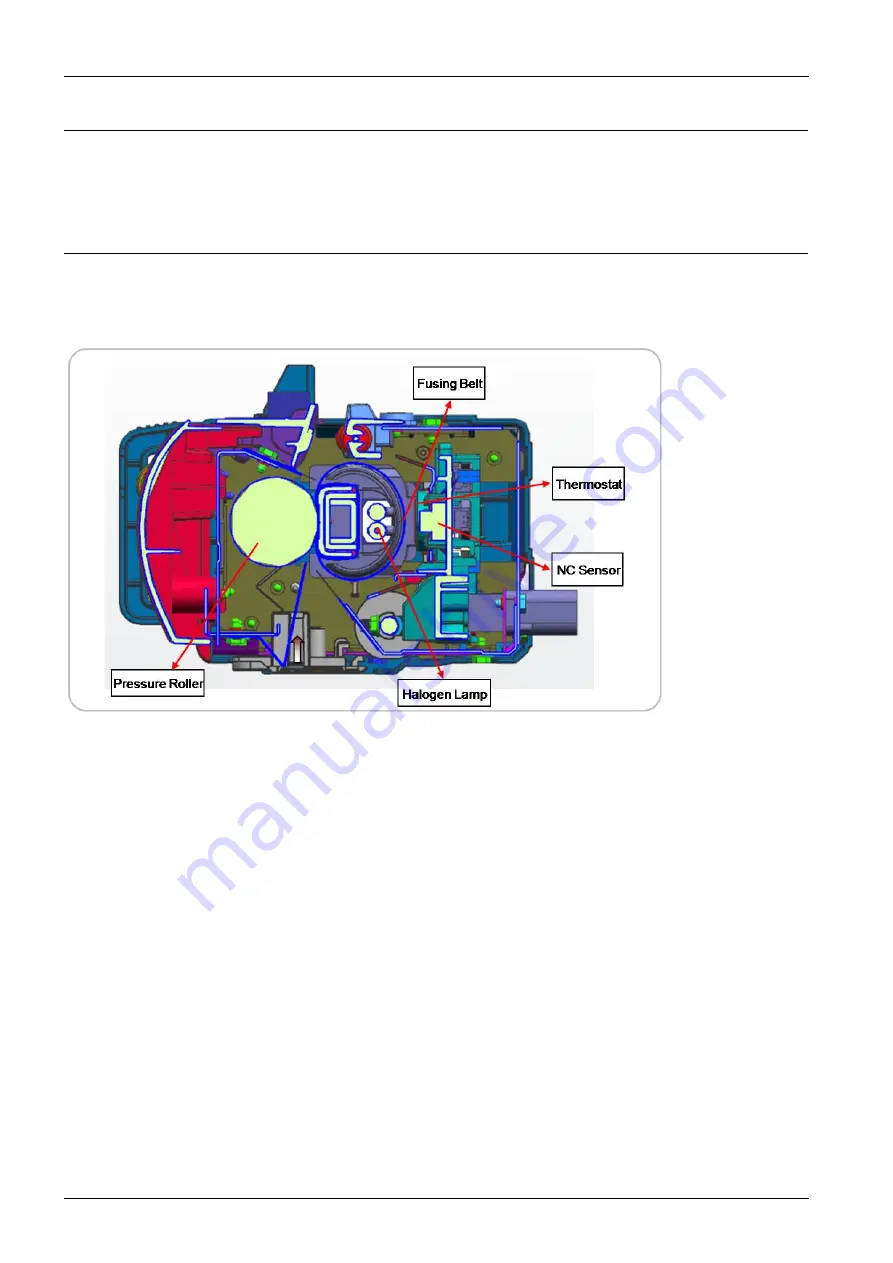
This unit fuses the toner that was transferred by the transfer roller onto the paper, by applying heat and pressure to complete
the fusing process. This machine uses an instant fusing system. This has a faster warm-up time than a conventional
fusing and pressure roller system.
1)
Halogen Lamp
The fuser unit has two halogen lamps. One heats the center of the fusing belt, the other heats the end of axial direction.
These halogen lamps are lit alternately to heat the fusing belt. Each lamp has its coil in a different location. The coil of
the center heater lamp is in the center, those of the side heater lamp are on both sides. The lamp s are fixed inside of
the fusing belt. When rotating the fusing belt, these lamps does not rotate.
2)
Fusing Belt
The fusing belt gets heat from the halogen lamp and transfer it to toner and paper. The fusing belt consists of three
thin-layers. The thin fusing belt reduces warming up time and mode changing time. To prevent the fusing belt from
adhering to the toner, the surface of the fuser belt is fluorinated. There is a Nip inside the fusing belt. To maintain the
proper Nip between the fusing belt and pressure roller, the spring is used.
3)
Pressure Roller
The pressure roller is a rubber roller which ensures proper nip width between the pressure roller and fusing belt. It is
driven by the driving system and drives the fusing belt.
4)
NC Sensor
NC sensors (non-contact type thermistors), located near the center and the end of the fusing belt, control the temperature
of the fusing belt.
2-42
Copyright© 1995-2017 SAMSUNG. All rights reserved.
Содержание MultiXpress X4 Series
Страница 84: ...2 Product Specifications and Description 2 68 Copyright 1995 2017 SAMSUNG All rights reserved ...
Страница 150: ...3 Disassembly and Reassembly 7 Release the reverse roller Assy 3 20 Copyright 1995 2017 SAMSUNG All rights reserved ...
Страница 189: ...3 Disassembly and Reassembly 7 Remove the scan glass Copyright 1995 2017 SAMSUNG All rights reserved 3 59 ...
Страница 193: ...3 Disassembly and Reassembly 9 Reassemble the scan glass Copyright 1995 2017 SAMSUNG All rights reserved 3 63 ...


