


64
GB
MISCELLANEOUS
65
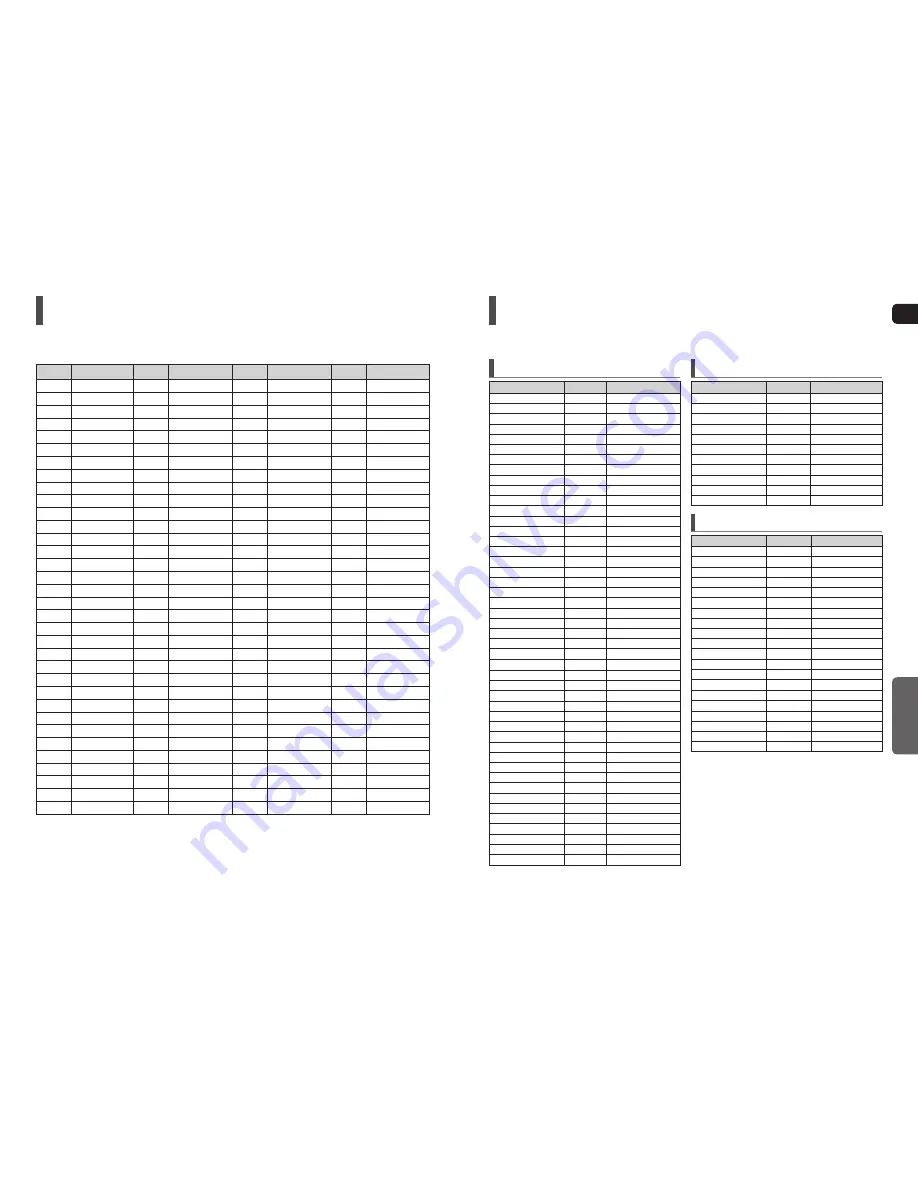
Language Code List
Enter the appropriate code number for the initial settings <Disc Audio>, <Disc Subtitle> and/or <Disc Menu> (See page 42).
Code
Language
Code
Language
Code
Language
Code
Language
1027
Afar
1181
Frisian
1334
Latvian, Lettish
1506
Slovenian
1028
Abkhazian
1183
Irish
1345
Malagasy
1507
Samoan
1032
Afrikaans
1186
Scots Gaelic
1347
Maori
1508
Shona
1039
Amharic
1194
Galician
1349
Macedonian
1509
Somali
1044
Arabic
1196
Guarani
1350
Malayalam
1511
Albanian
1045
Assamese
1203
Gujarati
1352
Mongolian
1512
Serbian
1051
Aymara
1209
Hausa
1353
Moldavian
1513
Siswati
1052
Azerbaijani
1217
Hindi
1356
Marathi
1514
Sesotho
1053
Bashkir
1226
Croatian
1357
Malay
1515
Sundanese
1057
Byelorussian
1229
Hungarian
1358
Maltese
1516
Swedish
1059
Bulgarian
1233
Armenian
1363
Burmese
1517
Swahili
1060
Bihari
1235
Interlingua
1365
Nauru
1521
Tamil
1069
Bislama
1239
Interlingue
1369
Nepali
1525
Tegulu
1066
Bengali; Bangla
1245
Inupiak
1376
Dutch
1527
Tajik
1067
Tibetan
1248
Indonesian
1379
Norwegian
1528
Thai
1070
Breton
1253
Icelandic
1393
Occitan
1529
Tigrinya
1079
Catalan
1254
Italian
1403
(Afan) Oromo
1531
Turkmen
1093
Corsican
1257
Hebrew
1408
Oriya
1532
Tagalog
1097
Czech
1261
Japanese
1417
Punjabi
1534
Setswana
1103
Welsh
1269
Yiddish
1428
Polish
1535
Tonga
1105
Danish
1283
Javanese
1435
Pashto, Pushto
1538
Turkish
1109
German
1287
Georgian
1436
Portuguese
1539
Tsonga
1130
Bhutani
1297
Kazakh
1463
Quechua
1540
Tatar
1142
Greek
1298
Greenlandic
1481
Rhaeto-Romance
1543
Twi
1144
English
1299
Cambodian
1482
Kirundi
1557
Ukrainian
1145
Esperanto
1300
Kannada
1483
Romanian
1564
Urdu
1149
Spanish
1301
Korean
1489
Russian
1572
Uzbek
1150
Estonian
1305
Kashmiri
1491
Kinyarwanda
1581
Vietnamese
1151
Basque
1307
Kurdish
1495
Sanskrit
1587
Volapuk
1157
Persian
1311
Kirghiz
1498
Sindhi
1613
Wolof
1165
Finnish
1313
Latin
1501
Sangro
1632
Xhosa
1166
Fiji
1326
Lingala
1502
Serbo-Croatian
1665
Yoruba
1171
Faeroese
1327
Laothian
1503
Singhalese
1684
Chinese
1174
French
1332
Lithuanian
1505
Slovak
1697
Zulu
USB Host Feature Supported Products
Digital Camera
Product
Company
Type
Finepix-A340
Fuji
Digital Camera
Finepix-F810
Fuji
Digital Camera
Finepix-F610
Fuji
Digital Camera
Finepix-f450
Fuji
Digital Camera
Finepix S7000
Fuji
Digital Camera
Finepix A310
Fuji
Digital Camera
KD-310Z
Konica
Digital Camera
Finecam SL300R
Kyocera
Digital Camera
Finecam SL400R
Kyocera
Digital Camera
Finecam S5R
Kyocera
Digital Camera
Finecam Xt
Kyocera
Digital Camera
Dimage-Z1
Minolta
Digital Camera
Dimage Z1
Minolta
Digital Camera
Dimage X21
Minolta
Digital Camera
Coolpix4200
Nikon
Digital Camera
Coolpix4300
Nikon
Digital Camera
Coolpix 2200
Nikon
Digital Camera
Coolpix 3500
Nikon
Digital Camera
Coolpix 3700
Nikon
Digital Camera
Coolpix 4100
Nikon
Digital Camera
Coolpix 5200
Nikon
Digital Camera
Stylus 410 digital
Olympus
Digital Camera
300-digital
Olympus
Digital Camera
U300
Olympus
Digital Camera
X-350
Olympus
Digital Camera
C-760
Olympus
Digital Camera
C-5060
Olympus
Digital Camera
X1
Olympus
Digital Camera
U-mini
Olympus
Digital Camera
Lumix-FZ20
Panasonic
Digital Camera
DMC-FX7GD
Panasonic
Digital Camera
Lumix LC33
Panasonic
Digital Camera
LUMIX DMC-F1
Panasonic
Digital Camera
Optio-S40
Pentax
Digital Camera
Optio-S50
Pentax
Digital Camera
Optio 33LF
Pentax
Digital Camera
Optio MX
Pentax
Digital Camera
Digimax-420
Samsung
Digital Camera
Digimax-400
Samsung
Digital Camera
Sora PDR-T30
Toshiba
Digital Camera
Coolpix 5900
Nikon
Digital Camera
Coolpix S1
Nikon
Digital Camera
Coolpix 7600
Nikon
Digital Camera
DMC-FX7
Panasonic
Digital Camera
Dimage Xt
Minolta
Digital Camera
AZ-1
Olympus
Digital Camera
USB Flash Disk
Product
Company
Type
Cruzer Micro
Sandisk
USB 2.0 USB Flash Drive 128M
Cruzer Mini
Sandisk
USB 2.0 128M
Cruzer Mini
Sandisk
USB 2.0 256M
SONY Micro Vault
Sony
USB 2.0 64MB
FLEX DRIVE
Serotech
USB 2.0 32MB
AnyDrive
A.L tech
USB 2.0 128MB
XTICK
LG
USB 2.0 128M
Micro Mini
Iomega
USB 2.0 128M
iFlash
Imation
USB 2.0 64M
LG
XTICK(M)
USB 2.0 64M
RiDATA
EZDrive
USB 2.0 64M
MP3 Player
Product
Company
Type
Creative MuVo NX128M
Creative
128 MB MP3 Player
Iriver H320
Iriver
20G HDD MP3 Player
YH-920
Samsung
20G HDD MP3 Player
YP-T7
Samsung
MP3 Player
YP-MT6
Samsung
MP3 Player
YP-T6
Samsung
MP3 Player
YP-53
Samsung
MP3 Player
YP-ST5
Samsung
MP3 Player
YP-T5
Samsung
MP3 Player
YP-60
Samsung
MP3 Player
YP-780
Samsung
MP3 Player
YP-35
Samsung
MP3 Player
YP-55
Samsung
MP3 Player
iAUDIO U2
Cowon
MP3 Player
iAUDIO G3
Cowon
MP3 Player
iAudio M3
Cowon
HDD MP3 Player
SI-M500L
Sharp
256MB MP3 Player
H10
Iriver
MP3 Player
YP-T5 VB
Samsung
MP3 Player
YP-53
Samsung
256MB MP3 Player


