background image

Figures and illustrations in this User Manual are provided for reference only and may differ from actual product 
appearance. Product design and specifications may be changed without notice.

Instruction

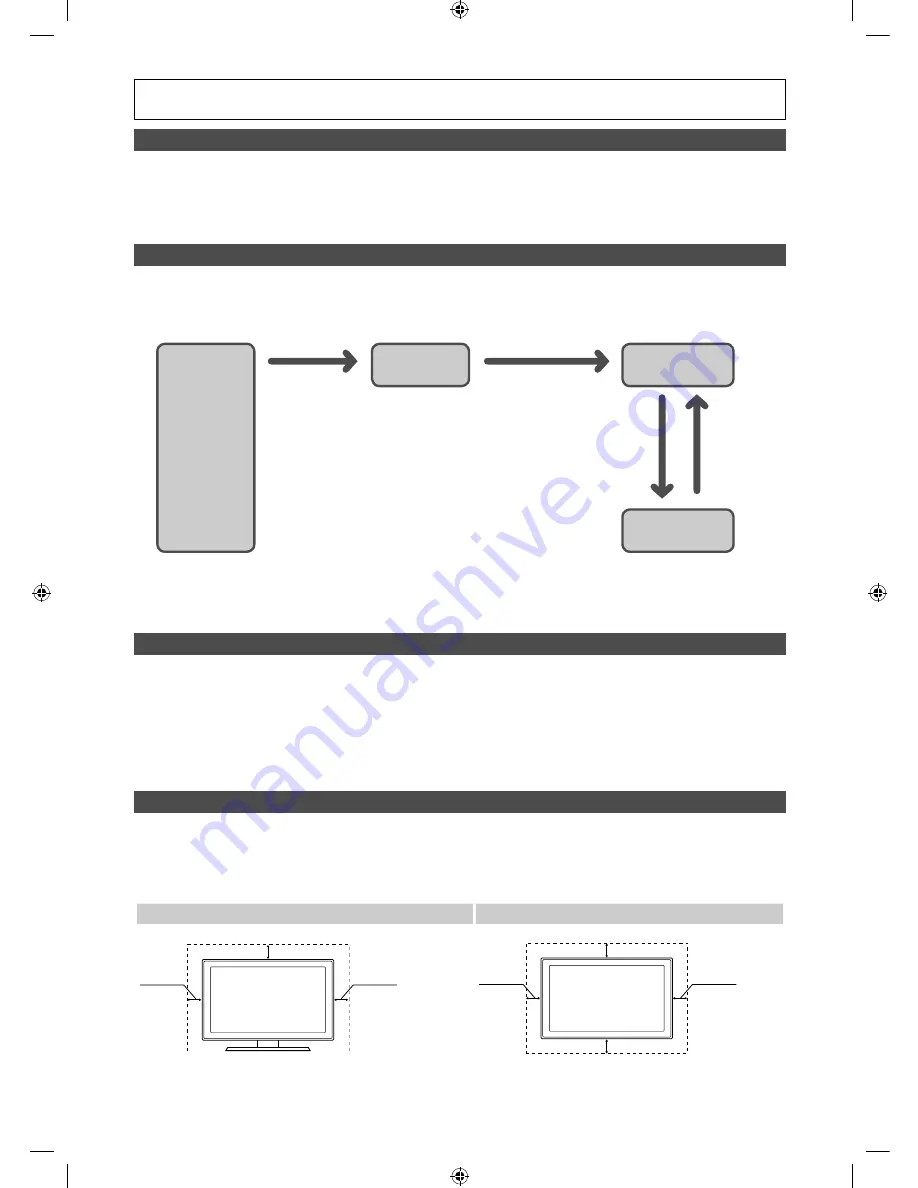
This TV is provided with interactive functionality through a set-back box (SBB/STB) connected to the TV, and with other TVs in a 
computer-controlled system for hotels and other hospitality businesses. 

Interactive

: When the TV is powered-up initially, it sends a command to identify the SBB/STB; if identified, theTV switches to 

ONLINE mode and full control is through the SBB/STB.
If the TV is in ONLINE mode, it stops receiving IR(Samsung remote) commands and acts according to interface protocol. 

Stand-Alone

: If SBB/STB is not identified, the TV should be switched to STAND-ALONE mode with restricted operation.

Operational Modes

When this TV (in Hotel mode) is operated with a SBB/STB, it is in one of two states :


ONLINE or STAND-ALONE. In the STAND-ALONE state, the TV will act as a Hotel TV, but without active communication. 
This is to prevent guests from trying to cheat the system by disconnecting the SBB/STB. 

To set the details for Stand-alone or interactive mode, refer to pages 19-22(Setting the hotel option data : Stand-alone 
mode and Interactive mode)


Some operations may be restricted to prevents guests from "cheating" the TV system.


No main menu(Interactive mode) or Channel Menu, Plug & Play in Main Menu (Stand-Alone mode)


Limited Volume and Panel key lock or unlock

Still image warning

Avoid displaying still images (like jpeg picture files) or still image element (like TV Program logo, panorama or 4:3 image format, 
stock or news bar at screen bottom etc.) on the screen. Constant displaying of still picture can cause uneven wear of screen 
phosphor, which will affect image quality. To reduce risk of this effect, please follow below recommendations:


Avoid displaying the same TV channel for long periods.


Always try do display any image on full screen, use TV set picture format menu for best possible match.


Reduce brightness and contrast values to minimum required to achieve desired picture quality, exceeded values may speed 
up the burnout process.


Frequently use all TV features designed to reduce image retention and screen burnout. Refer to the relevant user manual 
section for details.

Securing the Installation Space

Keep required distances between the product and other objects (e.g. walls) to ensure proper ventilation.
Failing to do so may result in fire or a problem with the product due to an increase in the internal temperature.


When using a stand or wall-mount, use parts provided by Samsung Electronics only.


Using parts provided by another manufacturer may result in a problem with the product or injuries due to the product falling.


The appearance may differ, depending on the product.

Installation with a stand.

Installation with a wall-mount.

10 cm

10 cm

10 cm

10 cm

10 cm

10 cm

10 cm

Power

ON

Hotel TV

Online Mode

Poll Rate 20/sec

Stand-alone 

Mode

Hotel Mode On

SBB/STB Online if 

one success within 

10 attempts

SBB/STB 
Online-10 

consecutive 

fails

SBB/STB 
Status-
Attempt 
every 2secs

[HG690_EURO]Install_Guide-00ENG.indd   2

2013-03-21   

 4:36:50

Содержание HG690

Страница 1: ...k you for purchasing this Samsung product To receive more complete service please register your product at www samsung com register Model Serial No LED TV Installation manual HG690_EURO Install_Guide 00ENG indd 1 2013 03 21 4 36 50 ...

Страница 2: ...age warning Avoid displaying still images like jpeg picture files or still image element like TV Program logo panorama or 4 3 image format stock or news bar at screen bottom etc on the screen Constant displaying of still picture can cause uneven wear of screen phosphor which will affect image quality To reduce risk of this effect please follow below recommendations Avoid displaying the same TV cha...

Страница 3: ...ote Control 11 y Connecting the TV with SBB 12 y Connecting the Bathroom Speakers 14 y Connecting the MediaHub HD 16 y Connecting the RJP Remote Jack Pack 17 y Connecting to a COMMON INTERFACE slot Your TV viewing Card Slot 19 y Setting the Hotel Option Data 20 y SIRCH 59 y Installing the Wall Mount 76 y Securing the TV to the Wall 77 y Anti theft Kensington Lock 77 y Speciications 78 HG690_EURO I...

Страница 4: ...ustainable reuse of material resources Household users should contact either the retailer where they purchased this product or their local government office for details of where and how they can take these items for environmentally safe recycling Business users should contact their supplier and check the terms and conditions of the purchase contract This product and its electronic accessories shou...

Страница 5: ... between the front and back of the Stand and the Stand Guide when assembling them Make sure that at least two people lift and move the TV A 1 EA or 28 Model only B 1 EA or 28 32 40 55 4 Place a soft cloth over the table to protect the TV and then place the TV on the cloth screen side down Insert the Stand Guide into the slot of TV bottom side 1 2 B A Rear Front Side View 3 Correct assembly Top Vie...

Страница 6: ... HG40EB690 HG46EB690 HG55EB690 Europe Model HG28EB690 AUDIO B VIDEO COMPONENT AVIN PCIN 5 8 9 0 PC DVIAUDIOIN EXT RGB 1 2 3 4 6 7 VARIABLE AUDIOOUT VOL CTRL HDMIIN3 HDMIIN2 DVI HDMIIN1 ARC HDD 1 0A CLONING SATELLITE AIR CABLE AUDIO B VIDEO COMPONENT AVIN PCIN 5 8 9 0 PC DVIAUDIOIN EXT RGB 1 2 3 4 6 7 VARIABLE AUDIOOUT VOL CTRL HDMIIN3 HDMIIN2 DVI HDMIIN1 ARC 5V0 5A CLONING SATELLITE AIR CABLE HG69...

Страница 7: ... screen resolution for the TV on the computer The optimal resolution is 1920 x 1080 60 Hz If it is set to any other than in the table below the TV may display nothing Set the resolution properly referring to the user guide of the computer or its graphic card The resolutions in the table are recommended Optimal resolution is 1366 X 768 60 Hz Mode Resolution Horizontal Frequency KHz Vertical Frequen...

Страница 8: ...k The interlace mode is not supported The set might operate abnormally if a non standard video format is selected Separate and Composite modes are supported SOG is not supported 7 COMPONENT IN AV IN Connect audio cables to R AUDIO L on your TV and the other ends to corresponding audio out jacks on an A V device Connects Component video audio The COMPONENT IN jack is also used as the VIDEO 1 jack C...

Страница 9: ...ce with an HDMI output No sound connection is needed for an HDMI HDMI connection HDMI connections carry both audio and video Use the HDMI IN 2 DVI jack for a DVI connection to an external device Use a DVI to HDMI cable or DVI HDMI adapter DVI to HDMI for the video connection and the PC DVI AUDIO IN jacks for audio ANT IN SATELLITE AIR CABLE To view television channels correctly the TV must receive...

Страница 10: ...t again the function menu screen disappears Using the Menu Selects the MENU m by moving the controller in the function menu screen The OSD On Screen Display of your TV s feature appears Selecting the Source Selects the Source s by moving the controller in the function menu screen The Source list screen appears Selecting the SMART HUB With the Function menu visible select SMART HUB by moving the Co...

Страница 11: ...and change menu values Return to the previous menu Buttons in the Channel list Contents Home menu etc Enter the hour your want the TV to turn on Use these buttons in the Contents Home Display and select available video sources Electronic Programme Guide EPG display Cut off the sound temporarily Change channels Swich to the HOME Screen View the Contents Home Press to display information on the TV s...

Страница 12: ...DIOIN EXT RGB EXT RGB TV Rear Panel Data Cable Installing batteries Battery size AAA X Z Y NOTE Use the remote control within 23 feet of the TV Bright light may affect the performance of the remote control Avoid using nearby special luorescent light or neon signs The colour and shape may vary depending on the model Remote control button HOME 3D are not supported When pressing these buttons the TV ...

Страница 13: ...Vendors and Compatible Data Cables Supplied with the TV Conirm that you are using the correct data cable for your vendor Refer to the code label on the data cables HG690_EURO Install_Guide 00ENG indd 13 2013 03 21 4 36 53 ...

Страница 14: ... switch is a Tact switch Setting the Sub AMP Mode 0 Turns the Sub AMP function off PWM off 1 Determines the Sub volume according to the main volume control the sub volume is determined according to the Power On Volume the Min Volume and the Max Volume values of Hotel Mode 2 Determines the volume according to the bathroom control panel setting Variable Output Port Speciications Speaker Wire Use spe...

Страница 15: ...Drawing of the Headphone Box AUDIO B VIDEIO COMPONENT AVIN PCIN PC DVIAUDIOIN AUDIO B VIDEIO VIDEIO COMPONENT AVIN PCIN PC DVIAUDIOIN PC DVIAUDIOIN HEADPHON BOX TV Headphones jack Whitewire Audio L Shield Wire TV HP ID jack Red wire White wire Red Wire Audio R Shield wire TV Rear Panel Headphone Box Headphone Box HG690_EURO Install_Guide 00ENG indd 15 2013 03 21 4 36 54 ...

Страница 16: ...ediaHub communicates with the TV by sending messages regarding Active Inactive sources The TV switches to the Active external source You have to connect the HDMI of the MediaHub to the HDMI IN 2 DVI port of the TV When the TV is on connect the TV and the RJP within 10 seconds Special features PIP Auto Detection VARIABLE AUDIOOUT VOL CTRL HDMIIN3 HDMIIN2 DVI HDMIIN1 ARC HDD1 0A CLONING SATELLITE AI...

Страница 17: ...JP communicates with the TV via RS232 Hot Plug Play is a function that allows hotel guests to connect an external source to the RJP The RJP communicates with the TV by sending messages regarding Active Inactive sources The TV will switch to the Active external source according to the priority set by the User You can select HDMI IN 1 ARC 2 DVI or 3 and AV IN for connecting RJP When the TV is on con...

Страница 18: ...he TV and the RJP The following table shows the approximate time in seconds to switch from the TV to the input source based on the priority Scenario 1 When no inputs are connected Source To Connect AV 2 Sec PC 0 7 Sec HDMI 3 9 Sec Scenario 2 When two or more inputs are connected and an Input source is disconnected and then reconnected Source Disconnect To Connect Total AV 4 5 Sec 2 Sec 6 5 Sec PC ...

Страница 19: ...or CI CARD must be inserted If you don t insert the CI or CI CARD some channels will display the mes sage Scrambled Signal The pairing information containing a telephone number the CI or CI CARD ID the Host ID and other information will be displayed in about 2 3 minutes If an error message is displayed please contact your service provider When the coniguration of channel information has inished th...

Страница 20: ...vel Min Volume 0 Minimum Volume Level user can set in Stand Alone Hospitality mode Max Volume 100 Maximum Volume Level user can set in Stand Alone Hospitality mode Power on Source TV Select the Input source when TV is turned on initially Power On Option Last Option Power On AC Power On Option Standby Stand By Mode Power ON Power On Last Option Last Power State 4 Channel Channel Setup User can set ...

Страница 21: ...coming through a Component Input Source When on you can hear sound from the player through the TV even when there is no video signal The TV s backlight however remains on When adding a video signal the TV works normally Music Mode Backlight OFF Use the Backlight On Off option in Music mode to save energy 10 External Device 7610 Priority AV 1 If jack priority is set the corresponding source is auto...

Страница 22: ...he saved TV option values in a USB memory device to the TV Setting Auto Initialize OFF When Setting Auto Initialize is set to On and the power is turned off and on or the Master Power is turned off and on the data is restored to the cloned values If there is no cloned value Setting Auto Initialize is set to On it will be ignored and the operation will be the same as that when Setting Auto Initiali...

Страница 23: ...move to the next source 19 Service Self Diagnosis for TV Enter Self Diagnosis Menu Picture Test Use this to check for picture problems If problems appear in the test picture select Yes and follow the directions on the screen Sound Test Use the built in melody sound to check for sound problems If problem occur during the test select Yes and follow the directions on the screen Self Dignosis for HTV ...

Страница 24: ...ome Message ON Edit Welcome Message Hospitality Logo OFF Hospitality Logo DL Logo Display Time A welcome message can be up to 25 characters and it can be edited by changing the text in the Hotel Service menu The following is the list of characters supported by Welcome message Capital letters from A Z Welcome message can be edited by using the navigation colour enter key on the Remote in the Edit W...

Страница 25: ... Hospitality Logo This option lets you choose whether the Hospitality Logo image is displayed or not Initial value is OFF Can be set to OFF or ON When set to ON the Logo Download and Logo Time Display menu items become accessible y Hospitality Logo DL This option lets you download the logo image to the TV s memory from a USB device A wait message appears while the image is being copied to the TV A...

Страница 26: ...by pressing buttons in order MUTE 1 1 9 ENTER 3 Press the or button to select Clone USB to TV then press the ENTER button 4 When the message Clone USB to TV is displayed then press the ENTER button 5 You can Make sure USB cloning behavior In Progress copying data to TV Completed copy inished successfully Failed copy did not inish successfully No USB USB is not connected No File there is no ile to ...

Страница 27: ...light Contrast Brightness Sharpness Colour Tint G R Picture Size Picture Size Zoom Position 4 3 Screen Size Auto Adjustment PC Screen Adjustment Coarse Fine Position Image Reset PIP Advanced Settings Dynamic Contrast Black Tone Flesh Tone RGB Only Mode Colour Space White Balance 10p White Balance Gamma Expert Pattern Motion Lighting Picture Options Colour Tone Digital Clean View MPEG Noise Filter ...

Страница 28: ...e ct Th e L a n g u a g e Se ttin g will b e a p p lie d to Ma in Me n u a n d n o t Plu g a n d Pla y c Configure your TV Select your information in the categories below Country Bulgaria Network type Wireless Picture Mode Standard Wireless network Select Select the country that you re in now Configure your TV Select your information in the categories below Country Bulgaria Network type Wired Pict...

Страница 29: ...y Network type Picture Mode Wireless network S elect the wireless network you wnat to connect to Select Samsung_00 WPS PBC Refresh c Configure your TV Select your information in the categories below Country Bulgaria Network type Wired Picture Mode Standard Plug a network cable in to the back of your TV 1 1 q w e r t y u i o p a ENG x z c v b n m com Cancel Done Clear Caps 123 s d f g h j k l 2 3 4...

Страница 30: ...consumer TV models If the ENTER button is pressed Select Area OSD is displayed Select Country Initial Highlight United Kingdom The Country OSD is displayed and the area can be selected Clock setting OSD Display time 30 seconds The Clock Set item OSD is displayed If ENTER button is pressed after setting the clock or in Auto Picture Mode OSD is displayed Auto Search Mode OSD If skip option is select...

Страница 31: ...appears The following words appear Remote control code is set to x If you want to change Remote control code Enter the digit you want to change X is the digit number This OSD displays until Exit is pressed Remote control code is set to 0 If you want to change the Remote control code enter the chosen digit For example TV and Remote will be set to ID code 1 if the user presses 1 The following words ...

Страница 32: ...ct the channel that will be used when remote doesn t have any card b BANK2 Family Card Green Select the channel that will be used when remote has a GREEN CARD c BANK3 Adult Card Red Select the channel that will be used when remote has a RED CARD n Move Select Deselect Return Channel Bank Edit Registered Bank1 4 Bank2 6 Bank3 36 1 1futech 2 BBC1 3 24ore tv 4 C3 5 BBC World 6 C5 7 Coming Soom 8 S2 9...

Страница 33: ...e tv starts with Hotel P P If P P alredy done If the tv starts with Hotel P P If P P alredy done 1 Do the P P except channel store Enter Hotel menu Do the P P all Air or Cable auto tune Enter Hotel menu 2 After P P TV shows hotel menu Setup Mixed Channel Map On After P P TV will show hotel menu Select channel type ATV or ADTV for Air CATV or CDTV for cable 3 Setup Mixed Channel Map On TV power off...

Страница 34: ...on user can use TV 9 Setup CH Bank Editor After power off on user can use TV 10 After power off on user can use TV Channel List You can view channel information All TV Radio Data Other Analogue or Favourites 1 5 When you press the CH LIST button on the remote control Channel List screen displays immediately Channel List Guide AllShare Play Schedule Manager Source Contents Home R Return The display...

Страница 35: ...Change the PIN using the Change PIN option Edit Channel Name analogue channels only Assign your own channel name Edit Channel Number digital channels only Edit the number by pressing the number buttons Some areas may not be able to support Edit Channel Name and Edit Channel Number Delete You can delete a channel to display the channels you want Information Displays details of the selected programm...

Страница 36: ...e by each country that master has managed in factory mode News O O Radio O O Entertainment O O Sport O O Hotel O O My Channel Current status Austria Sports Country Genre All Country All Austria News Belgium Dutch Radio Belgium French Entertainment Czech Sports France Hotel Germany Blue Keep Previous U D L R Move En Enter For the number of items to be displayed in the list refer to the design docum...

Страница 37: ...st memorized channel that appears when TV is turned on 2 Function Title This is name of the function 3 Current Status Display current settings the Country Genre 4 Country Items The item for the country list is displayed Displays the last selected country 5 Genre Items The item for the genre list is displayed Displays available genre items by each country that master managed in factory mode always ...

Страница 38: ...ia News Belgium Dutch Radio Belgium French Entertainment Czech Sports France Hotel Germany My Channel Current status All Country Sports Country Genre All Country All Austria News Belgium Dutch Radio Belgium French Entertainment Czech Sports France Hotel Germany My Channel Current status All Country Sports Country Genre Austria All Belgium Dutch News Belgium French Radio Czech Entertainment France ...

Страница 39: ... Radio Belgium French Entertainment Czech Sports France Hotel Germany Navigation Help Area My Channel Current status All Country Sports Country Genre All Country All Austria News Belgium Dutch Radio Belgium French Entertainment Czech Sports France Hotel Germany Navigation Help Area My Channel Current status All Country Sports Country Genre All Country All Austria News Belgium Dutch Radio Belgium F...

Страница 40: ...tainment Czech Sports France Hotel Germany Navigation Help Area DOWN LEFT Current Genre Mode All Country Sports My Channel Current status All Country Sports Country Genre All Country All Austria News Belgium Dutch Radio Belgium French Entertainment Czech Sports France Hotel Germany Navigation Help Area DOWN UP ENTER My Channel Current status All Country Sports Country Genre All Country All Austria...

Страница 41: ... key from the genre to country menu highlights an existing selected country item ENTER RETURN Timeout Current Status Austria News 1 My Channel Current status All Country Sports Country Genre All Country All Austria News Belgium Dutch Radio Belgium French Entertainment Czech Sports France Hotel Germany Navigation Help Area ENTER 1 Info Genre Mode change to Austria News OK HG690_EURO Install_Guide 0...

Страница 42: ... News Belgium Dutch Radio Belgium French Entertainment Czech Sports France Hotel Germany Navigation Help Area Current Genre Mode All Country Sports If the country is selected highlight moves to genre menu auto matically Current Genre Mode All Country Sports ENTER RIGHT Current Status Austria News BLUE RETURN EXIT ENTER RETURN Timeout 5 My Channel Current status All Country Sports Country Genre All...

Страница 43: ...Genre Mode Austria News Current Genre Mode Austria News Current Status Austria News Power Off POWER POWER My Channel Current status All Country Sports Country Genre All Country All Austria News Belgium Dutch Radio Belgium French Entertainment Czech Sports France Hotel Germany Navigation Help Area HG690_EURO Install_Guide 00ENG indd 43 2013 03 21 4 37 02 ...

Страница 44: ...nel list If any channel for which the country is set is selected from the channel list the Edit Countries item is added to the Tools Otherwise the Add to Countries item is added to the Tools If the corresponding function is executed a country for the selected channel can be set or canceled Front UI Provides the screen where the user can select a country or genre when the user turns the power on Le...

Страница 45: ... Description Air Cable Satellite Hotel Original Tuned Registered O O Lists all the channels registered by the Auto Tune operation Country All Country O O Provides the list of channels and sources speciied in the Registered Channels list All Country is the sum of all channels regis tered to each country This is only provided to end users Country 1 O O Country 2 O O O O Tools Registered Countries Ca...

Страница 46: ...lements No Name Description 1 Message When entering the browser if the Registered channels item is empty a popup message is displayed which enables users to switch to the Auto Store Program menu When both the time and the channel are not conigured and a user enters the Channel Manager a message that allows the user to switch to the Auto Tuning Auto Program operation is displayed in the same way as...

Страница 47: ...e no channels registered to the country category Elements No Description Description The message is displayed when the currently selected country does not contain any items Main Frame Channel Browser HG690_EURO Install_Guide 00ENG indd 47 2013 03 21 4 37 02 ...

Страница 48: ...s on the channel before entering Factory Mode or the external input Elements No Name Description 1 Main Frame Shows the channel or the source list of the currently selected category 2 Scroll Bar Shows the position of the current page amongst the total amount of pages 3 Navigation Help Area This is displayed whenever a user enters the Channel Manager If a user exits and then reenters the Channel Ma...

Страница 49: ...the regional speciications Channel list icon representation rules Item Example Priority Dynamic SI Icon Channels deleted by Dynamic SI NNNNNNNN CH NAME Channels that have been deleted by the Dynamic SI but not by the user 1 Channels added by Dynamic SI NNNNNNNN CH NAME Channels that have been added by the Dynamic SI but not by the user 2 Analog Channel Icon NNNNNNNN CH NAME The edited channel name...

Страница 50: ...RIGHT Moves the highlight Move INFO N R N R TOOLS Closes the current window and displays the Tools menu No Guide EXIT Cancels and returns to the previous step Factory Mode No Guide Note This is the deinition of Add to Countries The highlighted channel or more than one selected channel is added to the Country category Etc Timeout 60 sec Channel Manager Browser Tools Add to Countries HG690_EURO Inst...

Страница 51: ...is displayed after the completion of the operation This message is always displayed if the OK button is selected 5 Selection Mark How to identify the meaning of multiple channel selection marks When all of the items have been registered When only part of the items have been registered When none of the items have been registered Add to Countries Edit Countries 2 2 Key Guide Button Action Nav Help E...

Страница 52: ...ies the changes and closes the window Enter RETURN Cancels and returns to the previous screen Tools Return U D Changes the channel number of the selected channel Adjust 0 9 Enters a digit Number INFO N R N R TOOLS Closes the current window and displays the Tools menu No Guide EXIT Cancels and returns to the previous step Factory Mode No Guide Notes This is the function that changes the channel num...

Страница 53: ...mpty If there is a channel but it does not have a name the name is represented as 2 Warning Message If an already allocated channel is selected If the new channel number has already been allocated to another channel the conirmation message pops up Refer to the igure below If the user wants to change the channel number to one that has already been allocated to another channel the channel numbers ar...

Страница 54: ...external input source to a channel number The changes are applied to all the channels If the new channel number has already been allocated to another channel follow the Hotel speciications Etc Default Highlight Channel number area Vertical circulation is supported Timeout 60 sec Elements No Name Description 1 Channel Number Area The channel number area Both the numeric keys and the Up Down keys ar...

Страница 55: ...the current window and displays the Tools menu No Guide EXIT Cancels and returns to the previous step Factory Mode No Guide Notes This is the deinition of the keypad that is used for the Edit Channel Name function Etc Timeout 60 sec Elements No Name Description 1 Channel Name Edit Window 2 Channel Name The cursor and the character that are currently being entered are in the same colour as the high...

Страница 56: ...ies Edit Countries when an already registered item is checked Video Mute Reorder Satellite Select All Deselect All Delete Notes The position of the popup menu The Tools menu for an item in the left column of the Channel List This is displayed on the right The Tools menu for an item in the right column of the Channel List This is displayed on the left If a user presses the Tools button when the hig...

Страница 57: ...nts No Name Description 1 External Input Name The Channel List provides access to functions related to GenreTV Country Mode Changes the genre mode Mixed Channel Map Mixed Channel Map is a function to mix Air Cable and Setellite channels Except for Aus Singapore NZ models Mixed channel Map should be ON in order to mix Air Cable and Setellite channels Use Channel Editor to sort the channels after tu...

Страница 58: ...I Cable when the TV turns on the Sound Bar automatically detects the TV and then converts to hotel mode by itself The change with power on volume max volume on TV is applied to the connected sound bar since TV boots twice Features of Hotel Mode in Sound Bar Synchronized power on off with TV HDMI_CEC enabled Accessible HDMI OUT port only Other inputs are disabled Synchronizing power on max volume w...

Страница 59: ...em for Hotel HD ENCODULATOR HD ENCODULATOR HD ENCODULATOR HD ENCODULATOR Satellite Receiver Independence AV Stream Cable STB Terrestrial Receiver RF Combiner Features SIRCH Windows Application SW 19 inch Rack Unit type PC embedded Modulator OpenCable Remote Upgrade TV Software Cloning Data Channel Map Operation can be controlled by key button extra key board monitor and mouse Low Phase noise High ...

Страница 60: ...ing the Standby SIRCH is performed once a day at the deined time 2 Set the SIRCH Channel Use SIRCH Channel to set the PID frequency that willl carry the SIRCH parameters to the TVs in the system Open Cable You can use CH2 through CH135 A detailed frequency table is available in the SIRCH Windows Application Program User s Manual 3 Verify the SIRCH Version The SIRCH version at the headend must be a...

Страница 61: ...irements of the Hospitality Industry a management system is needed that will allow the operator to have control of the TV sets in the guest s room without requiring a potentially disruptive or costly visit to each room Channel Configuration Made Easy All from the Head End FMA System Will configure and deliver the channel line up and SW upgrade to the guest room terminals via the hotel s coaxial di...

Страница 62: ...Click on Next Button to proceed for Installation wizard of SIRCH 3 Read the license agreement carefully and select I accept the terms in the license agreement and click on Next button 4 Please enter User and Organization information and click on Next to proceed 5 Click Next to install the application iles to the default folder or click Change to install to a different folder HG690_EURO Install_Gui...

Страница 63: ... it is added in your Start Menu Programs Launching Starting SIRCH Application 1 To launch SIRCH either user can double click on the icon made on desktop named SIRCH exe or user can go to Start Menu Programs Samsung SIRCH SIRCH exe 2 Application will launch a window asking to select Mode and Model to proceed 3 User can choose options form File Menu to proceed to his speciic application requirement ...

Страница 64: ...ile Menu 2 Select the series region LCD LED type of the model from the drop down boxes If the user doesn t know the series region or type of the model select All 3 Selecting Region Series and type will ilter out the Models in Modelno Dropdown box 4 Select TV Model from the drop down box in front of Model Option 5 After selecting Model no S w name of the model will shown in S W name box 6 Click the...

Страница 65: ...cate the clone ile folder The user must locate the immediate parent folder of the iles not the folder named with version no 3 After locating iles click on OK 4 Model no Region Series Type and S w name will be uploaded from clone iles and are visible to the user The user is not allowed to change them 5 Click the Proceed button 6 All Hospitality option menu settings and channels in the channel map a...

Страница 66: ... have their different values 3 The user may select any value from the drop down box to change its parameters 4 Default values selected are shown according to that particular TV Model s default settings if the user doesn t make changes 5 Dark and Dim labels cannot change and are disabled 6 To set logo user can click on logo Download which will navigate him to a ile browser window 7 User should Clic...

Страница 67: ...te buttons Edit also shows complete information for a channel information that can be modiied by the user Add a New Channel To add a new channel user must follow these steps 1 Select Air Cable or Satellite to add a channel 2 Select Analog or Digital 3 Click the Add button Application will pop up an Add New Channel Window 4 Fill and complete the information ields The information required varies by ...

Страница 68: ...from 0 to 999 Deleting a Channel from the list To delete an existing channel from the list user must follow the following steps 1 Select Air Cable or Satellite 2 Select Analog or Digital 3 Select a channel from the list click Delete Channel Editor To change display no or channel name users must follow these steps 1 Select Air Cable or Satellite 2 Select Analog or Digital 3 Select the channel from ...

Страница 69: ...ion number Clone Going Back to Main Screen 1 To go back to the main screen click Back This operation will not save parameter changes or the channel map coniguration so be sure to save clone iles before going back and select a different model Merging with TS Stream To merge clone iles with the TS stream follow these steps 1 Go to File Menu Utility Generate and click on Launch TS Merge 2 Please read...

Страница 70: ...e 7 Click on Manual SIRCH Please check taht the channel setup is set to Cable not Air if the cable is connected to TV for broadcasting Updating the application with new Model To update the application with a new model to conigure the clone iles for that model users must possess a model installation XML ile To update a new mode follow these steps 1 Go to File Menu Update New Model 2 A window Add Up...

Страница 71: ...n version value E g i If software version is set as 01a0 in SIRCH PC application then current TV SIRCH version should be less than this value for update 4 Software version value for clone should in hexadecimal format e g fa1b but less than ffff 5 After providing the value click on Update update version value Closing the application 1 To close the application either click the close button on the to...

Страница 72: ...hould be matched to the SIRCH Channel of the TV If you change the frequency table please refer to the frequency table in the SIRCH manual Appendix A You should set same channel in both the SIRCH PC program and on the TV For example if you have an empty channel 2channel 57MHz in the Hotel you should set 2channel 57MHz for the SIRCH PC program and the TV Default initial value SIRCH 87 603MHz TV SIRC...

Страница 73: ...TV TV SIRCH version should be less than SIRCH PC application value for update PC application SIRCH Version Clone 0002 TV SIRCH Version 0001 Update is possible After update TV version will be set equal to SIRCH PC version hence TV will be 0002 PC application SIRCH Version Clone 0002 TV SIRCH Version 0002 Update is not possible Merge TV Binary support to upgrade Main SW You need to contact Samsung t...

Страница 74: ...h Merged TS Stream should be located in D stream OpenCable US or D stream DVBC EU You can check the SIRCH merged stream if you tune to the SIRCH channel HG690_EURO Install_Guide 00ENG indd 74 2013 03 21 4 37 05 ...

Страница 75: ...del number On basis of these parameters the application adds channels for DVB for EU or ATSC for US Please refer section 2 7 What all broadcasting type SIRCH Modulator supports The SIRCH modulator supports only DVB C for DVB and OpenCable for ATSC standards for broadcasting What is difference between Channel in the channel map and Channel configured in SIRCH modulator Channels in the Channel Map a...

Страница 76: ...mount kit a detailed installation manual and all parts necessary for assembly are provided Do not use screws that do not comply with VESA standard screw speciications Do not use screws longer than the standard dimensions as they may cause damage to the inside of the TV set For wall mounts that do not comply with the VESA standard screw speciications the length of the screws may differ depending on...

Страница 77: ...to connect the string so that the clamps ixed on the wall are equal to or lower than the clamps ixed on the TV Untie the string before moving the TV 4 Verify that all connections are properly secured Periodically check connections for any sign of fatigue for failure If you have any doubt about the security of your connections contact a professional installer Anti theft Kensington Lock The Kensingt...

Страница 78: ...ting Humidity 10 80 non condensing Storage Temperature 20 C 45 C 4 F 113 F Storage Humidity 5 95 non condensing Design and speciications are subject to change without prior notice For information about power supply and more about power consumption refer to the label attached to the product The terms HDMI and HDMI High Definition Multimedia Interface and the HDMI Logo are trademarks or registered t...

Страница 79: ... Customer Care Centre AUSTRIA 800 112233 FINLAND 0771 400002 FRANCE 0825 022062 GERMANY 01805 471101 HUNGARY 0640 985985 ITALIA 800 194194 NETHERLANDS 015 2197000 POLAND 0 801 B2BSAM 222726 PORTUGAL 808 B2BSAM SPAIN 0902024 010 UNITED KINGDOM 44 0 845 8414141 SOUTH AFRICA 0860 SAMSUNG 726 7864 U A E 800 SAMSUNG 726 7864 8000 4726 HG690 EURO 00 HG690_EURO Install_Guide 00ENG indd 79 2013 03 21 4 37...

Отзывы: