background image

English


1

03
Getting Started

Audio CD (CD-DA)

This product can play back CD-DA format audio 

CD-RW/-R discs.

The product may not be able to play some 

CD-RW/-R discs due to the condition of the 

recording.

CD-RW/-R

Use a 700MB (80 minute) CD-RW/-R disc.  

If possible, do not use an 800MB (90 minute) or 

larger disc, as the disc may not play back.

If the CD-RW/-R disc was not recorded as a 

closed session, you may experience delays 

when playing back the beginning of the disc or 

all recorded files may not play.

Some CD-RW/-R discs may not play on this 

product, depending on the device which was 

used to burn them. For contents recorded on 

CD-RW/-R media from CDs for your personal 

use, playability may vary depending on the 

contents and discs.

AVCHD (Advanced Video Codec High 

Definition)

This product can play back AVCHD format 

discs. These discs are normally recorded and 

used in camcorders.

The AVCHD format is a high definition digital 

video camera format.

The MPEG-4 AVC/H.264 format compresses 

images with greater efficiency than the 

conventional image compressing format.

Some AVCHD discs use the “x.v.Colour” format. 

This product can play back AVCHD discs that 

use “x.v.Colour” format.

“x.v.Colour” is a trademark of Sony Corporation.

“AVCHD” and the AVCHD logo are trademarks 

of Matsushita Electronic Industrial Co., Ltd. and 

Sony Corporation.

NOTE

Some AVCHD format discs may not play, depending 

on the recording condition. 

AVCHD format discs need to be finalized.
“x.v.Colour” offers a wider colour range than normal 

DVD camcorder discs.
Some DivX, MKV and MP4 format discs may not 

play, depending on the video resolution and frame 

rate condition.


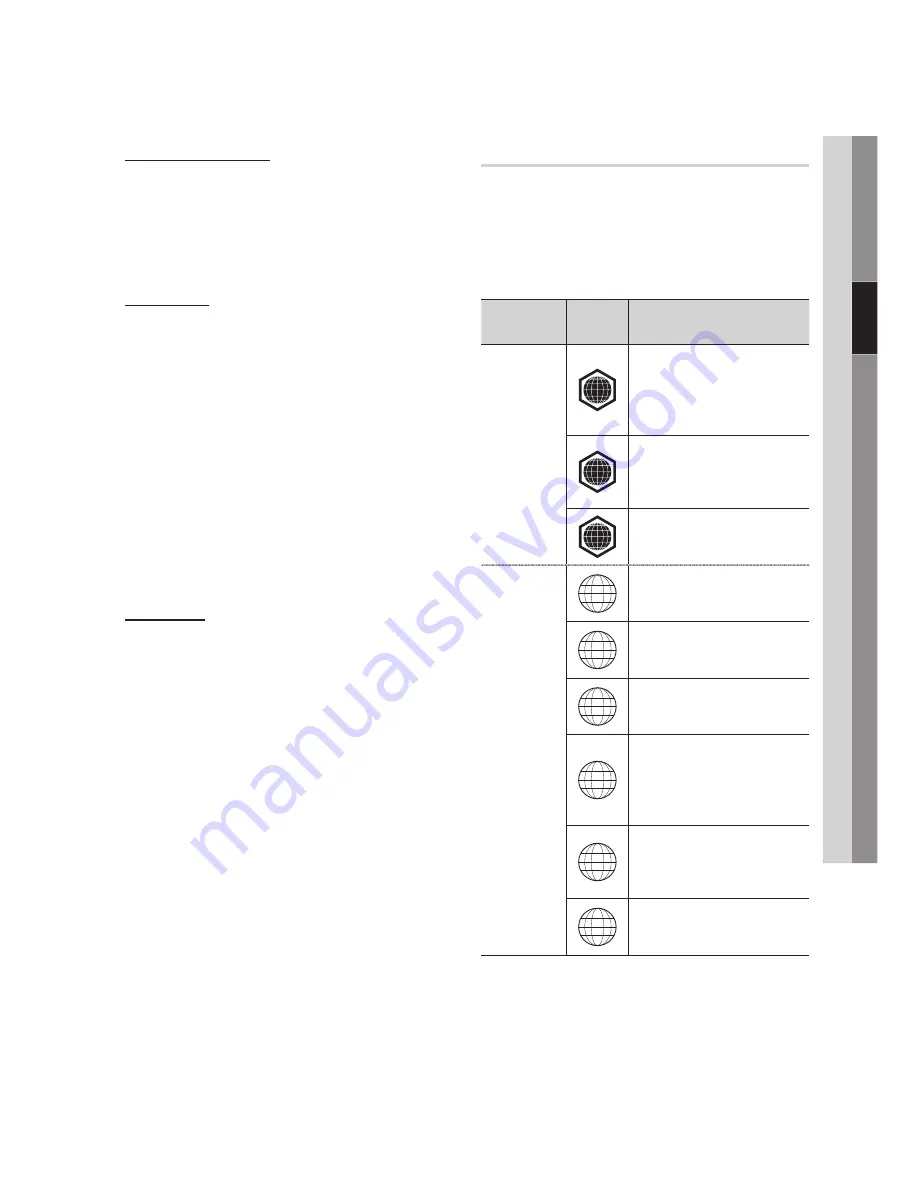
Region Code

Both products and discs are coded by region. 

These regional codes must match for a disc to 

play. If the codes do not match, the disc will not 

play. 

The Region Number for this product is displayed 

on the rear panel of the product.

Disc Type

Region 

Code

Area

Blu-ray Disc

A

North America, Central America, 

South America, Korea, Japan, 

Taiwan, Hong Kong and South 

East Asia.

B

Europe, Greenland, French 

territories, Middle East, Africa, 

Australia and New Zealand.

C

India, China, Russia, Central 

and South Asia.

DVD-VIDEO

1

The U.S., U.S. territories and 

Canada

2

Europe, Japan, the Middle East, 

Egypt, South Africa, Greenland

3

Taiwan, Korea, the Philippines, 

Indonesia, Hong Kong

4

Mexico, South America, 

Central America, Australia, 

New Zealand, Pacific Islands, 

Caribbean

5

Russia, Eastern Europe, India, 

most of Africa, North Korea, 

Mongolia

6

China

Содержание BD-D8200A

Страница 1: ...gine the possibilities Thank you for purchasing this Samsung product To receive a more complete service please register your product at www samsung com register BD HDD Combo user manual BD D8200A BD D8500A ...

Страница 2: ...nnection These applications provide a range of Internet services and content including news weather forecasts stock market quotes games movies and music AllShare You can play videos music and photos saved on your devices such as your PC mobile phones or NAS through a network connection Playing multimedia files You can use the USB connection to play various kinds of multimedia files MP3 JPEG DivX e...

Страница 3: ...BACK NO USER SERVICEABLE PARTS INSIDE REFER SERVICING TO QUALIFIED SERVICE PERSONNEL This symbol indicates important instructions accompanying the product Never use the plug with the fuse cover omitted if the cover is detachable If a replacement fuse cover is required it must be of the same colour as the pin face of the plug Replacement covers are available from your dealer If the fitted plug is n...

Страница 4: ...ution when moving the cart apparatus combination to avoid injury from tip over 1 2 3 4 5 6 7 8 9 10 11 12 Unplug this apparatus during lightning storms or when unused for long periods of time Refer all servicing to qualified service personnel Servicing is required when the apparatus has been damaged in any way such as power supply cord or plug is damaged liquid has been spilled or objects have fal...

Страница 5: ...is highly vulnerable to the environment Do not keep under direct sunlight Keep in a cool ventilated area Store vertically Keep in a clean protection jacket If you move your product suddenly from a cold place to a warm place condensation may occur on the operating parts and lens and cause abnormal disc playback If this occurs unplug the product wait for two hours and then connect the plug to the po...

Страница 6: ...outlet the product will still draw power standby mode when it is turned off Apparatus shall not be exposed to dripping or splashing and no objects filled with liquids such as vases shall be placed on the apparatus The main plug is used as a disconnect device and shall stay readily operable at any time Do not touch the power plug with a wet hand Otherwise it can cause an electric shock Do not share...

Страница 7: ...Formats 17 Connect a USB device before using the Time shift and Recorded TV functions 17 Blu ray Disc Compatibility 17 Copyright 18 Logos of Discs the Product Can Play 18 Accessories 19 Front Panel 20 Rear Panel 21 Remote Control 21 Tour of the Remote Control 22 Setting the Remote Control to Operate Your TV 23 TV Control Codes Connections 24 Connecting to a TV with an Audio Video cables and RF cab...

Страница 8: ...0 Connecting to the Network 30 Cable Network 31 Wireless Network Setup 32 Before Starting Plug Play 32 Accessing the Settings Menu 33 Watch TV 33 Channel List 34 Channel Manager 35 Settings 35 Display 39 Audio 42 Channel 43 Network 47 System 49 Language 50 Security 50 General 51 Support 52 Contact Samsung Basic Functions 53 Playing a Video 53 Playback 53 3D Converter 54 Disc Structure 54 Using the...

Страница 9: ...he Picture Settings 57 Selecting the Audio Language 58 Selecting the Subtitle Language 58 Changing the Camera Angle 58 Selecting the Information 58 Setting BONUSVIEW 59 Listening to Music 59 Playing an Audio CD CD DA MP3 59 AMG function 59 Repeat an Audio CD CD DA MP3 60 Playlist 60 Playing back a Pictures 60 Playing JPEG files 61 Using the TOOLS button 61 Media Play DTV Functions 63 Display Scree...

Страница 10: ... 69 Playing a Disc while Recording a TV channel 69 Time Shift function 70 Playing the Recorded Title 71 Edit the Recorded Title 71 Renaming a Recorded Title 71 Splitting a Section of a Title Divide into two 71 Splitting a Section of a Title Partial Delete 72 Copy 72 Copying Videos Music or Photos 72 Ripping from a Audio CD CD DA Network Services 73 Using Smart Hub 73 Starting Smart Hub for the Fir...

Страница 11: ...P3 or WMA contents PHOTO G Indicates a function available in a CD RW R DVD RW R BD RE R disc or a USB storage media containing JPEG contents VIDEO MUSIC PHOTO T Indicates a function available on the HDD NOTE The product may not play certain CD RW R and DVD R because of the disc type or recording conditions If a DVD RW R disc has not been recorded properly in DVD video format it will not be playabl...

Страница 12: ...estions or encounter difficulty when playing Blu ray Disc DVD or CD discs in this product Also refer to rest of this user manual for additional information on playback restrictions HDD Recording You can record digital broadcast on the internal HDD as below Broadcast Type BD D8200A 250GB BD D8500A 500GB Recording Time Estimated Bitrate Recording Time Estimated Bitrate HD 208 Hrs 20 Mbps 52 Hrs 20 M...

Страница 13: ...y back AVCHD discs that use x v Colour format x v Colour is a trademark of Sony Corporation AVCHD and the AVCHD logo are trademarks of Matsushita Electronic Industrial Co Ltd and Sony Corporation NOTE Some AVCHD format discs may not play depending on the recording condition AVCHD format discs need to be finalized x v Colour offers a wider colour range than normal DVD camcorder discs Some DivX MKV ...

Страница 14: ... of the BD product to Off automatically when connected with each other Need to Know List before using Media Play Media Play only supports USB Mass Storage Class MSC devices MSC is a Mass Storage Class Bulk Only Transport device Examples of MSC are Thumb drives Flash Card Readers and USB HDD HUB is not supported MSC supports Music Photo and Video files while a PTP device supports Photo files only M...

Страница 15: ...SF DivX 3 11 4 x 5 1 6 0 1920x1080 6 30 8 MP3 AC3 LPCM ADPCM WMA XviD 1920x1080 6 30 8 H 264 BP MP HP 1920x1080 6 30 25 MPEG4 SP ASP 1920x1080 6 30 8 Motion JPEG 1920x1080 6 30 8 wmv ASF Window Media Video v9 1920x1080 6 30 25 WMA mp4 MP4 H 264 BP MP HP 1920x1080 6 30 25 MP3 ADPCM AAC MPEG4 SP ASP 1920x1080 6 30 8 XVID 1920x1080 6 30 8 3gp 3GPP H 264 BP MP HP 1920x1080 6 30 25 ADPCM AAC HE AAC MPE...

Страница 16: ...oder Supports up to H 264 Level 4 1 Does not support H 264 FMO ASO RS VC1 SP MP AP L4 and AVCHD XVid MPEG4 SP ASP Below 1280x720 60 frames max Above 1280x720 30 frames max Does not support GMC 2 or higher Audio decoder Supports WMA 7 8 9 and STD Does not support WMA 9 PRO multi channel lossless audio decoding if number of channels is more than 2 Does not support WMA sampling rate of 220 50Hz mono ...

Страница 17: ...rights managements protected and cannot be played on a PC or other product Note that files saved on the TV cannot be used after the main board is changed If available storage is left less than 10MB during the recording recording is finished automatically If the USB device has failed the Device Performance Test the USB device must go through the Device Format and Device Performance Test again befor...

Страница 18: ... Check for the supplied accessories below BD HDD TV 2D 3D 0000 000000 POWER 1 2 3 4 5 6 7 8 9 DISC MENU TITLE MENU 0 TTX MIX BD TV TIME SHIFT TV VOL PROG TV SOURCE 1 1 CH LIST SMART GUIDE i MENU 2D 3D FULL SCREEN A B C D INFO TOOLS EXIT RETURN HUB SEARCH AD SUBTITLE REC PAUSE REC AUDIO TV MUTE TV POWER Audio Video cable RF cable for TV Batteries for Remote Control AAA Size User Manual Remote Contr...

Страница 19: ...and off 3 DISC SLOT Inserts a disc 4 DISPLAY Displays the playing status time etc 5 STOP BUTTON Stops disc playback 6 PLAY PAUSE BUTTON Plays a disc or pauses playback 7 ENTER BUTTON Selects menu items or starts a disc 8 EJECT BUTTON Ejects a disc 9 USB HOST It can be used for software upgrades and MP3 JPEG DivX MKV MP4 playback a bc d efgh i ...

Страница 20: ...ts to external devices that have Component video input 5 DIGITAL AUDIO OUT OPTICAL Connects to an AV receiver 6 VIDEO OUT Connects to the video input of external devices using a video cable 7 AUDIO OUT Connects to the audio input of external devices using audio cables 8 HDMI OUT Using an HDMI cable connect this HDMI output terminal to the HDMI input terminal on your TV for the best quality picture...

Страница 21: ...formation of TV channel These buttons are used both for menus on the product and also several Blu ray Disc functions Press to search backwards or forwards Press to skip backwards or forwards Stops playback or recording TV volume adjustment Mutes the speakers of your TV Displays channel lists on the screen Press this to pause a playback or pause the Time Shift function Press this to play or start t...

Страница 22: ...Used to input number directly TV VOL Used to adjust the volume of the television TV MUTE Used to toggle the sound on and off PROG Used to select the desired channel TV SOURCE Used to select an external source connected to the TV 1 2 3 4 In case of Samsung TV below buttons are also compatible with this remote control Button Function MENU Used to move to the TV menu TOOLS Used to display Tools menu ...

Страница 23: ...A TV POWER 06 57 MAGNAVOX TV POWER 40 METZ TV POWER 57 MITSUBISHI TV POWER 06 48 62 65 MIVAR TV POWER 52 77 NEC TV POWER 83 Brand Code NEWSAN TV POWER 68 NOBLEX TV POWER 66 NOKIA TV POWER 74 NORDMENDE TV POWER 72 73 75 PANASONIC TV POWER 53 54 74 75 PHILIPS TV POWER 06 55 56 57 PHONOLA TV POWER 06 56 57 PIONEER TV POWER 58 59 73 74 RADIOLA TV POWER 06 56 RADIOMARELLI TV POWER 57 RCA TV POWER 45 46...

Страница 24: ...gnals of TV You must connect the Audio Video cables to watch output from your product Noise may be generated if the audio cable is placed too close to the power cable If you want to connect to an AV receiver please refer to the AV receiver connection pages See pages 28 29 The number and position of terminals may vary depending on your TV set Please refer to the user manual of your TV If there is o...

Страница 25: ...080i or 1080p output mode you must use a High speed category 2 HDMI cable HDMI outputs only a pure digital signal to the TV If your TV does not support HDCP High bandwidth Digital Content Protection random noise appears on the screen Depending on your TV certain HDMI output resolutions may not work Please refer to the user manual of your TV When you connect the product to the TV using the HDMI cab...

Страница 26: ...selector on your TV remote control until the COMPONENT signal from the product appears on the TV screen If you have set the remote control to operate your TV See pages 22 23 press the TV SOURCE button on the remote control and select COMPONENT as the external source of the TV NOTE Depending on the manufacturer the component terminals on your TV may be marked R Y B Y Y or Cr Cb Y instead of PB PR Y...

Страница 27: ...rate your TV See pages 22 23 press the TV SOURCE button on the remote control and select VIDEO as the external source of the TV NOTE Noise may be generated if the audio cable is placed too close to the power cable If you want to connect to an AV receiver please refer to the AV receiver connection pages See pages 28 29 The number and position of input terminals may vary depending on your TV set Ple...

Страница 28: ...r Case 1 Connecting to an Audio System HDMI supported AV receiver Best Quality Recommended Using an HDMI cable connect the HDMI OUT terminal on the rear of the product to the HDMI IN terminal of your AV receiver Using an HDMI cable connect the HDMI OUT terminal of the AV receiver to the HDMI IN terminal of your TV Turn on the product TV and AV receiver Press the input select button of the AV recei...

Страница 29: ...3 4 5 Case 3 Connecting to an Audio System AV receiver with Dolby Digital or DTS decoder Better Quality Using an optical cable connect the DIGITAL AUDIO OUT OPTICAL terminal on the rear of the product to the DIGITAL AUDIO IN OPTICAL terminal of your AV receiver Using the video signal cable s connect the HDMI COMPONENT or VIDEO OUT terminals on the rear of the product to the HDMI COMPONENT or VIDEO...

Страница 30: ...e connect the LAN terminal of the product to the LAN terminal of your modem or router To set the network options see pages 43 47 NOTE Internet access to Samsung s software update server may not be allowed depending on the router you use or your ISP s policy For more information contact your ISP Internet Service Provider For DSL users please use a router to make a network connection To use the AllS...

Страница 31: ...onnection in compliance with new Wi Fi certification specifications If your AP supports WPS Wi Fi Protected Setup you can connect to the network via PBC Push Button Configuration or PIN Personal Identification Number WPS will automatically configure the SSID and WPA key in either mode You can setup a wireless network three ways Wireless general Using WPS PBC One Foot Connection Wireless general in...

Страница 32: ...ease refer to pages 43 47 NOTE When the product is connected to the TV for the first time the product turns on automatically This is normal operation 1 2 3 4 5 Accessing the Settings Menu Press the MENU button The home menu will be displayed Press the buttons to select the desired home menu and then press the ENTER button Press the buttons to select the desired submenu and then press the ENTER but...

Страница 33: ... the desired item then press the ENTER button Press the EXIT button to exit the menu NOTE The Guide menu is not displayed if you select a country to New Zealand 1 2 3 4 5 Channel List You can see all channels searched Press the CH LIST button on the remote control The Channel List will be displayed Channel List Screen 1 Shows the stored channels 2 Navigation Help Displays remote control buttons av...

Страница 34: ...If the Edit Channel Number option is not displayed in the Channel Manager set it to Enable in the channels menu See page 43 This menu will be displayed only when you set the country to New Zealand Delete Select this to delete the Channel Deselect All Select this to deselect all channel Select All Select this to select all channel NOTE For satellite broadcasting editing the channel numbers may be p...

Страница 35: ...nter the actual screen size of your TV so that the product can adjust the image according to the screen size and display an optimal 3D image For 3D displays bigger than 116 inches simply setting it as 116 is a safe choice CAUTION If you want to enjoy 3D content connect a 3D device 3D compliant AV receiver or TV to the product s HDMI OUT port using a high speed HDMI cable Put on 3D glasses before p...

Страница 36: ...sung Products only BD Wise is Samsung s latest inter connectivity feature When you connect a Samsung product and a Samsung TV with BD Wise to each other via HDMI and BD Wise is on in both the product and TV the product outputs video at the video resolution and frame rate of the Blu ray Disc DVDs Off The output resolution stays fixed at the resolution you set previously in the Resolution menu regar...

Страница 37: ...0i Movie Frame Auto 24Fs 1080p 24F 1080p 24F 480i 1080i 1080i 1080i 576i 480i 576i 480i 576p 480p 576i 480i 720p 720p 720p 576i 480i 576i 480i 576p 480p 576i 480i 576p 480p 576p 480p 576p 480p 576i 480i 576i 480i 576p 480p 576i 480i 576i 480i 576i 480i 576i 480i 576i 480i DVD playback Output Setup HDMI connected HDMI not connected HDMI Mode Component VIDEO Mode Component Mode VIDEO Mode BD Wise 57...

Страница 38: ...tings are restored to the factory default Follow the steps on the previous page to access each mode and select the Display Setup that your TV will support When the factory default settings are restored all stored user BD data is deleted The Blu ray Disc must have the 24 frame feature for the product to use the Movie Frame 24Fs mode If both HDMI and Component jacks are connected and you are current...

Страница 39: ...ect for the best picture quality from concert or TV show DVDs Audio Digital Output You set the Digital Output to match the capabilities of the AV receiver you ve connected to the product PCM Choose if you have connected an HDMI supported AV receiver Bitstream Unprocessed Select if you have connected an HDMI supported AV receiver with Dolby TrueHD and DTS HD Master Audio decoding capabilities Bitst...

Страница 40: ...Re encoded Dolby Digital DTS HD High Resolution Audio Up to 7 1ch PCM 2ch DTS HD High Resolution Audio DTS Re encoded DTS Re encoded Dolby Digital DTS HD Master Audio Up to 7 1ch PCM 2ch DTS HD Master Audio DTS Re encoded DTS Re encoded Dolby Digital Audio Stream on DVD PCM PCM 2ch PCM 2ch PCM 2ch PCM 2ch PCM 2ch PCM 2ch Dolby Digital Up to 5 1ch PCM 2ch Dolby Digital Dolby Digital Dolby Digital D...

Страница 41: ...ets you select how the product will downmix multi channel audio into fewer channels Normal Stereo Downmixes the multi channel audio into two channel stereo Choose when connected to equipment that does not support virtual surround functions such as Dolby Pro Logic Surround Compatible Downmixes multi channel audio into surround compatible stereo Choose when connected to equipment that supports virtu...

Страница 42: ...atures such as country and auto tune Country Select this to change the country Enter the desired 4 digit password using the number buttons Press the buttons to select the desired country then press the ENTER button Press the RETURN button 1 2 Auto Tuning Scans for all channels with active broadcast stations and stores them Scans for a channel automatically and stores in the product Automatically a...

Страница 43: ...ds including VOD Video On Demand ITV Interactive TV EC Electronic Commerce teleeducation teleconferencing digital libraries and network games Network Before you begin contact your ISP to find out if your IP address is static or dynamic If it is dynamic and you are using a wired or wireless connection we recommend using the Auto procedures If you are using a wireless connection and your router has ...

Страница 44: ...the buttons to select Wired and then press the ENTER button Press the buttons to select IP Settings and then press the ENTER button On the Network Status screen select Cancel and then press Enter Press the ENTER button to select IP Mode Press the buttons to select Manual and then press the ENTER button Press the button to go to the first entry field IP Address Use the number buttons on your remote...

Страница 45: ...E You should be able to find the Pass Phrase on one of the set up screens you used to set up your router or modem When done press the GREEN B button on your remote or press the buttons to move the cursor to Done and then press the ENTER button The Network Status screen appears The product connects to the network after the network connection is verified Setting Up the Wireless Network Connection Ma...

Страница 46: ...ss the button to go to the first DNS entry field Enter the numbers as above Press the OK button The Network Status screen appears The product connects to the network after the network connection is verified WPS PBC The easiest way to set up the wireless network connection is using the WPS PBC function or the One Foot Connection function If your wireless router has a WPS PBC button follow these ste...

Страница 47: ...ed only for BD LIVE contents containing a valid certificate Prohibit No Internet connection is allowed for any BD LIVE content NOTE What is a valid certificate When the product uses BD LIVE to send the disc data and a request to the server to certify the disc the server uses the transmitted data to check if the disc is valid and sends the certificate back to the product The Internet connection may...

Страница 48: ...HDMI cable does not support CEC If your Samsung TV has an Anynet logo then it supports the Anynet function Depending on your TV certain HDMI output resolutions may not work Please refer to the user manual of your TV If you press the Play button of TV when product is in DTV mode Time Shift function will start Device Management Manage internal HDD and external devices You can manage options such as ...

Страница 49: ...Storage Delete BD Data Press this to delete the BD data NOTE The total size of BD Data Management may differ depending on the conditions DivX Video On Demand View DivX VOD Registration Codes to purchase and play DivX VOD contents Reset All settings will revert to the default except for the network and Smart Hub settings Language You can select the language you prefer for the Home menu disc menu et...

Страница 50: ...l 6 discs that contain Level 7 8 will not play Change PIN Change the 4 digit password used to access security functions If you forgot your password Press the MENU button to display home menu with no disc inserted Press the STOP button on the front panel of the product for more than 5 seconds All settings will revert to the factory settings NOTE When the factory default settings are restored all th...

Страница 51: ... bar and the download starts 1 2 3 4 5 6 7 1 2 When the download is complete the Upgrade Query window appears with three choices Upgrade Now Upgrade Later or Don t Upgrade If you select Upgrade Now the product upgrades the software turns off and then turns on automatically If you do not make a selection in one minute or select Upgrade Later the product stores the new upgrade software You can upgra...

Страница 52: ...wnloaded you will see the software version number to the right of Via Download Select Via Download and then press the ENTER button 1 2 3 4 5 6 7 8 1 2 The product displays a message asking if you want to upgrade Select Yes The product begins the upgrade When the update is complete the product turns off automatically and then turns on NOTE When the system upgrade is done check the software details ...

Страница 53: ...this function NOTE You can t convert 2D contents into 3D or use the 2D to 3D button In the following cases When the product is not connected with an HDMI cable When the connected TV does not support 3D When you are playing 3D contents disc file 2D content is converted into the following 3D formats 1080p 24fps Output to 1080p 24 fps 3D Others Output to 720p 3D Photo files Output to 720p 3D 2D conte...

Страница 54: ...n and then press the ENTER button NOTE Depending on the disc the menu items may differ and this menu may not be available Using the Title Menu Z During playback press the TITLE MENU button on the remote control Press the buttons to make the desired selection then press the ENTER button NOTE Depending on the disc the menu items may differ and this menu may not be available Playing the Title List z ...

Страница 55: ...rmal speed playback press the PLAY button NOTE The product does not play sound in search mode 1 2 Skipping Chapters ThzZyx During playback press the SKIP button If you press the SKIP button the disc moves to the next chapter If you press the SKIP button the disc moves to the beginning of the chapter One more press makes the disc move to the beginning of the previous chapter Slow Motion Play Step M...

Страница 56: ...to normal play press the TOOLS button again Press the buttons to select Repeat Mode Press the buttons to select Off then press the ENTER button Repeating the Title or Chapter Tx Repeat the disc title or all Depending on the disc the Repeat function may not be available During playback press the TOOLS button Press the buttons to select Repeat Mode then press the buttons to select Title or All To re...

Страница 57: ...hoose this setting for most viewing applications 1 2 3 4 5 6 7 8 1 2 3 Movie This is the best setting for watching movies User Lets you adjust the advanced settings NOTE When you use BD wise function this menu will not appear Selecting the Audio Language ThzZx You can also operate this function by pressing the AUDIO button on the remote control During playback press the TOOLS button Press the butt...

Страница 58: ...s Press the RETURN button to remove the subtitle bar 1 2 3 Changing the Camera Angle hZ When a Blu ray Disc DVD contains multiple angles of a particular scene you can use the ANGLE function During playback press the TOOLS button Press the buttons to select Angle Press the buttons to select the desired Angle Selecting the Information Tx This function enables you to check the contents information in...

Страница 59: ...l be displayed Press the ENTER button The CD information will be displayed and the first track will be played automatically NOTE When the product is disconnected from the network it may not retrieve the CD information from the Audio CD CD DA if it s the latest version Repeat an Audio CD CD DA MP3 During the Playlist playback press the TOOLS button Press the buttons to select Repeat Mode and then p...

Страница 60: ... on the track is cancelled When done press the TOOLS button 1 2 3 4 5 6 Press the buttons to select Play Selected and then press the ENTER button The tracks you selected will be played automatically To go to the Music List press the RETURN button NOTE You can create a playlist with up to 99 tracks on Audio CDs CD DA Playing back a Pictures G Playing JPEG files Insert a JPEG disc Press the buttons ...

Страница 61: ... encoding method Using the Slide Show function Press the TOOLS button Press the buttons to select Start Slide Show and then press the ENTER button The Slide Show starts To pause the slide show press the TOOLS button again Press the buttons to select Pause Slide show and then press the ENTER button You can also set the slide show speed and effect using the same method Media Play Media Play will ena...

Страница 62: ...he USB storage device safely by performing the Safely Remove USB function in order to prevent a possible damage to the USB memory Press the MENU button to move to the Home menu select the YELLOW C button and then press the ENTER button If you insert a disc when playing a USB storage device the device mode changes to DVD or CD automatically 2 3 4 5 c Safely Remove USB d WPS PBC Watch TV My Devices ...

Страница 63: ...1 2 3 4 DTV Functions Using the TOOLS button Press the TOOLS button while you are viewing a channel Tools Menu Screen Picture Settings Press the TOOLS button while you are viewing a channel Press the buttons to select Picture Settings then press the ENTER button For more information about this menu please refer to page 57 Selecting the Audio Language Press the TOOLS button while you are viewing a ...

Страница 64: ... the TOOLS button while you are viewing a channel Press the buttons to select the Add to Favourites then press the ENTER button Press the buttons to edit the desired channel then press the ENTER button Press the buttons to select the OK then press the ENTER button Signal Information Press the TOOLS button while you are viewing a channel Press the buttons to select the Signal Information then press...

Страница 65: ...C button GREEN B button will be displayed Press this to display the list of channels before 24 hours BLUE D To change the Channel View All TV Radio Data Other Favourites 1 2 3 PROG buttons Go to previous page or next page ENTER button When you select a programme currently being broadcast you can watch the selected channel in the full screen When you select a programme scheduled to broadcast you ca...

Страница 66: ... 3D effect with all live TV programme and recorded TV programme During watching the TV programme or playing recorded TV programme press the 2D 3D button on your remote control The 3D menu will appear 2D 3D Changes a 2D image to 3D Side by Side Displays two images next to each other Top and bottom Displays one image above another Press the buttons to select the desired 3D mode then press the ENTER ...

Страница 67: ...selected in the same way To display the previous or next page press the corresponding coloured button 5 1 sub page Displays the available sub page 1 2 6 2 page up Displays the next Teletext page 7 3 page down Displays the previous Teletext page 8 6 index Displays the index contents page at any time while you are viewing Teletext 9 0 mode Selects the Teletext mode LIST FLOF If pressed during LIST m...

Страница 68: ...ou are recording a TV channel other than you are watching now press the STOP button then message appears as below Press the buttons to select Yes then press the ENTER button to stop recording During these process there are no need to change TV channels to the channel under recording Playback control during recording During recording a TV channel you can search scene or move to the beginning point ...

Страница 69: ...s already loaded before start recording Press the MENU button on your remote while recording a TV channel In the Home menu press the buttons to move to My Devices 1 2 3 1 1 2 Press the buttons to select a disc to play and press the ENTER button When Disc is not loaded Insert a disc into Disc Slot Disc will be loaded and played while keeping recording NOTE This product supports Blu ray Video DVD Vi...

Страница 70: ...yed Press the buttons to select the title you want to play then press the ENTER button The selected title will be played back During the playback press the ENTER button Display five scenes as thumbnails Press the buttons to select desired scene then press the ENTER button to start playback from the beginning of the scene 6 7 1 2 3 4 5 1 2 3 4 5 Time Shift information You can see current informatio...

Страница 71: ...en press the ENTER button The split title is divided into two and the following titles will be shifted down by one Press the ENTER button to select OK NOTE The minimum length of split section should be longer than 10 seconds Splitting a Section of a Title Partial Delete Press the buttons to select the Partial Delete then press the ENTER button 1 2 3 4 5 1 No title xx xxx xxxx xx xx xx 1 1 Page Rec...

Страница 72: ...device to the USB port on the front panel of the product Press the ENTER button Press the buttons to select the Music then press the ENTER button 2 3 4 5 1 2 3 4 Press the YELLOW C button to display the check box Press the ENTER button to check desired track Press the TOOLS button Press the buttons to select the Copy then press the ENTER button Press the ENTER button again To cancel the copying in...

Страница 73: ...button 1 2 The Smart Hub screen appears In a few cases the Country screen appears immediately after If the Country screen has appeared press the buttons to select your country then press the ENTER button NOTE Certain applications are available only in certain countries The Terms of Service Agreement screen appears If you want to agree press the buttons to select Agree then press the ENTER button N...

Страница 74: ...sonal gallery of applications which you can add to modify and delete NOTE Samsung Electronics takes no legal responsibility for any interruption of the Smart Hub service caused by the service provider for any reason The Smart Hub service downloads and processes data via the Internet so that you can enjoy the Internet contents on your TV screen If the Internet connection is unstable the service may...

Страница 75: ...ount follow these steps Press the RED A button on your remote control The Create Account screen appears Press the buttons to select Create Account and then press the ENTER button On the next screen select Smart TV ID and then press the ENTER button An entry screen and keypad appear Use the keypad to enter your e mail address This will serve as your ID NOTE The keypad works like the keypad on a cel...

Страница 76: ...screen displayed on your TV press the RED A button on your remote The Create Account screen appears Select the Down Arrow next to the Smart TV ID field and then press the ENTER button 8 9 10 11 12 13 14 1 2 Select your ID from the list that appears and then press the ENTER button The Create Account screen re appears Select Password and then press the ENTER button An entry screen and a keypad appea...

Страница 77: ...ovider When you are done press the RETURN button 1 2 3 4 5 6 Change Password The Change Password function lets you change your Smart Hub password To change the password follow these steps Select Change Password and then press the ENTER button Enter your current password The next screen appears On the next screen enter a new password on the first line Enter it again on the second line to confirm Th...

Страница 78: ...of the screen Press the to select a menu item and then press the ENTER button 3 4 1 2 The functions in the Edit Mode Menu bar are described below NOTE Some menu items may not appear on the screen To see these items press the to move to the screen edge and then press one more time to reveal the items You can close the bar by highlighting the X on the bottom right side and then pressing the ENTER bu...

Страница 79: ...older window and a keypad appear Use the keypad to enter the name of the folder and then press the ENTER button The New Folder screen closes and the New Folder appears on the Smart Hub screen 1 2 3 1 2 3 1 2 3 Rename Folder The Rename Folder function lets you rename folders To use the Rename Folder function follow these steps Press the YELLOW C button on your remote Press the to select a folder an...

Страница 80: ...ect a sorting method and then press the ENTER button Smart Hub sorts the widgets by the method you have chosen 1 2 3 4 5 1 2 3 4 1 2 Samsung Apps Samsung Apps lets you download for pay or free of charge applications and services to your product and view or use them on your TV These applications and services include videos music photos games news sports etc Widgets for the new apps appear in My App...

Страница 81: ...os Game Displays various games such as sudoku and chess Sports Displays various sports media services such as match information images and short length videos Lifestyle Includes various lifestyle media services such as music personal photo management tools and social networking such as Facebook and Twitter Information Includes various information services such as news stocks and weather Other Incl...

Страница 82: ... use AllShare with your PC you must install AllShare software on your PC If you have a DLNA compatible mobile phone or NAS you can use AllShare without any additional software You can download the PC software and get detailed instructions for using AllShare from the Samsung com web site Auto Back up You can save and play video photos and music saved in Samsung products using Auto backup to this pr...

Страница 83: ...when an invalid button is pressed The Blu ray Disc DVD s software doesn t support the feature e g angles You ve requested a title or chapter number or search time that is out of range Play mode differs from the Setup Menu selection Some of the functions selected in the Setup Menu may not work properly if the disc is not encoded with the corresponding function The screen ratio cannot be changed The...

Страница 84: ...k of the product Check if your TV supports 576p 480p 720p 1080i 1080p HDMI input resolution Abnormal HDMI output screen If random noise appears on the screen it means that TV does not support HDCP High bandwidth Digital Content Protection AllShare function I can see folders shared through AllShare but I cannot see the files AllShare shows only files corresponding to the Image Music and Movie categ...

Страница 85: ...age appears and also Timer recording and Time Shift function does not work Using lower quality USB storage device not supporting Recording function can cause this kind of problem It is recommended to use USB HDD storage device Recommended specification of USB HDD is at least 5400 rpm USB HDD of RAID type is not supported NOTE When the factory default settings are restored all stored user BD data i...

Страница 86: ...41 H HDD 5 HDMI Deep Color 39 J JPEG 60 61 K Keypad 75 M Movie Frame 24Fs 39 MP3 59 60 N Network Settings 43 47 P PCM Downsampling 41 Plug Play 32 Popup Menu 54 Progressive Mode 39 R Recording 68 70 Region Code 13 Remote Control 21 Remote Control Sensor 18 Resolution 36 38 S Samsung Apps 80 81 Schedule Manager 65 66 Slide Show 61 Smart Hub 73 80 Software Upgrade 51 52 Subtitle Language 58 T 3D Set...

Страница 87: ... 1 0 Vp p 75Ω load Blu ray Disc DVDs 576i 480i Component Video Y 1 0 Vp p 75Ω load PR 0 70 Vp p 75Ω load PB 0 70 Vp p 75Ω load Blu ray Disc 576i 480i DVD 576p 480p 576i 480i Video Audio HDMI 1080p 1080i 720p 576p 480p PCM multichannel audio Bitstream audio Audio Output Analogue Audio Output 2 Channel 2Vrms 10 Digital Audio Output Optical Network Ethernet 10 100BASE TX Terminal Wireless LAN Built i...

Страница 88: ...le features may be subject to delayed availability some discs bearing the BD ROM BD RE R DVD VIDEO DVD RW R DVD RW R and CD RW R logos may still be non standardized discs some discs may not be played depending on their physical state or recording conditions problems and errors can occur during the creation of Blu ray Disc DVD software and or the manufacture of discs this product operates different...

Страница 89: ... or service provider you may not modify copy republish upload post transmit translate sell create derivative works exploit or distribute in any manner or medium any content or services displayed through this device THIRD PARTY CONTENT AND SERVICES ARE PROVIDED AS IS SAMSUNG DOES NOT WARRANT CONTENT OR SERVICES SO PROVIDED EITHER EXPRESSLY OR IMPLIEDLY FOR ANY PURPOSE SAMSUNG EXPRESSLY DISCLAIMS AN...

Страница 90: ...istered trademarks of HDMI Licensing LLC in the United States and other countries Oracle and Java are registered trademarks of Oracle and or its affiliates Other names may be trademarks of their respective owners Rovi Flow Down Licence Terms Terms of Use This application incorporates software and technology of Rovi Corporation Rovi The Rovi software and technology collectively the Rovi Technology ...

Страница 91: ...present and warrant that you are the sole author of such work s and further hereby assign to Rovi all rights of copyright therein including the right to register the copyright in such work s as part of the Rovi Database THE ROVITECHNOLOGY AND EACH ITEM OF ROVI DATA ARE LicenceD TO YOU AS IS ROVI MAKES NO REPRESENTATIONS OR WARRANTIES EXPRESS OR IMPLIED REGARDING THE ACCURACY OF ANY ROVI DATA ON TH...

Страница 92: ...Area Contact Centre Web Site Serbia 0700 Samsung 0700 726 7864 www samsung com Slovakia 0800 SAMSUNG 726 7864 www samsung com Spain 902 1 SAMSUNG 902 172 678 www samsung com Sweden 0771 726 7864 SAMSUNG www samsung com Switzerland 0848 SAMSUNG 7267864 CHF 0 08 min www samsung com ch www samsung com ch_fr French U k 0330 SAMSUNG 7267864 www samsung com Eire 0818 717100 www samsung com Lithuania 8 8...

Страница 93: ...AK68 02063V 00 ...

Отзывы: