106
SAMSUNG ELECTRONICS
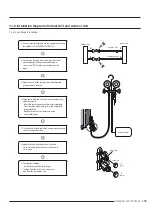
11-6-2 "Pump down" Procedure
1) Remove the caps from the 3 way valve and the
3 way valve.
2) Turn the 3 way valve clockwise to close and
connect a pressure gauge (low pressure side)
to the service valve, and open the 3 way valve
again.
3 way Valve
2 way Valve
4) Turn the 3 way valve clockwise to close.
3) Set the unit to cool operation mode.
(Check if the compressor is operating.)
5) When the pressure gauge indicates "0" turn the
3 way valve clockwise to close.
6) Stop operation of the air conditioner.
7) Close the cap of each valve.
Note
Relocation of the air conditioner
• Refer to this procedure when the unit is relocated.
• Carry out the pump down procedure (refer to the details of 'pump down').
• Remove the power cord.
• Disconnect the assembly cable from the indoor and outdoor units.
• Remove the flare nut connecting the indoor and the pipe.
• At this time, cover the pipe of the indoor unit and the other pipe using a cap or vinyl plug to avoid foreign
material entering.
• Disconnect the pipe connected to the uotdoor unit.
• At this time, cover the valve of the outdoor unit and the other pipe using a cap or vinyl plug to avoid foreign
material entering.
• Make sure you do not bend the connection pipes in the middle and store together with the cables.
• Move the indoor and outdoor units to a new location.
• Remove the mounting plate for the indoor unit and move it to a new location.
Содержание AR07TXCAAWKNEU
Страница 49: ...49 SAMSUNG ELECTRONICS 5 2 ASSY KIT CODE DB92 04839Q ...
Страница 50: ...50 SAMSUNG ELECTRONICS 5 3 ASSY KIT CODE DB92 04839Q ...
Страница 59: ...59 SAMSUNG ELECTRONICS 6 Wiring Diagram 6 1 Indoor Unit CODE DB68 08680A 01 ...
Страница 61: ...61 SAMSUNG ELECTRONICS 7 PCB Diagram 7 1 Indoor Main PCB DB92 04839A ...
Страница 62: ...62 SAMSUNG ELECTRONICS 7 2 Outdoor PCB DB92 04837A ...
Страница 63: ...63 SAMSUNG ELECTRONICS ...
Страница 67: ...67 SAMSUNG ELECTRONICS 8 5 DISPLAY PCB DB92 04833B ...

