background image


4


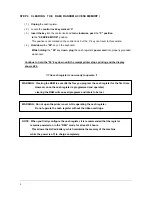
STEP 4  CLEARING  THE  RAM ( RANDOM ACCESS MEMORY )


        ( 1 )   

Unplug

 the cash register. 

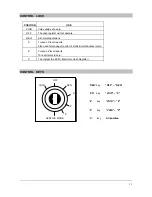
    ( 2 )  Locate the 

control lock key marked ‘C’

.  

        ( 3 )   

Insert the key

 into the control lock and 

turn clockwise

past

 the

 “P” position


to

 the 

“SERVICE MODE”

 position. 

          This position is not marked on the control lock, but the ‘C’ key can travel to this position. 

        ( 4 )   

Hold down

 the 

“00”

 key on the keyboard. 


While holding

 the 

“00”

 key 

down

plug

 the cash register’s 

power cord

 into properly grounded   

                    wall socket. 


        Continue to hold the “00” key down until the receipt printer stops printing and the display   

    shows 0.00.


                      !! The cash register is now ready to operate. !!


WARNING : Clearing the RAM is essential before you program the cash register for the first time.         

             However once the cash register is programmed and operated, 

                          clearing the RAM will cause all programs and totals to be lost. 


WARNING : Do not open the printer cover while operating the cash register. 

                          Do not operate the cash register without the ribbon cartridge. 


NOTE : When you firstly configure the cash register, it is recommended that the register   

                  remains powered on in the “REG” mode for at least 24 hours.


This allows the Ni-Cad battery, which maintains the memory of the machine   

                  while the power is off, to charge completely.   


Содержание ER-5100? SERIES

Страница 1: ...ER 5100 ELECTRONIC CASH REGISTER Programming Operating Manual All specifications are subject to change without notice...

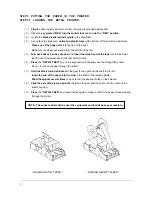
Страница 2: ...ash drawer STEP 2 INSERTING THE PRINTER RIBBON CARTRIDGE 1 Locate the printer cover key The printer cover key is the smallest on the key ring Insert this key into the printer cover lock Turn the key a...

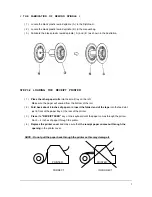
Страница 3: ...ed slot just in front of the paper tray at the rear of the printer 6 Press the DETAIL FEED key on the keyboard until the edge has fed through the printer Run 6 8 inches of paper through the printer 7...

Страница 4: ...paper will unwind from the bottom of the roll 2 Fold back about 6 inches of paper and insert the folded end of the tape into the feed slot just in front of the paper tray at the rear of the printer 3...

Страница 5: ...printer stops printing and the display shows 0 00 The cash register is now ready to operate WARNING Clearing the RAM is essential before you program the cash register for the first time However once t...

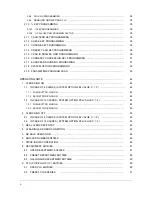
Страница 6: ...PROGRAMMING 19 2 2 REGISTER NUMBER PROGRAMMING 19 2 3 TAX PROGRAMMING 20 2 4 VAT RATE PROGRAMMING 20 2 5 DEFAULT LEVEL PROGRAMMING 21 2 6 CLERK SECRET CODE DRAWER ASSIGNMENT PROGRAMMING 21 2 7 DESCRI...

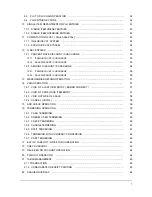
Страница 7: ...44 1 1 IN CASE OF 4 CLERKS SYSTEM OPTION 28 s VALUE C 0 44 1 1 1 PUSH BUTTON SIGN ON 44 1 1 2 SECRET CODE SIGN ON 44 1 2 IN CASE OF 15 CLERKS SYSTEM OPTION 28 s VALUE C 4 44 1 2 1 PUSH BUTTON SIGN ON...

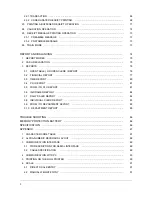
Страница 8: ...SCOUNT SURCHARGE 56 13 MERCHANDISE RETURN OPERATION 57 14 VOID OPERATION 57 14 1 VOID OF A LAST ITEM ENTRY ERROR CORRECT 57 14 2 VOID OF A PREVIOUS ITEM ENTRY 57 14 3 VOID OUTSIDE OF A SALE 58 14 4 CA...

Страница 9: ...ORT 77 3 3 TIME REPORT 80 3 4 PLU REPORT 81 3 5 FROM TO PLU REPORT 81 3 6 IN DRAWER REPORT 82 3 7 DAILY SALES REPORT 82 3 8 INDIVIDUAL CLERK REPORT 83 3 9 FROM TO DEPARTMENT REPORT 85 3 10 DEPARTMENT...

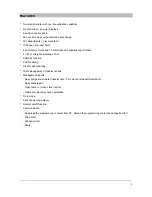
Страница 10: ...VAT or straight percentage TAX CANCEL function Post tendering Preset cash tendering Table management Cashier overlap Management reports Daily and period to date financial time PLU clerk and department...

Страница 11: ...10 KEYBOARD LAYOUT...

Страница 12: ...logged on before the cash register will operate CONV 1 2 Use these keys to convert a home currency to the equivalent of another country s currency These keys are allowed after the SUBTL key convert a...

Страница 13: ...a department or PLU Price Inquiry RECD ACCT Use this key to register cash and check added to the cash drawer Received Account RECEIPT Use this key to issue the buffered receipt RECEIPT FEED Press thi...

Страница 14: ...perations X To issue X level reports Also used for manager control of voids merchandise return Z To issue Z level reports To reset totals to zero P To program the ECR Electronic Cash Register CONTROL...

Страница 15: ...nt displayed is a total Indicates that the amount displayed is negative This symbol shows directly in front of negative amount Indicates that the amount displayed is a subtotal Indicates that a table...

Страница 16: ...t now a table is open Indicates that all the open tables or clerks must be finalized Indicates that the sale data is too big Please issue all Z report 100 SUBTL in Z mode Indicates that the scale runt...

Страница 17: ...out of the box 1 SERVICE MODE PROGRAMMING Service mode programming is the initial programming that is required when the register is new out of the box Service mode programming is also used to return...

Страница 18: ...t lock key marked C into the control lock and turn clockwise past the position marked P to the SERVICE MODE Master Clear position This position is not marked on the control lock but the C key will tra...

Страница 19: ...ccupy key position 1 107 level 2 and so on 2 RECEIPT DETAIL RECEIPT FEED FEED ON OFF Department key position number 1 will be occupied by department 1 2 and 3 on levels 1 2 and 3 Department key positi...

Страница 20: ...TIME PROGRAMMING 1 Enter standard military time in the form of HH MM 2 Press the X TIME key EX 25 DECEMBER 1996 WEDNESDAY 12 00 noon 1 2 2 5 9 6 3 1 2 0 0 In military time noon 1200 midnight 0000 WEE...

Страница 21: ...EM OPTION ADDRESS 4 to 1 NOTE If you clear RAM the machine has the INCLUSIVE TAX SYSTEM 2 4 VAT RATE PROGRAMMING 1 Press the VAT number 1 2 3 or 4 and the TAX key 2 Enter the percentage of tax from th...

Страница 22: ...he SYSTEM OPTION ADDRESS 28 This programming assigns a clerk code number to each clerk The code number is used by the clerk to log on for operations 1 Press the one of CLERK 1 2 3 or 4 keys Any clerk...

Страница 23: ...0 0 2 2 0 0 2 3 0 0 2 4 0 0 2 5 12 CHAR 12 CHAR 12 CHAR 12 CHAR 12 CHAR 12 CHAR 12 CHAR 12 CHAR 12 CHAR 12 CHAR CASH CHECK CHG1 CHG2 CHANGE TOTAL RECD ACCT PAID OUT NON ADD ADD CHECK NO SALES ERR CORR...

Страница 24: ...L KEY 1 0 0 0 1 PAID OUT A P P L E CASH TEND 2 0 0 1 0 3 0 0 0 4 4 0 0 0 1 4 0 0 0 5 PAID OUT DOUBLE O R A N G DOUBLE E CASH TEND PAID OUT J A M E S CASH TEND PAID OUT PAID OUT a l n l k g A Y a o i u...

Страница 25: ...24 2 7 3 DESCRIPTOR PROGRAMMING SCAN PAID OUT CASH TEND...

Страница 26: ...ot 2 8 1 DEPARTMENT STATUS PROGRAMMING A PROGRAMMING OPTION PROGRAMMING OPTION VALUE OPTION DIGIT Department GROUP NO 0 9 N 1 Resettable counter counter will increase Nonresettable counter counter wil...

Страница 27: ...t Lock Out at the maximum seven digits 99999 99 for standard department and five digits 99 999 for gallonage department Zero preset departments are allowed PRESET PRICE ACTIVITY EXIT OR HALO COUNTER 0...

Страница 28: ...ET and NON TAX with nonresettable and increasing counter EX 5 Program DEPT 6 so it is a PRESET VAT 1 3 and a KP item EX 6 Program DEPT 214 so it is a GALLONAGE and NON TAX EX 7 Program DEPT 321 so it...

Страница 29: ...e 10 00 EX 3 Program DEPT 4 so it has a price 15 00 EX 4 Program DEPT 5 so it has a price 1 00 and activity counter is 50 EX 5 Program DEPT 214 so it has a price 1 399 Gallonage Price 9 9 9 9 1 0 0 0...

Страница 30: ...rst DEPARTMENT key you want to scan 3 Press the last DEPARTMENT key you want to scan If you want to scan only one department press the same DEPARTMENT key twice NOTE The first department number The la...

Страница 31: ...table counter counter will decrease Nonresettable counter counter will decrease 0 1 2 3 N 1 HASH PLU feature GALLONAGE PLU feature NON ADD NUMBER compulsory a b c YES 1 YES 2 YES 4 NO 0 NO 0 NO 0 N 2...

Страница 32: ...rd PLU and five digits 99 999 for gallonage PLU Zero preset PLUs are allowed 0 99999999 PLU CODE STATUS From PLU NO Linked Dept Only When resetting PLU CODE to 0 To PLU NO PRESET PRICE ACTIVITY OR HAL...

Страница 33: ...nter is 100 with nonresettable decreasing status EX 5 Program PLU 50 so it is VAT 1 and a KP item It has a PRESET price 10 00 and linked to DEPT 6 Its code is 50100 EX 6 Program PLU 1000 so it is VAT...

Страница 34: ...D key 2 Enter the number of the first PLU you want to scan and press the PLU key 3 Enter the number of the last PLU you want to scan and press the PLU key NOTE The first PLU number The last PLU number...

Страница 35: ...G OR DELETING A PLU In order to de activate a PLU or remove its status and linked department Deleted or inactivated PLUs will not be allowed to register 1 Enter the PLU number 1 1000 and press the PLU...

Страница 36: ...E ACTIVE a b c 1 0 2 0 4 0 N 2 a b c B PROGRAMMING 1 Press the key to be programmed 2 Enter the status from the above table and press the SUBTL key 3 Enter the percentage or amount up to 5 digits and...

Страница 37: ...charge keys Tendering HALO 0 999999 0 for no HALO 2 14 PRESET CASH KEY PROGRAMMING Desired amount 0 999999 2 15 CASH IN DRAWER LIMIT PROGRAMMING Total amount of cash and checks allowed to be in the ca...

Страница 38: ...VALUE DECIMAL POINT POSITION From the right EX 1 00 2 4455 DM DECIMAL POINT POSITION 2 17 EUROPEAN ROUNDING PROGRAMMING If you use the European rounding after programming the European rounding set the...

Страница 39: ...inclusive VAT c YES 4 NO 0 SUM a b c 4 Tax is figured by inclusive VAT Tax is figured by exclusive VAT a 0 1 a a YES 1 NO 0 5 Cash declaration is compulsory before X Z reports Cash drawer does not ope...

Страница 40: ...ry validation on RETURN function RETURN function is inactive c YES 4 NO 0 SUM a b c a YES 1 NO 0 b YES 2 NO 0 17 key function is only allowed in the X control lock position Compulsory validation on ke...

Страница 41: ...es a 1 2 3 0 a 27 Enter the HDLO High Digit Lock Out 0 01 0 09 for the total amount allowed for RECD ACCT 0 01 0 99 PAID OUT transactions 0 01 9 99 0 01 99 99 0 01 999 99 0 01 9999 99 0 01 99999 99 a...

Страница 42: ...will be printed on the receipt Only preamble message will be printed on the receipt a 0 1 2 a a YES 1 NO 0 b YES 2 NO 0 44 Postamble message will be printed on the receipt Preamble message will be not...

Страница 43: ...s allowed Validation on CHARGE 2 tendering is compulsory c YES 4 NO 0 SUM a b c 53 Clerk key Button key Real clerk key a 0 1 a 54 Printer type No printer EPSON TM 290 EPSON TM 300 D EPSON TM T80 CITIZ...

Страница 44: ...43 2 19 PARAMETERS PROGRAM SCAN SUBTL CASH TEND...

Страница 45: ...before operation takes place All registrations are made in the REG or VOID control lock position 1 CLERK SIGN ON 1 1 IN CASE OF 4 CLERKS SYSTEM OPTION 28 s VALUE C 0 1 1 1 PUSH BUTTON SIGN ON The cler...

Страница 46: ...message CLOSEd displays on the display 1 2 3 or 4 2 2 IN CASE OF 15 CLERKS SYSTEM OPTION 28 s VALUE C 4 When clerk sign off the message CLOSEd displays on the display 3 REAL CLERK KEY ENTRY Optional D...

Страница 47: ...ed to enter up to eight digits This numeric entry will be added to non add number total NO SALE NON ADD NUMBER 7 PRICE INQUIRY OPERATION If you want to know the price preset or HALO of DEPT or PLU dur...

Страница 48: ...open DEPARTMENT entry Decimal Q ty 0 001 999 999 5 Override HALO price entry Q ty 1 999 6 Split pricing on open DEPARTMENT entry Triple multiplication SYSTEM OPTION 41 1 Q ty 0 001 999 999 Basic Q ty...

Страница 49: ...on of preset DEPARTMENT entry Decimal Q ty 0 001 999 999 5 Override preset price entry 6 Split pricing on preset DEPARTMENT entry Triple multiplication SYSTEM OPTION 41 1 Q ty 0 001 999 999 Basic Q ty...

Страница 50: ...age department is registered Same as gallonage PLU EX DEPARTMENT 214 has been programmed as gallonage department and unit price 1 399 AMOUNT Gallonage Dept 214 9 PLU PRICE LOOK UP ENTRIES 9 1 OPEN PLU...

Страница 51: ...ALO price entry Q ty 1 999 6 Split pricing on open PLU entry Triple multiplication SYSTEM OPTION 41 1 Q ty 0 001 999 999 Basic Q ty 0 001 999 999 PLU PLU PLU PLU 1 0 0 0 0 1 0 0 0 1 0 1 0 X TIME X TIM...

Страница 52: ...al multiplication of preset PLU entry Decimal Q ty 0 001 999 999 5 Override preset price entry Only 1 6 Split pricing on preset PLU entry Triple multiplication SYSTEM OPTION 41 1 Q ty 0 001 999 999 Ba...

Страница 53: ...Us will be automatically registered EX PLU 1000 is linked to PLU 50 9 4 PLU ENTRIES BY CODE This cash register can register PLU not only sequential index 1 1000 but also code up to 8 digits If you wan...

Страница 54: ...or exclusive VAT 11 1 INCLUSIVE VAT SYSTEM 1 Inclusive VAT is used when a tax amount is already included in the item price and a breakdown of the various tax charged is separated out No Breakdown If...

Страница 55: ...ed when a tax amount is not included in the item price and a tax amount is calculated by a tax rate 2 TAX EXEMPT While the exclusive VAT system is in use you can exempt a taxable department or PLU fro...

Страница 56: ...press the SUBTL key before entering the key 12 1 PERCENT RATE DISCOUNT SURCHARGE 12 1 1 ITEM DISCOUNT SURCHARGE 1 Preset percent item discount surcharge 2 Override preset item discount surcharge Perce...

Страница 57: ...item discount surcharge 2 Override amount item discount surcharge AMOUNT 12 2 2 SALE DISCOUNT SURCHARGE 1 Preset amount sale discount surcharge 2 Open sale discount surcharge AMOUNT 1 DEPT 1 SUBTL DE...

Страница 58: ...void of merchandise return entry is not allowed 14 VOID OPERATION 14 1 VOID OF A LAST ITEM ENTRY ERROR CORRECT Press the VOID key immediately after making an incorrect entry Incorrect Entry 14 2 VOID...

Страница 59: ...will appear as alternative sign amount 4 All VOID position operations maintain their own total on the report 14 4 CANCEL VOID 4 The pressing of the CANCEL key during a transaction cancels the entire...

Страница 60: ...59 15 ADD CHECK OPERATION 16 TENDERING OPERATION 16 1 CASH TENDERING AMOUNT DEPT or PLU ADD CHECK DEPT or PLU ADD CHECK TENDER CASH TEND SUBTL DEPT or PLU...

Страница 61: ...TENDERING You must program the PRESET CASH key If you don t program this key an error will occur when you enter the PRESET CASH key AMOUNT 16 3 CHECK TENDERING AMOUNT PRESET CASH SUBTL DEPT or PLU CHE...

Страница 62: ...RING The entering amount of charge must not be more than subtotal amount AMOUNT 16 5 SPLIT TENDERING You can tender any combination of media AMOUNT AMOUNT CHARGE SUBTL DEPT or PLU CHECK SUBTL DEPT or...

Страница 63: ...ERING NOTE If you want to use post tendering function you must set SYSTEM OPTION ADDRESS 13 to 1 Page 39 Post tendering function is only allowed on cash transactions After post tendering the display w...

Страница 64: ...ore tendering each message is printed on the receipt and each total is added to that of the financial report 18 CHECK CASHING If a customer wants to cash a check use this function 1 Enter the amount o...

Страница 65: ...k that is added to the cash drawer AMOUNT B CHANGE BACK AMOUNT A AMOUNT B A B 20 PAID OUT OPERATION Use the PAID OUT key to register cash or check that is moved from the cash drawer AMOUNT RECD ACCT C...

Страница 66: ...ss the table number and the CHECK TENDER key TABLE NO NOTE If you set the SYSTEM OPTION 47 to 0 the consolidated receipt is only printed on the receipt of ECR If you set the SYSTEM OPTION 47 to 1 the...

Страница 67: ...TABLE NO STEP 8 TABLE NO STEP 1 STEP 2 CHECK TENDER CHECK TENDER MDSE RETURN CHECK TENDER CHECK TENDER CHECK TENDER CHECK TENDER CHARGE 1 CHECK CASH TEND CASH TEND DEPT 3 DEPT 1 CHECK DEPT 3 X TIME CH...

Страница 68: ...67 STEP 3 STEP 4 STEP 5 STEP 6 SLIP PRINTING STEP 7 STEP 8 SLIP PRINTING...

Страница 69: ...ACTION CLERK CHANGE CLERK X Y TRANSACTION CLERK CHANGE CLERK Y Z TRANSACTION CLERK Z FINALIZES CLERK CHANGE CLERK Z Y TRANSACTION CLERK Y FINALIZES CLERK CHANGE CLERK Y X TRANSACTION CLERK X FINALIZES...

Страница 70: ...DDRESS 48 to 0 when cashier overlap the transaction will be printed on the slip printer Refer to SYSTEM OPTION ADDRESS 54 Page 42 to select the printer type EX Assume that clerk sign on method is push...

Страница 71: ...70 STEP 1 STEP 2 STEP 3 STEP 4 SLIP PRINTING STEP 5 STEP 6 SLIP PRINTING...

Страница 72: ...lines If more than 50 entries are made in the sale the cash register will issue a stub receipt only show the total net sale and correct the tax totals and payment tendered NOTE The RECEIPT ON OFF key...

Страница 73: ...is completed and the message S P will appear on the display If any other operations are attempted before validation an error will occur Refer to SYSTEM OPTION ADDRESS 20 Page 39 SAMPLE VALIDATION REC...

Страница 74: ...ON 43 0 SYSTEM OPTION 43 1 SYSTEM OPTION 43 2 25 2 POSTAMBLE MESSAGE If you want to print the receipt postamble messages on the receipt you must program SYSTEM OPTION ADDRESS 44 Page 41 after programm...

Страница 75: ...2 X2 X Z X Z 3 SUBTL 3 SUBTL 203 SUBTL 203 SUBTL IN DRAWER 4 X X 4 SUBTL DAILY SALES 5 X2 Z2 X Z 205 SUBTL 205 SUBTL OPEN TABLE or OPEN CLERK 6 X X 6 SUBTL INDIVIDUAL CLERK X Z X2 Z2 X Z X Z SUBTL CLE...

Страница 76: ...to value b Page 38 2 CASH DECLARATION If the compulsory cash declaration is programmed SYSTEM OPTION ADDRESS 5 the cash declaration must be performed in X Z mode prior to taking X Z reports START AMOU...

Страница 77: ...shier overlap SYSTEM OPTION ADDRESS 46 1 open clerk report will be issued NOTE If open table or clerk exists the reports in Z mode will not be issued and an error tone will sound E9 So if you want to...

Страница 78: ...77 3 2 FINANCIAL REPORT A X financial report Key lock X B Z financial report Key lock Z C X2 financial report Key lock X D Z2 financial report Key lock Z SAMPLE FINANCIAL REPORT SUBTL 1 SUBTL 2 0 1...

Страница 79: ...78...

Страница 80: ...79...

Страница 81: ...80 3 3 TIME REPORT A X time report Key lock X B Z time report Key lock Z C X2 time report Key lock X D Z2 time report Key lock Z SAMPLE TIME REPORT SUBTL 2 SUBTL 2 0 2...

Страница 82: ...port Key lock Z 3 5 FROM TO PLU REPORT A X from to PLU report Key lock X PLU NO 1 1000 PLU NO 1 1000 a b a b NOTE If you press the CASH TEND key during issuing the PLU or FROM TO PLU report the report...

Страница 83: ...DRAWER REPORT A X in drawer report Key lock X 3 7 DAILY SALES REPORT A X2 daily sales report Key lock X B Z2 daily sales report Key lock Z SAMPLE IN DRAWER REPORT SAMPLE DAILY SALES REPORT SUBTL 4 SU...

Страница 84: ...port Key lock X D Z2 individual clerk report Key lock Z 1 2 3 or 4 3 8 2 IN CASE OF 15 CLERKS SYSTEM OPTION 28 s VALUE C 4 A X individual clerk report Key lock X B Z individual clerk report Key lock Z...

Страница 85: ...84 OPTIONAL FULL CLERK REPORT SYSTEM OPTION 8...

Страница 86: ...t report Key lock X a b a b 3 10 DEPARTMENT REPORT A X department report Key lock X B Z department report Key lock Z C X2 department report Key lock X D Z2 department report Key lock Z SAMPLE DEPARTME...

Страница 87: ...ON BATTERY Totaled sales and other items are protected during power failures by a built in memory protection battery The memory protection battery is charging when the power is on and discharging when...

Страница 88: ...50 CHAR 3 4 5 6 7 8 9 CODE 051 052 053 054 055 056 057 058 059 060 CHAR A B C D E F CODE 061 062 063 064 065 066 067 068 069 070 CHAR G H I J K L M N O P CODE 071 072 073 074 075 076 077 078 079 080 C...

Страница 89: ...88 2 ALPHA NUMERIC KEYBOARD LAYOUT...

Страница 90: ...ERFACE 5 4 3 2 1 9 8 7 6 SERIAL PORT SERIAL PORT PIN NO SIGNAL 1 Not connect 2 RXD 3 TXD 4 DTR 5 GND 6 Not connect 7 Not connect 8 Not connect 9 Not connect 3 2 CABLE SPECIFICATION CABLE FOR SERIAL PO...

Страница 91: ...shown on the display NOTE If you want to escape from online mode press the CLEAR key 5 PRINTING ON THE ROLL PRINTER If you want to print the sale items on the roll printer set the SYSTEM OPTION ADDRE...

Страница 92: ...LE key 6 1 DIRECT SCALE ENTRY When product is placed on the scale and the SCALE key is pressed the weight will be appear on the display EX 6 2 MANUAL WEIGHT ENTRY If you want to make manual weight ent...

Отзывы: