11
protection.
- Check the vacuum hose conditions;
- check the power cord, plug and outlet socket conditions: in
case contact an authorized service centre for replacement;
- check the dust bag: do not exceed recommended weight and
capacity!
- check filter cartridges condition (9).
In case of lacerations or perforations contact an authjorized
service centre for replacement.
Do not use the appliance without the full filter set fitted!
Bag replacement
Do not spread dust during dust bag replacement!
- Wear adequate filter mask;
- turn off the switch in 0 position;
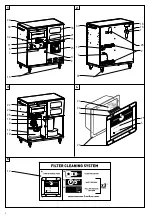
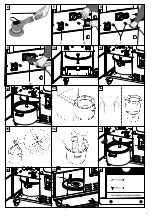
- open the frontal dust container door (17) (pic. 11);
- release the metal hook and extract the dust container (pics. 12-13);
- free the dust bag from the plastic ring (pic. 14);
- remove the bag containing the dust and seal it with a clip.
See the sequence in pics. 14-15-16;
- hook the bag onto the plastic ring and fix it in position in its housing
(pic. 14) using the elastic;
- tilt the bag so that the pressure balancingm (pic. 14) holes (pic. 8)
are free;
- place the bag in the container ensuring that it is well spread on the
bottom of the container (pic. 16);
- place all the components inside the compartment and close the door
(pic. 11):
- close the door.
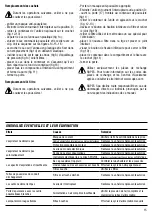
TROUBLESHOOTING AND SOLUTION
EFFECTS
CAUSES
SOLUTIONS
The motor will not start
No power
Make sure the uniti is plugged in
Power cord, switch or motor defective
Contact an authorised service centre
Motor electric protection activated
Contact an authorised service centre
The vacuum does not start automatically
Electronic module fault
Contact an authorised service centre
Pneumatic valve fault
Contact an authorised service centre
Electric tool connected to SERVICE plug
Connect electric tool to AUTOMATIC plug
Vacuum flow is insufficient
One of the hoses is clogged
Check the flexible hoses and accessories
Clogged filters
Make a filter cleaning operation
Dust container full
Check dust level
Dust from the exhaust (10)
FIlter cartridge torn ripped
Contact an authorised service centre
Tools do not start
3-way switches fault
Contact an authorised service centre
No compressed air or electric supply
Check the unit is plugged in and connected
to compressed air line
Insufficient power for pneumatic tool
Insufficient compressed air supply
Check compressed air pressure and compressed
air pipe diameter
FILTER CHECK indicator on
Clogged filters
Make a filter cleaning operation
Filter replacement
Do not spread dust during filter replacement!
- Wear adequate filter mask;
- turn off the switch in 0 position;
- open the frontal dust container door (17) (pic. 11);
- release the metal hook and extract the dust container;
- remove the plastic knob and the gasket under the filter (pic.19);
- remove used filter and place it in a dedicated bag for the disposal;
- place the new filter inside the metal drum and the gasket (pic. 19);
- block the filter with the plastic knob (pic. 19);
- place the dust container under the filter drum and fix the metal hook
(pic.11);
- close the door.
Use genuine RUPES spare parts only.
Refer to www.rupes.com for parts code and authorized
service centre.
Follow local legal regulations for disposal.
RUPES Spa. will not be held responsible for direct or
indirect damages resulting from non-compliance with the
requirements of this manual.


