


WORKSHOP MANUAL BULLET
Page 70
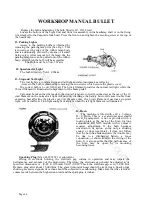
CARBURETTER
(VILLIERS)
The carburetter fitted to the engine produced prior to middle of 1982 are Villiers S.25 type
incorporating a choke control.
The throttle control operates the throttle slide, regulating the amount of mixture entering the
engine. The carburetter itself automatically meters and atomises the correct amount of fuel to
give the necessary mixture strength. To achieve this, the carburetter incorporates pilot jet and
main jet systems. At idling speeds fuel is drawn from the pilot jet and as the throttle is
progressively opened, fuel is drawn in turn from the pilot progression hole and the main jet
system.
DISMANTLING
In order to remove the carburetter from the engine the air filter has to be disconnected from
carburetter and dismantled from its mounting on the frame. The carburetter stud nuts are then
easily accessible which can be unscrewed and the carburetter is removed from the engine. The
top ring of the carburetter should then be removed by unscrewing to separate the slide from the
carburetter body.
Remove float cup by unscrewing the bottom nut. Unscrew main jet from the centre piece
and the float will come down the centre piece. The fuel needle can then be removed. To remove
the taper needle, there is a small slotted screw in the centre of the throttle. This screw is provided
for adjusting taper needle setting and when this is removed, the needle with spring and a smaller
collar can be pushed up from underneath. When re-assembling make sure that the collar and
spring are in position.
The centre piece is a press fit in the carburetter body and should not be removed unless
absolutely essential. If replacement is necessary, the old one may be removed by tapping the
thread end inwards with a mallet
RE-ASSEMBLY
Clean the various components and make sure that the tickler vent hole is clear. Check
whether the passage in the jets are free by blowing air. Replace float in correct position (this is
marked 'Bottom') and replace main jet in the side of centre piece. Replace float cup with large
fibre joint washer at top. Replace bottom nut and fibre washer, but DO NOT use too much force,
otherwise there is danger of stripping the thread of centre piece.
Replace throttle in body at the same time guiding taper needle into hole on top of centre piece. A
guide screw in carburetter body will prevent the throttle being replaced unless it is correctly
positioned. Locate top disc on top of body and screw on top ring. Push the carburetter on to the
manifold as far as possible, and set it upright. There are four narrow slots in the body to allow the
securing clip to function, and if the manifold stub does not extend past the end of the slots, air
will be drawn-in causing hard starting and erratic running.
The carburetter has a banjo for petrol pipe inside which is a fine mesh filter gauze. This
should be periodically cleaned in petrol. When replacing the fuel pipe be sure that the fibre
washers make a petrol tight joint. Otherwise fuel will be wasted.
Periodic cleaning of the float chamber and carburetter is recommended every 3,000 Kms.
SETTINGS
The Villiers S.25 carburetter fitted on this machine has the following setting
Main jet
120 c.c.
Pilot jet
50 c.c.
Needle
No. 5 (set 50 mm 1.95" out)
Throttle slide No. 6
www.hitchcocksmotorcycles.com
Содержание 350 BULLET 1989
Страница 9: ...WORKSHOP MANUAL BULLET Page 9 w w w h i t c h c o c k s m o t o r c y c l e s c o m ...
Страница 17: ...w w w h i t c h c o c k s m o t o r c y c l e s c o m ...
Страница 34: ...WORKSHOP MANUAL BULLET Page 34 w w w h i t c h c o c k s m o t o r c y c l e s c o m ...
Страница 37: ...w w w h i t c h c o c k s m o t o r c y c l e s c o m ...
Страница 41: ...WORKSHOP MANUAL BULLET Page 41 w w w h i t c h c o c k s m o t o r c y c l e s c o m ...
Страница 58: ...WORKSHOP MANUAL BULLET Page 58 w w w h i t c h c o c k s m o t o r c y c l e s c o m ...
Страница 69: ...WORKSHOP MANUAL BULLET Page 69 w w w h i t c h c o c k s m o t o r c y c l e s c o m ...
Страница 73: ...w w w h i t c h c o c k s m o t o r c y c l e s c o m ...
Страница 77: ...w w w h i t c h c o c k s m o t o r c y c l e s c o m ...
Страница 103: ...w w w h i t c h c o c k s m o t o r c y c l e s c o m ...
Страница 105: ...w w w h i t c h c o c k s m o t o r c y c l e s c o m ...
Страница 107: ...WORKSHOP MANUAL BULLET Page 107 w w w h i t c h c o c k s m o t o r c y c l e s c o m ...
Страница 108: ...WORKSHOP MANUAL BULLET Page 108 w w w h i t c h c o c k s m o t o r c y c l e s c o m ...
Страница 109: ...WORKSHOP MANUAL BULLET Page 109 w w w h i t c h c o c k s m o t o r c y c l e s c o m ...
Страница 110: ...WORKSHOP MANUAL BULLET Page 110 w w w h i t c h c o c k s m o t o r c y c l e s c o m ...
Страница 111: ...WORKSHOP MANUAL BULLET Page 111 w w w h i t c h c o c k s m o t o r c y c l e s c o m ...
Страница 113: ...WORKSHOP MANUAL BULLET Page 113 w w w h i t c h c o c k s m o t o r c y c l e s c o m ...


