
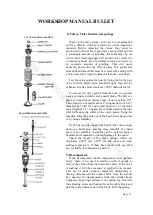


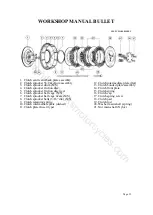


WORKSHOP MANUAL BULLET
Page 28
SERVICE OPERATIONS
ENGINE REMOVED FROM FRAME
1. Removal of the Engine from the Frame
A.
Disconnect alternator leads,
B.
Disconnect the spark plug cap. Suppressor cap
C.
Turn off petrol
tap and disconnect the fuel pipe,
D.
Remove carburetter assy. along with throttle cable,
E.
Remove the
air filter assy.,
F.
Remove the exhaust pipe and silencer,
G.
Disconnect the engine steady bolt,
H.
Remove the rear chain,
I.
Remove the footrest (LH.),
J.
Support the engine on a suitable box or wood
block,
K.
Remove the centre stand and the stand stop,
L.
Remove the front engine plates and the small
bolt fixing the stand spring bracket and fixes the rear mudguard,
M.
Remove the stud securing the rear
engine plate to the frame,
N.
Slide out the engine.
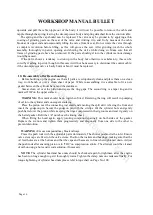
2. Removal of the Gearbox
Remove the primary chaincase outer, clutch assembly, stator and rotor, engine sprocket and clutch
sprocket. Remove the clutch centre and chain case inner.
Remove four 3/8" nuts and the gearbox can then be withdrawn from the engine.
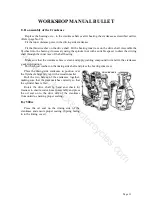
3. Dismantling the Crankcase
Drain the oil tank by removing the feed and return filter assembly plugs located in the crankcase
bottom.
Having removed the engine from the frame dismantle the cylinder head, barrel, piston, timing gear,
etc, as described in the chapter "Decarbonising".
Remove the nuts on the driving side of the engine from four fixed studs at the rear of the crankcase.
Remove six studs passing through the crankcase by undoing nuts.
The two halves of the crankcase can then be separated.
The driving side outer race of bearings will remain in the driving side half of the crankcase.
The driving side bearing inner race and the inner distance piece will remain on the engine shaft.
(Crank shaft)
The flywheel assembly may be removed from the driving side of the crankcase.
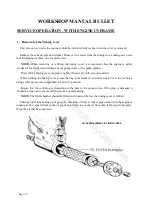
4. Removal and Reassembly of main bearings
1. Clean the crank case thoroughly as any trace of oil in the crankcase will burn and discolour the
bearing race while heating the crank case.
2. Heat the crankcase in an oven or apply the naked flame of a blow lamp on the circumferential
area of the bearing boss and not directly on the bearing race. When the crankcase gets heated up fairly,
tap the crankcase on a wooden block (with bearing race facing downwards) gently so that it will drop
down due to the expansion of the bearing boss.
3. Remove the circlip from the driving side crankcase and reheat to remove the ball bearing.
NOTE:
Bullets manufactured up to 1973 are fitted with inch type ball and roller bearings. These used
a LS10 ball bearing and a RLS10 roller bearing on the drive side. On the timing side a nylon cage with
24 separate rollers (0.250 x 0.327) running in a hardened sleeve pressed in to the crankcase.
www.hitchcocksmotorcycles.com
Содержание 350 BULLET 1989
Страница 9: ...WORKSHOP MANUAL BULLET Page 9 w w w h i t c h c o c k s m o t o r c y c l e s c o m ...
Страница 17: ...w w w h i t c h c o c k s m o t o r c y c l e s c o m ...
Страница 34: ...WORKSHOP MANUAL BULLET Page 34 w w w h i t c h c o c k s m o t o r c y c l e s c o m ...
Страница 37: ...w w w h i t c h c o c k s m o t o r c y c l e s c o m ...
Страница 41: ...WORKSHOP MANUAL BULLET Page 41 w w w h i t c h c o c k s m o t o r c y c l e s c o m ...
Страница 58: ...WORKSHOP MANUAL BULLET Page 58 w w w h i t c h c o c k s m o t o r c y c l e s c o m ...
Страница 69: ...WORKSHOP MANUAL BULLET Page 69 w w w h i t c h c o c k s m o t o r c y c l e s c o m ...
Страница 73: ...w w w h i t c h c o c k s m o t o r c y c l e s c o m ...
Страница 77: ...w w w h i t c h c o c k s m o t o r c y c l e s c o m ...
Страница 103: ...w w w h i t c h c o c k s m o t o r c y c l e s c o m ...
Страница 105: ...w w w h i t c h c o c k s m o t o r c y c l e s c o m ...
Страница 107: ...WORKSHOP MANUAL BULLET Page 107 w w w h i t c h c o c k s m o t o r c y c l e s c o m ...
Страница 108: ...WORKSHOP MANUAL BULLET Page 108 w w w h i t c h c o c k s m o t o r c y c l e s c o m ...
Страница 109: ...WORKSHOP MANUAL BULLET Page 109 w w w h i t c h c o c k s m o t o r c y c l e s c o m ...
Страница 110: ...WORKSHOP MANUAL BULLET Page 110 w w w h i t c h c o c k s m o t o r c y c l e s c o m ...
Страница 111: ...WORKSHOP MANUAL BULLET Page 111 w w w h i t c h c o c k s m o t o r c y c l e s c o m ...
Страница 113: ...WORKSHOP MANUAL BULLET Page 113 w w w h i t c h c o c k s m o t o r c y c l e s c o m ...


