


WORKSHOP MANUAL BULLET
Page 63
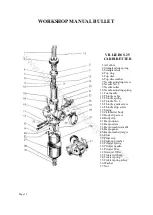
8. Contact Breaker Unit/Contact Set
The contact breaker setting should be checked after the first 800 Kms. running and subsequently
every 5,000 Kms. (3000 miles)
Cleaning contact breaker points
Remove the contact breaker cover and examine the contacts. If they are dirty or pitted, they must be
cleaned by polishing with a fine carborandum stone or very fine emery cloth. Afterwards wipe away
any dirt or metal dust with a petrol moistened cloth.
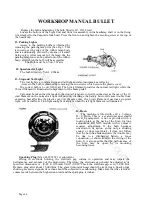
CONTACT BREAKER OPERATION
Setting contact breaker gap.
To check or reset the gap, turn the engine over slowly until the piston is at TDC on compression
stroke and the contacts are seen to be fully open. Insert 0.35 to 0.40mm (0.014" - 0.16") feeler gauge
between the contacts. Slacken the screw 'A' securing the fixed contact plate and adjust the position of
the plate until the gap is the thickness of the feeler gauge and tighten. If the gap is correct, the gauge
will be a sliding fit.
Setting ignition timing.
To check or reset the ignition timing, rotate, the crankshaft in the normal direction until the piston
is just before TDC and the contact breaker points just commence to open. (The best way to check the
opening of points is to switch on the ignition and crank the engine slowly until the ammeter needle just
returns to its central position. The points should just commence to open at this position. Check the
position of the piston which should now be 0.8mm before TDC on the compression stroke. At this
position slacken the two screws B. Swing the base plate to the left to advance or to the right to retard
the ignition.
www.hitchcocksmotorcycles.com
Содержание 350 BULLET 1989
Страница 9: ...WORKSHOP MANUAL BULLET Page 9 w w w h i t c h c o c k s m o t o r c y c l e s c o m ...
Страница 17: ...w w w h i t c h c o c k s m o t o r c y c l e s c o m ...
Страница 34: ...WORKSHOP MANUAL BULLET Page 34 w w w h i t c h c o c k s m o t o r c y c l e s c o m ...
Страница 37: ...w w w h i t c h c o c k s m o t o r c y c l e s c o m ...
Страница 41: ...WORKSHOP MANUAL BULLET Page 41 w w w h i t c h c o c k s m o t o r c y c l e s c o m ...
Страница 58: ...WORKSHOP MANUAL BULLET Page 58 w w w h i t c h c o c k s m o t o r c y c l e s c o m ...
Страница 69: ...WORKSHOP MANUAL BULLET Page 69 w w w h i t c h c o c k s m o t o r c y c l e s c o m ...
Страница 73: ...w w w h i t c h c o c k s m o t o r c y c l e s c o m ...
Страница 77: ...w w w h i t c h c o c k s m o t o r c y c l e s c o m ...
Страница 103: ...w w w h i t c h c o c k s m o t o r c y c l e s c o m ...
Страница 105: ...w w w h i t c h c o c k s m o t o r c y c l e s c o m ...
Страница 107: ...WORKSHOP MANUAL BULLET Page 107 w w w h i t c h c o c k s m o t o r c y c l e s c o m ...
Страница 108: ...WORKSHOP MANUAL BULLET Page 108 w w w h i t c h c o c k s m o t o r c y c l e s c o m ...
Страница 109: ...WORKSHOP MANUAL BULLET Page 109 w w w h i t c h c o c k s m o t o r c y c l e s c o m ...
Страница 110: ...WORKSHOP MANUAL BULLET Page 110 w w w h i t c h c o c k s m o t o r c y c l e s c o m ...
Страница 111: ...WORKSHOP MANUAL BULLET Page 111 w w w h i t c h c o c k s m o t o r c y c l e s c o m ...
Страница 113: ...WORKSHOP MANUAL BULLET Page 113 w w w h i t c h c o c k s m o t o r c y c l e s c o m ...


