


WORKSHOP MANUAL BULLET
Page 21
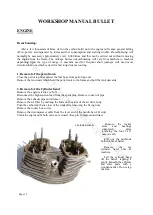
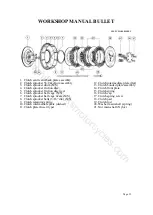
CAM TIMING MARKS
A: MARK ON INLET CAM
B: MARK ON EXHAUST CAM
C: MARK ON TIMING PINION
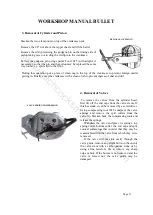
5. Removal of Contact breaker housing.
Loosen the distributor pinion nut and pull out the distributor pinion off the distributor shaft after
removing the idler pinions.
Loosen and remove the three screws which secure the spigotted contact breaker housing and
seperate from crankcase. Remove the contact breaker cover. Remove the base plate after removing the
two hex bolts securing it.
Pull out the contact breaker shaft from the housing. The two sintered bushes provided in the
housing would have to be replaced only if excessive radial play is noticed on the distributor shaft.
Reassembly is just the reverse process of dismantling but take care to replace the washer between
the contact breaker housing and the crank case.
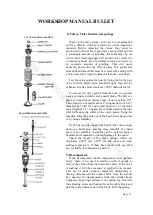
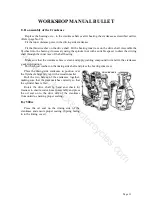
6. Valve Timing
The cams are integral with the cam pinions. They
have internal sintered iron bushes running on fixed
spindles in the timing chest.
The cams and the timing pinion are provided with
timing marks to set proper valve timing. The procedure
is detailed below.
Bring the piston to TDC position. Match the exhaust
cam (provided with two sets of punch marks with the
timing pinion so that the two punch marks coincide on
both. Match the inlet cam to the exhaust cam so that the
single punch marks coincide on both. Push the cams
home towards the crankcase.
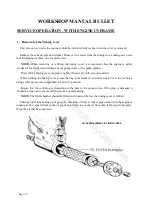
7. Tappet Adjustment – Cold
It is very essential to ensure that the valves are
closed fully during the closing period of the cam.
The tappet clearance should be adjusted properly to
achieve this and to cater to certain amount of
thermal expansion of the working components. We
recommend 'NIL' clearance for the tappets to be set
at cold. Provision for adjustment is given at the
bottom end of the push rod which sits over the
tappet. Access to this is by removing the tappet
cover.
Proceed as follows for adjustments. Bring the piston
to TDC at the end of compression stroke, so that
both the valves are at the closed position. This may
be ensured by seeing the valve timing marks, if the
timing cover is open or through ammeter needle in
its centre position, when ignition is switched on.
ADJUSTING TAPPETS
www.hitchcocksmotorcycles.com
Содержание 350 BULLET 1989
Страница 9: ...WORKSHOP MANUAL BULLET Page 9 w w w h i t c h c o c k s m o t o r c y c l e s c o m ...
Страница 17: ...w w w h i t c h c o c k s m o t o r c y c l e s c o m ...
Страница 34: ...WORKSHOP MANUAL BULLET Page 34 w w w h i t c h c o c k s m o t o r c y c l e s c o m ...
Страница 37: ...w w w h i t c h c o c k s m o t o r c y c l e s c o m ...
Страница 41: ...WORKSHOP MANUAL BULLET Page 41 w w w h i t c h c o c k s m o t o r c y c l e s c o m ...
Страница 58: ...WORKSHOP MANUAL BULLET Page 58 w w w h i t c h c o c k s m o t o r c y c l e s c o m ...
Страница 69: ...WORKSHOP MANUAL BULLET Page 69 w w w h i t c h c o c k s m o t o r c y c l e s c o m ...
Страница 73: ...w w w h i t c h c o c k s m o t o r c y c l e s c o m ...
Страница 77: ...w w w h i t c h c o c k s m o t o r c y c l e s c o m ...
Страница 103: ...w w w h i t c h c o c k s m o t o r c y c l e s c o m ...
Страница 105: ...w w w h i t c h c o c k s m o t o r c y c l e s c o m ...
Страница 107: ...WORKSHOP MANUAL BULLET Page 107 w w w h i t c h c o c k s m o t o r c y c l e s c o m ...
Страница 108: ...WORKSHOP MANUAL BULLET Page 108 w w w h i t c h c o c k s m o t o r c y c l e s c o m ...
Страница 109: ...WORKSHOP MANUAL BULLET Page 109 w w w h i t c h c o c k s m o t o r c y c l e s c o m ...
Страница 110: ...WORKSHOP MANUAL BULLET Page 110 w w w h i t c h c o c k s m o t o r c y c l e s c o m ...
Страница 111: ...WORKSHOP MANUAL BULLET Page 111 w w w h i t c h c o c k s m o t o r c y c l e s c o m ...
Страница 113: ...WORKSHOP MANUAL BULLET Page 113 w w w h i t c h c o c k s m o t o r c y c l e s c o m ...


