


WORKSHOP MANUAL BULLET
Page 45
The fork is filled with a light oil (S.A.E. 30) to a point above the lower end of the spring so that the
damper chamber 'B' is always kept full of oil. Upward movement of the wheel spindle forces oil from
the lower chamber 'A' through the annular space between the spring stud and the bore of the main tube
valve port into the damper chamber 'B'. During this stroke the pressure on the underside of the valve
plate causes this to lift so that oil can also pass from 'A' to 'B' through the eight holes in the valve body.
Since, however, the diameter of chamber 'B' is less than that of chamber 'A' there is no room in 'B' to
receive all the oil which must be displaced from 'A' as the fork operates. The surplus oil passes through
the cross hole in the spring stud and up the centre hole in the stud, spilling out through the nut which
secures the upper end of the spring stud to the guide at the lower end of the fork spring.
On the rebound stroke, the oil in the damper chamber 'B' is forced through the annular space
between the spring stud and the bore of the main tube valve port. During this stroke pressure in
chamber 'B' closes the two disc valves at the upper and lower ends of the chamber so that the only path
through which the oil can escape is the annular space between the spring stud and the port. Damping
on the rebound stroke is therefore heavier than on the bump stroke. At the extreme end of either bump
or rebound stroke a small taper portion on the spring stud enters the bore of the valve port, thus
restricting the annular space and increasing the amount of damping. At the extreme end of the bump
stroke the larger diameter taper on the oil control collar enters the main counter-bore of the valve port
thus forming a hydraulic cushion to prevent metal to metal contact.
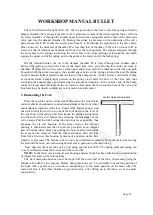
MAIN TUBE SPANNER 2036
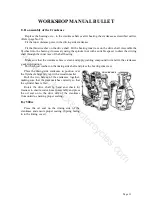
3. Dismantling the Fork
Place the machine on the centre stand, disconnect the front brake
control cable & speedometer connection and remove the front wheel
and mudguard complete with stays. Unscrew the bottom spring, stud
nut which will allow oil to run out of the fork down to the level of
the cross hole in the spring stud. Now knock the spring stud upwards
into the fork with a soft mallet, thus allowing the remainder of the
oil to escape. Pull the fork bottom tube down as far as possible, thus
exposing the oil seal housing. In the latest version the oil seal
housing is eliminated and the oil seals are provided as an integral
part of bottom tubes. Hence by pulling the bottom tube downwards
the same can be removed from the fork main tubes. [For old type
front forks: Unscrew this housing by means of a spanner on the flats
with
which it is provided. The bottom tube can now be withdrawn completely from the main tube leaving
the bottom tube bush, oil seal housing and oil seal in position on the main tube.]
Now unscrew the main tube valve port using special tool 2026. The spring stud and spring can
now be withdrawn from the lower end of the main tube.
NOTE:
In the latest version the oil seal housing and steel bush has been eliminated on introduction
of integral oil seals in the bottom tubes.
The steel main tube bush can now be tapped off the lower end of the tube, if necessary using the
bottom tube bush for this purpose. Before doing this, however, it is advisable to mark the position of
the bush with a pencil so as to ensure re-assembling it in the same position on the main tube. The
reason for this is that these bushes are ground to size, after fitting on to the tubes, so as to ensure
concentricity.
www.hitchcocksmotorcycles.com
Содержание 350 BULLET 1989
Страница 9: ...WORKSHOP MANUAL BULLET Page 9 w w w h i t c h c o c k s m o t o r c y c l e s c o m ...
Страница 17: ...w w w h i t c h c o c k s m o t o r c y c l e s c o m ...
Страница 34: ...WORKSHOP MANUAL BULLET Page 34 w w w h i t c h c o c k s m o t o r c y c l e s c o m ...
Страница 37: ...w w w h i t c h c o c k s m o t o r c y c l e s c o m ...
Страница 41: ...WORKSHOP MANUAL BULLET Page 41 w w w h i t c h c o c k s m o t o r c y c l e s c o m ...
Страница 58: ...WORKSHOP MANUAL BULLET Page 58 w w w h i t c h c o c k s m o t o r c y c l e s c o m ...
Страница 69: ...WORKSHOP MANUAL BULLET Page 69 w w w h i t c h c o c k s m o t o r c y c l e s c o m ...
Страница 73: ...w w w h i t c h c o c k s m o t o r c y c l e s c o m ...
Страница 77: ...w w w h i t c h c o c k s m o t o r c y c l e s c o m ...
Страница 103: ...w w w h i t c h c o c k s m o t o r c y c l e s c o m ...
Страница 105: ...w w w h i t c h c o c k s m o t o r c y c l e s c o m ...
Страница 107: ...WORKSHOP MANUAL BULLET Page 107 w w w h i t c h c o c k s m o t o r c y c l e s c o m ...
Страница 108: ...WORKSHOP MANUAL BULLET Page 108 w w w h i t c h c o c k s m o t o r c y c l e s c o m ...
Страница 109: ...WORKSHOP MANUAL BULLET Page 109 w w w h i t c h c o c k s m o t o r c y c l e s c o m ...
Страница 110: ...WORKSHOP MANUAL BULLET Page 110 w w w h i t c h c o c k s m o t o r c y c l e s c o m ...
Страница 111: ...WORKSHOP MANUAL BULLET Page 111 w w w h i t c h c o c k s m o t o r c y c l e s c o m ...
Страница 113: ...WORKSHOP MANUAL BULLET Page 113 w w w h i t c h c o c k s m o t o r c y c l e s c o m ...


