Ross HDR-8130USB Скачать руководство пользователя страница 27

24

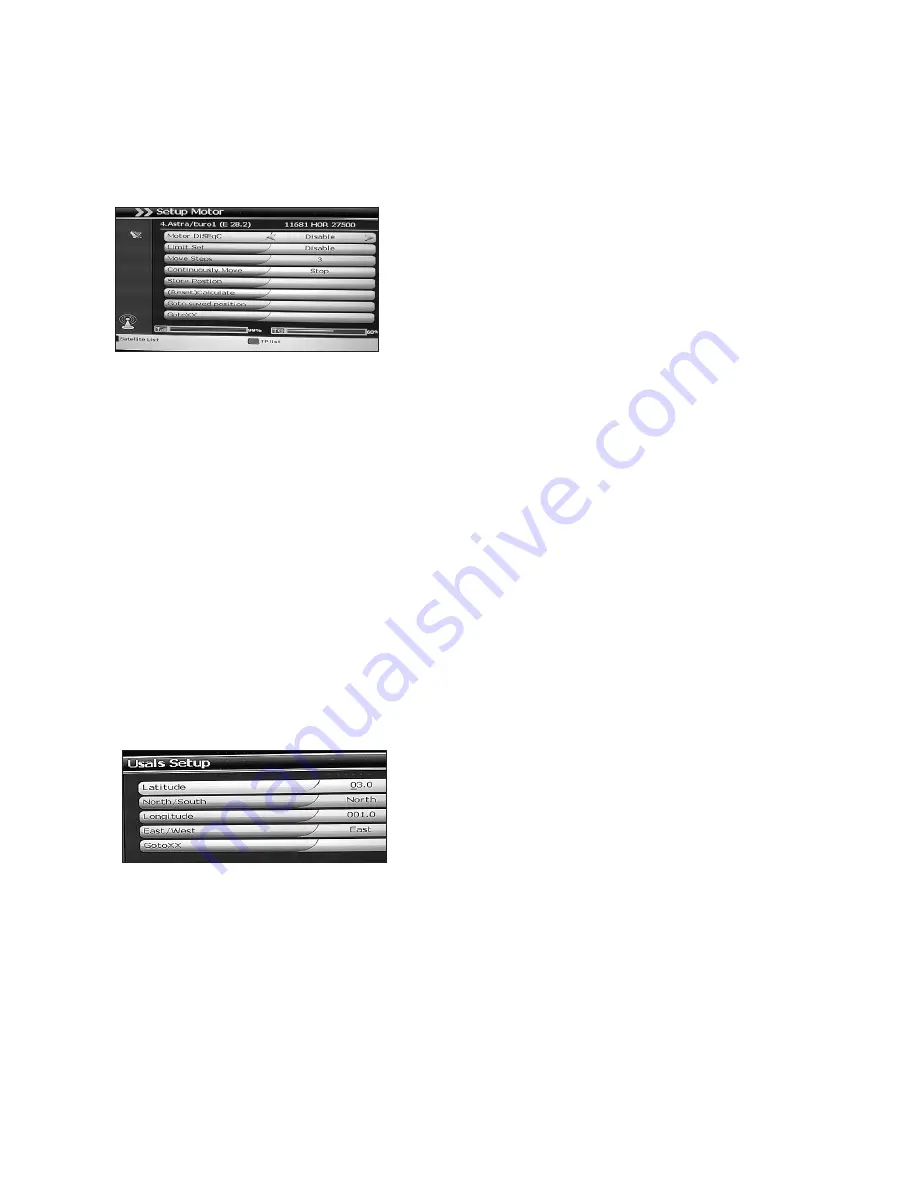
6.4 Motor Setup (DiSEqC) 


NOTE:  In order to make adjustments in the SETUP MOTOR section of the menu the 
DiSEqC setting in the ANTENNA SETTING menu corresponding to the relevant 
Satellite needs to be set to match the version of DiSEqC that your system is using.  


Using the CH+- buttons scroll down to the SETUP MOTOR menu and press OK.


Motor DiSEqC:

 Set the DiSEqC setting to match


  with that for the relevant Satellite in the


  ANTENNA SETTING menu


Limit Set:

 Set the motor limit to EAST, WEST 


  or DISABLE


Move Steps:

 Adjust the incremental steps between EAST and WEST using the VOL+- 

  buttons, select the step size between 3,6,9,12 and 15 using the OK button. Move the dish  
  observing the signal strength bars to determine best position.


Continuously Move:

 Move the Motor continuously EAST or WEST using the VOL+- 

  buttons


Store Position:

 Store a current location. Press OK to store.


(Reset) Calculate: 

Reset  the motor position. Press OK to execute.


Goto Saved Position:

 Press OK to go to a previously saved position (See Store Position

  above)


Goto XX:

 Moves the dish to the reference position.

NOTE: Use the signal strength and quality bars at the bottom of the screen to judge 
the best position for the dish.

6.5 USALS (DiSEqC) Set-Up


This Menu is used to setup the USALS system on


your set top box to match with your motorised dish


system. If you have a USALS motorised system, you


must set your position (latitude and longitude) in order


to calculate all motor positions for viewable satellites.


You should refer to the motorised  dish manual to

  obtain more information. Using the CH+- buttons scroll down to the USALS SETUP menu   
  and press OK.


Latitude:

 Enter your Latitude using the numerical keys


North / South: 

Default is NORTH for UK


Longitude:

 Enter your Longitude using the numerical keys


East / West:

 Select EAST / WEST depending on the Satellite locations


GotoXX:

 Moves the dish to the reference position.

Enter the required information as above and then press OK to SAVE and EXIT back to the 
INSTALLATION MENU. Please refer to your Motorised Dish Installation Manual for further 
information.

Содержание HDR-8130USB

Страница 1: ...igital Receiver User Manual MODEL NUMBER HDR 8130USB Please read this Manual thoroughly before using your Receiver and then retain for future reference MENU SIGNAL STANDBY HD Digital Satellite Receive...

Страница 2: ......

Страница 3: ...atellite p9 5 1 2 Selecting your SCAN Mode p9 5 1 3 Scanning p10 5 2 Channel Manager Menu p10 5 2 1 TV Channel Edit p10 5 2 2 Move Channel p11 5 2 3 Set TV Favourites p11 5 3 System Menu p12 5 3 1 AV...

Страница 4: ...e Power Cord If the power cord should become damaged IMMEDIATELY switch the Receiver off at the wall and unplug it You should then contact your Service Centre to carry out a repair DO NOT overload the...

Страница 5: ...ce or contact the retailer where the product was purchased Batteries used in operating this product may contain toxic agents that are hazardous to the environment Therefore as with the unit itself dis...

Страница 6: ...o connect the input cable from the satellite dish LNB OUT To connect to another satellite receiver if required S PDIF Socket Audio output if required to an Audio Amplifier or AV System HDMI Socket To...

Страница 7: ...VIOUS NEXT MEDIA GAME 2 4 5 6 7 8 9 10 11 12 13 14 15 16 18 17 19 3 3 Remote Control MUTE AUDIO SUBTL RECALL PAGE UP DOWN TIMESHIFT V FORMAT EXIT TXT TV RADIO PAUSE STOP PLAY PAUSE RECORD SLOW HDD PVR...

Страница 8: ...current programme SAT To display the satellite list or channel list in the viewing mode In theAntenna Setting or the Transponder menu press SAT to initiate a scan Red button to add satellite ZOOM Pres...

Страница 9: ...aying back a media file or to stop a recording PLAY PAUSE Press to start watching a recording or media file or to pause RECORD Press to start recording to an external USB Memory Device SLOW NOTAVAILAB...

Страница 10: ...lied Open the cover on the rear of the Remote Control by sliding it downwards and insert two batteries taking care to observe the polarity markings inside the compartment 4 2 3 TV Format Set Up You ar...

Страница 11: ...d in the two bars PIC1 Strength PIC2 Quality towards the bottom of the Antenna Setting Menu to help fine tune reception try to obtain better than 50 for both 4 2 5 Fast Channel Set Up Astra 2A B D Eur...

Страница 12: ...re adjust your dish When you are satisfied with the signal quality and strength Press the red Scan button This reveals your Scan options drop down menu 5 1 2 Selecting your SCAN Options Scan Mode Sele...

Страница 13: ...and VOL buttons you can select from the options of RENAME SKIPCHANNEL LOCK CHANNEL or DELETE to edit your TV programmes You can press the CH or CH buttons to select the channel and press VOL or VOL bu...

Страница 14: ...NOTE Use this feature with CAUTION as the Channel will be permanently deleted and a Factory Default or a Rescan will be required to restore the deleted channel s 5 2 2 Move Channel Move Select the cha...

Страница 15: ...his occurs connect to the TV using the SCART lead and adjust the resolution to a compatible mode AR Conversion Using the VOL buttons select from AUTO RECOMMENDED OPTION PAN SCAN or LETTER BOX You will...

Страница 16: ...set between GMT 12 and 12 hours The Factory default setting is 0 which equates to GMT Use the VOL buttons to select your preference Press Exit then OK to save your new settings Local Date Select Local...

Страница 17: ...amount of time such as when you are making a recording Power Off This is used where you wish to set an off time for a specific date and time Timer Cycle Use the VOL buttons to select One Time Every Da...

Страница 18: ...TIMEOUT and EPI LANGUAGE Menu Language To select the preferred OSD language English is set as the default language Options available are ENGLISH FRENCH GERMAN ITALIAN SPANISH and ARABIC Use the VOL b...

Страница 19: ...ttings on exiting Channel Lock To lock channels from viewing which are not suitable for children Use the VOL buttons to select your preference You will be prompted to save your new settings on exiting...

Страница 20: ...you have changed your mind or OK to confirm NOTE If you carry out a DELETE ALL CHANNELS you will need to perform a DEFAULT ALL afterwards in order to restore your preloaded programmes 5 5 USB Module A...

Страница 21: ...rmatted memory devices Movie Use the VOL buttons to select MOVIE Press OK A list of compatible music files will be shown Use the CH buttons to select the file you wish to play and press OK Press the R...

Страница 22: ...on as they will have already have been adjusted when you setup the basic receiver to your preferences Care should be taken when making any changes in this section Movie In this section you can adjust...

Страница 23: ...ed press the BLUE Format Disk button Your disk will now have been formatted 5 5 6 PVR Preview NOTE You can access this feature directly by pressing the PVR button on the remote Control This facility e...

Страница 24: ...dish Options are UNIVERSAL C BAND or USER LNB Low Frequency LNB High Frequency Input the LNB LOW and LNB HIGH FREQUENCY for your LNB using the numeric keys if required 22kHz Tone Control If the LNB fr...

Страница 25: ...to press OK after making any changes to the SCAN OPTIONS that you might require GREEN Button TP List This provides a listing of all transponders available on your chosen Satellite OK Button Satellite...

Страница 26: ...n to TRANSPONDER LIST and press OK RED Button Scan Use the CH button to select the Transponder you wish to scan Press the RED Button to initiate a SCAN on the selected Satellite GREEN Button Edit Pres...

Страница 27: ...to Saved Position Press OK to go to a previously saved position See Store Position above Goto XX Moves the dish to the reference position NOTE Use the signal strength and quality bars at the bottom of...

Страница 28: ...ode Insert the USB device in the rear USB Port 3 Whilst pressing the CH button on the front of the Receiver switch the Receiver back on using the STANDBY button 4 A pop up window will appear on your T...

Страница 29: ...e set top box has power but cannot find any channels or shows any signal strength Is the Satellite dish installed correctly Reinstall the dish and calibrate it LNB input is not connected correctly Rec...

Страница 30: ...7 8 2 MPEG2 Decoding Transport Stream Profile Level MPEG 4 H 264 MPEG 2 MP ML MP HL MPEG 4 AVC Aspect ratio Video 4 3 16 9 Format 480i 480p 576i 576p 720p 1080i Audio Decoding MPEG 1 MPEG 2 Layer I II...

Страница 31: ......

Страница 32: ...fice Stafford Park 1 Telford Shropshire England TF3 3BD Tel 44 0 1952 238 100 Fax 44 0 1952 238 180 Helpline UK 0845 194 7584 IRL 1800 930 185 For further product information please go to www ross co...

Отзывы: