background image

HDC-8222A User Manual (Iss. 02)

User Controls • 3–5

Control and Monitoring Features

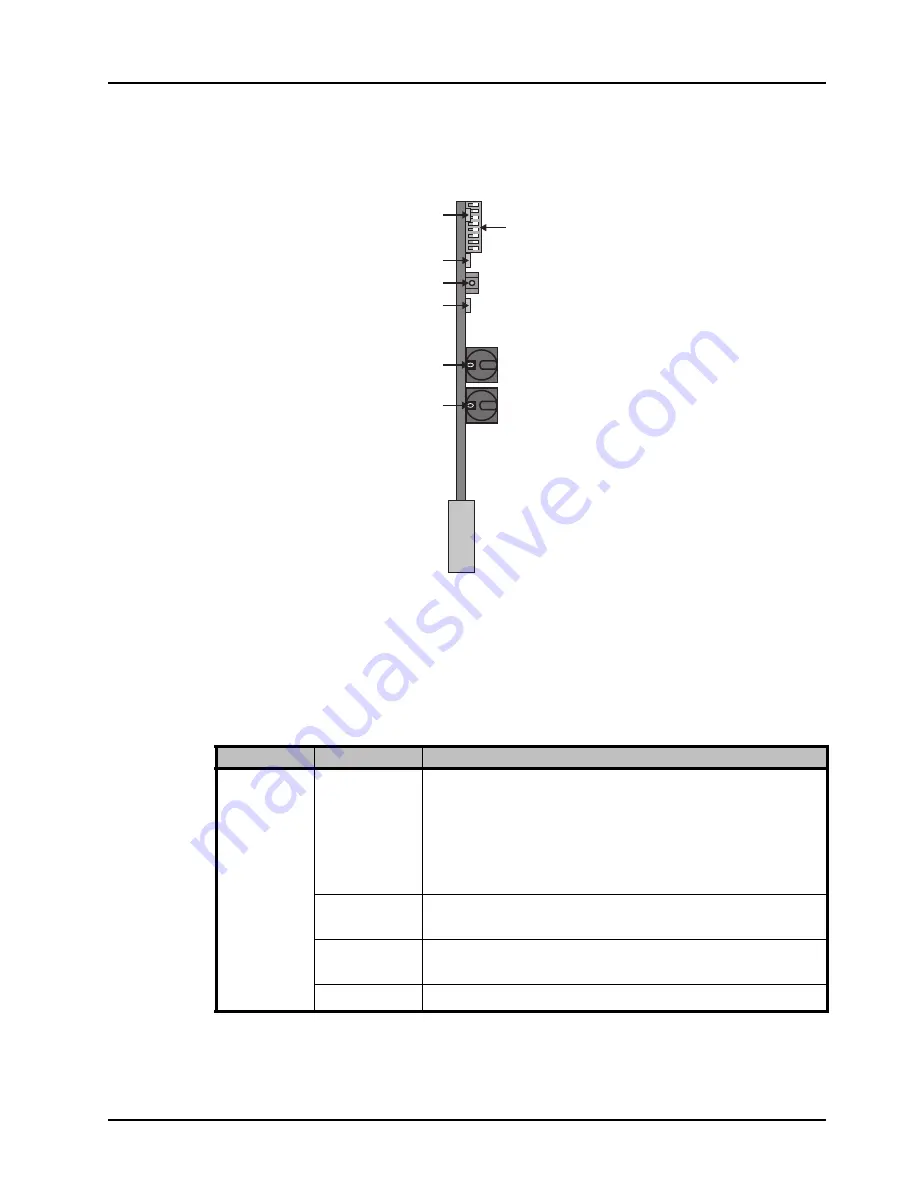
The front-edge of the HDC-8222A has LED indicators for communication activity. This section 
provides information on the LEDs located on the card-edge of the HDC-8222A. Refer to 

Figure 

3.3

 for the location of the LEDs. 

Figure 3.3  

HDC-8222A Card-edge Controls

Status LEDs

The front-edge of the HDC-8222A has LED indicators for the power, video input status and 
communication activity. Basic LED displays and descriptions are provided in 

Table 3.2

.

Table 3.2  LEDs on the HDC-8222A

LED

Color

Display and Description

POWER

Green

When lit green, this LED indicates that the card is functioning 
correctly and that no anomalies have been detected. The 
following conditions must be satisfied:
• a valid input signal is present
• a valid reference signal is present when a reference is required, 

and that the reference standard matches the input standard.

Flashing Green 
and Orange

When lit green with flashing orange, this LED indicates that the 
card is running the bootloader.

Orange

When lit orange, this LED indicates the card is powering on, but 
no software is running on the card.

Off

When unlit, this LED indicates there is no power to the card.

1234

5678

O N

POWER LED

Function Select Switch (S4)

Function Select Switch (S3)

Menu Select Switch (S2)

Control Settings Switch (S1)

INPUT STANDARD LED (D14)

LOCK  STATUS LED (D2)

Содержание HDC-8222A

Страница 1: ...Ross Video Limited HDC 8222A HD Down Converter and Distribution Amplifier User Manual...

Страница 2: ...is protected by the following Canadian Patents 2039277 1237518 1127289 Other patents pending Notice The material in this manual is furnished for informational use only It is subject to change without...

Страница 3: ...oided may result in major or minor equipment damage or a situation which could place the equipment in a non compliant operating state ESD Susceptibility This symbol is used to alert the user that an e...

Страница 4: ...th the essential requirements and other relevant provisions of CE Directive 93 68 EEC INTERNATIONAL This equipment has been tested to CISPR 22 1997 along with amendments A1 2000 and A2 2002 and found...

Страница 5: ...ral resources Ross Video encourages you to use the appropriate take back systems These systems will reuse or recycle most of the materials from your end of life equipment in an environmentally friendl...

Страница 6: ...O Box 880 Ogdensburg New York USA 13669 0880 General Business Office 1 613 652 4886 Fax 1 613 652 4425 Technical Support 1 613 652 4886 After Hours Emergency 1 613 349 0006 E mail Technical Support t...

Страница 7: ...8222A 2 4 Cabling for the HDC 8222A 2 5 DFR 8310 Series Frame Cabling Overview 2 5 DFR 8321 Series Frame Cabling Overview 2 5 Software Upgrades 2 6 User Controls 3 Card Overview 3 2 Configuring the DI...

Страница 8: ...sing DataSafe 4 14 Saving and Loading via the Card edge Controls 4 14 Saving and Loading via DashBoard 4 14 Loading the Factory Defaults 4 15 Specifications 5 Technical Specifications 5 2 Service Info...

Страница 9: ...pment family of products backed by Ross Video s experience in engineering and design expertise since 1974 You will be pleased at how easily your new HDC 8222A fits into your overall working environmen...

Страница 10: ...ata NTSC Line 21 is decoded delayed and embedded in the output video regardless of aspect ratio correction With the 8320AR 1821 Full Rear Module the HDC 8222A also supports audio de embedding with fou...

Страница 11: ...are two fields per frame thus the interlaced frame rate is 59 94Hz 1080p 29 97Hz is 29 97 frames per second SD active line rates are PAL 575 and NTSC 486 The HDC 8222A cannot accept native 720p 23 98...

Страница 12: ...Equalizer HD SD SDI Input SD Serializer SD Driver SD Encoder SD Analog Output SD SDI CVBS 4 SD SDI CVBS 3 SD SDI CVBS 2 Dual Rate Reclock Decode and De serialize Down Conversion and ARC Audio Memory...

Страница 13: ...After conversion audio timecode and closed captioning signals are embedded Finally the reticule overlays if any are applied and the signal passes through circuitry to reduce output clock jitter Up to...

Страница 14: ...herwise noted Dual Rate refers to multi definition Frame refers to DFR 8300 series frame that houses the HDC 8222A card as well as any openGear frames Lift refers to black offset Operator and User ref...

Страница 15: ...apter provides instructions for installing the Rear Module s for the HDC 8222A installing the card into the frame cabling details and updating the card software The following topics are discussed Befo...

Страница 16: ...te Unpacking Unpack each HDC 8222A you received from the shipping container and ensure that all items are included If any items are missing or damaged contact your sales representative or Ross Video d...

Страница 17: ...1 series frames the 8320AR 030 Full Rear Module or the 8320AR 1821 Full Rear Module can be used Installing a Rear Module If you are installing the HDC 8222A in a DFR 8310 BNC frame or the Rear Module...

Страница 18: ...cate the Rear Module you installed in the procedure Installing a Rear Module on page 2 3 2 Hold the HDC 8222A by the edges and carefully align the card edges with the slots in the frame 3 Fully insert...

Страница 19: ...r Module Each card occupies one slot and provides one HD SD SDI input four output copies of the re clocked input and four SD SDI CVBS outputs Figure 2 2 DFR 8321 Series Frame Cabling Overview In the D...

Страница 20: ...ing fields indicate any errors such as incompatible software or card type mismatch Click Finish to display the Uploading to Selected Devices dialog 8 Monitor the upgrade The Uploading to Selected Devi...

Страница 21: ...or monitoring the HDC 8222A via DashBoard or using the LEDs and switches on the card edge This chapter provides a general overview of the controls available on the card edge of the HDC 8222A The follo...

Страница 22: ...and lower range limit 3 Function Select Switches S3 and S4 Use S3 and S4 in conjunction with S2 to select parameters to configure for the HDC 8222A The parameter number 00 99 is selected with the rota...

Страница 23: ...ings S1 1 S1 2 S1 3 S1 4 S1 5 S1 6 S1 7 S1 8 Remote Software Control Enable ON Remote Software Control Disabled OFF SD SDI Video Input SD to SD Video Inputa a An SD video input validates the SD to SD...

Страница 24: ...witch enables or disables color on the SD analog output Field Lock S1 8 This switch enables or disables the Field Lock feature on the HDC 8222A The Field Lock feature is used to ensure that the output...

Страница 25: ...OWER Green When lit green this LED indicates that the card is functioning correctly and that no anomalies have been detected The following conditions must be satisfied a valid input signal is present...

Страница 26: ...RD LED blinks accordingly For example the card is reporting a value of 275 The sequence is as follows 1 A blink of all LEDs 2 Two blinks of the POWER LED 3 Seven blinks of the LOCK STATUS LED 4 Five b...

Страница 27: ...Menus In This Chapter This chapter provides a summary of the menus available for the HDC 8222A The following topics are discussed DashBoard Menus for the HDC 8222A Card edge Menu System Managing Card...

Страница 28: ...Info tab Table 4 1 Card Info Tab Items Tab Title Item Parameters Description Card Info Read only Product HDC 8222A Manufacturer Ross Video Ltd Input Format Reports the current input format Equalizer...

Страница 29: ...to 100 0 75 V Letter Box Vertical zoom set to 75 1 33 V Vertical zoom set to 133 0 75 H Pillar Box Horizontal zoom set to 75 1 33 H Center Cut Horizontal zoom set to 133 User Setting Adjustment of the...

Страница 30: ...s the Ancillary Data options in DashBoard Table 4 3 Ancillary Data Menu Items Tab Title Item Parameters Description Ancillary Data 24 Bit Audio Processing Enable SD embedded audio will be 24bits deep...

Страница 31: ...ackground hue when the scaled image size is less than the active video size Background Color Saturation 0 100 Adjusts the background color when the scaled image size is less than the active video size...

Страница 32: ...ertical Thickness defaults to 1 Reticules Overlay Reticules Follow Arc Enable Reticules scale with the video when scaled image size is less than the active video size Disable Disables this feature Ret...

Страница 33: ...iption Miscellaneous Referencea a Refer to the section Card edge Menu System on page 4 10 for details on reporting the status of SW1 position 8 Off No reference is specified Ref 1 Selects Ref 1 to use...

Страница 34: ...channels the L and R channels For example when Emb Ch 1 is selected downmix L is routed to output Emb Ch 1 and downmix right is routed to the next embedded channel Emb Ch 2 Center Mix Ratio 10 to 0 A...

Страница 35: ...tes downmix L and R to analog outputs Channel 1 and Channel 2 and a copy to analog audio outputs Channel 3 and Channel 4 a Embedded audio channels not selected for downmixing or de embedding are not a...

Страница 36: ...e LOCK STATUS LED will flash the number of 10s and the bottom INPUT STANDARD LED will flash the number of 1s At the start of a numerical report all the LEDs will blink simultaneously For example the c...

Страница 37: ...tion 6 Background color value Scalar 4 0 Horizontal and Vertical Aspect Zoom 1 Horizontal Aspect Zoom 2 Vertical Aspect Zoom 3 Horizontal Aspect Pan 4 Vertical Aspect Pan 5 Prefilter type 1 Better Edg...

Страница 38: ...te default 6 Downmix LFE Mute UP Mute DOWN Unmute default 7 Downmix Ls Channel Mute UP Mute DOWN Unmute default 8 Downmix Rs Channel Mute UP Mute DOWN Unmute default 9 Analog Audio Downmix Select UP C...

Страница 39: ...Black 3 Blue 4 Red 2 Diagnostic setting 3 Shadow Luma 4 Shadow Chroma Miscellaneous 9 2 Reference Input Select a DOWN Reference 1 UP Reference 2 3 Vbit Correctionb 5 Equalizer Status Error if lit ther...

Страница 40: ...ut DataSafe enabled You also have the option to revert back to the saved configuration settings or to factory defaults Saving and Loading via the Card edge Controls This section outlines how to save a...

Страница 41: ...trols available on the card edge 2 Set S3 to position 9 3 Set S4 to position 7 4 Toggle the Menu Select Switch S2 up The three LEDs will flash To reset to the default settings using DashBoard 1 Ensure...

Страница 42: ...4 16 Menus HDC 8222A User Manual Iss 02...

Страница 43: ...ons 5 1 Specifications In This Chapter This chapter provides the technical specification information for the HDC 8222A Note that specifications are subject to change without notice The following topic...

Страница 44: ...9 97Hz 1080pSF 23 98Hz Frames Rates Supported SD 480i 59 94Hz 576i 50Hz Impedance 75ohm terminating Equalization 75m of Belden 1505A cable 1 485Gbps 300m of Belden 1505A cable 270Mbps Return Loss 10dB...

Страница 45: ...Outputs Differential Gain 0 6 Differential Phase 0 6 Signal Level 1V p p DC Offset NTSC 220mV PAL 350mV Analog Audio Outputs Number of Outputs 4 balanced Power Power Consumption 8W Table 5 1 HDC 8222...

Страница 46: ...5 4 Specifications HDC 8222A User Manual Iss 02...

Страница 47: ...HDC 8222A User Manual Iss 02 Service Information 6 1 Service Information In This Chapter This chapter contains the following sections Troubleshooting Checklist Warranty and Repair Policy...

Страница 48: ...and any associated peripheral equipment for signs of trouble 2 Power Check Check the power indicator LED on the distribution frame front panel for the presence of power If the power LED is not illumi...

Страница 49: ...his User Manual provides all pertinent information for the safe installation and operation of your openGear Product Ross Video policy dictates that all repairs to the HDC 8222A are to be conducted onl...

Страница 50: ...6 4 Service Information HDC 8222A User Manual Iss 02 Notes...

Страница 51: ...Notes...

Страница 52: ...on Related products and full product lines On line catalog News Testimonials Ross Part Number 8222ADR 004 02 PHONE General Business Office and Technical Support 613 652 4886 After Hours Emergency 613...

Отзывы: