Automatic Escalator Deep Cleaning Machine – Rotomac 360
Created by Rosemor International Ltd
Page 9
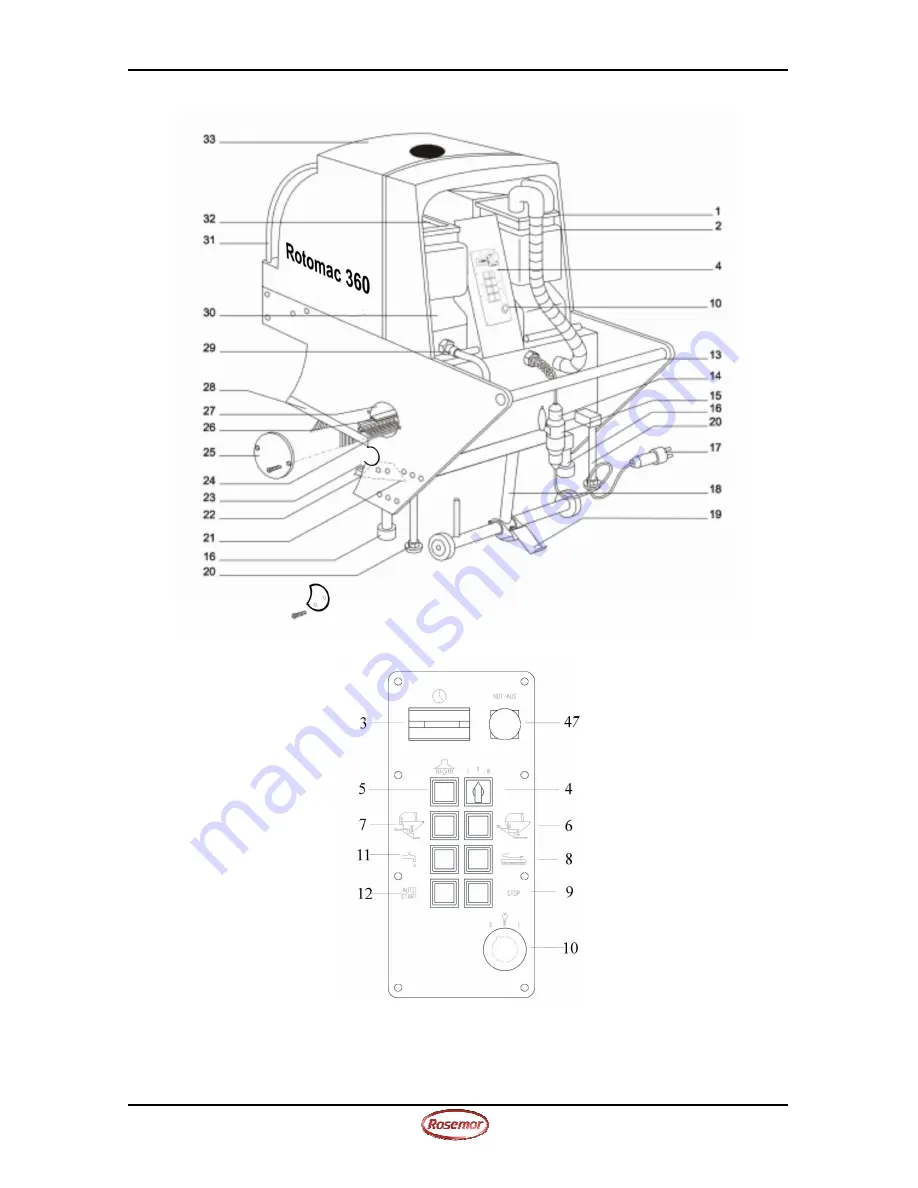
2.3 Location of components
Fig. 1: Location of components
Fig. 2: Control panel
Страница 1: ...structional Manual Automatic Escalator Deep Cleaner Rotomac 360 ROSEMOR INTERNATIONAL LIMITED UNIT F MOSES WINTER WAY WALLINGFORD OXFORDSHIRE OX10 9FE TELEPHONE 44 01491 838011 FAX 44 01491 832010 info rosemor com www rosemor com ...
Страница 2: ...er to fulfil these requirements the operator must obtain sufficient skill in handling the machine its maintenance and care It is therefore vital that the operator receives instruction and training from Rosemor International Ltd specialists before the cleaning machine is started for the first time The present operation and maintenance instruction manual represent additional assistance for the opera...
Страница 3: ...Filling fresh water 11 3 4 Preparations on site 11 3 5 Safety measures on site 12 3 6 Preliminary work 12 3 7 Working instructions 12 3 8 Positioning machine on escalator 12 3 9 Setting step height 13 3 10 Select cleaning programme 14 3 10 1 Programme 1 Initial and basic cleaning 14 3 10 2 Programme 2 maintenance cleaning 14 3 11 Cleaning the escalator 15 3 12 Subsequent cleaning 16 3 13 Refilling...
Страница 4: ...ating equipment 89 655 EEC Art 4a to inspect the machine before start up following repair work and following faults or malfunction 1 3 Intended and specified use The escalator deep cleaning machine Rotomac 360 is exclusively intended for basic and maintenance cleaning of indoor and outdoor escalators Any use beyond this stipulation must be considered as contrary to the manufacturer s intentions Th...
Страница 5: ...ors whose permitted load is adequate for this purpose 1 8 Safety instructions for mains operated machines Care must be taken that the mains cable incurs no damage by being crushed torn frayed driven over etc This connection must be examined regularly for damage bare points scorched areas etc The machine may not be used unless the mains connections are in perfect condition The plug must always be d...
Страница 6: ...this machine measures 78 2 dB A 1 13 Sources of Danger If the operator on the escalator wishes to leave machine he must lower the machine i e let the machine rest on the glide strip The machine must then be moved in this lowered position with the escalator to the bottom end of the escalator 1 14 Procedure in case of emergency Lower machine turn key switch 10 to 0 and remove key Markings warning si...
Страница 7: ...r volume of suction 162 m h Low pressure 300 mbar Type of current frequency A C current 50 Hz Rated voltage 230 V Rated power input 1900 W Power output Brush motor 750 W Suction motor 1500W Spindle drive 2 x 180 W Pump 40 W Number of brushes 11 Capacity of fresh water tank Max 10L of water and 1L of cleaning chemical RC91 15 L Capacity of dirty water tank 15 L Dimensions Length 1350mm Width 536mm ...
Страница 8: ...rake 20 Safety support step height adjustment 21 Suction basin 22 Seal strip 23 Stripping brush 24 Brush 25 Cover for brush replacement opening 26 Guide rail 27 Opening for replacing brush 28 Glide rail 29 Coupling for fresh water tube 30 Fresh water tank 31 Handle 32 Fresh water tank cover 33 Hood 34 Chain 35 Chain wheel 36 Chain adjuster 37 Spray nozzle 38 Suction machine 39 Filter 40 Collecting...
Страница 9: ...Automatic Escalator Deep Cleaning Machine Rotomac 360 Created by Rosemor International Ltd Page 9 2 3 Location of components Fig 1 Location of components Fig 2 Control panel ...
Страница 10: ...rush assembly Fig 3 Brush Assembly The procedure below should be followed Insert power plug Set key switch 10 to 1 Raise machine pushbutton 7 on operating console 4 Move rail in the opening for replacing brushes 27 pushbutton 8 Touch operation for bush Set key switch 10 to 0 Shove in brush 24 until it hits against the right side wall Set key switch 10 to 1 Move next rail completely in the opening ...
Страница 11: ...sonnel possibly process electrician in charge of the escalator The safety manager should also be informed if necessary The operator must plug in the mains cable for the machine or a suitable socket must be shown to him The operator must furthermore obtain instruction on manual control of the escalator or else ensure that some person familiar with the workings of the escalator is available near by ...
Страница 12: ... 8 Positioning machine on escalator The machine with extended lifting spindles 18 should then be pushed into the escalator and moved by authorised escalator operators to the first completely extended step Fig 7 The escalator is then stopped completely Fig 7 Fixing the machine Ensure that the escalator is switched off by the relevant personnel and secured against accidental starting Remove escalato...
Страница 13: ...alator lower and push forward as far as possible on the tread of the stair Set the travelling support 16 and the safety support 20 on the right side of the machine according to the procedure described above Start the cleaning operation Fig 8 Setting step height It will be possible to start the cleaning process only when the running gear has been driven to the point where the limit switch is activa...
Страница 14: ...aning programmes which have been tested and optimised by Rosemor International Ltd An ideal cleaning performance is achieved with a minimum use of water 3 10 1 Programme 1 Quick Cleaning Cycle Duration of a cleaning cycle 25 seconds 3 10 2 Programme 2 Maintenance Cleaning Duration of cleaning cycle 45 seconds 3 10 3 Programme 3 Intensive Cleaning Duration of cleaning cycle 60 seconds ...
Страница 15: ...he machine Fig 10 Lowering the machine Fig 11 Positioning the machine The pre selected programme can now be started When the cleaning cycle has been completed the machine is raised Fig 12 Raising the machine Fig 12 Raising the machine The machine is then pushed forward again until the wheels stop on the next highest step Fig 7 and then lowered again The machine can now be pushed on the glide rails...
Страница 16: ... receiving a supply of detergent solution If bubbles appear in the tube or if no liquid can be seen the fresh water tank is empty and must be refilled Let the machine stand in the lowered position on the escalator and fill fresh water along with cleaning agent according to instructions in Section 3 3 3 14 Emptying the dirty water tanks see Fig 14 Remove dirty water tank and Fig 15 Insert dirty wat...
Страница 17: ...e machine is then raised over the lifting spindle drive 18 If the escalator is going downwards leave the escalator at the lower end while making sure that Take out the machine with transport trolley Fig 17 see Section 3 16 Use of transport trolley and bring to place of storage Fig 16 Removal of machine from escalator When the machine is driving over the rim comb 45 the rear axle along with the bra...
Страница 18: ...Fig 18 Moving into transport position After the fixing axle 46 has been inserted and secured the travelling mechanism can be drawn in and the machine thus placed on the transport trolley The guide rollers of the transport trolleys allow the machine to be manoeuvred easily see Fig 19 Fig 19 Machine in transport position The fixing axle 46 must be secured against slipping out by means of the supplie...
Страница 19: ...ntenance position After the fixing axle 46 has been inserted and secured again the travelling gear can be drawn in to about half its length and the machine then swung into the maintenance position on the trolley In this way maintenance and cleaning work can be carried out easily and quickly see Fig 21 Fig 21 Machine in maintenance position The fixing axle 46 must be secured against slipping out by...
Страница 20: ...he power cable for any damage Always empty the dirty water tank 2 following use and rinse thoroughly with water Note instructions in Section 3 14 Inspect brushes 24 Note instructions in Section 3 2 and clean Rinse out suction basin 21 Clean stripping brush 23 4 3 Weekly care Clean and lightly lubricate the extended lifting spindles 18 Check suction tubes for leaks Check seal strips 22 and renew if...
Страница 21: ...st be examined every year in accordance with VDE 702 or some comparable international standards 4 6 1 Tightening the chain see Fig 24 Chain drive spray nozzles The chains must be tightened so that the centre of each chain can be raised by hand between the chain wheels by approx 3 mm A or pressed together by 4 5 mm B The chain can be tensioned by adjusting the pressure spindle 36 in the direction o...
Страница 22: ...nozzles on page 21 Screw off coupling ring 44 Remove pressure spring 42 spray nozzle 43 and ball 41 Clean spray nozzle using only instruments without sharp edges Re assemble fresh water nozzle as shown in illustration while making sure The spray nozzles must be aligned in their mounting according to the turning safety device The coupling ring should only be twisted on manually ...
Страница 23: ...ust suction basin 21 Detergent return to the machine is too low Stripping Brush 23 is dirty Remove suction basin 21 and clean striping brush 23 Stripping Brush 23 is dirty Remove suction basin 21 and clean stripping brush 23 Dirt streaks are visible on front escalator face Stripping Brush 23 is worn Remove suction basin 21 and replace stripping brush 23 Attach cover 1 Water residues on escalator C...