background image

Strawberry Server

 User and Hardware Manual 


29 


Chapter 6 

User and Project management settings   


A

A

d

d

m

m

i

i

n

n

i

i

s

s

t

t

r

r

a

a

t

t

i

i

n

n

g

g


U

U

s

s

e

e

r

r

s

s

,

,


T

T

e

e

a

a

m

m

,

,


a

a

n

n

d

d


Q

Q

u

u

o

o

t

t

a

a

s

s


Use the following procedures to create unique user names and assign them to unique team 
names like “Final Cut Editors”,  “Film crew”, or “Masters of Disaster”!  Each user can be 
assigned to multiple teams and as such each team can search and open projects and media 
that is associated with that team.  Each user has a storage amount that he can use called 
‘quota’, that is considered ‘soft’ in nature [ users can exceed their quota but a screen alert 
appears stating such in a red error text ]. 

If you choose not to use these user and project settings, you can let all the Strawberry clients 
use the general 

user

  login.  Set the quota for the team to a value higher that the total 

capacity of the storage seen by all clients on the SAN   

Any member of the Strawberry admin team can make these assignments.  The tool is 
located here: http:strawberry_ip_address/Strawberry/admin.aspx 


The default login is 

edwe


and password is 

mh   


Содержание Strawberry Server Series

Страница 1: ...Strawberry Server Series User and Hardware Manual version 021512V3 ...

Страница 2: ... or warranties with respect to the contents hereof and specifically disclaims any implied warranties of merchantability or fitness for any particular purpose Furthermore Rorke Data reserves the right to revise this publication and to make changes from time to time in the content hereof without obligation to notify any person of such revisions or changes Product specifications are also subject to c...

Страница 3: ...u ué ée es s s su ur r l le e p pr ro od du ui it t 4 4 N Ne e p pa as s u ut ti il li is se er r l le e p pr ro od du ui it t p pr rè ès s d de e l l e ea au u 5 5 C Ce e p pr ro od du ui it t d do oi it t ê êt tr re e u ut ti il li is sé é a av ve ec c l le e t ty yp pe e d de e s so ou ur rc ce e d d a al li im me en nt ta at ti io on n i in nd di iq qu ué é s su ur r l l é ét ti iq qu ue et tt...

Страница 4: ...served ATTENTION Cette icône indique l existence d un risque potentiel qui peut entraîner des blessures corporelles dommages à votre équipement ou de perte de données si les consignes ne sont pas respectées NOTE This icon indicates important points to consider during the integration process NOTE Cette icône indique les points importants à considérer lors du processus d intégration Notational Conve...

Страница 5: ... K 17 CHAPTER 4 PREPARING FOR OPERATION 18 L LA AN N S ST TA AN ND DA AL LO ON NE E C CO ON NF FI IG GU UR RA AT TI IO ON N 19 S SA AN N C CO ON NF FI IG GU UR RA AT TI IO ON N S ST TA AN ND DA AR RD D 20 S SA AN N C CO ON NF FI IG GU UR RA AT TI IO ON N H HI IG GH H A AV VA AI IL LA AB BI IL LI IT TY Y 21 CHAPTER 5 CONNECTIONS AND CONFIGURATIONS 23 S SI IN NG GL LE E S ST TR RA AW WB BE ER RR RY ...

Страница 6: ... Application FAQs 34 CHAPTER 8 MAINTENANCE PROCEDURES 35 B BE EF FO OR RE E Y YO OU U B BE EG GI IN N 35 Supplies Needed 35 Understand Assembly Safety Instructions 35 Integration Warnings 35 Changing the Hot Swappable Fan 38 Replacing a defective RAID Hard Disk Drive 38 Removing the Hard Drive from the chassis 38 De installing the Hard Drive from drive tray 38 Replacing the Power Supply 39 APPENDI...

Страница 7: ...erry server should be reported to the shipper immediately NOTE Electrostatic discharge can damage electronic components Be sure you are properly grounded before beginning any procedure NOTE Les décharges électrostatiques peuvent endommager les composants électroniques Assurez vous que vous êtes bien à la terre avant d entamer toute procédure Items Included The following components are included wit...

Страница 8: ... push buttons located on the front of the chassis UID button a reset button and a power on off button UID Depressing the UID unit identifier button illuminates an LED on both the front and rear of the chassis for easy system location in large stack configurations The LED will remain on until the button is pushed a second time Another UID button on the rear of the chassis serves the same function R...

Страница 9: ...covers are installed This LED will remain fl ashing or on as long as the overheat condition exists NIC2 Indicates network activity on GLAN2 when flashing NIC1 Indicates network activity on GLAN1 when flashing HDD This light indicates HDD and or DVD ROM drive activity when flashing Power Indicates power is being supplied to the system s power supply units This LED should normally be illuminated whe...

Страница 10: ... Mouse USB VGA Use these connections for Keybd mouse or monitor during setup After setup typically the server will be administered remotely these are not used IPMI I O The IP address for IPMI can be configured from the motherboard s BIOS Once configured the IPMI can be accessed from http ip_address with username ADMIN and password ADMIN Contact tech support for connectivity and usage 10Gb s Ports ...

Страница 11: ...ck servers related equipment and cables exceeds 1800 pounds for a single 42U rack External cable weight contributes to overall of the rack installation Carefully consider cable weight in all designs ATTENTION Assurer un soutien au sol appropriée et veiller à ce que les spécifications charge au sol sont respectées Ne pas le faire peut entraîner des blessures physiques ou des dommages à l équipement...

Страница 12: ...nsure your installation has adequate power supply and branch circuit protection Check nameplate ratings to assure there is no overloading of supply circuits that could have an effect on overcurrent protection and supply wiring Reliable earthing of this equipment must be maintained Particular attention should be given to supply connections when connecting to power strips rather than direct connecti...

Страница 13: ...mmandé de fixer solidement le support de montage au sol ou au mur afin d éliminer toute possibilité de basculement de la crémaillère Ceci est particulièrement important si vous décidez d installer plusieurs châssis Alpha Serveur de stockage dans le haut de la grille A brief overview of server installation follows 1 Select an appropriate site for the rack 2 Unpack the server and rack mounting hardw...

Страница 14: ... rack mounting All the equipment needed to install the server into the rack cabinet is included Kit Contents The chassis package includes two rack rail assemblies in the rack mounting kit Each assembly consists of two sections an inner fixed chassis rail that secures directly to the server chassis and an outer fixed rack rail that secures directly to the rack itself ...

Страница 15: ...fully extended from the rack This prevents the server from coming completely out of the rack when you pull it out for servicing Inner Rail Extension The inner rails are pre attached and do not interfere with normal use of the chassis if you decide not to use a server rack Attach the inner rail extension to stabilize the chassis within the rack If you are not using a rack you do not have to install...

Страница 16: ...Extension Outer rails attach to the server rack and hold the server in place The outer rails for the chassis extend between 30 inches and 33 inches Installing the Inner Rails 1 Attach the short bracket to the outside of the long bracket You must align the pins with the slides Also both bracket ends must face the same direction 2 Adjust both the short and long brackets to the proper distance so tha...

Страница 17: ...he outer rails are installed on the rack 2 Line chassis rails with the front of the rack rails 3 Slide the chassis rails into the rack rails keeping the pressure even on both sides you may have to depress the locking tabs when inserting When the server has been pushed completely into the rack you should hear the locking tabs click 4 Optional Insert and tightening the thumbscrews that hold the fron...

Страница 18: ... la licence Based on your usage and system functions Strawberry can be used to be the project manager for various configurations Each Strawberry server is preloaded at the factory with its base operating system installation and administration software The Linux OS along with Windows 2008 R2 Web Virtual Machine is loaded on the internal mirrored storage where it is protected Note if you are putting...

Страница 19: ...will have a NAS function to LAN project clients The Strawberry requires 3 IP addresses to operate in this way Eth 0 will connect to the local metadata LAN but need 2 IP addresses one for the SAN IP and the other for the Strawberry IP Eth 1 will connect to the corporate house ethernet and will require a corporate house IP address to get Internet access for licensing and firmware software updates Yo...

Страница 20: ...ense to access the SAN storage The Strawberry requires 3 IP addresses to operate in this way Eth 0 will connect to the local metadata LAN but need 2 IP addresses one for the SAN IP and the other for the Strawberry IP Eth 1 will connect to the corporate house ethernet and will require a corporate house IP address to get Internet access for licensing and firmware software updates Your Standard SAN c...

Страница 21: ... 0 will connect to the local metadata LAN but need 2 IP addresses one for the SAN IP and the other for the Strawberry IP Eth 1 will connect to the corporate house ethernet and will require a corporate house IP address to get Internet access for licensing and firmware software updates Finally Eth 3 will be connected between the Strawberry servers and function as a clustered heartbeat Your HA SAN co...

Страница 22: ...Strawberry Server User and Hardware Manual 22 ...

Страница 23: ...u to a standard Linux GUI login screen See the following sections for setup management and usage of the Strawberry software Configuring a standard single Strawberry The Strawberry server has a Linux boot disk with a Windows 2008 R2 Web Virtual Machine Therefore both the Linux portion and the Windows portion need an IP Address set see below 1 Connect ETH0 of the Strawberry server to the Metadata se...

Страница 24: ...er to get the SAN mounted to mh Next add mh mount to fstab so the storage will mount on each boot 8 Connect a computer to this network to use REMOTE DESKTOP to access the Windows VM NOTE Mac Users need to download a free copy of REMOTE DESKTOP from Microsoft 9 Open REMOTE DESKTOP and connect to machine name STRAWBERRYSERV This is actually using NetBIOS until you setup the Strawberry IP then the IP...

Страница 25: ... clients your server is licensed for After reboot 16 Test IP Address by accessing http strawberry_ip_address Strawberry setup aspx Troubleshoot IP s if not connecting 17 Go to http strawberry_ip_address Strawberry admin aspx and log in as username edwe and password mh Add users assign them to teams add and subtract teams and give teams quotas from this screen See Chapter 6 for details 18 From Linu...

Страница 26: ...rawberry server has a Linux boot disk with a Windows 2008 R2 Web Virtual Machine Therefore both the Linux portion and the Windows portion need an IP Address set see below 1 Connect ETH0 of each Strawberry server to the Metadata segmented LAN network that has the SAN metadata server on it 2 Connect ETH1 of each Strawberry server together as the clustered Heartbeat Connect ETH 3 of each server to th...

Страница 27: ...ients will use to connect to Strawberry Local Area Connection 2 is already set to 51 IP address to communicate to the Linux OS on the Server DON T CHANGE IT Local Area Connection 3 is un configured as we intend to use that in the future 11 Shutdown this Strawberry Server We will now configure the other HA server 12 Pick the other server and open REMOTE DESKTOP and connect to machine name STRAWBERR...

Страница 28: ... one of the nodes you can use the command crm node standby This will set the respective node to standby mode and strawberry will migrate to the other node if it is running there this normally takes up to 1 minute 21 Enable a Strawberry Node To get the node online again use crm node online This will ONLY signal the other node that it is ready again strawberry will keep running on the current node I...

Страница 29: ...edia that is associated with that team Each user has a storage amount that he can use called quota that is considered soft in nature users can exceed their quota but a screen alert appears stating such in a red error text If you choose not to use these user and project settings you can let all the Strawberry clients use the general user login Set the quota for the team to a value higher that the t...

Страница 30: ...e of 0 on a new system since this is not a true entry field but a indication of how much of the quota is used up Repeat for each Team Normal text editing functions are usable in these fields But to delete a Team you need to click on the Team name and click the Delete Team button in the lower right of the page Making new Users Once Teams are made Users can be made and assigned to Teams Click on the...

Страница 31: ... Deleting Projects The useful button on the Projects page is the Delete button Selecting a project and clicking the Delete button will delete all the components in that project You will get a ARE YOU SURE Y N message to verify that you want to delete the project All deletion is final Note that if you have media images text sound or sub folders in the project all of them will be deleted as well Arc...

Страница 32: ...anged using the vi command to look at the sb conf entry Change the entry if needed Note The Archive function does ask ARE YOU SURE when archiving so if you click a project of file and click the Archive button the Archive function will occur Note All Archive projects will show in search results as italicized ...

Страница 33: ...our motherboard may be old Check to verify that it still supplies 3VDC If it does not replace it with a new one No Video 1 If the power is on but you have no video remove all the add on cards and cables 2 Use the speaker to determine if any beep codes exist Refer to the Appendix for details on beep codes Memory errors 1 Make sure the DIMM modules are properly and fully installed 2 Determine if dif...

Страница 34: ...Strawberry Server User and Hardware Manual 34 System BIOS errors Strawberry Application FAQs Because the amount type and uses for FAQs we will refer you to the Strawberry FAQ web site ...

Страница 35: ...y Instructions Before replacement you should make sure you follow certain basic safety precautions CAUTION Integration and servicing of this chassis assembly should only be performed by technically qualified persons ATTENTION intégration et l entretien de cet ensemble de châssis doit être effectué uniquement par des personnes techniquement qualifiées Follow these guidelines to meet and maintain sa...

Страница 36: ...rveur 2 Mettez le serveur de l OS ou en appuyant sur le bouton d alimentation à l arrière du châssis puis débranchez les cordons d alimentation du châssis Débranchez tous les câbles périphériques et tous les câbles réseau connectés au châssis 3 Assurer la protection de décharge électrostatique en portant un bracelet antistatique relié à la terre 4 Utilisez uniquement le type correct de bord CMOS d...

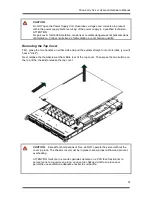
Страница 37: ...e two handles on either side and pull the system straight out until it locks you will hear a click Next release the thumbscrew at the middle rear of the top cover Then press the two buttons on the top of the chassis to release the top cover CAUTION Except for short periods of time do NOT operate the server without the cover in place The chassis cover must be in place to allow proper airflow and pr...

Страница 38: ...nt space in the housing while making sure the arrows on the top of the fan indicating air direction point in the same direction as the arrows on the other fans 4 Reconnect the fan wiring to the exact same chassis fan header as the previous fan used 5 Power up the system and check that the fan is working properly before replacing the chassis cover Replacing a defective RAID Hard Disk Drive Follow t...

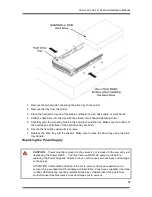
Страница 39: ...six screws 7 Replace the drive tray into the chassis Make sure to close the drive tray using the drive tray handle Replacing the Power Supply CAUTION Power must be removed on the server is not removed to the server by just depressing the Power switch You must remove BOTH AC power cords before replacing the Power Supplies Failure to do so could cause personal injury and damage to the server ATTENTI...

Страница 40: ...er is off An illuminated green light indicates that the power supply is operating 1 Remove the AC power cords from both supplies 2 Push the release tab on the back of the power supply of the bad supply as illustrated 3 Pull the power supply out using the handle provided 4 Replace the failed power module with the same model 5 Push the new power supply module into the power bay until you hear a clic...

Страница 41: ...supports RAID 0 1 5 6 10 50 and 60 RAID 5 supported with Windows OS only SATA Controller Intel ICH10R on chip controller for six port SATA which supports RAID 0 1 5 and 10 RAID 5 supported with Windows OS only Drive Bays Eight hot swap drive bays to house SAS drives Peripheral Drive Bays One slim DVD ROM drive Expansion Slots Left side two PCI E x8 add on cards w RSC R1UU 2E8 riser Right side one ...

Страница 42: ...Supply Rated Output Power 700W Part PWS 703P 1R Rated Output Voltages 12V 58A 5Vsb 3A Operating Environment Operating Temperature 10º to 35º C 50º to 95º F Non operating Temperature 40º to 70º C 40º to 158º F Operating Relative Humidity 8 to 90 non condensing Non operating Relative Humidity 5 to 95 non condensing ...

Отзывы: