background image

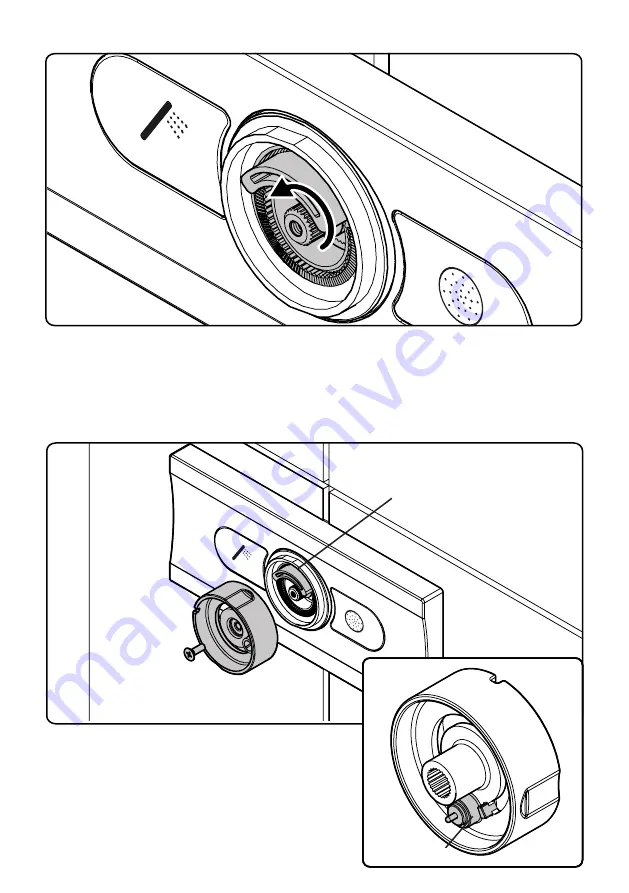
18. On the rear of the handle is a handle stop that sits 
against the right hand side of the valve temperature stop 
ring to prevent the handle being rotated past the pre-
determined maximum temperature position. Without moving 
the temperature spindle, position the handle onto the 
cartridge so that it cannot rotate anti-clockwise. 
 
Note: Do NOT remove the temperature stop ring to make 
adjustments as this will prevent correct assembly later.

Figure 16

Figure 17

You are now ready to set the maximum temperature of the valve.

17.  With both outlet buttons checked for smooth operation, using a thermometer, test the temperature 
of the water from the outlets. Rotate the cartridge spindle anti-clockwise to increase the temperature 
and clockwise to reduce the temperature until the water from the outlet reaches the maximum 
recommended temperature of 44ºC. Leave the cartridge in this position.

Temperature Stop Ring

Handle Stop

Содержание Event-Click SV3114

Страница 1: ...EVENT CLICK SV3114 Push Button Control Shower Valve Installation Aftercare Instructions Retain for future reference REF RRCLICKAR 09 18 V1 ...

Страница 2: ...or the valves to operate effectively is 2 1 Hot or cold pressure must be reduced or boosted so as to work within the required range These shower valves are suitable for use with all water supply systems up to a maximum of 5 0 Bar Operating pressures above 5 0 Bar will require the installation of pressure reducing valves The valve must be installed so that it is readily accessible for commissioning...

Страница 3: ...or reference during installation Installation Frame x 1 Flexible Hoses x 4 Cover Plate Assembly x 1 1 x spare outlet button Valve Assembly x 1 Handle Assembly x 1 1 x chrome centre dial 1 x white centre dial Fixing Spanner x 1 Fixing Screws x 4 Isolation Valves x 2 assembled to installation frame Zip Tie x 1 Hose Labels x 4 Tile Guide x 1 ...

Страница 4: ...installation frame between the two vertical stud timbers at a suitable height for its final installation position The front of the frame and the front of the timber stud should be flush Figure 1 Use a spirit level placed on the tiling guide to make sure the installation frame is level both front to back and left to right Once level remove the tile guide and keep the fixing screws safe for later st...

Страница 5: ...inlet supplies installed install outlet pipework using suitable plumbing fittings Outlet 1 is intended to be used for shower handset options below the valve with Outlet 2 intended for use with overhead showers Note If using this valve with a bath filling option this needs to be connected to Outlet 2 See Step 15 for a guide on swapping control buttons over Figure 2 Brass Manifold Isolation Valve H ...

Страница 6: ...easily identify which hose is which during later installation stages 6 At this point it is critical that leak tests are performed Connect the valve body to the flexible hoses the hot and cold inlets are marked with red and blue paint on the valve Turn on the water supply and test the system for leaks Push the buttons for Outlet 1 and 2 and check all connections are fully sealed HOT COLD OUTLET 1 O...

Страница 7: ...ses together to make them easier to access later You are now ready to apply the final finished surface 8 Reattach the tile guide using the fixing screws Cut a hole in the plasterboard using the tile guide to determine position and sizing Tip There are pins in the corners of the tile guide to help mark its position on the plasterboard to use as a cutting template HOT COLD OUTLET 1 OUTLET 2 Figure 6...

Страница 8: ...correct size access hole Failure to do so may mean the cover plate does not form a water tight seal in later installation stages 10 Remove the tiling guide allowing access to the pipework behind the tiled wall Keep these screws safe as they will be used to mount the valve From this position the isolation valves should be visible and accessible through the access hole Figure 8 Figure 9 ...

Страница 9: ...sure the hose from the hot supply is connected to the inlet marked hot on the valve Do the same for the cold supply Ensuring both outlet buttons are in the OFF position Figure 11 turn the water supply back on at the isolation valve Do not overtighten the hoses as this may damage the rubber washers HOT OUTLET 1 OUTLET 2 COLD OUTLET 1 OUTLET 2 COLD HOT Figure 10 Figure 11 OFF ON ...

Страница 10: ... valve to the fixing frame Note Tighten fixing screws with a screwdriver to prevent over tightening Do not use an electric driver as this may damage the valve housing 14 When secured in place the fixing nuts of the flexible hoses will be visible above the valve housing This will allow the connections to be checked for leaks and for the hoses to be tightened slightly if necessary without removing t...

Страница 11: ...eration You are now ready to install the cover plate and valve controls 15 The cover plate is supplied with control buttons marked for a shower handset and shower head A spare button for a bath filler is also supplied If you are using a shower handset and shower head you do not need to change the button and can proceed to Step 16 If installing a bath filler to the valve remove the unused outlet bu...

Страница 12: ...ature stop ring to make adjustments as this will prevent correct assembly later Figure 16 Figure 17 You are now ready to set the maximum temperature of the valve 17 With both outlet buttons checked for smooth operation using a thermometer test the temperature of the water from the outlets Rotate the cartridge spindle anti clockwise to increase the temperature and clockwise to reduce the temperatur...

Страница 13: ...screw anti clockwise will loosen the pin and soften the click 20 With the handle installed the centre dial can be pushed into place The dial has a tab that fits into the temperature stop ring via a gap in the handle To remove the dial for maintenance line up the notch in the centre dial with the notch on the handle and use a small screwdriver to separate the two parts Installation is now complete ...

Страница 14: ...d into the water flow Follow the procedure below 1 Measure the mixed water temperature 2 Carry out a cold fail safe shut off test by using the mains isolation valve to shut off the water to the cold supply Wait 5 seconds if water is still flowing check that the water temperature is below 44 C The flow should stop or reduce to a trickle 3 Open the cold water isolation valve and measure mixed water ...

Страница 15: ...temperature setting guide in this manual Hot Cold supplies are plumbed the wrong way around Remove the valve from the wall and check the plumbing connections to the valve The valve does not turn on even when the button is pressed The button operation is not smooth and sometimes scrapes In some cases this may be caused by over tightening the cover plate during installation which can cause the butto...

Страница 16: ...Roper Rhodes Ltd Brassmill Lane Trading Estate Bath BA1 3JF Tel 01225 303 900 Email sales roperrhodes co uk www roperrhodes co uk ...

Отзывы: