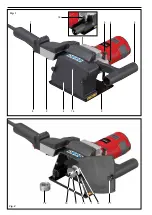
thrust pressure and on reaching the cutting depth, push it forward
against
the
direction of the arrow (14) because otherwise the cutting disc could lift uncon-
trolled out of the cut. Make sure that the diamond cutting disc does not twist/
jam. After cutting the workpiece, switch off the ROLLER’S Groove and wait
until the diamond cutting disc has come to a complete standstill. Do not lift off
the workpiece until the drive unit is at a standstill. Switch off the safety vacuum
cleaner/dust extractor.
CAUTION
Diamond cutting discs get very hot. Let them cool down before touching or
removing.
Make sure that the suction hose of the safety vacuum cleaner/dust extractor
does not kink and impair the dust extraction. Also make sure that no fragments
of stone or other objects jam in the suction nozzle (15) and/or suction hose.
Empty the dust bag of the safety vacuum cleaner/dust extractor early and clean/
renew the filter regularly. Observe the operating instructions of the safety vacuum
cleaner/dust extractor.
ROLLER’S Groove 180 SR
Use a suitable safety vacuum cleaner/dust extractor. Only insert one diamond
cutting disc in the machine. Secure/clamp the workpiece to be cut. Hold the
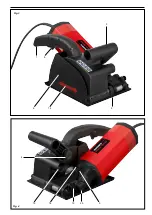
ROLLER’S Groove 180 SR by the switch handle (1) and holding handle (3)
and set the contact plate (9) against the workpiece to be cut. Make sure you
have a safe footing and enough room for the drive unit, safety vacuum cleaner/
dust extractor, suction hose and user. Safety vacuum cleaner/dust extractor.
Switch on the ROLLER’S Groove 180 SR at the switch handle. To do this, first
press the lock button on the side of the switch handle (1) and then press the
safety switch (8). On reaching full speed, press the ROLLER’S Groove 180 SR
against the workpiece with even thrust pressure and on reaching the slitting
depth, push it forward
in the direction
of the arrow (14) because otherwise
the cutting disc could lift uncontrolled out of the cut. Make sure that the diamond
cutting disc does not twist/jam. After cutting the workpiece, switch off the
ROLLER’S Groove 180 SR and wait until the diamond cutting disc has come
to a complete standstill. Do not lift off the workpiece until the drive unit is at a
standstill. Switch off the safety vacuum cleaner/dust extractor.
CAUTION
Diamond cutting discs get very hot. Let them cool down before touching or
removing.
Make sure that the suction hose of the safety vacuum cleaner/dust extractor
does not kink and impair the dust extraction. Also make sure that no fragments
of stone or other objects jam in the suction nozzle (15) and/or suction hose.
Empty the dust bag of the safety vacuum cleaner/dust extractor early and clean/
renew the filter regularly. Observe the operating instructions of the safety vacuum
cleaner/dust extractor.
4. Maintenance
WARNING
Pull out the mains plug before doing maintenance work!
4.1. Maintenance
The gear of ROLLER’S Groove diamond slitting and cutting machines is
maintenance-free. It runs in a life-long grease filling and therefore needs no
lubrication. Keep the power tool and the mount of the diamond cutting discs
clean. Blow out the air vents on the motor from time to time with the machine
running. Clean plastic parts (e.g. housing) only with machine cleaner or a mild
soap and a damp cloth. Do not use household cleaners. These often contain
chemicals which can damage the plastic parts. Never use petrol, turpentine,
thinner or similar products for cleaning. Make sure that liquids never get inside
the electric power tool. Never immerse the power tool in liquid.
CAUTION
Check the diamond cutting discs regularly for cracks or damage. Cracked and/
or damaged diamond cutting discs may not be used.
4.2. Inspection/repair
WARNING
Pull out the mains plug before doing maintenance work!
This work may
only be performed by qualified personnel.
The ROLLER diamond slitting and cutting machine with universal motor has
carbon brushes. These are subject to wear and must therefore by checked and
changed by qualified specialists or an authorised ROLLER customer service
workshop from time to time.
NOTICE
Damaged or worn diamond cutting discs cannot be repaired.
eng eng
5. Faults
5.1. Fault:
ROLLER diamond slitting and cutting machine does not work.
Cause:
Remedy:
●
Worn carbon brushes.
●
Have the carbon brushes changed by qualified personnel or an authorised
ROLLER customer service workshop.
●
Mains lead defective.
●
Have the mains lead changed by qualified personnel or an authorised ROLLER
customer service workshop.
●
Diamond cutting disc has jammed.
●
Switch off ROLLER diamond slitting and cutting machine. Release clamp.
●
ROLLER diamond slitting and cutting machine defective.
●
Have the ROLLER diamond slitting and cutting machine inspected/repaired by
an authorised ROLLER customer service workshop.
5.2. Fault:
Creation of sparks during work.
Cause:
Remedy:
●
The diamond cutting disc can overheat when working in hard materials, e.g.
concrete with a high pebble content.
●
Choose a suitable diamond cutting disc for the material to be cut. Let the
diamond cutting disc cool down if necessary.
●
Diamond cutting disc is blunt.
●
Sharpen diamond cutting disc in abrasive material.
●
Diamond cutting disc is blunt.
●
Change diamond cutting wheel.
5.3. Fault:
Heavy dust development with connected and running safety vacuum cleaner/dust extractor.
Cause:
Remedy:
●
Suction hose has come loose from the suction nozzle (15).
●
Plug the suction hose into the suction nozzle.
●
Loose fragments of stone or other objects have jammed in the suction
nozzle (15) and/or in the suction hose.
●
Remove fragments of stone/objects.
●
Suction hose is kinked..
●
Remove kink from suction hose, change suction hose if necessary.
●
Suction hose has a hole.
●
Change suction hose.
●
The container of the safety vacuum cleaner/dust extractor is full.
●
Empty the container.
●
Protective cover (6) not fitted or not fitted correctly (ROLLER’S Groove
125).
●
Fit protective cover (see 2.3.).
6. Disposal
The ROLLER slitting and cutting machines may not be thrown in the household
waste when they are finished with.
They must be disposed of according to the
legal regulations.
Содержание Groove 125
Страница 2: ...Fig 2 10 13 11 12 Fig 1 1 2 3 4 5 6 14 9 8 15 7 12 17 16 18...
Страница 3: ...Fig 4 Fig 3 1 8 3 14 9 6 15 18 5 20 19 4...
Страница 55: ......

