background image

3

Panel Descriptions

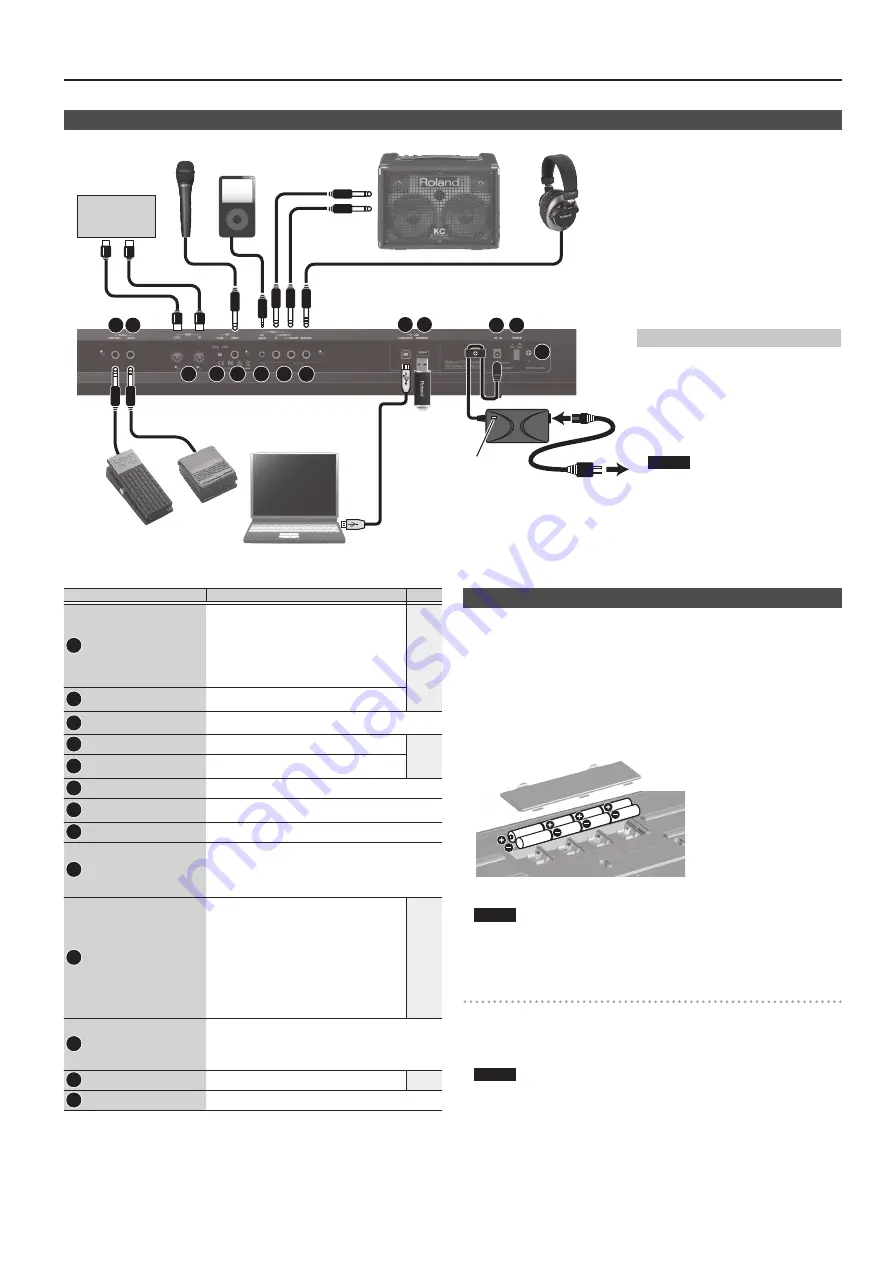
Rear Panel (Connecting Your Equipment) 


* To prevent malfunction and equipment failure, 

always turn down the volume, and turn off all the 

units before making any connections.

Concerning the Auto Off Function

The power to this unit will be turned 

off automatically after a predetermined 

amount of time has passed since it was last 

used for playing music, or its buttons or 

controls were operated (Auto Off function). 

If you do not want the power to be turned 

off automatically, disengage the Auto Off 

function (p. 16).

NOTE


5

Any settings that you are in the process 

of editing will be lost when the power 

is turned off. If you have any settings 

that you want to keep, you should save 

them beforehand.


5

To restore power, turn the power on 

again.

Headphones

Microphone

Pedal switch

Expression pedal

Computer

USB flash drive


* Place the AC adaptor so the side with the indicator (see 

illustration) faces upwards and the side with textual 

information faces downwards. The indicator will light when 

you plug the AC adaptor into an AC outlet.

Power Cord

AC Outlet

Amplified speakers

MIDI device

External audio player

8  9 

10  11  12  13  14  15 

16  17 

18  19 

20 

AC adaptor

Indicator

Jack/Controller

Explanation

Page


PEDAL CONTROL jack

You can connect an expression pedal (EV-5; 

sold separately) or pedal switch (DP series; sold 

separately) here and use them to control various 

parameters or functions.


* Use only the specified expression pedal (EV-

5; sold separately). By connecting any other 

expression pedals, you risk causing malfunction 

and/or damage to the unit.

p. 16


PEDAL HOLD jack

You can connect a pedal switch (DP series; sold 

separately) and use it as a hold pedal.

10   

MIDI IN, OUT connectors

For connecting a MIDI device.

11 


MIC [LEVEL] knob

Adjusts the input level of the MIC INPUT jack.

p. 8

12 


MIC INPUT jack

Connect your microphone here.

This is an unbalanced 1/4” phone jack.

13 


EXT INPUT jack

Connect your external audio player or audio device here.

14 


OUTPUT R, L/MONO jacks

These output the audio signal in stereo to your amp or mixer. 

If you’re outputting in mono, connect only the L/MONO jack.

15 


PHONES jack

Connect your headphones (sold separately) to this jack.

16 


USB COMPUTER port 

Use a commercially available USB 2.0 cable to connect this 

unit to your computer.

You can synchronize it with a DAW on your computer via USB 

MIDI, and record the sound of the XPS-30 into your DAW via 

USB audio.

17 


USB MEMORY port

Connect a USB flash drive (sold separately) here.

You can use a USB flash drive to play audio files or 

to back up data.


* Use USB Flash Memory sold by Roland. We 

cannot guarantee operation if other products 

are used.


* Never insert or remove the USB flash drives 

while this unit is turned on. Doing so may 

corrupt the unit’s data or the data on the USB 

flash drives.


* Carefully insert the USB flash drives all the way 

in—until it is firmly in place.

p. 9

p. 12

p. 17

18 


DC IN jack

Connect the included AC adaptor here.


* To prevent the inadvertent disruption of power to your 

unit (should the plug be pulled out accidentally), and to 

avoid applying undue stress to the jack, anchor the power 

cord using the cord hook, as shown in the illustration.

19 


[POWER] switch

This turns the power on/off.

p. 5

20 


Ground terminal

Refer to “Ground Terminal” (p. 21).

Installing Batteries

If eight commercially available AA nickel-metal hydride batteries are installed, you’ll 

be able to play the XPS-30 without connecting the AC adaptor.

1. 

While pressing the tabs of the battery compartment cover on the bottom 

panel, remove the cover.


* When turning the unit over, be careful so as to protect the buttons and knobs 

from damage. Also, handle the unit carefully; do not drop it.

2. 

Insert the batteries into the battery compartment, taking care to observe 

the correct polarity.

3. 

Securely close the battery compartment cover.

NOTE

If you handle batteries improperly, you risk explosion and fluid leakage. Make 

sure that you carefully observe all of the items related to batteries that are listed 

in “USING THE UNIT SAFELY” and “IMPORTANT NOTES” (leaflet “USING THE UNIT 

SAFELY” and Owner’s manual (p. 21)).

When to replace the batteries (BATTERY indicator)

When the batteries run down, the BATTERY indicator will light or blink.


5

The BATTERY indicator will light when the batteries run low.


5

If you continue using the XPS-30, the indicator will blink; please replace the 

batteries.

NOTE


5

If you continue use even though the indicator is blinking, the display will 

indicate “Battery Low!” and further operation will be impossible.


5

The BATTERY indicator is only an approximation.

Содержание XPS-30

Страница 1: ...l Knobs to Vary the Sound 7 Registering Favorite Sounds to a Button FAVORITE 7 Playing Arpeggios ARPEGGIO 8 Performing with Voice from a Mic 8 Importing a Sample and Playing It on the Keyboard SAMPLE...

Страница 2: ...the value changes more greatly p 4 A PIANO E PIANO SAMPLE Category buttons 0 9 buttons Select categories types of sound such as patches or drum kits You can also use the value dial to select other so...

Страница 3: ...SB COMPUTER port Use a commercially available USB 2 0 cable to connect this unit to your computer You can synchronize it with a DAW on your computer via USB MIDI and record the sound of the XPS 30 int...

Страница 4: ...a performance When using SPLIT DUAL SUPER LAYER you ll always be in Performance mode the PATCH PERFORM button is lit Basic Operation Move the cursor To change a selection or parameter setting that s s...

Страница 5: ...audio files Patches are organized into categories which are assigned to buttons Each category is further divided into several sub categories 3 Use the value dial to select a patch MEMO Patches whose c...

Страница 6: ...e 5 Upper Part 1 Category number Patch name Patch level Level meter No Explanation 6 Lower Part 2 Category number Patch name Patch level Level meter 7 frame Indicates the part whose patch will be swit...

Страница 7: ...ontaining four parameters If you select the parameters to be set for each part the target affected by these modifications will depend on the current settings Patch mode Drum Kit Control knobs will app...

Страница 8: ...ton to make it light The ARPEGGIO screen appears 2 Move the cursor to the item that you want to edit and use the value dial to edit the setting 3 Press the EXIT button to exit the ARPEGGIO screen MEMO...

Страница 9: ...rted If user memory is full the screen indicate Memory Full and you can t import the audio file In this case you ll need to delete unnecessary samples 9 Repeat steps 7 8 to import the desired files in...

Страница 10: ...DAW CONTROL button simultaneously The EDIT MENU screen appears 2 Move the cursor to EFFECTS EDIT and press the ENTER button The EFFECTS EDIT screen appears 3 Move the cursor to the parameter that you...

Страница 11: ...eter Guide English PDF 001 030 Drum Kit Selects the drum kit that is used to play the rhythm patterns Switching the rhythm pattern group will switch the drum kit that is assigned by the rhythm pattern...

Страница 12: ...pads in descending order For example if you choose the SONG1 folder the files are assigned as shown in the illustration MEMO The files inside the folder are shown in alpha numeric order and the first...

Страница 13: ...tern Sequencer Operations for the pattern sequencer are valid only when the PATTERN SEQUENCER button is lit Controller Explanation s button Plays stops the pattern u button Returns the pattern to the...

Страница 14: ...A track that does not contain data To change the sound of the recording track 1 Move the cursor to the category number The PATCH LIST screen appears 2 Use the value dial to select a patch You can als...

Страница 15: ...R Source Pattern Track Selects the copy source track TRACK ALL TRACK 1 8 Destination Pattern Track Selects the copy destination track TRACK ALL TRACK 1 8 Copy Target Selects the content to be copied A...

Страница 16: ...ter Higher values make the keyboard feel heavier 10 9 Velocity Specifies the velocity transmitted when a key is played REAL The transmitted velocity value will correspond to the force with which you s...

Страница 17: ...e transmitted OFF OFF ON Transmit Edit Data Specifies whether changes you make in the settings of a patch or performance will be transmitted as system exclusive messages ON or will not be transmitted...

Страница 18: ...he button once again 2 Move the cursor to DELETE or RENAME and press the ENTER button Function Explanation DELETE When you press the ENTER button the message Are you sure appears Move the cursor to OK...

Страница 19: ...evel setting p 16 Could you be using a condenser microphone The XPS 30 does not support condenser microphones Error Messages If an incorrect operation is performed or if processing could not be perfor...

Страница 20: ...39 11 16 W x 11 13 16 D x 3 7 8 H inches Weight 5 3 kg 11 lbs 12 oz Accessories Owner s manual Leaflet USING THE UNIT SAFELY AC adaptor Power cord Options sold separately Keyboard stand 1 KS 18Z KS 1...

Страница 21: ...keyboard cleaner that does not contain abrasives Start by wiping lightly If the dirt does not come off wipe using gradually increasing amounts of pressure while taking care not to scratch the keys Rep...

Страница 22: ...22 MEMO...

Страница 23: ...23...

Страница 24: ...AMPLE EDIT screen SHIFT EXIT Turns off the display backlight SHIFT ENTER Turns on the display backlight KEYBOARD SPLIT keyboard Specifies the split point if Split is on SPLIT DUAL In split dual exchan...

Отзывы: