12
Playing Audio Files (Audio Player)
Audio files saved on a USB flash drive can be assigned to pads [1]–[8] and played
back.
Audio files that can be played
MP3
Format
MPEG-1 audio layer 3
Sampling Frequency
44.1 kHz
Bit Rate
32, 40, 48, 56, 64, 80, 96, 112, 128, 160, 192, 224, 256, 320 kbps, VBR
(Variable Bit Rate)
WAV/AIFF
Sampling Frequency
44.1 kHz
Bit
8, 16, 24-bit
NOTE
5
Two or more audio files can’t be played simultaneously.
5
The tempo of an audio file can’t be changed.
Assigning Audio Files to Pads and Playing Them
MEMO
If there are audio files in the root directory of the USB flash drive when you turn
on the power, they will automatically be assigned to the pads.
1.
Format your USB flash drive on the
XPS-30 (p. 17).
2.
Power-off the XPS-30, and
disconnect the USB flash drive.
3.
Using your computer, create a
folder inside the “SONG LIST” folder.
* Use only single-byte alphanumeric
characters in folder names.
4.
Copy the desired audio files into
the folder that you created.
5.
Connect the USB flash drive to the
XPS-30, and turn on the power.
6.
Press the [AUDIO] button.
The AUDIO PLAYER screen appears.
7.
Make settings for the audio player.
Parameter
Value/Explanation
Song List
Displays the folders that are in the SONG LIST folder of the USB flash drive.
* Move the cursor to this parameter, and press the [ENTER] button to see
the SONG LIST screen which lists the folders.
Audio Level
Specifies the volume of the audio files.
* The Level setting is lost when you turn off the power. If you want the
setting to be remembered even after the power is turned off, specify
the desired value in the system setting “Audio Level” (p. 16).
0–127
PAD1–8
Name
Shows the audio files that are assigned to the pads.
Loop
Turns loop playback on/off.
OFF, ON
Start
Specifies the start position for loop playback.
0–(available position range)
End
Specifies the end position for loop playback.
(available position range)–end
NOTE
Loop settings can’t be made for an MP3 file. If you want to make loop settings, use
your computer to convert the file to a WAV or AIFF file before you import it.
8.
Press the [ENTER] button.
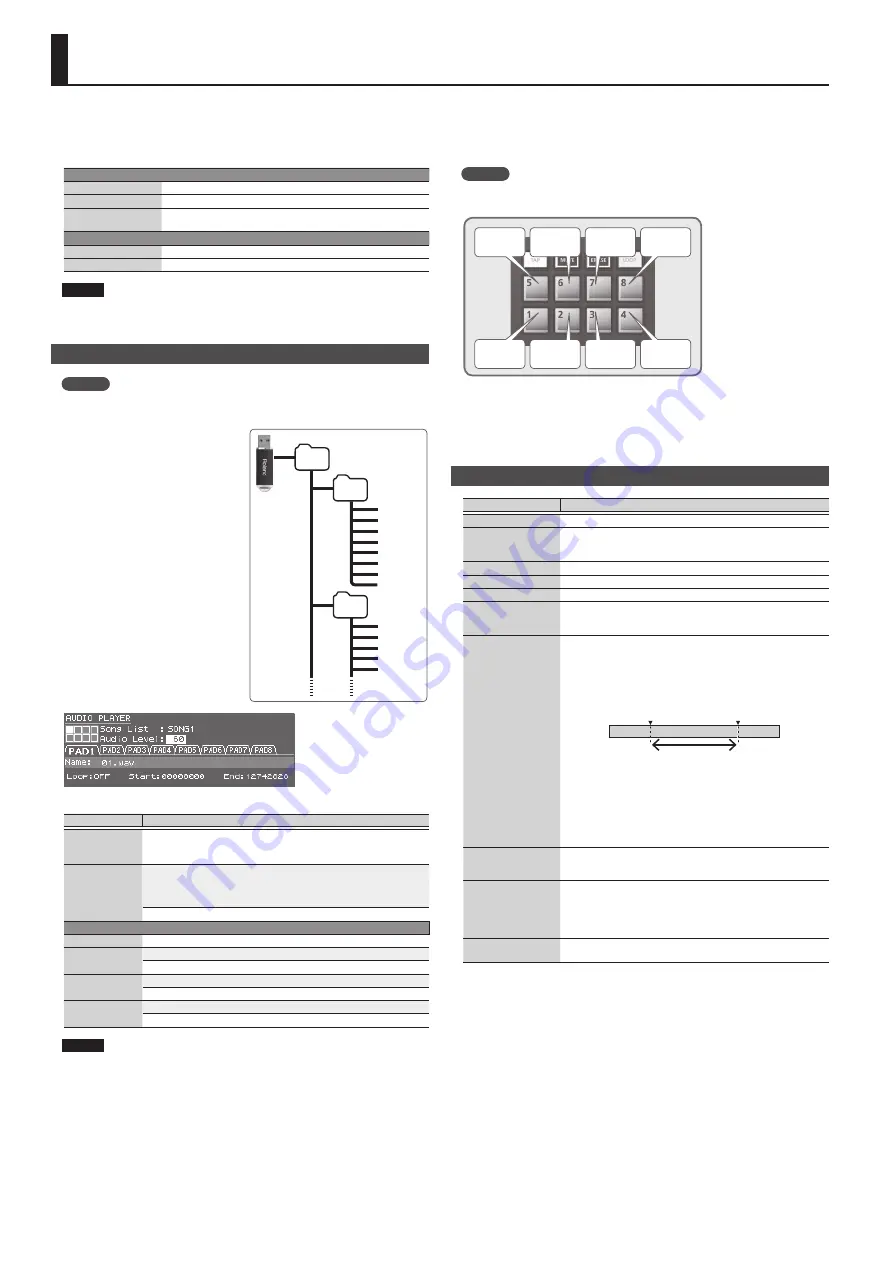
The audio files in the selected folder are automatically assigned to the pads in
descending order. For example if you choose the SONG1 folder, the files are
assigned as shown in the illustration.
MEMO
The files inside the folder are shown in alpha-numeric order, and the first eight
files are assigned.
01.wav
02.wav
03.wav
04.wav
05.wav
06.wav
07.wav
08.wav
9.
Press one of the Pad [1]–[8].
The pad you pressed blinks, and the assigned audio file plays.
Press the pad once again to stop playback (the pad is lit).
Audio Player Operations
Action
Operation/Explanation
Play back
Press one of the Pad [1]–[8].
Stop
Press a currently-playing pad.
To resume playback from the location at which you stopped, hold
down the [AUDIO] button and press the same pad.
Move to the beginning
Hold down the [SHIFT] button and press Pad [1].
Rewind
Hold down the [SHIFT] button and hold down Pad [2].
Fast-forward
Hold down the [SHIFT] button and hold down Pad [3].
Loop settings (*1)
Press the [LOOP] button.
Looping is enabled for the currently selected pad.
The [LOOP] button lights.
Loop a region of the
file
Setting the Start point:
While the file plays, hold down the [SHIFT] button and press the
[LOOP] button.
Setting the End point:
Once again, hold down the [SHIFT] button and press the [LOOP]
button.
Audio file
Start point
End point
Loop region
When the End Point is set, playback repeats over the Start–End region
that you specified.
If a file with a specified loop region is played from the beginning,
it will play until the End point and then start looping over the loop
region.
* If, after specifying the loop region, you want to change the setting
so that the entire file loops, hold down the [LOOP] button and
press the pad whose setting you want to change.
Adjusting the Start
point or End point (*1)
Move the cursor to “Start” or “End,” and use the value dial to change
the setting.
Playing the next pad
To switch immediately:
Press one of the Pad [1]–[8].
To switch after playback has ended:
Hold down the currently-playing pad, and press the pad that you
want to play next.
Adjusting the volume
of the Audio Player
Move the [PHRASE PAD] LEVEL slider.
*1:
Loop settings for each audio file are automatically saved in the SONG LIST folder. If you
move an audio file to a different folder, the loop settings will be preserved by moving the
settings file (.bin) as well.
SONG LIST folder
01.wav
02.wav
03.wav
04.wav
05.wav
SONG1
06.wav
07.wav
08.wav
001.mp3
002.mp3
003.mp3
004.aif
005.aif
SONG2
Содержание XPS-30
Страница 22: ...22 MEMO...
Страница 23: ...23...


