background image

Chapter 5: Maintenance

49

5-2 Replacing Consumables

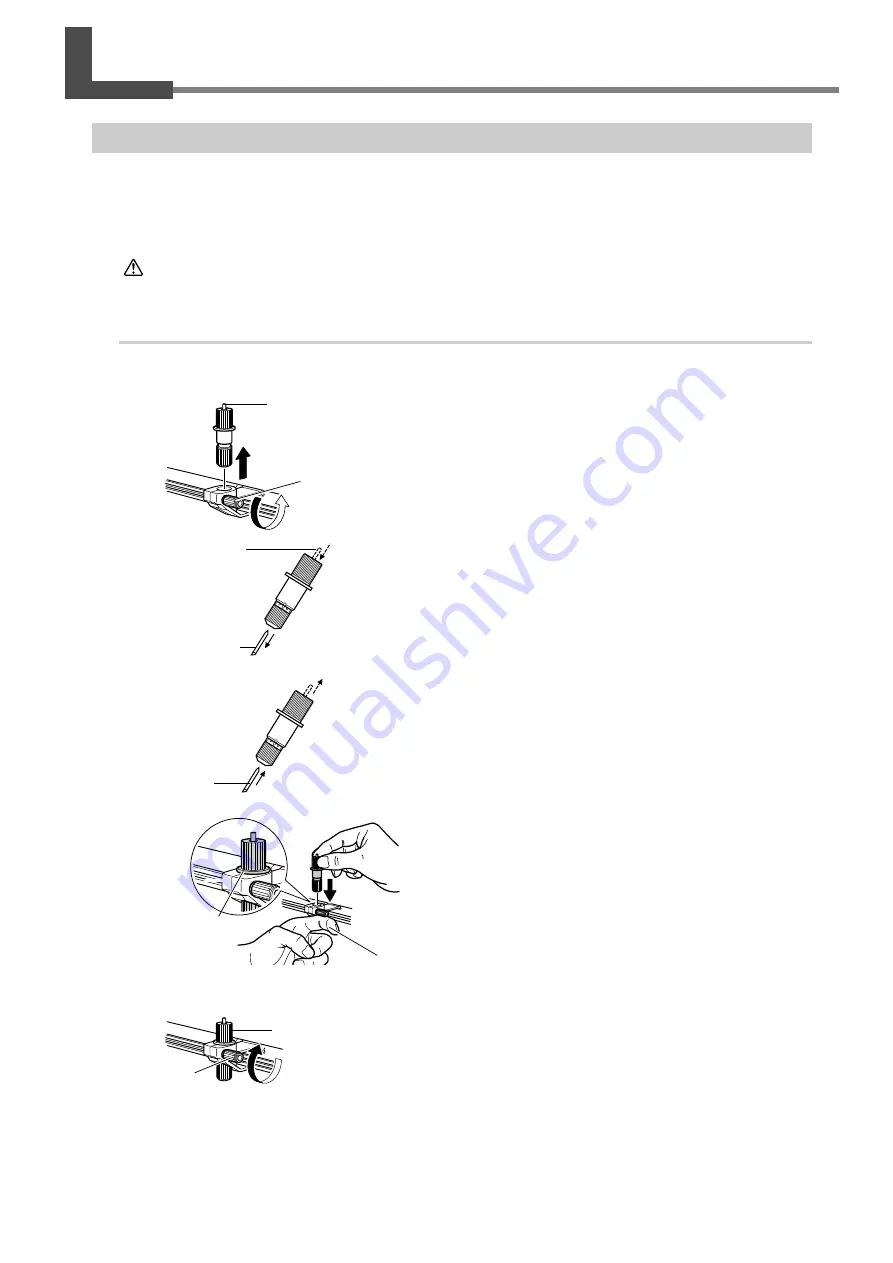
Replacing the Blade

If you adjust the blade amount and implement a cutting test several times, and the machine still does not properly cut
the material, the blade tip may be worn or damaged. Replace with a new blade.
Before replacing the blade, remove the material.

CAUTION

Do not touch the tip of the blade with your fingers.

Doing so may result in injury.

Procedure

Unplug the power cord from the machine.

Loosen the screw, remove the blade holder.

Press the pin and remove the old blade.

Press in until you can no longer see the pin.

Press the new blade in until you hear an audible
click.

The pin pops out.

Support the screw from below and insert the
blade holder.

Tighten the screw.

Tug the blade holder upward to make sure it does not
come loose.

Blade holder

Screw

Pin

Old blade

Blade

Support the
screw from
below.

Blade holder

Screw

Tight contact

Содержание Stika SV-12

Страница 1: ...l and the specifications of this product are subject to change without notice The operation manual and the product have been prepared and tested as much as possible If you find any misprint or error p...

Страница 2: ...ause harmful interference in which case the user will be required to correct the interference at his own expense Unauthorized changes or modification to this system can void the users authority to ope...

Страница 3: ...Macintosh 23 System Requirements 23 Installing the Software 23 Chapter 3 Performing Cutting 25 3 1 What to Know Before Cutting 26 Useable Material Types 26 3 2 Cutting 28 Step 1 Load Material 28 Step...

Страница 4: ...oduct names are trademarks or registered trademarks of their respective holders http www rolanddg com Chapter 5 Maintenance 47 5 1 Maintenance 48 Cleaning the Blade Tip 48 Cleaning the Blade Holder 48...

Страница 5: ...udio STIKA Sticker STIKA Sticker with image Printer Illustrator CutStudio You can make stickers with data created in Illustrator Windows Advanced Guide electronic format Illustrator CutStudio You can...

Страница 6: ...relDRAW CutStudio You can run a material jam test Windows Advanced Guide electronic format You can cut in areas of the material that have not yet been cut Windows Advanced Guide electronic format STIK...

Страница 7: ...ing Guide electronic format Illustrator CutStudio STIKA Sticker For Macintosh You can use the included software plug in CutStudio Plug in for Adobe Illustrator to make stickers with data created in Il...

Страница 8: ...determined by the design contained within the triangle The symbol at left means danger of electrocution The symbol alerts the user to items that must never be carried out are forbidden The specific th...

Страница 9: ...atible items may lead to an accident Incorrect operation may cause injury CAUTION Caution cutting tool This machine has an internal tool To avoid in jury handle the tool with care Before attempting cl...

Страница 10: ...orrectly and with care Never use any article that is damaged Using a damaged article may result in fire or electrical shock When using an extension cord or power strip use one that adequately satisfie...

Страница 11: ...he power cord plug and electrical outlet Never place any object on top or subject to damage Never bend or twist with undue force Never pull with undue force Never bundle bind or roll up Never allow to...

Страница 12: ...d never subject the machine to impact or excessive force Install in a Suitable Location Install in a location having the specified temperature and relative humidity Install in a stable location offeri...

Страница 13: ...11 Chapter 1 Setup Preparation...

Страница 14: ...l present and accounted for The blade blade holder and pin are installed onto the machine Replaceable blade protector 1 AC adapter 1 Power cord 1 USB cable 1 Blade 1 Blade holder 1 Pin 1 Test use mate...

Страница 15: ...SB connector Sheet feed knob Blade protector Blade holder Shaft cover AC adapter jack Power light Sheet adjustment lever Pinch rollers The SV 15 has sheet adjustment levers on the left and right The S...

Страница 16: ...ent of an emergency Install the machine next to an electrical outlet Also provide enough empty space to allow immediate access to the electrical outlet CAUTION Install in a location that is level and...

Страница 17: ...nd packing materials are attached to the machine to protect it from shocks during transportation When instal lation is complete remove these materials Remove all packing materials Any that remain may...

Страница 18: ...quency and current Use of multiple electrical loads on a single electrical outlet or of a lengthy extension cord may cause fire WARNING Use only brand nameAC adapters and power cords compatible with t...

Страница 19: ...17 Chapter 2 Installing Software This section describes how to install the included software...

Страница 20: ...s automatically installed when the STIKA driver is installed Roland CutStudio Roland CutStudio is software that allows you to create cutting data and easily perform cutting operations CutStudio Plug i...

Страница 21: ...his includes such computers later upgraded to Windows Me 2000 XP 2 Computers on which USB operation is assured by the manufacturer of computers Operating Systems Computer Drive Monitor Memory RAM Free...

Страница 22: ...luded CD ROM into the CD ROM drive After a short wait the setup menu shown at left ap pears Click Install The Installation and Setup Guide appears If you re using Windows 98 SE Windows Me or Win dows...

Страница 23: ...re Package Click Install The setup window appears Thereafter follow the instructions in the messages to complete installation and setup Next you install the Windows Advanced Guide Viewing the Roland C...

Страница 24: ...w the instructions in the messages to complete installation and setup At the setup menu go to the upper right and click the X to close the window Viewing the Windows Advanced Guide Click Start point t...

Страница 25: ...ins how to install and set up the software and Macintosh Cutting Guide If you re using a Macintosh follow the steps below to display the file then follow the explanation to perform installation and se...

Страница 26: ...24...

Страница 27: ...25 Chapter3 Performing Cutting This describes basic cutting operations under Windows For other opera tions not covered in this chapter refer to the Windows Advanced Guide electronic format...

Страница 28: ...If you re using a roll of material make sure to add a margin greater than 40 mm 1 5 8 in to the cutting area prior to cutting the material from the roll Material with a maximum length of 1100 mm 43 1...

Страница 29: ...3 1 What to Know Before Cutting Chapter 3 Performing Cutting 27...

Страница 30: ...trim the excess material from the edge of the material that is touching the pinch rollers until the left edge is parallel with the guide line Turn the sheet feed knob and move the mate rial into the m...

Страница 31: ...per If the open ing is widened the stopper may become loose and fall out when it is next attached to the unit Move the right side pinch roller to match the width of the material being loaded and attac...

Страница 32: ...erations and features If you are using Windows 2000 XP log on to Windows as Administrator right 1 Start CutStudio Click Start Point to All Programs or Program Roland CutStudio then click CutStudio 2 M...

Страница 33: ...to 250 mm 9 84 in if you are using the included test use material The width cannot be changed on the SV 12 8 models For the length set a range that subtracts the mar gin from the loaded material lengt...

Страница 34: ...e it easier to peel of f later Click Click anywhere in the white area then type in SALE Click Displayed around the text are and symbols Drag the and symbols for the text box to change the size of the...

Страница 35: ...Save As screen appears For Save in choose the folder you want Enter the file name then click Save The data you created is saved Important Note When Saving Data The cutting range set in File Cutting Se...

Страница 36: ...ve been completed Procedure Press the power button and turn the machine on The power light flashes The cutting carriage moves to the left edge of the machine Once the light changes to a steady illumin...

Страница 37: ...Stop Cutting While in Progress Press the power button and turn the machine off Press the power button again and turn the ma chine on The cutting carriage returns to the left edge If you need to cut th...

Страница 38: ...ly by using a com mercially available squeegee or the flat part of a ruler or the like to rub the cut material from above the ap plication tape Affix the material together with the joined ap plication...

Страница 39: ...37 Chapter4 Mastering the STIKA This describes in details how to adjust the blade extension amount how to correct the angle of the loaded material and how to create cutting data...

Страница 40: ...the figure is cut To consecutively perform cutting tests hold down the power button for 2 seconds or longer once the prior cutting operation has finished This cutting test is done in an area that doe...

Страница 41: ...out the cutting test and check the cutting quality for the material Repeat until optimal cutting quality is attained p 38 Check the Cutting Quality for the Material Rough Estimate for the Amount of B...

Страница 42: ...cutting You can use the sheet adjustment lever to correct the angle of the material without removing it from the machine Procedure Raise the sheet adjustment lever Move the material backward and forw...

Страница 43: ...n appears You can also display the Properties screen as indi cated below Click Format Properties Click Properties on the mouse right click shortcut menu Change the text size and design For more inform...

Страница 44: ...e characters Drawing a square around the text will make the mate rial easier to peel off When cutting small text draw a square around each character Click Save The Save As screen appears For Save in c...

Страница 45: ...images to be read by CutStudio Data Conditions for Clean Cutting Colors must not contain continuous tones and color borders must be clearly defined We recommend black and white Scanned photos general...

Страница 46: ...ars Click Extract Contour Lines The image contour is detected The contour displays as a blue line Verify that the contour line is correct and then click OK The image contour is detected You can use th...

Страница 47: ...mage contour is separated Click on the undesired cutting line Click Edit Delete The undesired cutting line is deleted The read data remains and is not deleted Drag the mouse to select the remaining co...

Страница 48: ...decrease the likelihood of bubbles becoming trapped between the application surface and material Procedure Prepare the cut material and tape the material from the top with application tape Remove any...

Страница 49: ...47 Chapter5 Maintenance This describes how to clean the machine and replace the blade...

Страница 50: ...or material adhesive adhering to the blade tip Cleaning the Blade Holder CAUTION Do not touch the tip of the blade with your fingers Doing so may result in injury Dust and adhesive material can collec...

Страница 51: ...the blade with your fingers Doing so may result in injury Procedure Unplug the power cord from the machine Loosen the screw remove the blade holder Press the pin and remove the old blade Press in unti...

Страница 52: ...n to avoid injury Procedure Unplug the power cord from the machine Peel the blade protector from the main unit Use a commercially available retractable knife to fa cilitate removal If you are using th...

Страница 53: ...5 2 Replacing Consumables Chapter 5 Maintenance 51 Peel off the double sided tape and affix the blade protector For the SV 15 lower the left right sheet adjust ment levers Sheet adjustment levers...

Страница 54: ...52...

Страница 55: ...53 Chapter 6 Appendix...

Страница 56: ...tion has occurred The method for resolving problems not listed below are indicated in the Windows Advanced Guide or Macintosh Cutting Guide electronic format Use both as necessary The machine does not...

Страница 57: ...an obstruction while it was being cut Do not use material wider than can be handled The left and right edges of the material will touch the inner surfaces of the machine and in addition to shifting t...

Страница 58: ...e you start uninstallation of the driver unplug the USB cables from your computer Log on to Windows If you are installing under Windows 2000 XP log on as Administrators right Insert the included CD RO...

Страница 59: ...d in the figure Use a machine oil to lubricate Procedure Unplug the power cord from the machine Remove the shaft cover Use a Phillips head screwdriver to remove the screws Wipe and remove dust adherin...

Страница 60: ...h 360 to 381 mm 14 1 8 to 15 in Maximum 1000 mm 39 5 16 in Cutting range width 250 mm 9 13 16 in Pinch rollers Blade holder Margin 30 mm 1 3 16 in Material Loadable material width SV 12 280 to 305 mm...

Страница 61: ...nd Serial Number Labels Power rating Use an electrical outlet that meets the requirements for voltage frequency and amperage given here Serial number This is require when you seek maintenance servicin...

Страница 62: ...sec 12 to 40 mm sec 7 16 to 3 7 8 in sec 7 16 to 1 9 16 in sec 7 16 to 1 9 16 in sec Vinyl chloride material material section thickness alone is 0 1 mm or less thickness including backing paper is 0 3...

Страница 63: ......

Страница 64: ...ransfer the rights granted under this agree ment or the Software itself including the accompanying items to any third party You may not provide use of the Software through a time sharing service and o...

Отзывы: