background image

28

28

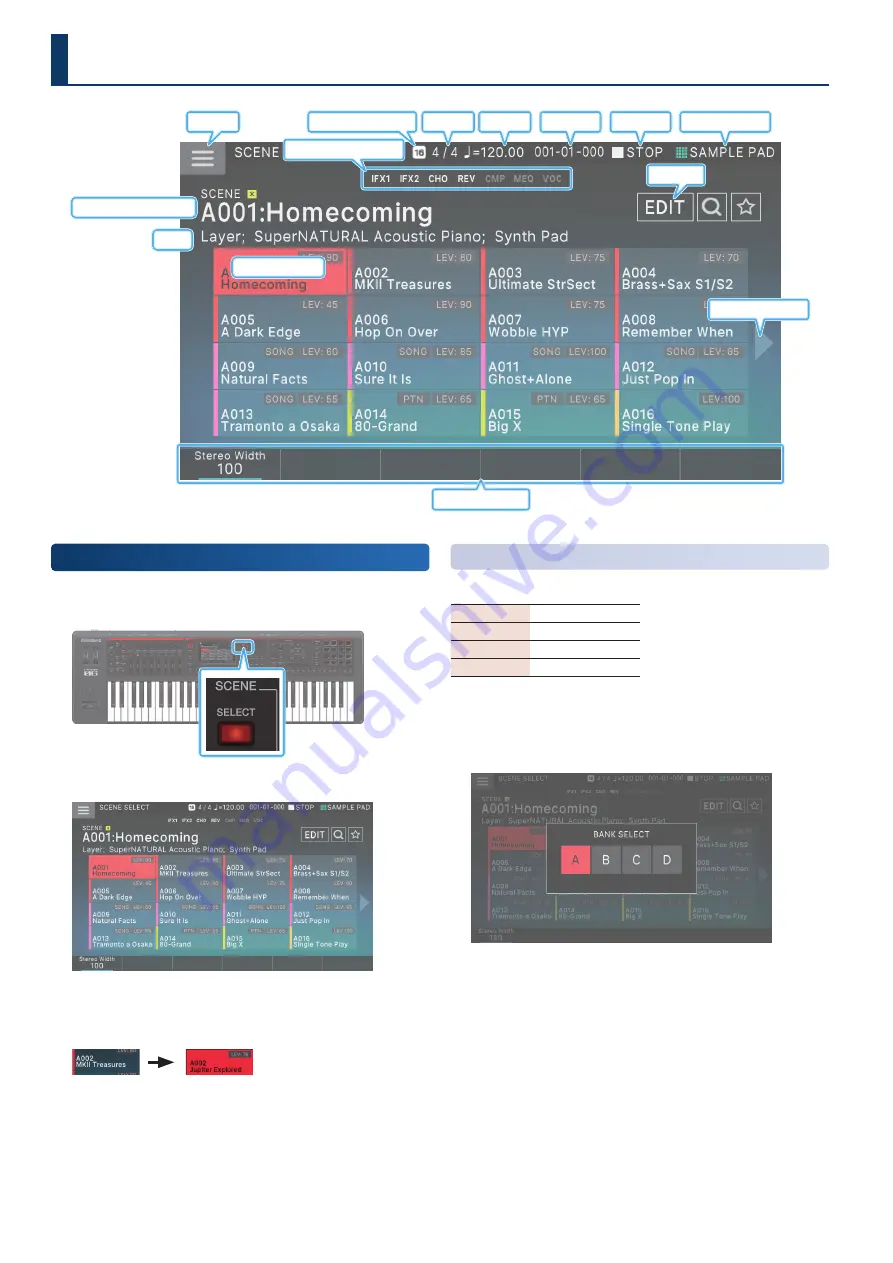
Menu

Edit

Beat

Status of scene remain

Tempo

Locator

Play/Stop

Current pad mode

Scene Number: Scene Name

Show next 16 scenes

Status of each effect

Memo

Quick Edit

Selected scene

Selecting a Scene

1 . 

Press the [SCENE SELECT] button.

The SCENE SELECT screen appears.

2 . 

Touch a scene icon in the screen to select the 

desired scene.

The icon of the selected scene 

is colored.

Sixteen scene icons are arranged in the screen as a 4 x 4 grid, 

and you can select one of these scenes. By touching the 

ã

 (

â

icon located at the left or right edge of the screen, you can 

choose from the previous (or next) 16 scenes.

Selecting a Bank

Scenes are organized in “banks” of 128 scenes.

BANK A

A001–A128

BANK B

B001–B128

BANK C

C001–C128

BANK D

D001–D128

Here’s how to switch banks.

1 . 

Press the [ENTER] button.

The BANK SELECT screen appears.

2 . 

Select the desired bank.

Selecting a Sound 

(SCENE/TONE)

Содержание FANTOM-06

Страница 1: ...ence Manual 2022 Roland Corporation 01 This Manual explains the basic operations of the FANTOM 06 07 08 Ver 1 01 and later You can check the instrument s current version by accessing MENU Ó SYSTEM Ó INFO tab ...

Страница 2: ...nes in a Category Category Lock 31 Selecting Tones from a List 31 Tone Search Function 32 Performing 34 Playing One Tone in One Zone Single 34 Layering Zones Layer 35 Selecting a Tone Layer 35 Dividing the Keyboard into Two Regions Split 36 Changing the Keyboard s Split Point 36 Selecting a Tone Split 36 Playing Multiple Zones 37 Specifying the Range of Each Zone KEY RANGE 37 Changing the Keyboard...

Страница 3: ... in the Order of Songs Scene Chain 74 Using Scene Chain 74 Switching Between Screen Content 75 Creating a Chain Set 76 Editing a Chain Set 77 05 Sampler 79 Sampling Functions 80 About the SAMPLING MENU 81 Sampling To Keyboard 81 Sampling To Storage 83 Sampling To Pad 83 Importing an Audio File To Keyboard 84 Importing an Audio File To Pad 84 Importing Multiple Audio Files To Multisample 85 Editing...

Страница 4: ... Copy It 125 Operations of the E1 E6 Knobs 126 Microscope 126 Convenient Functions Pattern Utility 126 Applying Various Edits MODIFY 128 Importing SMF as a Pattern IMPORT 130 Exporting a Pattern as SMF EXPORT 130 Saving a Pattern 131 How to Create a Group 132 Creating a Group 132 Naming a Group RENAME 132 Editing a Group 133 Basic Operation in the GROUP Screen 133 Specifying the Loop Settings Leng...

Страница 5: ...RENAME 162 Deleting a File or Folder DELETE 162 Copying a File or Folder COPY 163 Moving a File or Folder MOVE 163 Creating a New Folder CREATE FOLDER 163 Settings for the Entire FANTOM 164 Basic Procedure for System Settings 164 Saving the System Settings 164 System Parameter 164 Overall Settings GENERAL 164 Keyboard Settings KEYBOARD 165 Pedal Settings PEDAL 165 Wheel Settings WHEEL 1 2 166 S1 S...

Страница 6: ...6 6 Memo Memo ...

Страница 7: ...ons 14 MENU Button 15 Operations in the Display 15 SCENE SELECT Screen 15 TONE EDIT Screen 1 15 TONE EDIT Screen 2 15 ZONE VIEW Screen 16 MENU Screen 16 RENAME Screen 16 REC STANDBY Screen 16 An Overview of FANTOM 17 Basic Structure 17 Controller 17 Synthesizer 17 Sequencer 17 Sampler 17 Units of Sound 18 TONE 18 ZONE 19 SCENE 19 About the Effects 20 About Memory 22 Getting Ready 23 Placing the FA...

Страница 8: ...al time ASSIGN button Assign other functions to sliders 1 8 and control knobs 1 8 ASSIGN1 assigns parameters that you set for a scene and ASSIGN2 assigns parameters that you edit in system settings Hold down the SHIFT button and press one of these buttons to access a screen that lets you assign a function How to switch between ASSIGN1 and ASSIGN2 ASSIGN1 SCENE ASSIGN button ASSIGN2 SYSTEM ASSIGN b...

Страница 9: ...ssigned to these sliders The parameters that can be controlled depend on the function select buttons located at the left SPLIT button Turns the split function on off CHORD MEMORY button Turns the chord memory function on off ARPEGGIO button Turns the arpeggiator on off TRANSPOSE button Hold down this button and use the OCTAVE DOWN UP buttons to raise or lower the pitch range in semitone steps OCTA...

Страница 10: ...Explanation PATTERN button The PATTERN screen appears GROUP button The GROUP screen appears SONG button The SONG screen appears TR REC button Enables TR REC p 121 RHYTHM PTN button The RHYTHM PATTERN screen appears ðSTOP button Stops pattern playback or recording or stops playback of the group or song øPLAY button Plays the pattern group or song óREC button Enters the record standby condition Tone...

Страница 11: ...your audio device external synthesizer or other equipment to these jacks E SUB OUT jack Controller Explanation R L MONO jacks These are output jacks for sub out audio STEREO PHONES jack The SUB OUT audio signal is output in stereo You can also connect a pair of headphones here with a stereo mini plug When doing so set the volume from the MIXER screen and the source you want to hear from the OUTPUT...

Страница 12: ...ER switch Turns the power on off J DC IN jack Connect the included AC adaptor here K Cord hook If the included AC adaptor is connected to the DC IN jack secure the cord to this hook to prevent it from being accidentally disconnected ...

Страница 13: ...on Modifying a value more greatly Hold down the SHIFT button and turn the VALUE dial Display Touch Panel You can directly touch or drag an on off icon knob icon or slider icon in the screen to switch a setting on off or to edit a value Knob Slider Selection buttons Examples of on off icons Operation Explanation Drag up or right Value increases Drag down or left Value decreases NUMERICWindow If you...

Страница 14: ...lso stops all samples that are being played by the sample pads 1 Hold down the SHIFT button and press the EXIT button The PANIC function is executed Display Touch Panel Indication such as OK or SELECT shown in a confirmation screen have the same operation as the ENTER button and EXIT has the same operation as the EXIT button SHIFT Button This is used in conjunction with other buttons By holding do...

Страница 15: ...here we explain the typical screen operations Text enclosed in square brackets indicates a button or knob on the panel Text enclosed in angle brackets indicates a button knob in the display NOTE A light touch with your finger is sufficient to operate the touch panel The touch panel might be damaged if you press it strongly or if you press it with a hard object Do not use excessive force and use on...

Страница 16: ...h on off Touch to move the cursor MENU Screen Returns to the screen of the next higher level Touch to move between screens RENAME Screen Cancel Confirm Touch to enter characters REC STANDBY Screen From the menu use the E4 knob to select a parameter and confirm Touch to open the list ...

Страница 17: ...rectly using the 16 tracks Realtime recording step recording and TR REC are provided You can combine patterns to create groups and place groups in a desired order to create a song Pattern This is a unit of sequence data that records performance data for an individual tone There can be up to eight patterns in one track You can record up to 64 measures in one pattern Group This records a combination...

Страница 18: ...t and edit parameters that are specific to that instrument To use the SN EP tones an SN EP tone expansion must be installed p 171 Pre installed by factory default VTW Virtual Tone Wheel Tone Although you are limited to using just one part of the keyboard for ZONE 2 only this feature lets you use the latest in modeling technology to recreate the sounds of the most highly acclaimed tonewheel organs ...

Страница 19: ...NE EQ Level Pan Key Range etc Level Pan Key Range etc INT EXT MIDI USB SCENE A scene contains a favorite performing state including settings for each zone tone MFX volume etc settings common to all zones Reverb Chorus IFX etc and sequence data for each zone You can store an idea for a song or phrase as a scene and manage scenes by switching them for each song You can freely recall saved scenes in ...

Страница 20: ... general purpose insert effects that can transform the sound itself giving it a completely different character There are 90 types and you can select and use the type that s appropriate for your purpose Use these when you want to apply a further effect in addition to the multi effect The insert effects provide two independent effect units IFX 1 and 2 and you can make routing settings to connect IFX...

Страница 21: ...rus Send from Sub Reverb Send Audio Input Reverb Comp x 6 for Drum Kit TFX Master EQ Master Comp Main Output Sub Output Master FX to Sub to Sub to Sub to Sub to Sub to Sub to Sub to Rev to Rev to Rev to Rev from Rev to Cho to Cho to Cho to Cho from Cho Drum Kit Comp Zone PARTIAL EQ KIT PTL EQ Low Cut Vocoder NS MFX Input EQ Input Reverb ...

Страница 22: ...age memory inside the FANTOM You can use the file utility functions to copy delete or move saved files between this storage and a USB flash drive USB flash drive The user memory data and the system parameter settings can be backed up together to a USB flash drive p 158 SMF or WAV files can be imported into the FANTOM or exported from the FANTOM Non rewritable memory Preset memory Data in preset me...

Страница 23: ... stand Adjust the width of the stand so that the stand arms are lined up between the rubber feet of the FANTOM Top view KS 12 Adjust the horizontal width of the stand so that the rubber feet on the keyboard side of the FANTOM fit into the holes that are provided to accommodate them Top view KS 20X Line up the FANTOM so that it rests on the rubber rings of the stand FANTOM 06 Open up the stand from...

Страница 24: ...M with the front of the stand KS 12 Adjust the horizontal width of the stand so that the rubber feet on the keyboard side of the FANTOM fit into the holes that are provided to accommodate them Top view KS G8B Align the front of the FANTOM with the front of the stand s upper arm Align the center of the FANTOM with the center of the stand KS 20X Line up the FANTOM so that it rests on the rubber ring...

Страница 25: ...rnal devices 4 Adjust the volume of the connected external devices 5 Adjust the volume of this unit Turning off the Power 1 Minimize the volume of this unit Also completely turn down the volume of any connected external devices 2 Turn off the power of the connected external devices 3 Press the POWER switch The unit is turned off NOTE Before turning the unit on off always be sure to turn the volume...

Страница 26: ...aved in advance To restore power turn the power on again Changing the Auto Off Setting 1 Press the MENU button The MENU screen appears 2 Touch SYSTEM The SYSTEM screen appears 3 Touch GENERAL 4 Select Auto Off and change the setting Parameter Value Explanation Auto Off Off The power will not turn off automatically 30min The power will automatically turn off if no operation is performed for 30 minu...

Страница 27: ...rch Function 32 Performing 34 Playing One Tone in One Zone Single 34 Layering Zones Layer 35 Selecting a Tone Layer 35 Dividing the Keyboard into Two Regions Split 36 Changing the Keyboard s Split Point 36 Selecting a Tone Split 36 Playing Multiple Zones 37 Specifying the Range of Each Zone KEY RANGE 37 Changing the Keyboard Settings 38 Raising Lowering the Key Range in Semitones Transpose 38 Rais...

Страница 28: ... icon of the selected scene is colored Sixteen scene icons are arranged in the screen as a 4 x 4 grid and you can select one of these scenes By touching the ã â icon located at the left or right edge of the screen you can choose from the previous or next 16 scenes Selecting a Bank Scenes are organized in banks of 128 scenes BANK A A001 A128 BANK B B001 B128 BANK C C001 C128 BANK D D001 D128 Here s...

Страница 29: ...g by rating You can assign a rating to scenes that you like and find them quickly Adding a rating 1 In the SCENE SELECT screen select the scene to which you want to add a rating and then touch EDIT 2 Turn the E4 Scene Rating knob to assign a rating You can assign a rating in three levels 3 When you are finished making the setting touch WRITE The setting is overwritten onto the current scene and yo...

Страница 30: ...e name of the parameter corresponding to each knob Press the knob to switch the parameter The editable parameters differ depending on the tone type Depending on the tone type you can press a knob to switch parameters These quick edit operations edit the parameters of the current zone If the tone type is Drum they edit the parameters of the instrument that you specify by pressing a key on the keybo...

Страница 31: ...o select the zone that you want to control To select zones 9 16 use the ZONE 1 8 9 16 button to switch groups and then press a ZONE SELECT 1 8 button 4 Press a tone category button 1 16 to select the type category of tone 5 Move the cursor to the tone name number and use the VALUE dial or the INC DEC buttons to select a tone Cursor SelectingTones in a Category Category Lock If you move the cursor ...

Страница 32: ...egory of tones only those tones that include the entered text string are shown MEMO Touch the search symbol to clear the search results If you touch a category tab to select a different category another search is done on the tones in the selected category If you use the pulldown menu to select a different category group a search is again done on the tones in the selected category If you want to se...

Страница 33: ...re shown MEMO Touch the rating symbol to clear the search results If you touch a category tab to select a different category another search is done on the tones in the selected category If you use the pulldown menu to select a different category group a search is again done on the tones in the selected category If you want to search from all categories select All Category ...

Страница 34: ...settings you want to change 3 Press the SINGLE TONE button Now you can use the single tone play function In single play Only the sound of ZONE 1 is heard when you play the keyboard An acoustic piano tone is selected The ZONE VIEW screen 1 ZONE VIEW appears 4 Select a tone and play it 5 If you want to save the modified settings as a scene press the SINGLE TONE button once again The CONFIRM screen a...

Страница 35: ...ne MEMO If ZONE INT EXT Control is set to Advanced the current zone lights up green For this example we specify ZONE 1 as the current zone of the three ZONE 1 3 that are lit red You are free to specify ZONE 2 or ZONE 3 if you like Zone 1 Zone 2 Zone 3 When you play the keyboard in this state the zones that are lit red ZONE 1 3 sound together NOTE Zones whose ZONE INT EXT buttons are lit green when...

Страница 36: ...h G9 Even if zones are layered the button is lit whenever the KEY RANGE settings are other than the default Making the SPLIT button go dark means that the KEY RANGE settings of all zones are reset to the default values Changing the Keyboard s Split Point 1 While holding down the SPLIT button press the key that is to become the new split point Split point included in ZONE 1 When you press a key the...

Страница 37: ...ge KEYBOARD RANGE UPPER Sets the upper limit of the key range When you edit the KEYBOARD RANGE LOWER UPPER values the SPLIT button is automatically lit MEMO If you hold down the SHIFT button and press the SPLIT button the KEY RANGE screen of ZONE EDIT appears The KEY RANGE settings can also be edited in this screen For details refer to Parameter Guide PDF About unlit zones when Zone Int Ext Contro...

Страница 38: ...to make it go dark Once you have set transpose you can simply press the TRANSPOSE button to instantly transpose to the previously set value If you hold down the TRANSPOSE button and press the OCTAVE DOWN and UP buttons simultaneously the value is returned to 0 Raising Lowering the Key Range in Octaves Octave 1 Press the OCTAVE DOWN button or UP button When you press the button the screen shows the...

Страница 39: ...m Patterns 44 Editing a Rhythm Pattern Group 45 Saving a Rhythm Pattern Group 46 Changing the Tempo of the Rhythm Pattern 46 Saving the Rhythm Pattern Settings 46 Playing the General Purpose Controllers 47 Using the Sliders and Control Knobs 47 Using Other General Purpose Controllers 48 Using the SYNTH CTRL 49 Using the SYNTH CTRL 49 Simultaneously Modifying theVolume of Multiple Zones Motional Pa...

Страница 40: ...ios simultaneously 3 Press the ARPEGGIO button to make it light The ARPEGGIO screen appears Menu Explanation E1 HOLD Holds the arpeggio E6 EXIT Returns to the previous screen MEMO By setting the system parameter Arpeggio Switch Mode p 165 you can turn the arpeggiator on without accessing the ARPEGGIO screen 4 Play a chord on the keyboard An arpeggio is sounded by the zone that is turned on accordi...

Страница 41: ...ke the arpeggio continue sounding even after you release the keyboard 1 Press the ARPEGGIO button The ARPEGGIO screen appears MEMO By holding down the SHIFT button and pressing the ARPEGGIO button you can access the ARPEGGIO screen without affecting the arpeggio on off status 2 Select E1 HOLD The hold function turns on 3 Play a chord on the keyboard An arpeggio is sounded by the zone that is turne...

Страница 42: ...e assigned automatically giving priority to the lowest key that was pressed AUTO2 The timing at which keys will sound will be assigned automatically giving priority to the highest key that was pressed PHRASE Pressing a single key will sound the phrase based on the pitch of that key If multiple keys are pressed the last pressed key will be valid Keyboard Velocity REAL 1 127 Specifies the loudness o...

Страница 43: ... changes the way in which the chord is sounded For more about chord forms refer to Chord Memory List p 176 6 To turn the function off press the CHORD MEMORY button once again to make it go dark Chord Memory Settings Here s how to edit the chord memory settings 1 Press the CHORD MEMORY button The CHORD MEMORY screen appears MEMO By holding down the SHIFT button and pressing the CHORD MEMORY button ...

Страница 44: ... six rhythm patterns You can specify a rhythm pattern for Intro Pattern A Pattern D and Ending and save them as a rhythm pattern group The FANTOM provides the following rhythm pattern group Rhythm Pattern Group Explanation PRST PRESET These are rhythm pattern groups that cannot be rewritten Rhythm pattern settings that you edit can be saved as a user group USER These are rhythm pattern groups that...

Страница 45: ...ay a rhythm pattern that s assigned as Intro playback automatically switches to Pattern A when the Intro has finished playing If you play a rhythm pattern that s assigned as Ending the rhythm pattern automatically stops when the Ending has finished playing Editing a Rhythm Pattern Group You can edit a rhythm pattern group and freely assign rhythm patterns to it 1 Press the RHYTHM PTN button The RH...

Страница 46: ... is saved Changing theTempo of the Rhythm Pattern Here s how to change the tempo of the rhythm pattern MEMO The tempo that you specify here is common with the arpeggio tempo p 41 and the sequencer tempo p 111 The tempo value is stored in the scene 1 Press the TEMPO button The TEMPO screen appears Menu Explanation E5 CLICK If this is on a click is heard at the specified tempo E6 CLOSE Closes the sc...

Страница 47: ...EL 3 Press the PAN LEVEL button to make it light 4 Move a control knob or slider The pan or volume of the corresponding zone changes When you use a control knob or slider to edit a setting the edited parameter and its value appears in a popup window The popup window automatically closes after a time For some parameters a popup window does not appear MEMO When controlling PAN LEVEL the control knob...

Страница 48: ... S1 button S2 button Various parameters and functions can be assigned To use the assigned function press the button MEMO Operating these general purpose controllers affects the zone s that are heard when you play the keyboard If you re using layered settings multiple zones are affected If you re not using layered settings the current zone is affected The functions assigned to these general purpose...

Страница 49: ...filter response changes according to the type you select PARAM button Accesses the FILTER setting screen of the TONE EDIT ZOOM screen AMP section This specifies time varying changes in pitch tonal character and volume Controller Explanation AMP button Displays AMP ENV in the TONE EDIT screen FX section This applies various effects to the sound Controller Explanation FX button Access the MFX EDIT s...

Страница 50: ...nal pad function on off in the same way as the MOTIONAL PAD button AUTO If this is on the pointer moves automatically HOLD If this is on the most recent pointer position is held when you take your finger off the screen If this is off the pointer position is reset when you take your finger off the screen EXIT Returns you to the previous screen 2 While holding down a key drag the circle pointer in t...

Страница 51: ...ss the MOTIONAL PAD button The MOTIONAL PAD screen appears 2 Touch EDIT The MOTIONAL PAD EDIT screen appears 3 Select the desired parameter and edit its value Parameter Value Explanation Motional Pad Cross Fade Range 0 127 Specifies the extent to which the sound is mixed between adjacent areas Motional Pad Area1 4 Min 0 127 Specifies the minimum value for the variable range of each area Motional P...

Страница 52: ...52 52 Memo Memo ...

Страница 53: ...ize 64 Initializing a Partial Partial Initialize 65 Copying a Partial Partial Copy 65 Using the Edit Knobs 65 Editing the Effects 66 Basic Procedure for Effect Editing 66 Editing the Effects of Each Zone 66 Editing Effects Shared by All Zones 68 Editing the System Wide Effects 69 Adding a Multi Effect to the Entire Sound TFX 70 Editing the Sampling Input Effects 70 Applying Effects to the Sampler ...

Страница 54: ...der parameters AUDIO IN must be turned on to use this SONG Sets whether to use the sequencer or the SMF player MEMO For details on the parameters refer to Parameter Guide PDF Initializing a Scene UTILITY 1 On the SCENE EDIT screen touch UTILITY The UTILITY window appears Menu Explanation SCENE INITIALIZE Initializes all settings of the current scene SOUND CONTROL INITIALIZE Initializes only the cu...

Страница 55: ... MIDI messages sent by each zone LEVEL PAN Specifies settings for the level pan and send level sent by each zone KEY RANGE Specifies settings for the key range sent by each zone VEL RANGE Specifies settings for the velocity range sent by each zone Pitch Specifies pitch related settings sent by each zone OFFSET Specifies offset values for parameters such as cutoff and resonance sent by each zone MO...

Страница 56: ...e RENAME screen appears Enter a memo as described in the directions for the RENAME screen p 16 4 When you have finished editing touch WRITE The settings are overwritten onto the current scene and you return to the SCENE screen Saving a Scene The edited zone and tone settings and the recorded data are temporary They will be lost if you turn off the power or select another scene or tone If you want ...

Страница 57: ... scene scene parameters Settings for each zone zone parameters Settings related to the appearance of a scene such as memo and rating Arpeggio settings Chord memory settings Rhythm pattern settings Pad settings Effect settings shared by all zones IFX1 IFX2 REVERB CHORUS Vocoder settings Sequencer pattern data Sequencer group data Sequencer song data ...

Страница 58: ...s Z Core then press the MENU button and touch TONE EDIT The TONE EDIT ZOOM screen appears The TONE EDIT ZOOM shows the main parameters graphically and lets you edit them intuitively Menu Explanation E1 Scrolls up or down through the tabs E2 E6 Edit the corresponding parameters The corresponding parameters change depending on the cursor location Partial Sw Turn a partial on off Partials that are of...

Страница 59: ... For details on the tone parameters refer to Parameter Guide PDF Selecting Partials Select the partial TONE EDIT screen Operation Explanation Touch the Partial 1 4 tab Selects the partial you press Touch the SHIFT Partial 1 4 tab Selects multiple partials that you press When PAD MODE is set to Partial Sw Sel Operation Explanation Press the pad 5 8 Selects the partial you press Press pads 5 8 toget...

Страница 60: ...e and you can change the current note by pressing a key on the keyboard MEMO When using the PRO Edit screen you can move the cursor to the note number and select the key to edit 3 Move the cursor to Inst Number and select an instrument Change the instrument if necessary Instruments are preset drum sounds and changing the instrument affects the parameters below the INST COMMON tab It s useful to se...

Страница 61: ...NTROL Settings for controlling MFX via MIDI VTW Organ TONE TYPE VTW Use TONE EDIT or the PARAM buttons to edit the VTW ZOOM EDIT WHEEL screen Tab When using the E1 knob to scroll and select the parameters to set are shown on the right side UTILITY Touch this to show the tone initialization menu Harmonic bars Drag the bars shown onscreen to edit the parameters You can also use sliders 1 8 to do thi...

Страница 62: ...or buttons for this Knobs E2 E6 The parameters in this area are assigned Press or turn the knobs to edit a parameter SuperNATURAL Acoustic PianoTone TONE TYPE SN AP For SuperNATURAL Acoustic Piano tones you can select one instrument and edit parameters that are specific to that instrument MFX MFX Inst Inst MEMO To use the SN AP tones an SN AP tone expansion must be installed p 171 The SN AP expans...

Страница 63: ... parameters MFX Settings related to multi effects MFX CONTROL Settings for controlling MFX via MIDI MODELTone TONE TYPE MODEL With the Model tones you edit the parameters that are unique to their respective model bank MFX MFX VCO 1 VCO 1 HPF HPF LFO LFO VCF VCF ENV 1 ENV 1 VCA VCA ENV 2 ENV 2 VCO 2 VCO 2 Model Bank JP8 MEMO To use the Model tones a Model tone expansion must be installed For detail...

Страница 64: ...reen When you have finished editing the name select E6 OK to close the window 4 Use the VALUE dial or the DEC INC buttons to select the save destination 5 Select E6 OK A confirmation message appears If you decide to cancel choose E5 CANCEL 6 Select E5 OK The tone is saved NOTE Never turn off the power while data is being saved Initializing aTone Tone Initialize Here s how to initialize the setting...

Страница 65: ...lization is in progress Copying a Partial Partial Copy Here s how to copy the settings of a partial a key in a ZEN Core tone or Drum Kit tone 1 On the TONE EDIT screen touch UTILITY The UTILITY window appears 2 Select PARTIAL COPY The PARTIAL COPY window appears 3 Select the copy source SOURCE partial and the copy destination DEST partial In the case of a Drum Kit tone select the key 4 Select E6 O...

Страница 66: ...uding USB and click 1 Press the MENU button The MENU screen appears 2 Touch EFFECTS EDIT The EFFECTS EDIT screen appears 3 Touch the desired tab to switch screens as needed Menu Explanation INTERNAL Settings for the internal sound engine s effects and routing AUDIO IN Settings for the sampling input effect PAD Settings for sampler pad routing USB Settings for routing the input from USB CLICK Setti...

Страница 67: ...his is valid only for one specified zone the zone specified as the Drum Kit Comp Zone 2 Move the cursor to the desired parameter and edit the value 3 If you want to make detailed edits touch EDIT in the section that you want to edit The EFFECT PRO EDIT screen appears Menu Explanation E1 Scrolls the cursor up or down E6 Edits the parameter that is selected by the cursor MEMO These parameters can al...

Страница 68: ...ect type and the send level and output destination from the IFX CHORUS REVERB In this screen you can edit major parameters such as the CHORUS REVERB on off status the send levels from the zone the effect type the effect level and the output destination 4 Move the cursor to the desired parameter and edit the value 5 If you want to make detailed edits touch EDIT in the section that you want to edit ...

Страница 69: ...rs such as the M COMP M EQ TFX on off status 4 Move the cursor to the desired parameter and edit the value 5 If you want to make detailed edits touch EDIT in the section that you want to edit Menu Explanation E1 Scrolls the cursor up or down E6 M COMP Edits the parameter that is selected by the cursor E2 E6 M EQ Edits the corresponding parameter The corresponding parameter changes depending on the...

Страница 70: ...gs For details on the parameters not related to effects refer to Sampling p 97 Turning each effect on off 2 In the screen touch LOWCUT EQ or REV to turn each effect on off Editing the parameters 1 In the section that you want to edit touch EDIT Either the INPUT FX screen or the INPUT REVERB EDIT screen appears To edit the various effects in INPUT FX touch EDIT for the section you want to edit MEMO...

Страница 71: ...is fixed as the SUB OUT jacks but you can choose the output destination jacks to which USB MASTER is routed 1 On the EFFECTS EDIT screen touch the USB tab 2 Select the USB MASTER output destination USB Audio Input Destination 1 The output destination changes according to this setting Specifying the ClickTone Output Destination Here s how to specify the output destination for the click that is used...

Страница 72: ...the chorus send amount of the current zone REV SEND E4 knob 1 0 127 Specifies the reverb send amount of the current zone PAN E5 knob 1 L64 R63 Specifies the pan stereo position of the current zone LEVEL E6 knob 1 0 127 Specifies the level volume of the current zone LEVEL E6 knob 2 0 127 Specifies the level of MAIN and SUB output MFX OFF ON Turns MFX on off for each zone IFX1 IFX2 CHO REV CMP MEQ O...

Страница 73: ...pears EQ on off Cursor 2 Edit the parameters as necessary Parameter Value Explanation EQ OFF ON Turns the ZONE EQ on off E1 knob Moves the cursor up down E2 E4 knob Edit the corresponding parameters depending on the cursor position For the example shown in the illustration above E2 corresponds to LOW Gain E3 to MID Gain and E4 to HIGH Gain respectively Input Gain E5 knob 24 24dB Specifies the inpu...

Страница 74: ...elect a chain set E5 CANCEL Cancels E6 OK Selects a chain set Parameter Value Explanation CHAIN SET 001 100 Chain set number 4 Press a tone category button 1 16 to select a scene The 16 scenes arranged horizontally in the screen correspond to tone category buttons 1 16 respectively You can also select a scene by directly touching a scene icon in the screen You can also use the INC DEC buttons ã â ...

Страница 75: ...name Marker pulldown menu Scene list Selected scene memo The screen display changes each time you press the CHAIN button Menu Explanation ã DEC E1 BWD Returns to the previous chain â INC E3 FWD Advances to the next chain à E5 MARKER Jumps to the previous marker á E6 MARKER Jumps to the next marker SHIFT à Selects the previous chain set SHIFT á Selects the next chain set Chain set useful functions ...

Страница 76: ...you want to re select a different scene for the registered position you can touch Select Scene from this state and reselect the scene 7 To register the next scene touch the box that contains the word Next The position to be registered moves one place to the right and the Next box is highlighted 8 Repeat steps 4 7 to register the necessary scenes Scenes are registered consecutively from the left ed...

Страница 77: ...ied or cut scene onto the highlighted position Insert Inserts the copied or cut scene at the highlighted position Swap Swaps the positions of two scenes INDIVIDUAL Selects and swaps the two scenes MARKER SELECTION Selects a given marker and all the scenes leading up to the next marker and swaps them together MARKER E1 Sets a marker at the highlighted scene You can use 62 markers from 0 9 A Z and a...

Страница 78: ...78 78 Memo Memo ...

Страница 79: ...rnal Memory Usage as a Graph WAVE EXPANSION MEMORY INFO 91 Optimizing the Sample Storage Area 91 Importing Sample Data IMPORT 91 Playing Pad Samples 93 Pressing Pads to Play Pad Samples 93 Sustaining the Pad Sample Playback Hold 93 Switching Banks 93 Moving Copying a Pad Sample 94 Moving a Pad Sample 94 Copying a Pad Sample 94 About the SAMPLE PAD Screen 94 Sampling To Pad 95 Preparing for Samplin...

Страница 80: ...ltisample function User Sample Data that you sample on this unit or import as audio files is called user samples There are two kinds of user samples Pad samples and Kbd keyboard samples Pad Sample Pad samples are effective for playing long phrases adding sound effects and so on Kbd Sample Kbd samples are effective for playing samples back in different pitches using the keyboard Samples are treated...

Страница 81: ...h memory but the samples may not save depending on how much memory is left 1 Connect the device audio device or mic you want to sample as necessary to the MIC LINE INPUT jack MEMO To sample an audio device in stereo connect the left channel to L MONO jack and the right channel to R jack 2 Press the SAMPLING button The SAMPLING MENU screen appears 3 Touch SAMPLING To Keyboard The SAMPLING STANDBY T...

Страница 82: ...mple while pressing this knob WRITE Saves the sample parameters RELOAD Reloads the sample parameters MODIFY Adds various effects to the sample UTILITY Displays the Kbd Sample Utility p 89 10 Edit the desired parameters Parameter Value Explanation START POINT 000000000 This is the playback start position Use this setting to skip unnecessary parts at the beginning of the waveform when it plays back ...

Страница 83: ...here you want to save the sample 4 Touch Sampling Mode to select the sampling mode 5 Set the input volume as necessary 6 Configure the sampling settings Parameter Explanation Destination This is the filename used to save the wave after sampling Touch RENAME to change the filename You can change the first 12 characters of the filename A four digit number starting with 0001 and counting up is append...

Страница 84: ...TING screen appears Name of file to be imported 6 Edit the desired parameters Menu Explanation Destination Tone Select the number of the user tone that uses the audio file you imported Emphasis When this is ON pre emphasis which emphasizes the high end of the sample is applied to the imported sound E1 PREVIEW You can preview the audio file while pressing this knob E2 Loop Mode Selects how the samp...

Страница 85: ...ning the VALUE dial while holding down the SHIFT button When you select multiple files the first file is previewed MEMO You can select the INTERNAL STORAGE tab and import the audio files in the LIBRARY folder 5 Select E6 IMPORT The IMPORT SAMPLE TO MULTISAMPLE SETTING screen appears Information of file to import Name of tone where the file is written to 6 Edit the desired parameters Menu Explanati...

Страница 86: ... Lower row A 128 note keyboard is always shown The lighter area turns into a scrollbar when the keyboard is magnified Red keys current note Green keys range of multiple notes selected This represents the area used for Assign or No Assign p 87 Waveform display area Shows the sample waveform assigned to the selected area Area list Displays information for the samples areas currently assigned to the ...

Страница 87: ...ves the multisample MANAGER Accesses the MULTISAMPLE MANAGER screen UTILITY This is the UTILITY menu for multisamples Managing Samples for Key Areas MULTISAMPLE MANAGER You can call up this screen from the MULTISAMPLE EDIT PRO EDIT screens Here you can set the individual parameters of each sample that was assigned when the multisample was created You can also add delete or change samples that are ...

Страница 88: ...down the SHIFT button the check boxes of samples marked for editing are selected as well Menu Explanation E3 PARAM EDIT Switches to the SAMPLE PARAMETER screen E4 WAVE EDIT Switches to the KBD SAMPLE WAVE EDIT screen E6 PREVIEW Previews the sample selected by the cursor WRITE Saves the sample parameters RELOAD Reloads the sample parameters MODIFY Adds various effects to the sample UTILITY Displays...

Страница 89: ...MPLE WAVE EDIT KBD SAMPLE LIST and SAMPLE PARAMETER you can use the SAMPLE UTILITY function to perform various tasks like changing the names of samples moving copying and so on The menu is different for each screen 1 In a screen where the utility functions are available select the desired sample s You can select the check boxes of samples for multiple selections 2 Touch UTILITY The KBD SAMPLE UTIL...

Страница 90: ...vel of the entire sample without exceeding the maximum level Creating aTone with Multiple Multisamples MULTISAMPLE VIEW You can combine more than one multisample that you created to make a single tone For example you can create a tone using up to four multisamples which captures the character of softly or strongly played notes on an instrument Assign each multisample to a different partial and the...

Страница 91: ... MEMORY INFO screen A confirmation message appears If you decide to cancel select E6 CANCEL 2 Select E5 OK This optimizes the Kbd sample storage area NOTE Never turn off the power while you see the message working on the screen Importing Sample Data IMPORT This imports FANTOM sample data from an svz file on a USB flash drive 1 Copy the file with the svz extension to import onto your USB flash driv...

Страница 92: ... button 10 Select E6 NEXT The IMPORT SAMPLE SELECT DESTINATION screen is displayed This list shows the samples in the FANTOM No marked no of items Imported samples Samples used by ZEN Core drum tones 11 Touch the check box to the left of a sample to select it as the import destination You can t select the check box if there is already a sample at that import destination 12 Select E6 EXECUTE A conf...

Страница 93: ...es and a maximum of four for stereo samples Sustaining the Pad Sample Playback Hold 1 While you hold down a pad press the HOLD button The pad sample continues playing even after you take your finger off the pad To stop the pad sample press the pad once again MEMO The hold function is available only for samples whose GATE parameter is turned on p 99 If the sound won t stop Rapidly press the HOLD bu...

Страница 94: ... pad The pad sample is copied If there is a pad sample in the copy destination pad the message Overwrite appears Press E5 OK if you want to overwrite or press E6 CANCEL if you want to cancel About the SAMPLE PAD Screen In the SAMPLE PAD screen you can view information about the currently selected bank and the pad samples that are assigned to each pad in that bank 1 Hold down the SHIFT button and p...

Страница 95: ...GER LEVEL E1 IN None E4 E1 TRIG TEMPO Changes the click tempo E1 IN REC LEVEL Set the sampling level E5 CANCEL Cancels the sampling standby state E6 START Starts sampling Click Turns the click tone on off Sampling Mode Selects the sampling mode input source Format Selects the sampling format 4 Note that the bank and number of the sample pad you re sampling are shown in the SAMPLE PAD display area ...

Страница 96: ...he USB COMPUTER port Input effects such as Low Cut and EQ do not apply to the audio input from the USB COMPUTER port 1 In the SAMPLING STANDBY screen adjust the input volume Adjust the volume as high as possible without allowing the level meter in the right of the screen to clip Connected device Explanation Computer Adjust using E4 REC LEVEL the level control on your computer and the USB Audio Inp...

Страница 97: ...unter advances If you specified AUTOTRIGGER OFF in step 1 Sampling starts the moment that you touch START Produce sound on the device that s connected to the FANTOM If you specified AUTOTRIGGER ON in step 1 Produce sound on the device that s connected to the FANTOM Sampling starts when the input signal exceeds the level specified by AUTO TRIGGER LEVEL 3 Touch STOP at the moment that you want to st...

Страница 98: ...ly 2 Select E4 AUTO IMPORT A confirmation message appears 3 Select E5 OK To execute AUTO IMPORT If you decide to cancel choose E6 CANCEL MEMO If there are not enough empty pads for the import operation the message Not Found Empty PAD was not found appears In advance use the DELETE function to prepare a sufficient number of empty pads before you execute the import operation To execute IMPORT 1 Touc...

Страница 99: ... the pad sample ON or not applied OFF MEMO Master FX can be applied to the sample 5 When you have finished editing select E2 QUICK EDIT once again to return to the SAMPLE PAD screen UsingWave Edit Wave Edit lets you make detailed settings for each pad sample 1 Hold down the SHIFT button and press the SAMPLING button The SAMPLE PAD screen appears 2 Touch a BANK tab to select a bank 3 Touch the desi...

Страница 100: ...er the effect will ON or will not OFF be applied to the sample MEMO You can apply Master FX to the sample 6 When you have finished editing press the EXIT button to return to the SAMPLE PAD screen MEMO The pad sample is saved automatically Using the Sample Utility Functions In addition to Quick Edit and Wave Edit you can use the Sample Utility functions to do various things such as rename a pad sam...

Страница 101: ... 4 1 On the SAMPLE PAD screen touch SAMPLE UTILITY The SAMPLE UTILITY window appears 2 Touch DELETE ALL A confirmation message appears If you decide to cancel select E6 CANCEL 3 Select E5 OK All pad samples are deleted Exporting the Pad Sample inWAV Format EXPORT WAV Here s how to export the pad sample in WAV format 1 In the SAMPLE PAD screen touch SAMPLE UTILITY Alternatively in the WAVE EDIT scr...

Страница 102: ...pears If you decide to cancel select E6 CANCEL 3 Select E5 OK All samples are exported 4 Select E6 CLOSE to close the screen The exported WAV file is saved in the EXPORT SAMPLE folder of the USB flash drive If the export destination contains a file of the same name the message Duplicate File Name Overwrite it appears Select E5 OK to overwrite or select E6 CANCEL to cancel NOTE Never turn off the p...

Страница 103: ...hem On Off Partial Sw Sel 105 Controlling a DAW DAW Control 105 Switching Zone Mute Zone Mute 106 Switching Zone Solo Zone Solo 106 Turning the Keyboard Switch Group On Off Kbd Sw Group 106 Playing Rhythm Patterns Rhythm Pattern 107 Selecting and Playing a Pattern Pattern 107 Playing a Pattern s Variations Variation Play 107 Playing Groups Group Play 107 Using the System Settings System 107 ...

Страница 104: ...ions 11 Group Play The pads play back the sequencer group 16 System The pads use the Pad Mode system settings MEMO After selecting a pad mode you can hold down the SHIFT button and press the PAD MODE button to access the edit screen for the selected function Playing Samples Sample Pad The pads play samples MEMO For details on using the sample pads refer to Pressing Pads to Play Pad Samples p 93 Pl...

Страница 105: ... a drum kit tone you can select and turn on off the wave of the selected key This function might be disabled depending on the tone being used Controlling a DAW DAW Control You can use the pads to control supported DAW software Logic Pro X MainStage Ableton Live NOTE Use this function when you want to use the DAW CTRL function to control Logic Pro X MainStage Ableton Live on a computer connected vi...

Страница 106: ...lo multiple zones The pad number corresponds to the zone number This is the same function as solo in the MIXER screen Turning the Keyboard Switch Group On Off Kbd Sw Group You can use the pads to switch between pre assigned keyboard switch groups MEMO Kbd Sw Group keyboard switch group lets you handle a combination of the on off status for each zone s ZONE INT EXT button as one of 16 keyboard swit...

Страница 107: ... the 4x4 area enclosed by the red frame The pads corresponding to the recorded pattern box are lit You can hold down the SHIFT button and press the PAD MODE button to access the PAD AREA SELECT screen and use the à á ã â buttons to move the 4x4 area Playing a Pattern sVariations Variation Play You can press pads to directly play each variation from the next measure location Example Play variation ...

Страница 108: ...108 108 Memo Memo ...

Страница 109: ...25 Operations of the E1 E6 Knobs 126 Microscope 126 Convenient Functions Pattern Utility 126 Applying Various Edits MODIFY 128 Importing SMF as a Pattern IMPORT 130 Exporting a Pattern as SMF EXPORT 130 Saving a Pattern 131 How to Create a Group 132 Creating a Group 132 Naming a Group RENAME 132 Editing a Group 133 Basic Operation in the GROUP Screen 133 Specifying the Loop Settings Length 133 Nam...

Страница 110: ...2 PLAY TRACK3 PLAY TRACK4 PLAY TRACK5 PLAY TRACK6 PLAY TRACK16 PLAY PATTERN Group The combination of patterns created for each track is called a group You can create groups such as Intro Verse or Fill corresponding to each section of your song A E B F C G D H TRACK1 PLAY TRACK2 PLAY TRACK3 PLAY TRACK4 PLAY TRACK5 PLAY TRACK6 PLAY TRACK16 PLAY GROUP 01 Intro GROUP Song The groups you create can be ...

Страница 111: ...nstrument icon when the 16Tr View is shown MUTE Lets you mute the playback of patterns for individual tracks SOLO Performs solo playback of the selected track Play standby If you long touch an already recorded pattern box in a track the pattern box changes to be highlighted This indicates play standby meaning that it will play when you press the øPLAY button Only one pattern box in each track can ...

Страница 112: ...ed pattern box 2 Select E1 LOOP SETTING The LOOP SETTING screen appears Loop region Measure number Pattern data area Ranges that are shown in brighter colors in the pattern data area indicate loop ranges In the pattern data area the presence or absence of note data is shown as a simple piano roll display 3 Edit the loop parameters Parameter Value Explanation E1 LOOP SW OFF ON Turns looping on off ...

Страница 113: ...MEMO The mute status of each track is saved in the scene 1 In the PATTERN screen touch MUTE to select The MUTE SELECT screen appears 2 Touch the track that you want to mute The icon of the track you touch changes color and the track playback is muted Muted track By touching ALL ON OFF in the screen you can mute unmute all tracks in a single operation 3 When you are finished making settings press t...

Страница 114: ...e muted Even if you switch a soloed track between variations A H the track s soloed status is maintained Soloed track Playing Group 1 Select a scene Select a scene in which a song is created Scenes in which a song is created have a SONG indication as shown in the illustration 2 Press the GROUP button The GROUP screen appears Current group Group list Play icon Group name The left side of the screen...

Страница 115: ...wn in an empty group box Number of loops Group number Simplified indication of playback position Group name 3 Press the øPLAY button The song plays and the groups play in numerical order The currently playing group the current group is indicated by a green group box 4 Press the ðSTOP button to stop playback Showing theTimeline as Measures MEAS Numbers that indicate the playback order are shown abo...

Страница 116: ...a from any stage in this process it s easy to move your production environment between systems For example you could create the basis of your song on the FANTOM and then carry out the mastering and mixdown using DAW software on your computer Preparing for Recording 1 Select a scene 2 Select a sound for the zone Import as SMF Export as SMF Creating a Group Editing a group p 133 Creating a Song Edit...

Страница 117: ...tions can be done even while a pattern is playing you can t perform recording operations from the GROUP screen or the SONG screen 2 Make settings for recording Directly touch parameters in the screen to select them or use the VALUE dial to edit the value TRACK PATTERN Recording parameter Recording parameter Value Explanation Count In Selects the way in which recording is started NONE Recording beg...

Страница 118: ...CHANNEL AFTER Channel aftertouch messages POLY AFTER Polyphonic aftertouch messages E5 CLICK OFF ON Turns the click metronome on off Tempo E4 knob 5 300 Specifies the tempo Length E3 knob 1 64 Ver 1 01 or later Specifies the length of the pattern 3 Make TRACK PATTERN settings Recording parameter Value Explanation NEW MIX MIX Overdub record onto the pattern of the selected track NEW Newly record on...

Страница 119: ... function lets you erase unwanted data during realtime recording In particular when LOOP REC SW is on you can use this to conveniently erase just an unwanted portion while you continue recording 1 Start realtime recording p 117 2 In the REALTIME RECORDING screen select E1 ERASE The REALTIME ERASE screen appears Lower limit key Upper limit key Playback position indicator 3 Erase unwanted data Opera...

Страница 120: ...tep time You can record a chord by playing multiple notes simultaneously 6 Repeat steps 4 5 to record each step You can use the following functions while recording Menu Explanation E1 REST Enters a rest E2 STEP BACK Deletes the step data returning to the input location one step earlier E6 Step Changes the input location TIE Inputs a tie UNTIE Deletes the tie that was input immediately before If yo...

Страница 121: ...arameter Value Explanation NEW MIX MIX Overdub records onto a pattern of the selected track NEW Newly records into an empty pattern of the selected track Recording parameter Value Explanation TRACK 1 16 Selects the track to record PATTERN A H Selects the pattern of the track to record As described in step 3 of Realtime Recording select the track and pattern that you want to record 3 Select E2 TR R...

Страница 122: ...hat you want to input When you specify an instrument or pitch the yellow frame in the screen moves correspondingly 6 Press the tone category buttons 1 16 to illuminate the steps at which you want a note to play HH SD BD Ŋ Ŋ Ŋ Ŋ Notes are entered at the corresponding step locations in the screen To delete a note press a lit tone category button 1 16 to make it go dark You can also press the øPLAY b...

Страница 123: ...at are entered Even if you specify the duration pressing COPY overwrites the copied duration setting Menu Explanation E2 Velocity Specifies the velocity of the notes that are entered Even if you specify the velocity pressing COPY overwrites the copied velocity setting E3 Zoom H Changes the display zoom in the horizontal direction Depending on the Zoom H and Grid settings the grid spacing might bec...

Страница 124: ...he beginning start point and end end point of the performance data Tracing on an area that already contains performance data erases the performance data within the start and end points TARGET Selects the performance data to input MODULATION CC01 Modulation VOLUME CC07 Volume PAN CC10 Pan EXPRESSION CC11 Expression GENERAL 1 CC16 General 1 4 GENERAL 2 CC17 GENERAL 3 CC18 GENERAL 4 CC19 HOLD CC64 Ho...

Страница 125: ... clear the selection of the note that you touched Dragging a Note to Copy It A note selected in the piano roll screen can be copied by dragging it 1 In the PATTERN screen select the pattern that you want to edit and then press the E3 EDIT The EDIT SELECT screen appears 2 Select PIANO ROLL The PIANO ROLL screen appears 3 Touch the note that you want to copy selecting it You can also select multiple...

Страница 126: ...s the value of the selected parameter ENTER Transmits the selected performance data If this includes a note message you will hear the corresponding sound Convenient Functions Pattern Utility By using pattern utility functions you can copy and paste a selected pattern to modify the overall structure or you can delete unneeded patterns Other useful functions are also provided such as assigning a nam...

Страница 127: ...lect the pattern that you want to delete and then touch DELETE The DELETE MENU appears Menu Explanation DELETE Deletes only the currently selected pattern Menu Explanation DELETE ALL Deletes the patterns from all tracks in the scene Undo is not available for this operation 2 Touch the function that you want to execute A confirmation message appears 3 Select E5 OK If you decide to cancel choose E6 ...

Страница 128: ...es apply to the region specified in LOOP SETTING p 112 PATTERN Changes apply to the selected pattern Quantize Type Specifies how quantization will occur GRID Grid quantization is applied during editing Use this when you want accurate timing such as for drums or bass SHUFFLE Shuffle quantization is applied during editing Use this when you want to give the rhythm a sense of shuffle or swing Resoluti...

Страница 129: ... VELOCITY This function changes the keyboard dynamics velocity in the specified region Parameter Value Explanation TARGET LOOP Changes apply to the region specified in LOOP SETTING p 112 PATTERN Changes apply to the selected pattern BIAS E1 knob 99 99 Specifies the amount by which the recorded velocity is changed Parameter Value Explanation RANGE MIN E3 knob 0 C 1 127 G9 Specifies the lower limit ...

Страница 130: ...creen 3 Select E6 IMPORT The SMF IMPORT screen appears Menu Explanation E1 Start Specifies the starting measure of the SMF to be imported E2 Length Specifies the number of measures of the SMF to be imported E3 Destination Specifies the import destination track E4 EDIT NAME Renames the pattern name after importing 4 Select E6 OK The import executed and return to the PATTERN screen when it is comple...

Страница 131: ...sed as the file name 10 Select E6 OK Return to the SEQ EXPORT screen 11 Select E4 DESTINATION The EXPORT DESTINATION screen appears 12 Select the export destination folder The selected folder is highlighted You can use the following operations to select the folder Operation Explanation Touching a file name in the screen Directly selects the folder that you touched Operation Explanation E1 knob à b...

Страница 132: ...s the øPLAY button You can audition the group you created to verify that it is the combination that you chose You can also audition by touching the play icon in the group list The GROUP PREVIEW screen is shown during audition Like the PTN screen the GROUP PREVIEW screen shows the current patterns of each track at a glance 8 To stop playback press the ðSTOP button You can also stop by touching the ...

Страница 133: ...his to make it loop in four measure units when played as a group Current group Group list The right side of the screen is called the GROUP Info area This area shows the presence or absence of data for each track in the current group and the length of the current pattern for each track 1 Use the E5 knob to set the Length parameter Loop region Loop region This changes the length for when the group i...

Страница 134: ...re s how the patterns of a group in the currently selected scene can be converted into SMF data and exported to a USB flash drive 1 On the GROUP UTILITY screen select E3 EXPORT The SEQ EXPORT screen appears 2 Make settings in the SEQ EXPORT screen as described in steps 2 14 of Exporting a Pattern as SMF EXPORT p 130 In this case select GROUP as the source 3 Press the EXIT button to return to the G...

Страница 135: ...can have one song NOTE After creating groups or a song the data you created will be lost if you switch to a different scene or turn off the power without saving the scene Editing a Song Even after creating a song you can edit the song structure in the SONG screen Basic Operation in the SONG Screen 1 Press the SONG button The SONG screen appears 2 Select a function and edit the parameters Menu Expl...

Страница 136: ... à á ã â buttons or by directly touching the group box 4 Use knobs E1 E6 to select the operation that you want to execute 5 Edit the settings of the menu item you selected Menu Explanation E1 MOVE Moves a group E2 COPY Copies a group and pastes it at another location E3 DELETE Deletes a group E4 LOOP Makes loop playback settings for the entire song E5 Repeat Makes loop playback settings for an ind...

Страница 137: ...ou decide to cancel choose E1 EXIT Deleting a group DELETE Here s how to delete the selected group 1 On the SONG EDIT screen select the group that you want to delete and then select E3 DELETE The selected group is deleted Making loop settings for the entire song LOOP Here s how to specify a loop region for the entire song When song playback enters the loop region the specified region continues pla...

Страница 138: ...of each group box icon Number of repeats MEMO Loop settings for the entire song can be used together with loop settings for individual groups Adjusting the Pan andVolume Balance When you ve finished creating your patterns and song adjust the balance and pan as necessary These adjustments can be made most conveniently in the MIXER screen where you can adjust the balance between zones while editing ...

Страница 139: ...tion one measure backwards with each press ø ð Plays back and stops the SMF ù Moves the current location one measure forwards with each press MUTE Sets the track to mute SOLO Sets the track to solo TRANSPOSE à á Sets the transposition Button Explanation E1 Jump to LOOP A Moves to AB LOOP point A E2 Loop A Sets the position of AB LOOP point A E3 Loop On Off Turns AB LOOP on off E4 Loop B Sets the p...

Страница 140: ...the track you want to mute The color of the icon for the track you touched changes and the track s playback is muted Touch ALL ON OFF in the screen for the track that s muted to mute unmute all tracks at once 3 When you re finished with the settings press the EXIT button to return to the SMF CONTROL screen Soloing aTrack SOLO You can make a selected track play back by itself in solo Tracks can als...

Страница 141: ...ing the USB Audio Input 142 Adjusting the USB Audio Output 143 Controlling an External MIDI Device EXT MIDI OUT 144 Controlling an External MIDI Device EXT MIDI OUT 144 Using the Vocoder 146 Using an External Device or a Mic 146 Using the Vocoder 147 Connecting a Mic 147 Making Vocoder Settings 147 Preventing Acoustic Feedback 149 Editing the Vocoder 149 Saving the VOCODER SETTING 150 ...

Страница 142: ...lable 5 Press the WRITE button to save the SYSTEM settings 6 Turn this unit s power off and then on again Performing Live with a Plug in Synthesizer You can use the FANTOM to play a plug in synthesizer that s installed on your computer In this case you can route the audio output of your plug in synthesizer via USB audio into the FANTOM so that it is heard from the OUTPUT jacks of the FANTOM Perfor...

Страница 143: ...audio to a USB connected computer 1 Press the MENU button 2 Touch MIXER The MIXER screen appears MEMO You can display the MIXER screen by pressing the PAN LEVEL button while holding down the SHIFT button 3 Select OUT USB at the bottom of the screen 4 Move the cursor to USB OUT and adjust the output level ...

Страница 144: ... internal sound engine nor the external sound module produce sound when you play the keyboard You can use the internal sequencer or MIDI data from an external device to play the internal sound engine ADVANCED The internal sound engine and external sound module play only when the ZONE INT EXT buttons for all zones are off unlit and you play the keyboard Button status When the applicable zone is the...

Страница 145: ...on or both the PAN LEVEL and ASSIGN buttons to make them light up The function to be controlled depends on which button you press Button Explanation ASSIGN button Uses ASSIGN1 SCENE PAN LEVEL button ASSIGN button Uses ASSIGN2 SYSTEM 2 Select a zone set to EXT as the current zone As necessary specify layering as well 3 Move the control knobs or sliders MIDI messages are output according to the assi...

Страница 146: ...ate a musical signal the carrier rather than the waveform produced by the vocal cords Resonances formants produced by the vocal tract shape of the throat and larynx and movements of the mouth Vocal cords carrier Performance tips Vocoder is constructed so that elements other than pitch are expressed by your voice via the microphone You play the keyboard to control the pitch Vocoder won t produce so...

Страница 147: ...nd Initially set the knob to approximately the middle MakingVocoder Settings After you have made connections make settings for using the vocoder 1 Select a scene 2 Press the MENU button The MENU screen appears 3 Touch EFFECTS EDIT The EFFECTS EDIT screen appears 4 Touch AUDIO IN Peak indicator Level meter To ZOOM EDIT Vocoder On Off Changes in the screen VOCODER and NS Noise Suppressor have been a...

Страница 148: ...er settings You can also customize your own vocoder settings and save them to the user bank p 150 The following VOCODER SETTING templates are provided as presets PRESET Name Explanation 001 Voc Large Choir A rich choir like sound with spacious stereo 002 Voc Future Lead A sharply distinctive sound with an aggressively changing Sync tone 003 Voc Ensamble A standard ensemble sound 004 Voc Robot A sy...

Страница 149: ...r to not work as you intend In this case adjust the mic sensitivity or the INPUT FX noise suppressor NS to reduce the noise that s being received Depending on the position of the mic and your external speaker acoustic feedback a howl or screech might occur In this case take the following actions Changing the orientation of the microphone s Relocating microphone s at a greater distance from speaker...

Страница 150: ... After you have edited the name select E6 OK to close the window 3 Use the VALUE dial or the DEC INC buttons to select the save destination 4 Select E6 OK A confirmation message appears If you decide to cancel select E6 CANCEL 5 Select E5 OK The settings are saved in the user bank MEMO If you also save the scene after you save the settings in the user bank you can then simply select the scene next...

Страница 151: ...ties 162 Basic Procedure for File Utilities 162 Renaming a File or Folder RENAME 162 Deleting a File or Folder DELETE 162 Copying a File or Folder COPY 163 Moving a File or Folder MOVE 163 Creating a New Folder CREATE FOLDER 163 Settings for the Entire FANTOM 164 Basic Procedure for System Settings 164 Saving the System Settings 164 System Parameter 164 Overall Settings GENERAL 164 Keyboard Settin...

Страница 152: ...orage Area You may find that you can t add new Kbd samples as the free memory might be fragmented after many Kbd samples have been added and deleted Optimizing the memory improves the condition of the sample storage area 1 Select E1 KBD SMPL OPTIMIZE from the WAVE EXPANSION MEMORY INFO screen A confirmation message appears If you decide to cancel choose E6 CANCEL 2 Select E5 OK This optimizes the ...

Страница 153: ...already imported Tones used in a scene 12 Touch the box at the left of the import destination user tone user drum kit to add a check mark NOTE The user tone s selected as the import destination are overwritten 13 Select E6 EXECUTE A confirmation message appears If you decide to cancel select E6 CANCEL 14 Select E5 OK The import is executed and you return to the IMPORT MENU screen Importing Scene D...

Страница 154: ...IAL SCENE is the import destination 12 Select E6 EXECUTE A confirmation message appears If you decide to cancel select E6 CANCEL 13 Select E5 OK The import is executed and you return to the IMPORT MENU screen The tones and drums used in the imported scenes are also imported together Importing Sample Data IMPORT SAMPLE This lets you import the FANTOM sample data from a USB flash drive MEMO Data tha...

Страница 155: ...xported to a USB flash drive as a svz format file MEMO The exported data can also be loaded by another sound module that supports ZEN Core tones such as the Jupiter Xm VTW or SuperNATURAL sounds cannot be exported 1 Insert the USB flash drive into the FANTOM s USB MEMORY connector 2 Press the MENU button The MENU screen appears 3 Touch UTILITY The UTILITY screen appears 4 Touch EXPORT 5 Touch EXPO...

Страница 156: ...k marks E3 SELECT ALL Adds a check mark to all scenes E6 NEXT Proceeds to the next step Menu Explanation Hold down the SHIFT button and touch a check box Adds a check mark to multiple scenes in a single action starting from the tone at the cursor location to the tone that you touched while holding down the SHIFT button 7 Select E6 NEXT The EXPORT SCENE SELECT DESTINATION screen appears Menu Explan...

Страница 157: ...rts the data 8 Use the E1 knob to select the save destination folder 9 To edit the name of the file to save select E2 RENAME and then edit the filename Input the name in the same way as with the RENAME screen that s used elsewhere After editing the name select E6 OK to close the window 10 Select E6 EXECUTE A confirmation message appears To cancel touch E6 CANCEL 11 Select E5 OK The sample data is ...

Страница 158: ...w you can back up all settings stored in the FANTOM to a USB flash drive The following settings are backed up User memory settings e g scenes user tones user rhythm groups System memory settings MEMO Select the INCLUDE KBD SAMPLE check box when doing a backup to back up all sample data assigned to the keyboard NOTE If you back up using the same file name as existing backup data on the USB flash dr...

Страница 159: ...confirmation message appears If you decide to cancel choose E6 CANCEL NOTE If the APPLY PAD SAMPLE APPLY KBD SAMPLE check box is selected an estimate of the required time is shown in the confirmation screen This estimated time is approximate and will not necessarily be precise The actual time will vary depending on the USB flash drive that you use and on the state of internal memory 6 To execute s...

Страница 160: ... appears If you decide to cancel choose E6 CANCEL 5 To execute select E5 OK When the operation is completed the display indicates Completed Please Power Off 6 Turn this unit s power off and then on again NOTE Never turn off the power while the factory reset is in progress Returning the Contents of Internal Storage to the Factory Settings Internal Storage Initialize Here s how you can return the co...

Страница 161: ... 2 Touch UTILITY 3 Touch WALLPAPER The setting screen appears 4 Use the VALUE dial to select a wallpaper Menu Explanation E2 Alpha Adjusts the brightness of the wallpaper E3 R Adjusts the red hues of the wallpaper E4 G Adjusts the green hues of the wallpaper E5 B Adjusts the blue hues of the wallpaper 5 Press the EXIT button to exit the screen The wallpaper settings are saved automatically ...

Страница 162: ...on á button Scroll up down to select a file or folder By holding down the SHIFT button and performing this operation you can select multiple files or folders Operation Explanation ENTER button Expands the contents of a folder Press once again to collapse the expanded contents â button Expands the contents of a folder to make it visible ã button Collapses the expanded contents EXIT button Returns t...

Страница 163: ...ce file or folder and then execute E5 MOVE The FILE UTILITY MOVE DESTINATION screen appears 2 Touch the move destination folder to select it The selected folder is highlighted 3 Select E6 SELECT The move is executed NOTE Never turn off the power or remove the USB flash drives while the screen indicates working Creating a New Folder CREATE FOLDER Here s how to create a new folder 1 In the FILE UTIL...

Страница 164: ...tain time has elapsed If you don t want the unit to turn off automatically choose OFF setting USB Driver VENDOR The dedicated USB driver is used GENERIC The generic driver provided by the operating system is used File Verify OFF ON Verifies the correctness of the file when copying or backing up This provides higher reliability but requires more time to execute LCD Brightness 1 20 Adjusts the brigh...

Страница 165: ...ARP SCREEN The ARPEGGIO screen appears when you operate the ARPEGGIO button to change from OFF to ON Parameter Value Explanation Chord Memory Switch Mode OFF ON The CHORD MEMORY screen does not appear when you operate the CHORD MEMORY button to change from OFF to ON OFF ON CHD SCREEN The CHORD MEMORY screen appears when you operate the CHORD MEMORY button to change from OFF to ON Pedal Settings PE...

Страница 166: ... No function is assigned CC01 31 33 95 Controller number 1 31 33 95 BEND DOWN The same effect as moving the pitch bend lever to the left BEND UP The same effect as moving the pitch bend lever to the right AFT Aftertouch MONO POLY Mono poly switch is assigned MFX SW MFX on off is assigned EQ SW EQ on off is assigned IFX1 SW IFX1 on off is assigned IFX2 SW IFX2 on off is assigned CHORUS SW CHORUS on...

Страница 167: ...ereo recording Other channels are output according to their settings PARALLEL The audio signals output from the FANTOM are output individually from all channels This is convenient for simultaneous multi channel recording Input USB Audio Input Switch OFF ON Specifies whether audio from a computer or other device connected to the USB COMPUTER port is input to the FANTOM ON or is not input OFF USB Au...

Страница 168: ...truments and computers If a MIDI cable is connected between devices equipped with MIDI connectors you ll be able to play multiple devices from a single MIDI keyboard perform ensembles using multiple MIDI instruments program the settings to change automatically as the song progresses and more About MIDI connectors The FANTOM is equipped with the following two types of MIDI connectors each of which ...

Страница 169: ...ion Local Off Sound generator Keyboard DAW Software Synchronization Settings SYNC TEMPO Parameter Value Explanation Sync Mode INTERNAL The FANTOM will be the synchronization master Choose this setting if you re using the FANTOM on its own without synchronizing it to another device or if you want the tempo of an external MIDI device to synchronize with the FANTOM REMOTE The FANTOM will obey start c...

Страница 170: ...ocity of the note messages that are sent when you strike the pads Control Function Settings CONTROL Parameter Value Explanation Control Source Select SYS Use System Control Source 1 4 for tone control SCENE Use the scene s Tone Control Source 1 4 settings for tone control System Control Source1 4 OFF CC01 31 33 95 BEND AFT Specify the MIDI messages that will be used as system controls System Contr...

Страница 171: ... In the EXPANSION screen use the cursor à á buttons to select the tone that you want to remove If you want to remove all tones select E2 UNINSTALL ALL and then proceed to step 3 2 Select E1 UNINSTALL A confirmation message appears If you decide to cancel select E6 CANCEL 3 Select E5 OK The tone is removed NOTE Never turn off the power or remove the USB flash drives while the screen indicates worki...

Страница 172: ...st 1 Select a tone whose TONE TYPE is SN AP and then touch MENU button Ó TONE EDIT The TONE EDIT screen appears Menu Explanation E1 Scrolls up or down through the tabs E2 Scrolls the cursor up down to select a parameter E6 Edits the parameter selected by the cursor Menu Explanation UTILITY Accesses the UTILITY window 2 Move the cursor to the desired parameter and edit the value Tab Explanation COM...

Страница 173: ...or position To PRO Displays the TONE EDIT PRO screen UTILITY Displays the UTILITY window 2 Move the cursor to the desired parameter and edit the value The tabs and parameters differ depending on the model bank selected For details on the parameters see the Owner s Manual for each expansion Deleting the License Information This deletes Roland Cloud license information from the FANTOM unit and also ...

Страница 174: ...174 174 Memo Memo ...

Страница 175: ...10 Appendix 10 Appendix Chord Memory List 176 Block Diagram 178 Error Message List 179 Troubleshooting 181 MIDI Implementation Chart 186 Main Specifications 188 ...

Страница 176: ...j9 D 3 G3 A 3 D4 F4 E Emaj9 E3 G 3 B3 D 4 F 4 F Fmaj9 F3 A3 C4 E4 G4 F Gbmaj9 F 3 A 3 C 4 F4 G 4 G Gmaj9 G3 B3 D4 F 4 A4 G Abmaj9 G 3 C4 D 4 G4 A 4 A Amaj9 A3 C 4 E4 G 4 B4 A Bbmaj9 A 3 D4 F4 A4 C5 B Bmaj9 B3 D 4 F 4 A 4 C 5 Assign Key Chord Name Constituent Notes of Chord Forms C C7 9 C3 A 3 D4 E4 C C 7 9 C 3 F3 B3 D 4 D D7 9 D3 F 3 C4 E4 D D 7 9 D 3 G3 C 4 F4 E E7 9 E3 G 3 D4 G4 F F7 9 F2 A3 D 4...

Страница 177: ...7 9 C3 D 3 A 3 D4 C Db7 9 C 3 F3 B3 D 4 D D 7 9 D3 F3 C4 E4 D Eb7 9 D 3 G3 C 4 F4 E Emaj7 9 E2 G 3 D 4 F 4 F F 7 9 F2 G 3 D 4 G4 F Gbdim7 F 2 A3 C4 D 4 G G7 13 G2 F3 B3 E4 G Ab 6 G 2 B3 D 4 F4 A A 7 b5 A2 C4 D 4 G4 A Bb 7 A 2 G 3 C 4 F4 B B 7 b5 B2 A3 D4 F4 Assign Key Chord Name Constituent Notes of Chord Forms C C4 C5 C C 4 C 5 D D4 D5 D D 4 D 5 E E4 E5 F F4 F5 F F 4 F 5 G G4 G5 G G 4 G 5 A A4 A5...

Страница 178: ...everb Send Audio Input Reverb Comp x 6 for Drum Kit Master EQ Master Comp Main Output Sub Output Master FX to Sub to Sub to Sub to Sub to Sub to Sub to Sub to Rev to Rev to Rev to Rev to Rev to Rev from Rev to Cho to Cho to Cho to Cho to Cho to Cho from Cho Low Cut Drum Kit Comp Zone Input EQ Input Reverb PARTIAL EQ KIT PTL EQ SCENE ZONE2 VTW Organ ZONE1 16 ZEN Core ZONE1 16 Drum Kit MIDI USB MIDI...

Страница 179: ...ort Incorrect Path When using File Utility the Copy Move destination path is invalid A subfolder that includes the Copy Move source cannot be specified as the Copy Move destination Invalid File Folder Name The file or folder name includes characters that cannot be handled by the FANTOM The FANTOM cannot handle files or folders whose name includes the following characters Nor can it handle special ...

Страница 180: ...area of memory is fragmented Execute the OPTIMIZE function to optimize the tone storage area Multiple License In a situation where licenses are not installed you are attempting to simultaneously select and install EXPANSION that have different user licenses Wave Memory Consistency Error The internal file is damaged Execute the UNINSTALL ALL operation Tone Full There is not enough free tone area to...

Страница 181: ... correct Check the effect on off settings Also check settings such as effect level p 66 Could the volume be lowered by a pedal operation or slider operation Raise the volume of zones that are not producing sound Advance the pedals raise the sliders or check the settings of the various controllers p 47 Could the volume be lowered by MIDI messages volume messages and expression messages received fro...

Страница 182: ...fferent upper limit the result might no longer sound mono If you want to make large changes in the pitch you should turn Legato Retrigger ON For details on the parameters refer to Parameter Guide PDF When you press a sample pad or note pad the sound remains stuck on Could the HOLD button be lit Press the HOLD button once again to make the button go dark Sound does not stop when you press a sample ...

Страница 183: ...in a short time possibly causing a delay in note processing p 126 Problems with saving A scene sounds different than when you saved it Save the tones If you edit the tones used by scene or if the temporary tones of the scene were rewritten from an external MIDI device you ll need to save those tones as well p 64 Check the effect settings It might be that the master effect system effect settings ha...

Страница 184: ...t Mic sound is absent or too quiet Sound from the computer is absent or too quiet Could the input volume be lowered Is the input gain LINE MIC set appropriately for the device that s connected For an external audio device external sound module music player etc Adjust the volume on the connected device Set the input gain to LINE For a mic Set the input gain to MIC Adjust the rear panel LEVEL knob I...

Страница 185: ...s to check Action Page Problems with USB connection The FA is not detected by the computer Does your computer s USB port support USB 2 0 Hi Speed The USB port of the computer to which the FANTOM is connected must support USB 2 0 Hi Speed ...

Страница 186: ...o o o x o o o x x o o o o o o o o o o o o o o o o o o o o o o o o o o o o o o o o x o Reverb o Chorus x x o 1 1 1 1 1 1 Bank select Modulation Breath type Foot type Portamento time Data entry Volume Panpot Expression General purpose controller 1 General purpose controller 2 General purpose controller 3 General purpose controller 4 Hold 1 Portamento Sostenuto Soft Legato foot switch Resonance Relea...

Страница 187: ...Mode On Mono Mode On Poly Mode On Active Sensing System Reset All channel x x x o o 0 127 o o o x x x x o 1 o 1 o o x x o o o o x x All channel 1 16 x x o o 0 127 0 127 o 1 o 1 o 1 x o x x x x o 1 o 1 o 1 2 o 1 x x 3 o 1 2 o 1 2 o 1 2 o 1 2 x x 0 119 o o 1 Model FANTOM 06 07 08 Date Feb 1 2022 Version 1 00 Mode 1 Omni On Poly Mode 3 Omni Off Poly o Yes x No Mode 2 Omni On Mono Mode 4 Omni Off Mono...

Страница 188: ... 8 per each Track Pattern Length 32 measures Recording Method Realtime recording Step recording TR REC SMF Player Format SMF Format 0 1 MIDI tracks 16 Tempo range 5 300 BPM Transpose function 5 6 semitone Track Mute Yes Track Solo Yes A B loop function Yes The pattern sequencer and SMF player can be used in each scene They cannot be used at the same time Sampler PAD Sampler Format 16 bit linear 44...

Страница 189: ...Power Supply AC adaptor Current Draw 1 300 mAh Dimensions 1 006 W x 323 D x 95 H mm 39 5 8 W x 12 3 4 D x 3 3 4 H inches 1 218 W x 323 D x 95 H mm 48 W x 12 3 4 D x 3 3 4 H inches 1 393 W x 354 D x 138 H mm 54 7 8 W x 13 15 16 D x 5 7 16 H inches Weight 6 0 kg 13 lbs 4 oz 7 0 kg 15 lbs 7 oz 14 8 kg 32 lbs 11 oz Accessories Owner s Manual AC adaptor Options Keyboard stand KS 10Z KS 12 KS 20X Keyboa...

Страница 190: ......

Отзывы: