background image

©

 2018  DJI  All Rights Reserved


21

Server Configurations

The computer host on which the RoboMaster Server is running must have the IP address set to 192.168.1.2 or 192.168.0.8 and the 
firewall must be disabled. For other configurations, refer to "Setting up a LAN ".

RoboMaster Client

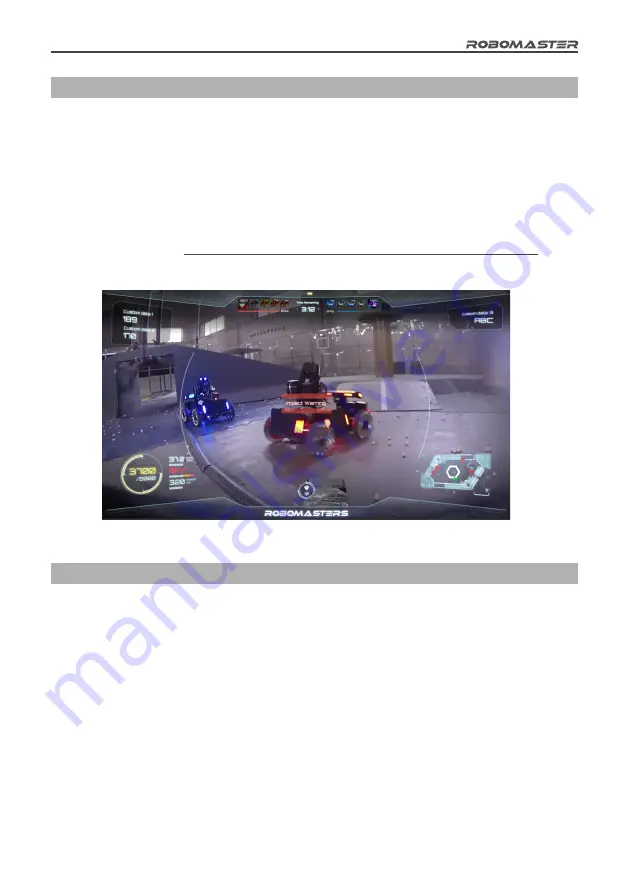
The Client is the first-person perspective application for an operator. With a capture card installed and a self-built Server connected, 
robot-related data uploaded from the Referee System can be viewed from a first-person perspective. This includes a robot's current 
HP, real-time projectile launching speed/rate, the battlefield mini-map, real-time chassis power output and teammate 
information. 

Download the Client

https://www.robomaster.com/zh-CN/products/components/referee?index=1&position=57

.

The full UI page is shown in the figure below:

On the software interface, press F1 to enter the Help page to obtain software use instructions.

Client Configurations

To connect the Client to the competition server, the PC host on which the Client is running must work in the same LAN as the Server. 
Therefore, the static IP address of the PC host on which the Client is running is 192.168.0.100–200. If you run multiple Clients, a 
unique IP address should be used for each one.

Checking Functions on the Robot Side

After a Robot Side is installed, follow the instructions to connect each module and read and understand all usage instructions 
mentioned above.
1.  Ensure that the supply voltage is correct and that the polarity of the power supply is reversed (rated input voltage for the Referee

System is 12 V).

2.  Ensure that wires are firmly connected to each module and that there is no risk of them being tangled into a movement mechanism.
3.  Turn on the battery power, wait until the Main Control Module of the Referee System has started up (startup may take about 

20 seconds), and then check the color of the light bar. If the Main Control Module of the Referee System is powered on for the
first time after installation, a yellow light is displayed after startup. As the Armor Module IDs have not been set, the Main Control 
Module is not connected to the Server.

Содержание Referee System

Страница 1: ...2018 03 V1 1 User Manual RoboMaster Referee System LAN WiFi 192 168 1 1 192 168 1 2 ...

Страница 2: ...e or property damage The complexity of this product requires that users familiarize themselves with its features and have a basic understanding of relevant concepts before operation Taking into account the importance of the various modules of the Referee System in the competition the Referee System has been fully tested in the factory and each module cannot be damaged easily A user should not disa...

Страница 3: ...tart Battle 8 Description of Robot Side Functions 10 Robot Side Interaction Instructions 10 Introduction to the Robot Side Module Initialization 15 Setting Armor Module IDs 15 Camera Transmission Module Instructions 15 Introduction to the Main Control Module User Interface 18 Introduction to Robot Side Module Updates 19 RoboMaster Server 20 Server Configurations 21 RoboMaster Client 21 Client Conf...

Страница 4: ... referred to as Robot Side 2 The PC client hereinafter referred to as Client and the PC server hereinafter referred to as Server The Robot Side is composed of the following modules 1 Main Control Module the brain of the Robot Side Automatically calculates damage according to data passed back from other modules In addition this module s light bar displays the status and HP of the Robot Side in real...

Страница 5: ...Module 42mm projectiles 4 RFID Interaction Module used by the Robot Side to interact with the battlefield Part of a robot s HP can be replenished by using an RFID Interaction Module Regeneration Card 5 Camera Transmission Module provides the user with a first person perspective This includes the VTM Transmitter and the VTM Receiver The VTM Transmitter is mounted on the Robot Side while the VTM Rec...

Страница 6: ...urement Module 17mm projectile Armor Module Armor Module The figure below shows the connection of each module on the Robot Side Modules to be installed vary between robot models For details please refer to the RoboMaster 2018 Referee System Specification Manual Download https www robomaster com en US resource pages 834 type announcementSub 6 2018 DJI All Rights Reserved ...

Страница 7: ...om zh CN products components referee index 1 position 57 2 Server calculates competition time triggers the battlefield switch and displays and transmits Robot Side parameters including HP battlefield information etc to the Client allows manual control of multi level warnings and warns the Client of user violations and automatically determines the outcome of the competition The following software s...

Страница 8: ...obot combat mode A user can choose to set up a local area network LAN for online combat If a local area network LAN is set up the Server must be used and a user must be able to check the HPs of all Robot Sides on the Server A user may also use the Client paired with the VTM Receiver to operate a robot from a first person perspective check the HPs of all Robot Sides and determine the outcome of the...

Страница 9: ...ed if the launching speed is not limited Speed Measurement Module 42mm projectile 0 RFID Interaction Module 0 2 Can be ignored if no interaction with a battlefield is required VTM Transmitter 2 VTM Receiver 2 Localization Module 0 2 Can be ignored if robot localization data will not be used 2 3v3 Mode 3v3 Mode works as follows A user may select any 6 Robot Side configurations from the configuratio...

Страница 10: ...zation data will not be used Description of Robot Side Functions Robot Side Interaction Instructions The human computer interaction interface of the Referee System consists of a display screen and four keys as shown in the figure below Pressing a key will enable a corresponding function Pressing and holding the same key will enable a different function PgUp Display screen OK PgDn Cancel Display Sc...

Страница 11: ... in the selected line on the current page pressing the OK key will direct you to the linked page otherwise pressing the OK key will carry out a function operation Press and hold the Cancel key On a page other than the homepage pressing and holding the Cancel key will bring you back to the homepage On the homepage pressing and holding the Cancel key will refresh the screen display 12 MODULES OFFLIN...

Страница 12: ...ings of the Referee System as shown below a Change the module initialization mode to Ignore All Offline or Ignore Current Offline for the convenience of supplying the power to the chassis and gimbal during debugging The following presents an example of the initialization process on the function page of the Main Control Module when ignoring current offline modules Main Armor Shooter RFID Light Modu...

Страница 13: ...he PgDn key 2 times Press the PgDn key 1 time Press and hold the OK key System Read Game Debug Setup Version Setup Option Ignore Ignore Function Cur Offline All Offline Enable Mask Offline Mode Auto Camera Chan Offline Mode Auto Camera Chan Press the OK key System Read Game Debug Setup Version Setup Option Press the OK key Ignore Ignore Function Cur Offline All Offline Enable Mask Press the OK key...

Страница 14: ...d SSID After connection the homepage will display the Wi Fi signal strength Press the OK key System Read Game Debug System Read Game Debug RED RED RED RED RED Setup Version Setup Option Setup Version Setup Option 1 2 3 4 5 Robot ID Robot Type Armor ID RFID Shooter Robot Type Armor ID RFID Shooter WiFi 1 testAP 2 dji_autocar 3 LinkIt_Smart_7688 4 LEDE 2 5 5 JLY Robot ID Robot Type Armor ID RFID Sho...

Страница 15: ...number of the Armor Modules If the read number of effective Armor Modules is the same as the number of Armor Modules installed the procedure is complete 5 On the Armor ID Setup page if you select Armor ID 0 the IDs of all Armor Modules connected to the Main Control Module will be set to 0 This function is mainly used to set an armor module to a specified ID Be sure to set the ID of an Armor Module...

Страница 16: ...es 2 Connect the VTM Transmitter to the Main Control Module and set the Robot ID For details please refer to the Robot Side Interaction Instructions section of Functional Descriptions of Robot Sides 3 The VTM Receiver ID must be set by using RoboMaster Tools on the PC side as follows a Install the driver for the Camera Transmission Module Use a power adapter to power the VTM Receiver Wait about 20...

Страница 17: ...s 1 From the Debug Option menu of the Main Control Module set the connection mode of the Camera Transmission Module to Manual pairing For details please refer to the Robot Side Interaction Instructions section of Functional Descriptions of Robot Sides 2 Connect the VTM Transmitter to the Main Control Module Wait about 20 seconds after the VTM Transmitter is powered up until the Network Activity in...

Страница 18: ... only the Blue team for debugging During combat it is recommended to set to Red 1 Red 3 and Blue 1 Blue 3 to avoid conflict Introduction to the Main Control Module User Interface To allow users to better carry out automatic control and obtain real time competition data a UART I O interface is open on the Robot Side to output Robot Side data Output data includes the remaining time in the competitio...

Страница 19: ...r serial communication data A baud rate of 921600 is used when updating the Referee System Ensure that the serial communication module can function reliably at this communication rate otherwise updating may be slow or even fail 2 RoboMaster Assistant is used to update the Referee System modules Download link https www robomaster com zh CN products components assitant 3 Run the update tool as shown...

Страница 20: ...te of 921600 RoboMaster Server The Server is the service center of the entire Referee System It collects data from all robots and Clients during the competition and visualizes it for users and automatically determines the outcome of the competition Download the Server https www robomaster com zh CN products components referee index 1 position 58 When running the RoboMaster Server the entire page a...

Страница 21: ... the competition server the PC host on which the Client is running must work in the same LAN as the Server Therefore the static IP address of the PC host on which the Client is running is 192 168 0 100 200 If you run multiple Clients a unique IP address should be used for each one Checking Functions on the Robot Side After a Robot Side is installed follow the instructions to connect each module an...

Страница 22: ...ctly read its light bar will flash in red or blue depending on the robot The direct effect of the RFID Interaction Module test card is to regenerate a robot s HP Pay attention to the detection distance If the RFID Interaction Module and test card come into contact with a magnetic object the detection distance and detection accuracy will be affected 9 Set the VTM Receiver and the VTM Transmitter fo...

Страница 23: ...robot on to supply power to the Referee System Following the Robot Side Interaction Instructions connect the Robot Side to the wireless AP After connection the Robot Side will be in the same LAN as the Server via Wi Fi 6 The RoboMaster Server runs on the Server PC You may check the connection status of the robot on the Server side If a LAN is set up you can check Robot Side related data on the Ser...

Страница 24: ...Contact us RoboMaster Website www robomaster com RoboMaster BBS bbs robomaster com RoboMaster Email robomaster dji com RoboMaster News RoboMaster WeChat Weibo and are trademarks of DJI ...

Отзывы: