


95
Chapter 3. Operating RoboBuilder
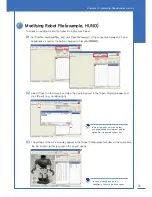
Make sure that HUNO is laid down tightly into the tray by pressing some points of robot
’
s back side.
Follow the sequence as shown below.
① Press position 1( ) vertically together by using thumbs and index fingers of two hands.
② Use one hand to vertically press position 4( ) and use the other hand to press position 2( ).
③ Press position 3( ) vertically with two hands.
④ Repeat step② to press position 4( ) and position 2( ) together.
Correct Home Posture can be secured only when the front of the robot is tightly attached to the hollow surface
of tray.
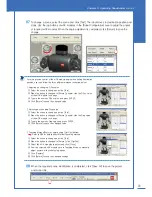
06
If robot is laid correctly, click [ZeroCapture]. The current posture is copied in as one of the
five sampling postures and pop-up windows appears saying
“
4 times left
”
. Click [OK].
Содержание DIY Robot kit
Страница 2: ......
Страница 20: ...21 Chapter 2 Assembling RoboBuilder HUNO DINO ...
Страница 36: ...37 Chapter 2 Assembling RoboBuilder H U N O ...
Страница 49: ...50 STEP 18 STEP 17 B40 ID 01 ID 06 ID 11 ID 12 ID 02 ID 07 ...
Страница 108: ...109 Chapter 4 Troubleshooting MEMO ...
Страница 109: ...110 MEMO ...