background image

23

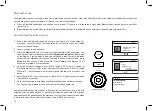
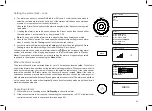
Alarms may be used whether the radio is powered from the mains or from batteries. If the 

radio is switched off when powered from batteries, the clock will continue to run so that 

alarms can be used. However the clock display will be switched off to extend battery life.
You may use the 

Tuning

 control to select or modify any particular setting using the control 

to enter the modification. If no buttons are pressed for 10 seconds, your radio will exit the 

alarm setup.

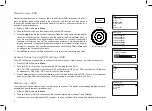
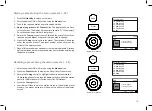
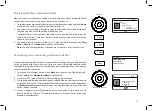
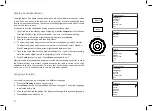
1.  To change the On / Off states of the alarms while the radio is in Standby or switched 

on, press either the 

Alarm 1 

or

 Alarm 2

 button. The display will cycle through No Alarm 

or Alarm enabled.

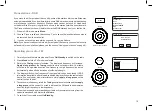
2.  To change the detailed alarm settings while the radio is in Standby or switched on, 

apply a long press

 on the 

Alarm 1 

or

 Alarm 2

 button. This will cause the Alarms 

menu to be displayed.

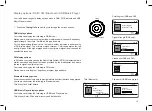
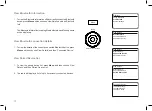
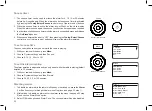
3. Choose 

'Alarm Time'

 to adjust the alarm time.

4.  Choose the alarm hour and then the minute. The display will then return to the alarm 

setting menu.

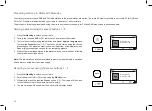
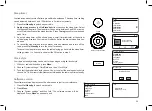
5. Choose 

'Alarm Mode'

. The display will show the alarm mode options. The alarm mode 

options are as follows:


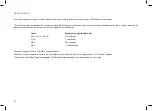
'Off'

 - the alarm will be disabled


'Daily'

 - the alarm will sound everyday


'Once'

 - the alarm will sound once


'Weekends'

 - the alarm will sound only at weekends


'Weekdays'

 - the alarm will sound on weekdays only


Choose the required alarm mode option. Choosing Off will disable the alarm.


Alarm 1

Alarm 2

Tuning

Select / Info / Snooze

Alarm Mode: Daily

Alarm Time: 06:00

Alarm Sound: Buzzer

Alarm Volume: 14

Alarm Save

Alarm 1

Alarm 1 Time

06

:30

Alarm Mode: Off

Alarm Time: 06:30

Alarm Sound: Buzzer

Alarm Volume: 14

Alarm Save

Alarm 1

Off

Daily

Once

Weekends

Weekdays

Alarm 1 Mode

13 : 16

17/07/2017 Monday

1

06:30

Setting the alarm clock

Your radio has two alarms which can be set to wake you to DAB, FM radio or buzzer alarm. Each alarm can be set to sound once, daily, on weekdays 

or at weekends. In the event of a power interruption your radio has a built in memory that will retain your alarm settings. Ensure that the time is set 

correctly before setting the alarms.
Alarms can be set while the radio is in Standby mode or switched on. You may set the alarm duration to sound for 30, 60, 90 or 120 minutes. Please 

see 

'To set the alarm duration'

 page 25.

Содержание Blutune T2

Страница 1: ...Please read this manual before use DAB DAB FM RDS Bluetooth portable digital radio with clock and alarms Blutune T2 ...

Страница 2: ...iles in Bluetooth mode 16 Connecting and reconnecting a Bluetooth device 16 Bluetooth information 17 18 Contents Using USB memory devices 19 Playing files from USB memory devices 20 21 Automatically updating the clock 22 Setting the clock format setting the clock manually 22 Setting the alarm clock 23 24 Cancelling alarms 24 Snooze timer 25 Disabling alarms 25 Sleep timer clock style 26 Software v...

Страница 3: ...set 2 Next button 10 Preset 3 Play Pause button 11 Volume control 12 Mode button 13 On Standby Sleep button 14 Tuning Select Info Snooze control 15 Preset 4 Previous Folder button 16 Preset 5 Next Folder button 17 Battery compartment see pages 3 4 18 Telescopic aerial 19 Auxiliary Input socket 20 Headphone socket 21 DC Input socket 22 USB Playback Charging socket Top Rear 3 5 6 7 8 9 10 11 12 13 1...

Страница 4: ... batteries have full charge the full battery indicator will be shown on the display 5 The alarm clock function may be used when the radio is powered from batteries see page 23 If the radio is not to be used for any extended period of time it is recom mended that the batteries are removed from the radio We would recommend for economy that the Blutune T2 is used via the AC adaptor whenever possible ...

Страница 5: ... freshly charged or if the radio detects that you may be attempting to recharge alkaline batteries In these cases the charging will be stopped Note You should never attempt deliberately to recharge alkaline batteries in the radio Attempted recharging of alkaline batteries can be dangerous Important when using rechargeable batteries the battery switch must be placed in the NiMH position When the ba...

Страница 6: ...m 4 Many operations require the user to make a selection from the menu This is done using the Tuning Select control Turn the control clockwise or anti clockwise to highlight the desired menu item then press the control to select that item If there are more than six items in a menu then the display will automatically scroll up or down so that the additional items become visible If there are many it...

Страница 7: ...ime the current time will appear on the display 6 If no signal is found it may be necessary to relocate your radio to a position giving better reception You should then carry out a scan to find stations see Finding new stations on page 8 The AC adaptor should be disconnected from the mains supply and from the radio when not in use IMPORTANT The mains adaptor is used as the means of connecting the ...

Страница 8: ... alpha order 0 9 A Z will be selected The first station in the list of stations found during scanning will be highlighted Rotate Tuning to step through the list of available stations Press Tuning to select and tune to the desired station The display will show the station name 5 If no signals are found then it may be necessary to relocate your radio to a position giving better reception You should ...

Страница 9: ...cate your radio to a position giving better reception Secondary services DAB Some radio stations may have one or more additional broadcasts associated with them If these are available they will appear immediately after the main station as you rotate the Tuning control clockwise To tune to the selected service press Tuning Finding new stations DAB As time passes new stations may become available or...

Страница 10: ... of the signal graph shows the minimum signal level required for satisfactory reception Any new radio stations found on the tuned DAB multiplex will be added to the list stored in the radio 4 Press Menu to choose a different frequency or return to the normal playing mode Dynamic Range Control DRC settings DAB The DRC facillity can make quieter sounds easier to hear when your radio is used in a noi...

Страница 11: ...ew stations please see the section Finding new stations on page 8 Operating your radio FM 1 Carefully extend the telescopic aerial Press On Standby to switch on the radio 2 Press Mode until the FM mode is selected 3 Rotate the Tuning control clockwise The displayed frequency will increase Apply a long press on the Tuning control to carry out an auto tune Your radio will scan in an upwards directio...

Страница 12: ...ing scanning choose Yes Normally this will restrict scanning to local transmissions 4 Alternatively tosetyourradiosothatallavailablestationsarefoundduringscanning local and distant transmissions choose No Note The initial setting out of the box or after a System Reset causes the radio to ignore weaker or more distant signals Stereo Mono switching FM headphones only Your radio will play stereo FM b...

Страница 13: ...o station name and additional text when provided by the broadcaster and where the radio signal is sufficiently clear Your radio can display the following in FM mode Station name scrolling text frequency program type and date Bluetooth display options If your connected device is able to provide information from the track being played your radio can display the following in Bluetooth mode Title Albu...

Страница 14: ...n 1 5 The station will be stored using the chosen preset button The preset number is shown at the bottom of the display screen Repeat this procedure as needed for the remaining presets 4 Stations that are already stored in the presets may be over written by following the procedure described above Note The radio station presets are retained in memory when the radio is switched off and disconnected ...

Страница 15: ...s needed for the remaining presets Stations which are already stored in the presets may be overwritten by following the above procedure Recalling a preset using the menu presets 1 30 1 Select either the DAB or FM mode using the Mode button 2 Press the Preset button to display the Recall from Preset menu 3 Rotate the Tuning control to highlight the desired preset station If a preset has been stored...

Страница 16: ...other device To cause the radio to become discoverable press Menu and then choose Setup Bluetooth Press Tuning Your Blutune T2 will become discoverable by other devices 4 Using the Bluetooth settings of your phone tablet or PC direct it to search for discoverable devices After a few seconds you should see a device named Blutune T2 Just occasionally it may take longer for the radio to be found by y...

Страница 17: ...vice connected to the radio at any one time although it may be paired with several devices Once you have a Bluetooth enabled device connected to your radio it cannot be interrupted by another Bluetooth device unless you choose to break the connection 1 To connect to a different device press Menu and then choose Setup Bluetooth Press Tuning The Bluetooth indicator flashes blue 2 Your Blutune T2 rad...

Страница 18: ... Details and then Connected Device View Paired Device list 1 To view the paired device list press Menu and then choose View Details and then Paired Device List 2 The radio will display a list of up to 8 previously connected devices Setup Bluetooth View Details System settings Bluetooth Tuning Select Info Snooze Menu Bluetooth Info Connected Device Paired Device List View Details Bluetooth Info Con...

Страница 19: ...sitionyourBluetooth devices closer to each other if you observe communication difficulties WiFinetworksandcordlessphonesgenerallyusesimilarradiofrequencies to Bluetooth and may interfere with one another If any interference is noticed then try relocating the radio or one of the other devices TheBluetoothcapabilitiesofyourradioenableittoreceiveaudiofrommany Bluetooth capable devices including mobil...

Страница 20: ... Recommendations Unless you have only a few files on the USB memory device do not place all files in the root folder The number of items files sub folders in any folder should be less than 2000 Searching and playback will be more responsive if the number of files in any one folder is limited we suggest not more than 250 ItisrecommendedthattheUSBmemoryisreformattedinyourcomputer before adding your ...

Страница 21: ...be displayed If you have nested folders such as album folders within an artist folder then you will simply step to the next folder level 7 Choose the desired track All files in the current folder following the selected file will then be played in turn Files are played in the order in which they exist in the filing system of the USB memory they are not sorted by file name or track number Controllin...

Страница 22: ...All Repeat all files Shuffle Play files in random order 4 Choosing the Off option will disable repeat and shuffle options 5 To enable the shuffle option choose Shuffle To skip to another folder 1 When the USB memory device is playing press either the Next or Previous Folder buttons The first file of the next or previous folder on the memory will be played Off Repeat One Repeat Folder Repeat All Sh...

Страница 23: ... the alarms 1 With your radio switched on press Menu 2 Choose System settings Time Date Set Format and then select 12 or 24 hour The current clock display format is marked with a tick If the 12 hour clock format is chosen the radio will then use the 12 hour clock for the setting of alarms and will display a 12 hour clock with an AM or PM indicator when in Standby mode Setting the clock manually No...

Страница 24: ...Mode The display will show the alarm mode options The alarm mode options are as follows Off the alarm will be disabled Daily the alarm will sound everyday Once the alarm will sound once Weekends the alarm will sound only at weekends Weekdays the alarm will sound on weekdays only Choose the required alarm mode option Choosing Off will disable the alarm Alarm 1 Alarm 2 Tuning Select Info Snooze Alar...

Страница 25: ...lly possible to go back to the previous screen using the Menu button Tuning Select Info Snooze Menu DAB FM Buzzer Alarm 1 Sound Alarm 1 Volume 15 Alarm Mode Daily Alarm Time 06 30 Alarm Sound Buzzer Alarm Volume 15 Alarm Save Alarm 1 ALARM 1 SAVED Alarm Mode Once Alarm Time 06 30 Alarm Sound DAB Preset Last Listened Alarm Volume 14 Alarm Save Alarm 1 When the alarm sounds The alarm will sound at t...

Страница 26: ... switched on press Menu 2 Choose System settings and then Snooze 3 Choose 5 10 15 20 or to Off To set the alarm duration The alarm duration is adjustable and can only be set while the radio is playing default duration is 30 minutes 1 With your radio switched on press Menu 2 Choose System settings and then Alarms 3 Choose 30 60 90 or 120 minutes Disabling alarms 1 To disable an alarm while the radi...

Страница 27: ...he playing displays Your radio will switch off after the preset sleep time has elapsed 4 To cancel the sleep time before the preset time has elapsed and to turn off the radio press On Standby to turn the unit off manually To cancel the sleep timer and leave the radio playing go back into the sleep timer settings steps 1 to 2 above and select the Off option in step 2 Clock style Your radio s standb...

Страница 28: ...ely to adjust the brightness using the menu press Menu 3 Choose System settings and then Brightness 4 To adjust the display brightness when the radio is switched on select Normal To adjust the display brightness when the radio is in Standby select Standby Press Tuning to enter the selected brightness adjustment mode 5 Choose the High Medium High Medium Medium Low Low or Off dimmer setting Note tha...

Страница 29: ... from the Auxiliary input socket or press Mode to cancelAuxiliary Input mode Note that audio played via the auxiliary input will be played in mono through the speaker and in stereo through stereo headphones Note If the radio is in Auxiliary input mode with no input signal being applied for more than 15 minutes then it will automatically switch to the standby mode The LCD will revert to the standby...

Страница 30: ...alfunction due to electrostatic discharge mains power supply transients or short interruptions reset the product as above to resume normal operation If you are not able to perform the reset operation as above removal and reconnection of the power supply and batteries may be required If the product is used in an environment with any ESD Immunity Radiated Immunity ConductedImmunitydisturbance thepro...

Страница 31: ...th items such as newspapers tablecloths curtains etc No naked flame sources such as lighted candles should be placed on the product It is recommended to avoid using or storing the product at extremes of temperature Avoid leaving the unit in cars on window sills in direct sunlight etc There are no user serviceable parts inside this product Do not attempt to disassemble any part of the product The p...

Страница 32: ...nger of explosion if the batteries are incorrectly replaced Rechargeable batteries Your Blutune T2 radio uses a range of methods to ensure correct and safe charging of Rechargeable Nickel Metal Hydride batteries These work to protect your batteries from excessive charge and discharge These protections can only work properly if the advice above is followed In particular the radio will not be able t...

Страница 33: ...mage the eyes and can be harmful if swallowed 1 Keep batteries out of the reach of children 2 Do not heat open puncture mutilate or dispose of batteries by burning 3 Do not mix different battery types or old and new batteries Always replace all the batteries at the same time 4 Do not carry or store batteries such that metal objects may contact the end caps 5 Remove batteries from the radio if they...

Страница 34: ...tes may be playable in some cases but performance of the product may be affected Codec Maximum supported data rate AAC LC HE HE V2 320 kbits sec FLAC 1 5 Mbits sec MP3 320 kbits sec WAV 1 536 Mbits sec All codecs support 2 channel stereo coded files only All codecs support sample rates up to 48 k samples sec includes 32k and 44 1k samples sec at 16 bits per sample Files which have Digital Rights M...

Страница 35: ...er guarantee Procedure Any claim under this guarantee should be made through the dealer from whom the product was purchased It is likely that your Roberts dealer will be able to attend to any defect quickly and efficiently but should it be necessary the dealer will return the product to the company s service department for attention In the event that it is not possible to return the product to the...

Страница 36: ...ROBERTS RADIO LIMITED PO Box 130 Mexborough South Yorkshire S64 8YT Website http www robertsradio com 2017 Roberts Radio Limited Issue 1 2017 08 24 ...

Отзывы: