


IMR01H01-E4
3
2. MOUNTING
This chapter describes installation environment, mounting cautions, dimensions and mounting procedures.
2.1 Mounting Environment
(1) This instrument is intended to be used under the following
environmental conditions. (
IEC61010-1
)
[OVERVOLTAGE CATEGORY II, POLLUTION DEGREE 2]
(2) Avoid the following conditions when selecting the mounting
location:
•
Ambient temperature less than 0 °C or more than 50 °C.
•
Ambient humidity of less than 45 % or more than 85 % RH.
•
Rapid changes in ambient temperature which may cause
condensation.
•
Corrosive or inflammable gases.
•
Direct vibration or shock to the mainframe.
•
Water, oil, chemicals, vapor or steam splashes.
•
Excessive dust, salt or iron particles.
•
Excessive induction noise, static electricity, magnetic fields or
noise.
•
Direct air flow from an air conditioner.
•
Exposure to direct sunlight.
•
Excessive heat accumulation.
2.2 Mounting Cautions
Take the following points into consideration when mounting this
instrument in the panel.
•
Provide adequate ventilation space so that heat does not build
up.
•
Do not mount this instrument directly above equipment that
generates large amount of heat (heaters, transformers, semi-
conductor functional devices, large-wattage resistors).
•
If the ambient temperature rises above 50
°
C, cool this
instrument with a forced air fan, cooler, or the like. However,
do not allow cooled air to blow this instrument directly.
•
In order to improve safety and the immunity to withstand noise,
mount this instrument as far away as possible from high
voltage equipment, power lines, and rotating machinery.
High voltage equipment: Do not mount within the same panel.
Power lines:
Separate at least 200 mm.
Rotating machinery:
Separate as far as possible.
•
Mount this instrument in the horizontal direction for panel. If
you did installation except a horizontal direction, this causes
malfunction.
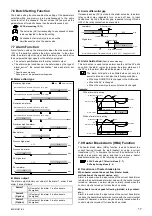
2.3 Dimensions
!"
External dimensions
100
8.2
9.2
11
0.
8
91
.8
1*
91
.8
Mounting bracket
96
96
(Unit: mm)
*
Rubber (option)
Up to 4 mounting brackets can be used.
!"
Panel cutout
For mounting of the MA900/MA901, panel thickness must be between
1 to
10 mm. When mounting multiple MA900/MA901s close together, the panel
strength should be checked to ensure proper support.
If the MA900/MA901s have waterproof/dustproof options, protection will be
compromised and not meet IP65 by close mounting.
Individual mounting
+0.8
0
L = 96
×
n
-
4
n
: Number of instruments (2
≤
n
≤
6)
Close mounting
(Unit: mm)
25
92
+0.8
0
30
92
+0
.8
0
L
92
+0
.8
0
+0.8
0
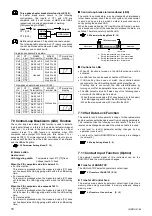
2.4 Mounting Procedures
When the instrument is mounted, always secure with two
mounting brackets either top and bottom.
The waterproof/dustproof option on the front of the
instrument conforms to
IP65
when mounted on the panel.
For effective waterproof/dustproof, the gasket must be
securely placed between instrument and panel without
any gap. If gasket is damaged, please contact RKC sales
office or the agent.
!"
Mounting to the panel
1.
Prepare the panel cutout as specified in 2.3 Dimensions.
2.
Insert the instrument through the panel cutout.
3.
Insert the mounting bracket into the mounting groove of the
instrument . (Fig.1)
4.
Push the mounting bracket forward until the bracket is firmly
secured to the panel. (Fig.2)
5.
The other mounting bracket should be installed the same
way described in
3.
and
4
.
Fig. 1
Mounting bracket
Fig. 2
!"
Mounting to the panel
(When using the mounting screws)
In addition, the mounting assembly also include two screws
which can be used with the brackets to secure the instrument to
the panel. Procedure
1.
and
2.
are the same as in the above. For
the procedure
3.
to
6.
, see the following figures.
(1) Insert the hexagon nut.
(2) Insert the mounting
screw.
図
3
3.
Mounting bracket
図
4
4.
Insert the L-shaped
hook of the mounting
bracket into the groove.
Pull till click sounds to the
direction shown by the arrow.
図
5
5.
When using the mounting screws,
only turn one full revolution after the
screw touches the panel.
図
6
6.
"
"
To prevent electric shock or instrument failure, always
turn off the power before mounting or removing the
instrument.
!
WARNING