


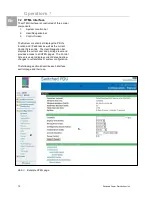


Operations 7
Switched Power Distribution Unit
15
EN
Setting the system 3-phase load out-of-bound
threshold:
This setting to use for devices with 3-phase input
voltages to notify of a system imbalance between
the three phases of power.
In the 3-Phase Load Out-of-Bounds Threshold
field, enter a value from 0 to 100% and press Ap-
ply.
Creating a descriptive unit name:
Click on the Tower Names link.
On the subsequent Tower Names page, enter a
descriptive name and press Apply.
Creating a descriptive input feed name:
Click on the Input Feed Names link.
On the subsequent Input Feed Names page, en-
ter a descriptive name and press Apply.
Creating a descriptive outlet name:
Click on the Outlet Names link, which will open
the Outlets configuration page. You can change
the names by clicking on the “Edit” button.
Creating a descriptive serial port name:
Click on the Serial Port Names link, which will
open the Serial Ports configuration page. See
Serial Ports on page 17 for additional information
on creating descriptive serial port names.
You can change the names by clicking on the
“Edit” button.
Creating a descriptive Environmental Monitor
name:
Click on the Environmental Monitor Names link.
On the subsequent Environmental Monitor Names
page, enter a descriptive name and press Apply.
Creating descriptive sensor names:
Click on the Sensor Names link.
On the subsequent Sensor Names page, enter a
descriptive name and press Apply.
Network
The Network configuration page is used for main-
tenance of the network interface. From this page
an administrator may configure the IP address,
subnet mask, gateway address, DNS addresses
as well as view the link status, speed and duplex
value.
The PDU is configured with the following network
defaults to allow unit configuration out-of-the-box
through either Telnet or HTML:
•
IP address:
192.168.1.254
•
Subnet Mask:
255.255.255.0
•
Gateway:
192.168.1.1
Note!
Contact your system administrator for
instructions in reconfiguring the network
connection. Reconfiguration of your
network connection may require a re-
start to take effect.
The initial local PC network connection must be
configured as noted below:
•
IP address:
192.168.1.x (where x is 2-253)
•
Subnet Mask: 255.255.255.0
Note!
The unit must be restarted after network
configuration changes.
Enabling or disabling DHCP support:
Select Enabled or Disabled from the DHCP drop-
down menu and press Apply.
Setting the IP address, subnet mask, gateway
or DNS address:
In the appropriate field, enter the IP address, sub-
net mask, gateway address or DNS address and
press Apply.
Telnet/SSH
The Telnet/SSH configuration page enables or
disables Telnet and SSH support and configures
the port number that the Telnet or SSH server
watches. For more information on SSH see page
49 in 8Advanced Operations.


