background image

1

10

2

3

4

M0DTOC1053

6
7

5

8

9

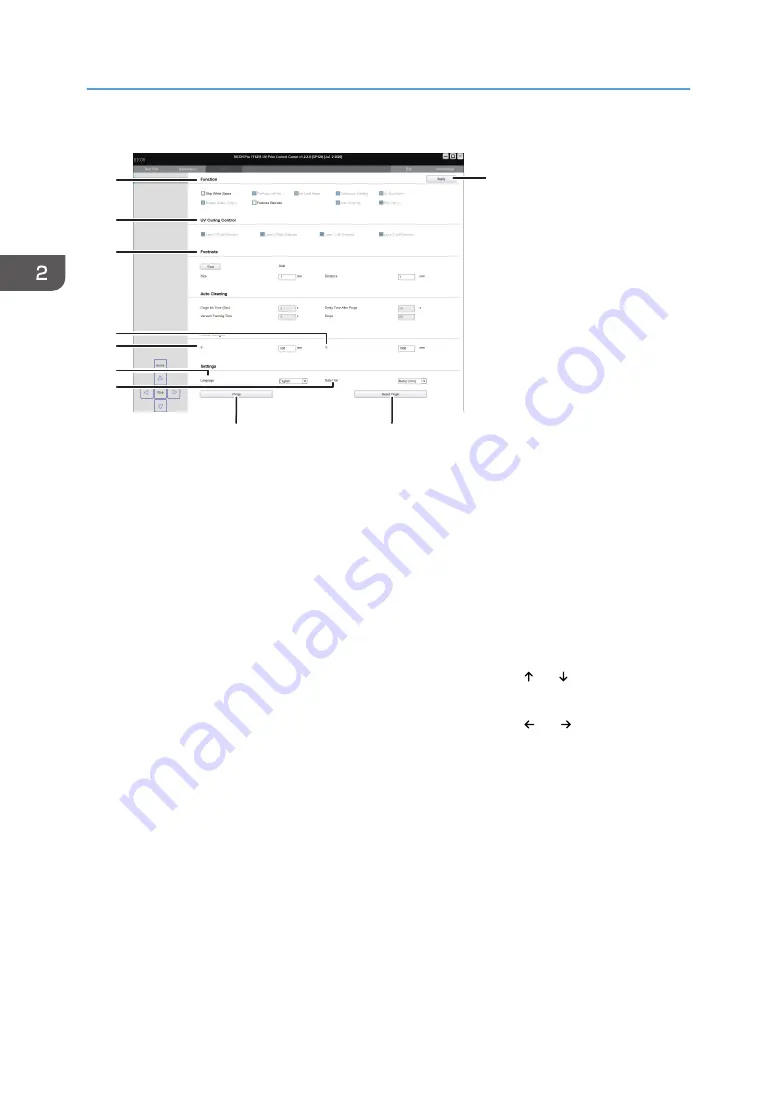
1. Function

Configure settings for skipping white spaces, continuous printing, and printing barcodes in a footnote, etc.

2. UV Curing Control

You can check lighting settings for when UV lamp 1 or 2 moves. These settings can be changed by an
administrator.

3. Footnote

Specify the font and size of a footnote. For details about how to print a footnote, see page 75 "Printing a
Footnote".

4. Y:

Specify the moving distance of the carriage in the Y direction at every click of [ ] or [ ] on the toolbar.

5. X:

Specify the moving distance of the carriage in the X direction at every click of [ ] or [ ] on the toolbar.

6. Language

Selects the language to be displayed on the screen.

7. Data Unit

Used to select the unit displayed on the screen from Metric (mm), inch, and mil.

8. [Purge]

Perform ink or air discharge. For details about ink discharge, see page 99 "Discharging Ink". For details
about air discharge, see page 87 "If Ink Mixes or Missing Nozzles Occur Due to Aeration".

9. [Reset Origin]

Resets the carriage original position while moving the carriage to the X or Y directions.

10. [Apply]

Click to apply the settings.

2. Using Print Control

40

Содержание PRO TF6215

Страница 1: ...e using the machine For information not in this manual refer to the PDF files on the supplied CD Appendix Maintenance and Specifications Troubleshooting Convenient Usage Basic Operations Using Print Control Getting Started Operating Instructions Original Instructions ...

Страница 2: ......

Страница 3: ...riage 15 Maintenance Station 16 Emergency Buttons 17 Proximity Sensor 19 Connecting the Power Cord 21 About Ink 24 Supported Ink 24 Storage Conditions for Ink Bottles 24 Expiration Dates of Ink Bottles 25 Precautions for Handling Ink Bottles 26 About Media 27 Size and Weight Specifications of Supported Sheet Media 27 How to Store Media 27 Precautions for Handling Media 27 2 Using Print Control Abo...

Страница 4: ...g to the Test Printing Result 51 Setting Media 53 Precautions for Setting Media 53 Setting Media on a Table 54 Changing Print start Position 59 Printing Data 60 Before Print Start 60 Start Printing 60 Interrupt Printing 63 Stop Printing Data Clear 63 Moving Gantry 64 Capping 65 Detaching caps 65 4 Convenient Usage Adjusting the UV Lamp Position 67 Adjusting the UV Lamp Position 67 Various Print Fu...

Страница 5: ... to Aeration 87 Precautions for Using Port for Discharging Air Bubbles and Air Bubble Ejection Tool 90 6 Maintenance and Specifications Replenishing and Replacing Consumables 93 Replenishing Ink 93 Replacing the Flushing Pad 95 Disposing of Waste Ink 97 If the Machine Is to be Left Unused for a Long Time or If a Power Outage Is Scheduled 99 Discharging Ink 99 Closing the Negative Pressure Valves 1...

Страница 6: ...4 ...

Страница 7: ... mainly North America Differences in the functions of Region A and Region B models are indicated by the two symbols Read the information indicated by the symbol that corresponds to the region of the model you are using Disclaimer To the maximum extent permitted by applicable laws in no event will the manufacturer be liable for any damages whatsoever arising out of failures of this machine losses o...

Страница 8: ...For good output quality the manufacturer recommends that you use genuine ink from the manufacturer The manufacturer shall not be responsible for any damage or expense that might result from the use of parts other than genuine parts from the manufacturer with your products The screen shots used in this manual are displayed in English 1 Getting Started 6 ...

Страница 9: ... C 59 86 F Humidity 40 80 RH Altitude 2 000 m approx 6 561 7 ft or less Place the machine on a level surface The machine must be level within 5 mm approx 0 2 inches both front to rear and left to right Place the machine in a stable place where the floor is strong enough to withstand a load of 1 800 N m2 or more Avoid the following environments when locating the machine If the machine is placed som...

Страница 10: ...cm 61 0 inches or more 2 Right and left 100 cm 39 4 inches or more 3 Front 105 cm 41 3 inches or more 4 Depth 467 cm 183 9 inches or more 5 Width 681 cm 268 1 inches or more About Moving the Machine Relocation of the machine should be performed by your service representative Contact your service representative if you need to relocate the machine How to secure the machine The legs of the machine ar...

Страница 11: ...to keep the machine flat Using the machine on an unstable surface might cause an injury or unexpected accident How to use the leveling feet Rotate each adjuster clockwise to lower the leveling feet ECD116 About Operating Environments 9 ...

Страница 12: ...ls for This Machine The operating instructions included with the machine are provided in both paper and PDF format users can view the contents on a display Operating instructions that can be viewed on a display are included on the supplied CD The following is a list of instruction manuals provided with the machine Safety Information Describes the Safety Information Be sure to read it before using ...

Страница 13: ... Product name Abbreviation ColorGATE Production Server Ricoh Pro T Series Edition ColorGATE RICOH Pro TF6251 UV Print Control Center Print Control ColorGATE is a software that converts image data into a RIP file so that it is suitable for printing For details about how to install ColorGATE see Installing the RIP Software RIP Settings Guide Print Control is a software necessary to read RIP files cr...

Страница 14: ...ly detects if a person approaches the carriage and stops the carriage immediately See page 19 Proximity Sensor 2 Emergency buttons Press any of these buttons when you need to stop the machine urgently during printing See page 17 Emergency Buttons 3 Gantry Moves the carriage to the left or right and moves forward and backward on the table 4 Front control section See page 13 Front view control secti...

Страница 15: ...tor Lights up when the power of the machine is on 2 Vacuum pressure control Adjusts the pressure used to vacuum the media on the table Adjust the vacuum pressure to strengthen the vacuuming of the media if the media becomes out of position or when using warped media This is effective when the vacuum switch is on 3 Vacuum switch Turns on and off media suction If switched on suction is applied to th...

Страница 16: ...ttons Press these buttons when you need to stop the machine urgently during printing See page 17 Emergency Buttons 2 Negative pressure valves If the machine is to be left unused for less than 10 days and a power outage is scheduled close the negative pressure valves For details see page 99 If the Machine Is to be Left Unused for a Long Time or If a Power Outage Is Scheduled 3 Ink lamps Lights up w...

Страница 17: ...utage Is Scheduled Carriage The carriage basically consists of the print head units and UV lamp It is also equipped with an ionizer for removing static electricity Do not place paper or cloth on the UV lamp or bring flammable objects close to the UV lamp Doing so might cause fire or smoke Do not touch the UV lamp As it becomes very hot touching the UV lamp might cause injury or burns Only perform ...

Страница 18: ... 3 UV lamp Irradiates the UV LED lamps during printing to cure ink 4 Ionizer Removes static electricity from media For details about how to clean the carriage see page 51 Cleaning Print Head Nozzles Maintenance Station The maintenance station basically consists of the capping station for maintaining the nozzles faces of the print heads and the head wipers ECD120 1 2 3 1 Getting Started 16 ...

Страница 19: ... Requests for Daily Care and Maintenance For details about how to clean the areas around the maintenance station see Cleaning the Area around the Maintenance Station Requests for Daily Care and Maintenance Emergency Buttons Press them when stopping the machine urgently for safety reasons The emergency buttons are located in 4 positions 2 buttons on the front of the machine 2 buttons on the rear of...

Страница 20: ...ne in case of emergency Press the emergency button DVB123 To release an emergency stop Turn the base of the emergency button in the direction of the arrow The emergency button moves back to its original position DVB124 1 Getting Started 18 ...

Страница 21: ...utton on the control section on the front part of the machine and then restart the software Do not leave the emergency stop button pressed Ink leakage may occur Proximity Sensor The sensor stops the machine if it senses someone approaching the carriage s movable range There are 3 proximity sensors on each side of the machine M0DTIC0007 The sensors cover the following areas As seen from the front o...

Страница 22: ...As seen from the back of the machine M0DTIC0009 1 Getting Started 20 ...

Страница 23: ...hine The power cord or power plug is damaged Do not use any power sources other than those that match the specifications shown Doing so could result in fire or electric shock The supplied power cord is for use with this machine only Do not use it with other appliances Doing so could result in fire or electric shock Do not use any frequencies other than those that match the specifications shown Doi...

Страница 24: ... becomes hot The power cord is damaged If any of the conditions above exist do not use the power cord and consult your dealer or service representative Use of the power cord could result in fire or electric shock Do not pull the power cord Pulling the cord can damage the power cord Use of damaged power cords could result in fire or electric shock Do not disconnect the power cord plug If the machin...

Страница 25: ...ector and insert it into the power socket of the machine M0DTIC0010 3 Connect the power cord plug to the power source For details about how to turn on off the power properly see page 44 Turning On Off the Power Connecting the Power Cord 23 ...

Страница 26: ...0 High adhesion and wide color gamut Cyan Magenta Yellow Black White Clear 2 1 Primer ink is used for both GP120 and DG130 2 The clear color for the DG130 is also used for the GP120 If the remaining amount of ink in the ink tank is low the machine will make a beeping sound Do not print while the machine is beeping If the machine beeps while printing stop using the machine immediately after complet...

Страница 27: ...ink bottles in a place lower than 1 m approx 3 3 ft If ink bottles are stored in a place higher than 1 m approx 3 3 ft the cap may come off when an ink bottle falls and ink inside the bottle will splash Ink may freeze if stored in a cold place for a long period of time If ink freezes it may become unusable as it may deteriorate Make sure to store ink in an environment where ink will not freeze Exp...

Страница 28: ...areful not to spill ink Avoid ink flowing into the natural water system or household wastewater Ink causes irritation and is toxic Avoid mixing ink with incompatible materials While handling ink bottles be sure to wear gloves and goggles during the work Otherwise ink may drip or be scattered Do not give a shock to the ink bottles Doing so might cause the ink to leak Shake the ink bottles well befo...

Страница 29: ...prox 4 3 inches or less Media weight 45 kg m2 or less How to Store Media Take the following precautions when storing media Make sure to store media in a place that is not exposed to direct sunlight and is free from humidity and dust For media that warps easily store the media for example by placing it on a smaller table so that the media warps down Warped up media may be impossible to vacuum on th...

Страница 30: ...re the media with a tape etc Perform a thorough test print before using media that reflects light from mirrors glass glossy metal etc Do not use media with missing nozzles or bending lines When printing media that reflects light from mirrors glass glossy metal etc perform maintenance on the print heads and the UV lamp with greater frequency Reflected UV light may harden the ink on the print heads ...

Страница 31: ...onfiguring settings related to print contents Configuring machine settings Operating environment Operating system Windows 10 64 bit CPU Intel CoreTM i5 2 GHz or more Memory 16 GB or more Display resolution 1366 768 or more and 16 bit color or higher For details about the Print Control screen see page 32 How to Use the Print Control Screen If you change the ink configuration or ink type you must ch...

Страница 32: ...used with the machine Ricoh Pro UV Ink GP120 RICOH Pro UV Ink Bottle GP120 Ricoh Pro UV Ink DG130 RICOH Pro UV Ink Bottle DG130 5 Click Install 6 Connect the machine and computer via a USB cable and then click OK 7 Click Finish A shortcut is created on the desktop If Print Control is reinstalled any contents that have been adjusted or set will be restored to their initial state After changing the ...

Страница 33: ...than the one set with the PC language setting For details see page 77 Changing the Display Language About Print Control 31 ...

Страница 34: ...he software will close Double clicking the shortcut icon on the desktop will start Print Control Startup Screen An icon is assigned to each function and these icons are displayed on the Startup screen The toolbar and other functions are described below M0DTOC5050 4 1 3 2 1 Function tab Click the icon to switch to the selected screen 2 Exit Terminates the application 3 Work area Used to configure s...

Страница 35: ... Click to display the Maintenance screen See page 37 Maintenance Screen 3 Option tab Click to display the Option screen See page 39 Option Screen Toolbar Functions of each button on the toolbar are described below M0DTOC5051 4 3 2 1 2 1 Home Click to move the carriage to the home position the right edge of the gantry 2 Click to move the carriage to the left or right How to Use the Print Control Sc...

Страница 36: ... 3 Print Position You can change print start position If you want to change the start position of the registered task select the task to change the Print Position settings 4 Printhead Status Click to display the Medium Thickness screen and print a nozzle check pattern See page 46 Test Printing 5 Mode switching Flatbed Roll Click to switch printing modes Flatbed Roll If a printing mode is switched ...

Страница 37: ...ete tasks 13 Add Click to select tasks 14 Print Click to start printing 15 Pause Click to pause printing Media Setting You can measure the thickness of the media and move the carriage to the height set in the setting items M0DTOC5057 3 1 5 2 4 7 6 1 Setting Status Specify the media thickness and the distance between the media and print heads 2 Up arrow button Down arrow button Move the carriage to...

Страница 38: ...reen Select a task in the task list and click Details Setting to display the Details Setting screen You can configure settings for partial printing multi copy printing and multicoat printing etc on the Details Setting screen 1 8 9 2 3 4 5 6 7 M0DTOC5060 1 Region Setting Specify a printing range to perform partial printing See page 69 Partial Printing 2 Multi Setting Configure settings for multi co...

Страница 39: ...print speed Select the print mode according to the color combination in use and required image quality The following are the 5 types of image quality Draft Used to check the layout You can select this only if the color set is 4C Production Prints at high speed but the quality is lowered Standard Prints at standard quality and speed Quality Prints at high quality but the printing speed is slower Hi...

Страница 40: ...ge the registered tasks 2 Direction Click to check the print direction 3 Printhead Status Click to display the Medium Thickness screen and print a nozzle check pattern See page 46 Test Printing 4 Cap Attach the cap to the nozzle face of the print head or detach the cap as required See page 65 Capping or page 65 Detaching caps 5 Clean Click to perform head cleaning See page 51 Cleaning Print Head N...

Страница 41: ... the carriage in Maintenance mode The height of the carriage at the end of the Maintenance mode is the same as that at the start of the Maintenance mode Weekly maintenance Option Screen Other You can configure settings for the footnote UV lamp and the carriage moving distance in the X and Y direction How to Use the Print Control Screen 39 ...

Страница 42: ...Y direction at every click of or on the toolbar 5 X Specify the moving distance of the carriage in the X direction at every click of or on the toolbar 6 Language Selects the language to be displayed on the screen 7 Data Unit Used to select the unit displayed on the screen from Metric mm inch and mil 8 Purge Perform ink or air discharge For details about ink discharge see page 99 Discharging Ink Fo...

Страница 43: ... 79 List of Setting Items on the Option Screen Other When you move to another screen without clicking Apply the setting values will not be reflected in operations Make sure to click Apply after changing the setting values How to Use the Print Control Screen 41 ...

Страница 44: ...2 Using Print Control 42 ...

Страница 45: ...erform test printing See page 46 Test Printing 3 Clean the print heads See page 51 Cleaning Print Head Nozzles 4 Set the media See page 53 Setting Media 5 Print data See page 60 Printing Data To transmit data from a computer to the printer DVB128 1 Create a RIP file using ColorGATE For details about how to use ColorGATE see the included help manual 2 Print the RIP file using Print Control You can ...

Страница 46: ...light up M0DTPC0011 2 Start Print Control Turning Off the Power Standby State Before you turn off the power standby state confirm Data is not being received from a computer There is no data that has not been output yet The carriage is placed in the maintenance station 1 Exit Print Control 2 Confirm that the cooling fan for the UV lamp has stopped and then press the power off button on the front of...

Страница 47: ...ned to the maintenance station position before turning off the power If you turn off the power before the carriage returns to the maintenance station position the print heads will get dry which may cause nozzle clogging Do not turn off the power during printing Otherwise the carriage may not return to the maintenance station You cannot turn off the power by pressing the emergency button Turning On...

Страница 48: ... set media see page 54 Setting Media on a Table 2 Click the Task Print tab 3 Specify the print start position of the X coordinate For details about how to set the print start position see page 59 Changing Print start Position 4 Click on the tool bar to make the carriage move to the original position 5 Click Printhead Status The Medium Thickness screen is displayed 6 Click Auto Detect on the Medium...

Страница 49: ... the measurement position ECD276 1 1 LED marker light 9 Click Move to Destination 10 Click OK The machine measures the media thickness and the carriage moves to the set height 11 Confirm the setting contents and click Confirm 12 Click Print After the carriage has moved toward the recess by approximately 180 mm the test pattern is printed If the media size is small the test pattern may be printed o...

Страница 50: ... How to read the test printing result is explained below Pr Cl and W are easier to see if printed on transparent media The areas where Pr Cl and W are printed depend on the ink configuration For details about changing the ink configuration contact your service representative If the ink configuration is set to Standard Ink Config DZQ131 4 3 2 1 5 6 7 1 Pr Primer 2 Cl Clear 3 W White 4 CMYK Color 5 ...

Страница 51: ... Color 4 Print head 3 5 Print head 2 6 Print head 1 Check the color and position of the print heads with discharge defects such as missing nozzles in the printing result Check the print heads with discharge defects by referring to the following illustration Normal printing result CFT168 Test Printing 49 ...

Страница 52: ...cts in the heads 1 4 2 3 DVB195 1 Missing nozzles have occurred 2 The test pattern is wave like 3 The test pattern is intermittent 4 The intervals in the test pattern are not equal Bending lines have occurred 3 Basic Operations 50 ...

Страница 53: ...Cleaning According to the Test Printing Result Head cleaning means discharging a small amount of ink from the print heads and wiping off unnecessary ink with a wiper You can remove unnecessary ink and clear ink clogging by cleaning the print heads Perform cleaning repeatedly until the printing result becomes normal 1 Confirm that the carriage is located in the home position If not click Home on th...

Страница 54: ...3 Basic Operations 52 ...

Страница 55: ...g the adsorption pressure see page 54 Setting Media on a Table The periphery of the media may be warped due to the heat To prevent the media from coming into contact with the print head which may cause media tearing and print head malfunction support the media with adhesive tape or some other item Take the following precautions when setting the media Otherwise a table may be deformed Do not drop h...

Страница 56: ...ws When the print start position is set to 100 100 ECD132 I N C H C M 4 2 1 3 1 Table 2 Media 3 Origin 0 0 4 Print start position 100 100 2 Switch the vacuum valves to align it with the size of the media to be used The valve will be opened when the handle is tilted in the longitudinal direction It will be closed when the handle is tilted in the lateral direction For details about how to adjust the...

Страница 57: ...M0DTIC0013 3 Press the vacuum switch to vacuum the media The vacuum fan will operate ECD143 4 Turn the vacuum pressure control to adjust the vacuum pressure ECD145 Setting Media 55 ...

Страница 58: ...etting positioning pins The positioning pins for aligning the media straight are built into the table The positioning pins are set when the positioning pin switch on the front of the machine is turned on You can use them as a guide An air compressor is required to use the positioning pins For details contact your service representative The locations of the positioning pins are shown below Position...

Страница 59: ...c luster for the dummy Keep the head gap to 2 mm or less for both the media and dummy If the head gap between the table and the print head is 10 mm or more the UV light reflects onto the print head This may cause the ink on the print head to harden and it may lead to malfunction For media with a metallic luster or that reflects light even if the head gap between the table and the print head is 10 ...

Страница 60: ...airflow resulting in printing failure ECD245 1 2 2 2 1 2 3 4 5 2 2 1 Media 2 Areas not covered by the dummy 3 Print head 4 Adequate head gap 2 mm or less 5 Head gap from table 10 mm or less Notes on printing under the high head gap The recommended head gap is 1 mm If you print under a high head gap the amount of ink mist will increase The ink can adhere to the irradiation surface of the UV lamp Pr...

Страница 61: ...e set up to 2 mm but a head gap greater than the recommended 1 mm may lead to a reduction in image quality Changing Print start Position You can change the print start position in the X and Y directions on the Operation screen 1 Click the Task Print tab 2 Select a task 3 Enter numerical values in X The print start position of the X coordinate is set 4 Enter numerical values in Y The print start po...

Страница 62: ...ge is not returned to the home position click Home on the toolbar to return the carriage to the home position As you may not obtain the printing result you want for some printing data or media types we recommend performing test printing beforehand Media may be heated by the UV lamp and raised causing printing to be interrupted In such cases set the new media and perform printing again Be sure to p...

Страница 63: ... settings see page 36 Details Setting screen or page 69 Various Print Functions To use white ink clear ink and primer ink see Using Spot Color to Print RIP Settings Guide 5 Click Apply The dragged file is added to the task list Perform printing 1 Click the Task Print tab and select the task to be printed You can confirm information about tasks and files that are printed from the preview area 2 Per...

Страница 64: ...t heads do not interfere with the media 6 Enter numerical values in X and Y for Medium Position in accordance with the position to measure the media thickness When printing on uneven media measure its thickest part Use the LED marker light as a guide for the measurement position ECD276 1 1 LED marker light 7 Click Move to Destination 8 Click OK The machine measures the media thickness and the carr...

Страница 65: ...rrupt ongoing printing jobs perform the following operations using Print Control 1 Select the Pause check box Printing is interrupted 2 Select the Pause check box to resume printing from the interrupted position Stop Printing Data Clear When you stop ongoing printing jobs perform the following operations using Print Control 1 Select the Stop check box during printing Printing stops 2 Select the ta...

Страница 66: ...ove the gantry to check the printing result or remove the media manually Moving the gantry manually Click the moving buttons on the toolbar to move the carriage or gantry manually This section uses the Y direction as an example to explain the setting procedure for the moving distance each time you click a moving button 1 Click the Option tab 2 Click Other 3 Basic Operations 64 ...

Страница 67: ...e clogging due to drying by capping the print heads 1 Click the Maintenance tab 2 Click Cap The carriage moves to the maintenance station and caps are attached to the print heads Detaching caps When moving the carriage from the maintenance station for measuring the thickness of media etc detach the caps beforehand 1 Click the Maintenance tab 2 Click Cap Caps are detached from the print heads Print...

Страница 68: ...3 Basic Operations 66 ...

Страница 69: ...position as described below When not using clear ink be sure to set both the left and right UV lamps to the 0 mm position When using clear ink do not perform reverse direction printing 1 Open left UV lamp cover ECD223 2 Turn the UV lamp securing screw counterclockwise to loosen it 0 1 2 3 4 5 6 0 1 2 3 4 5 6 ECD240 3 Slide the UV lamp to align the arrow with 20 mm graduation 2 If not using clear i...

Страница 70: ...0 1 2 3 4 5 6 0 1 2 3 4 5 6 ECD241 4 Tighten the screw to secure the UV lamp 5 Close left UV lamp cover 6 Adjust the right UV lamp position in the same way 4 Convenient Usage 68 ...

Страница 71: ...n use the following print functions Partial printing function Multicopy printing function Multicoat printing function Mirror printing function To perform printing see page 60 Printing Data Partial Printing Specify the printing range to perform printing DVB136 1 Select the task you want to specify and then click Details Setting The Details Setting screen is displayed 2 Select the Region Setting che...

Страница 72: ... adjust the selected range by entering a setting value for each item directly M0DTOC5066 4 Click Apply The image to which the area setting is applied is displayed in the preview area on the upper right of the Operation screen Multicopy Printing Allocate images repeatedly copied to one media When combined with the partial printing function it will print by repeatedly copying the image that has been...

Страница 73: ...8 This section describes how to copy the entire image repeatedly 1 Select the task you want to specify and then click Details Setting The Details Setting screen is displayed 2 Select the Multi Setting mm check box M0DTOC5068 The Multi Setting area is enabled Various Print Functions 71 ...

Страница 74: ...in the x direction Print quality is higher if printed with the distance in the x direction set shorter Multicoat Printing You can create a more even finish to the media by repeating coating Configure the settings for the re coating frequency with color ink and reciprocating printing When multicoat printing is combined with reciprocating printing the printing time can be reduced however the print q...

Страница 75: ...l be printed while reciprocating from the front side to the back side for the first time and from the back side to the font side for the second time 4 Click Apply When Reverse Dir is selected Alternate cannot be used Before performing multicoat printing on the same media check the head gap Mirror Printing The images are reversed towards the X direction or Y direction CKN047 1 Select the task you w...

Страница 76: ... time However the print quality may also be reduced This function can be used 1 Select a task and then click Details Setting The Details Setting screen is displayed 2 Specify the print position using the coordinates of the lower right of the print image 3 Select the Reverse Dir check box M0DTOC1064 4 Click Apply 4 Convenient Usage 74 ...

Страница 77: ...e Size A barcode can be added as required 1 2 3 4 DVB140 1 Media 2 Image 3 Footnote 4 Barcode 1 Click the Option tab 2 Click Other 3 Configure the necessary settings in the Footnote area Font Specify the font of the text to be printed in the footnote Size Specify the height of the footnote to be printed Distance Specify the distance between the footnote and the image Printing a Footnote 75 ...

Страница 78: ...ng screen of the task that adds a footnote select the Print Footnote check box and then print For details see page 36 Details Setting screen Footnotes are printed outside of image data Be sure to use media that is larger than the image data when printing a footnote The barcode to be printed includes the file name 4 Convenient Usage 76 ...

Страница 79: ...guese and Dutch 1 Click the Option tab 2 Click Other 3 Select the language to be displayed from the Language pull down in the Settings area The message screen will be displayed 4 Confirm the message and click Yes 5 Click Apply 6 Restart Print Control The display will be switched to the selected language The display language in Print Control is set automatically according to the language setting of...

Страница 80: ... can be displayed 1 Click the Option tab 2 Select the unit to be displayed from the Data Unit pull down in the Settings area The display will be switched to the selected unit If you change the data unit the setting values are converted automatically according to the selected unit and displayed 4 Convenient Usage 78 ...

Страница 81: ... function Users cannot change the settings except the following items as they have already been set to their optimum values Skip White Space If there is no image data blank spaces will not be printed Default Disabled Footnote Barcode Barcodes will be printed in the footnote the front side of the machine of the printed materials Default Disabled Footnote Specify the font and size of a footnote Font...

Страница 82: ...cify the moving distance of the carriage in the Y direction at every click of the or button on the toolbar Default xx mm Settings Configure the settings for each function Language Select a display language from Japanese English French German Italian Spanish Portuguese and Dutch Default Japanese Data Unit Select an indication unit from Metric mm inch and mil Default Metric mm 4 Convenient Usage 80 ...

Страница 83: ...power source The power indicator is off Turn on the power For details about how to turn on the power see page 44 Turning On Off the Power The power indicator is off even after the power switch is pressed Check if the power cord plug is firmly connected to the power source If the power indicator is still off disconnect the power cord and then contact your service representative An emergency button ...

Страница 84: ...ble Check if Print Control has been installed to the computer For details about how to install Print Control see page 29 Installing Print Control The machine does not start The interlock is enabled for one of the following reasons causing the machine to stop The machine cover is open The carriage is positioned too far to the left or right end Close the cover properly and then reboot Print Control ...

Страница 85: ...of the waste ink For details see page 97 Disposing of Waste Ink The amount of remaining ink in the ink tank is low If the amount of remaining ink in the ink tank is low the machine makes a beeping sound Check which ink tanks are low on ink and then replenish them with ink For details see page 93 Replenishing Ink When You Have Problems Operating the Machine 83 ...

Страница 86: ...ng or streaks appear on the printed image or the colors mix during printing Ink is clogged in the print head nozzles The print head nozzle faces are dirty The bottom plate and sides of the carriage are stained Perform head cleaning For details see page 51 Cleaning Print Head Nozzles Clean the maintenance station See Cleaning the Area around the Maintenance Station Requests for Daily Care and Maint...

Страница 87: ...n the wipers See Cleaning Wipers Requests for Daily Care and Maintenance 2 Clean the capping station See Cleaning the Capping Station Requests for Daily Care and Maintenance 3 Clean the areas around the print heads See Cleaning Around the Print Heads Requests for Daily Care and Maintenance 4 Perform head cleaning For details see page 51 Cleaning Print Head Nozzles There are blisters on the media s...

Страница 88: ...r 1 week or more or the nozzle faces are dirty clean the nozzle faces See Cleaning the Nozzle Faces of the Print Heads Requests for Daily Care and Maintenance After cleaning print nozzle check pattern For details see page 46 Test Printing If there is any problem with the printing result proceed to the following procedure 3 Perform head cleaning Perform head cleaning using Print Control For details...

Страница 89: ...ing on and cleaning the machine that has not been used for a long period of time The included dedicated tool is required to remove air bubbles Be sure to wear gloves and goggles during the work Otherwise ink may drip or be scattered If ink or dust adheres to an area surrounding the print heads clean the area as required to prevent the printed materials from becoming dirty Do not place any object o...

Страница 90: ...n select Purge from Other on the Option tab 4 Select the check boxes in Air Discharge to discharge air bubbles for each color If the ink configuration is set to Standard If the ink configuration is set to Double White 5 Troubleshooting 88 ...

Страница 91: ...ts until they click W1 2 W1 1 W2 2 W2 1 C 2 C 1 M 3 M 2 M 1 Y 3 Y 2 Y 1 K 3 K 2 K 1 Pr1 3 Cl1 2 Cl1 1 DYJ149 8 Click OK Ink is discharged to the air bubble ejection tool Wait until Remove the tubes of the air bubble ejection tool from the port and click OK button is displayed 9 Remove the tubes of the air bubble ejection tool from the ports As you remove the tubes the ink may leak Place an item su...

Страница 92: ...rriage and then click OK 13 Repeat Steps 6 to 10 until air bubbles for all the colors selected in Step 4 have been discharged 14 Click Exit 15 Wipe off the ink on the port and then attach the rubber cap to the air bubble discharge port 16 Attach the front cover of the carriage 17 Wipe off the ink on the air bubble ejection tool and then dispose of the ink in it 18 Store the air bubble ejection too...

Страница 93: ... the port of the tool by using a waste cloth or non woven fabric Failure to remove the ink may lead to ink leakage or the inability to discharge air bubbles W1 2 W1 1 W2 2 W2 1 C 2 C 1 M 2 M 1 Y 3 Y 2 Y 1 K 3 K 2 K 1 Pr1 3 Cl1 2 Cl1 1 Pr2 3 Cl2 2 Cl2 1 M0DTIC0027 1 2 1 Port for air bubble ejection tool remove the ink inside the port 2 Port for Discharging Air Bubbles remove the ink in the inside a...

Страница 94: ...5 Troubleshooting 92 ...

Страница 95: ...ot to spill ink Avoid ink flowing into the natural water system or household wastewater Ink causes irritation and is toxic Be sure to wear gloves and goggles during the work Otherwise ink may drip or be scattered Do not place caps or other items on the table as the carriage may move when replenishing ink during printing If you want to dispose of used ink contact a company that handles industrial w...

Страница 96: ...ished with ink DVB157 4 Open the cap of an ink bottle for replenishing and then replenish ink into the ink tank The buzzer will stop when you finish replenishing ink Be sure to empty all the ink from the ink bottle When replenishing white ink confirm the cap of the ink bottle is closed and shake the bottle well before replenishing 6 Maintenance and Specifications 94 ...

Страница 97: ...he pad replace the flushing pad Be sure to wear gloves and goggles during the work Otherwise ink may drip or be scattered Only use a Ricoh genuine replacement pad Otherwise malfunction or damage may result Do not place any object on the table as the carriage moves there during replacement 1 Click Daily Care on the Maintenance tab in Print Control 2 Click Maintenance Mode 3 Click Start Move away fr...

Страница 98: ...wise the pad might crush causing defects in cleaning Attach the pad firmly When printing is performed with the upper surface of the pad rising above the flush receiving section it interferes with the print heads This may cause an ink discharge defect ECD167 6 Click Exit to exit the maintenance mode Move away from the gantry as the carriage moves to the maintenance station position 6 Maintenance an...

Страница 99: ...k If you drop the waste ink ink may spill out Do not replace the waste ink tank while the machine is printing or being cleaned If you moved the waste ink to a polyethylene tank contact a company that handles industrial waste Some components such as photopolymerization initiators are toxic to aquatic animals Do not flow these components in natural water such as rivers or domestic wastewater such as...

Страница 100: ...he waste ink into a dedicated container such as a polyethylene tank ECD162 4 Wipe off any ink on the waste ink tank and then close the cap ECD163 5 Return the waste ink tank to its original position Confirm that the tubes coming out of the waste ink tank are not bent or crushed 6 Maintenance and Specifications 98 ...

Страница 101: ...the Negative Pressure Valves Discharging Ink If leaving the machine idle for a long period 10 days or more discharge the ink before stopping the machine Before using the machine after discharging the ink it is necessary to fill the tanks with ink Contact your service representative to fill the tanks with ink Be sure to wear gloves and goggles during the work Otherwise ink may drip or be scattered ...

Страница 102: ...ec to 30 seconds If the ink configuration is set to Double White Ink Config check White1 in Ink Discharge Charge area and then set Discharge time Sec to 30 seconds M0DTOC1062 4 Check the pressure gauges at the bottom of the left part of the machine and make a note of the indicated pressures kPa MODE 1 2 DZQ242 6 Maintenance and Specifications 100 ...

Страница 103: ... the P2 pressures 6 Click Discharge in the Ink Discharge Charge area The carriage moves to the left side ink receiver and then ink discharge starts Once discharge ends the message Discharged appears Of the sub tank ink levels indicated at the lower right of the screen the sub tank of the discharged ink flashes in red M0DTOC1063 7 Next discharge the ink in the following order Check 2 colors at a ti...

Страница 104: ...This prevents the ink from clogging on the nozzle surface while the machine is left unused You only need to apply cleaning liquid to the nozzle faces Be careful not to rub the nozzle faces with excessive force DVB329 9 Click Cap on the Maintenance screen to cap the print head 10 Turn off the power on the operation panel at the front of the machine 11 Turn off the computer 6 Maintenance and Specifi...

Страница 105: ...t ink receiver at the left end 2 Turn the machine s power off entering standby state For details about how to turn the power off see page 44 Turning Off the Power Standby State 3 Turn the main power off 4 Turn the two negative pressure valves on the side of the carriage clockwise to close them M0DTIC0025 To use the machine open the two negative pressure valves If the machine has not been used for ...

Страница 106: ... 342540 2 RICOH Pro UV Ink Bottle White GP120 342541 2 High adhesion and wide color gamut ink Name Product code Sales unit RICOH Pro UV Ink Bottle Black DG130 342543 1 RICOH Pro UV Ink Bottle Cyan DG130 342544 1 RICOH Pro UV Ink Bottle Magenta DG130 342545 1 RICOH Pro UV Ink Bottle Yellow DG130 342546 1 RICOH Pro UV Ink Bottle White DG130 342547 1 RICOH Pro UV Ink Bottle Clear DG130 342548 1 Befor...

Страница 107: ... this machine Maintenance Kit Maintenance Kit Type C Name Quantity Carriage filter 4 pieces Flushing pad 3 pieces Cleaning Kit Cleaning Kit Type C Name Quantity Waste cloth paper towel 1 box 50 sheets Non woven fabric 1 box 100 sheets Polyethylene gloves 7 pairs Nitrile gloves 14 pairs Cleaning stick 12 sticks Cleaning Liquid Name Sales unit Cleaning liquid 1 bottle List of Consumables 105 ...

Страница 108: ...um resolution 635 1 800 dpi Maximum print size 2 500 1 300 mm approx 98 4 51 2 inches Supported media For details see page 27 Size and Weight Specifications of Supported Sheet Media Media vacuuming Vacuuming is performed by a vacuum Divided into 4 parts Waste ink tank Bottle system 2 5 L Recommended operating environment Temperature 15 30 C 59 86 F Humidity 40 80 Power supply used mainly Europe an...

Страница 109: ...oh genuine ink Do not disassemble the ink bottle refill or add ink to the ink bottles Ink may freeze if stored in a cold place for a long period of time If ink freezes it may become unusable as it may deteriorate Make sure to store ink in an environment where ink will not freeze Supported ink colors Black cyan magenta yellow white clear and primer ink Ink tank capacity 2 5 L Ink supply method Ink ...

Страница 110: ...6 Maintenance and Specifications 108 ...

Страница 111: ...oduction 635 dpi 300 dpi 2 2_W 4C_Standard 635 dpi 600 dpi 2 3_W 4C_Quality 635 dpi 900 dpi 2 4_W 4C_High Quality 635 dpi 1 800 dpi 3 1_Pr 4C_Production 635 dpi 300 dpi 3 2_Pr 4C_Standard 635 dpi 600 dpi 3 3_Pr 4C_Quality 635 dpi 900 dpi 3 4_Pr 4C_High Quality 635 dpi 1 800 dpi 4 1_Pr W 4C_Production 635 dpi 300 dpi 4 2_Pr W 4C_Standard 635 dpi 600 dpi 4 3_Pr W 4C_Quality 635 dpi 900 dpi 4 4_Pr W ...

Страница 112: ...nfig Print mode X Resolution Y Resolution 1 0_4C_Draft 635 dpi 300 dpi 1 1_4C_Production 635 dpi 300 dpi 1 2_4C_Standard 635 dpi 600 dpi 1 3_4C_Quality 635 dpi 900 dpi 1 4_4C_High Quality 635 dpi 1 800 dpi 2 1_W 4C_Production 635 dpi 300 dpi 2 2_W 4C_Standard 635 dpi 600 dpi 2 3_W 4C_Quality 635 dpi 900 dpi 2 4_W 4C_High Quality 635 dpi 1 800 dpi 3 1_4C W_Production 635 dpi 300 dpi 3 2_4C W_Standa...

Страница 113: ...demarks or trademarks of Microsoft Corp in the United States and or other countries The proper names of the Windows operating systems are as follows The product names of Windows 10 are as follows Microsoft Windows 10 Home Microsoft Windows 10 Pro Microsoft Windows 10 Enterprise Microsoft Windows 10 Education Other product names used herein are for identification purposes only and might be trademar...

Страница 114: ...MEMO 112 EN GB EN US EN AU M0DT 7003 ...

Страница 115: ... 2020 Ricoh Co Ltd ...

Страница 116: ...M0DT 7003 AU EN US EN GB EN ...

Отзывы: