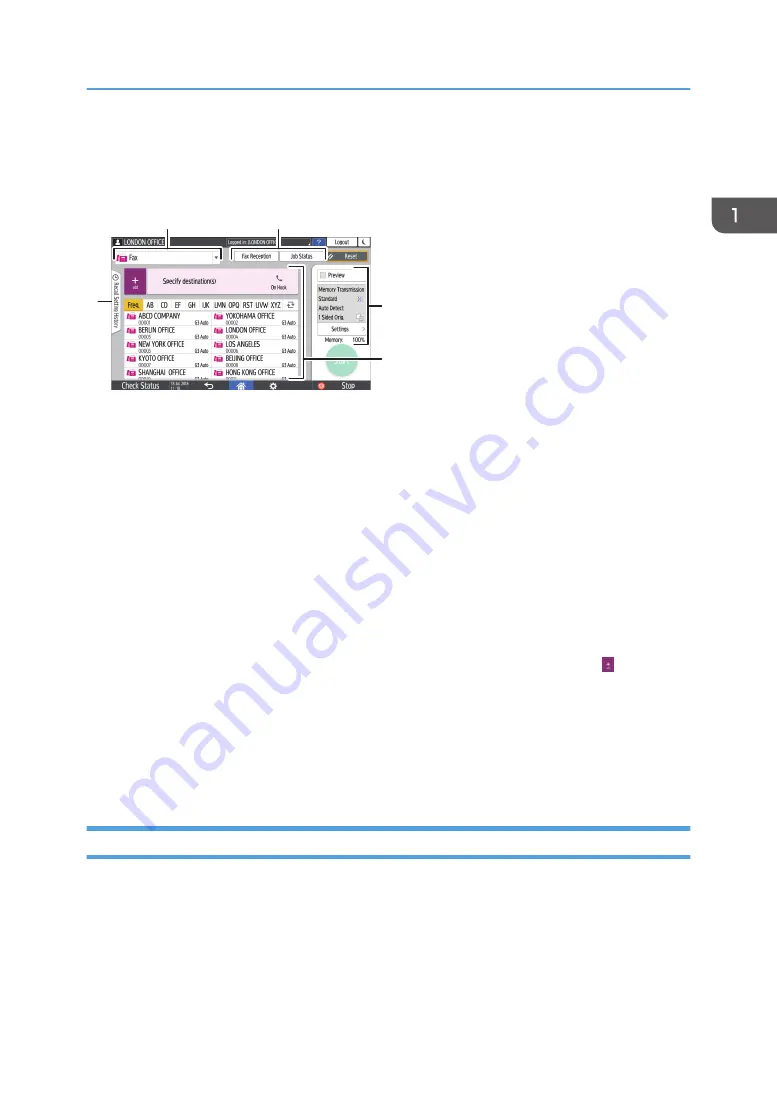
How to Use the Fax Screen
There are five kinds of functions and settings on the Fax screen.
1
3
5
4
DZX895
2
1. Destination type selection
Switch the destination type between [Fax] (including IP-Fax) and [Internet Fax]. The items displayed in the
address book and destination entry screen for manual entry change also when you switch the destination type.
2. Transmission/reception information confirmation
Browse and print the received documents that are stored in the memory or on the hard disk drive of the
machine. You can also browse and print the transmission and reception history.
3. Transmission settings
You can specify the additional features to use when sending a fax, configure the scan settings appropriately
for the original to scan, and display a preview before sending the fax. You can also check the settings that are
currently specified and the remaining amount of memory.
4. Destination specification
You can select an address registered in the address book through one-touch operation. Press to specify a
destination by using various other methods such as by entering manually or selecting from the history. You can
also register a new destination in the address book.
5. Job history
Job history of the executed jobs is displayed. When user authentication is set, the job history of each
authenticated user is displayed. When you select a job history, the setting will be applied on the current Fax
screen. This feature is convenient when you are using the same setting repeatedly.
Customizing the [Settings] Screen
Press and hold a key on the [Settings] screen to customize the layout of the keys.
When the administrator has enabled user authentication and User's Own Customization, the screen can
be customized for each user.
How to Use the Fax Screen
49
Содержание IM 550 Series
Страница 2: ......
Страница 34: ...4 Press Disable Mode 5 Press OK 6 After completing the procedure press Home 1 Getting Started 32...
Страница 76: ...1 Getting Started 74...
Страница 94: ...2 Copy 92...
Страница 168: ...5 Scan 166...
Страница 176: ...6 Document Server 174...
Страница 182: ...7 Web Image Monitor 180...
Страница 218: ...8 Adding Paper and Toner 216...
Страница 326: ...The Ethernet interface and wireless LAN board cannot be used simultaneously 10 Specifications for the Machine 324...
Страница 332: ...10 Specifications for the Machine 330...
Страница 340: ...MEMO 338...
Страница 341: ...MEMO 339...
Страница 342: ...MEMO 340 EN GB EN US EN AU D0BW 7024...
Страница 343: ...2019...
Страница 344: ...D0BW 7024 AU EN US EN GB EN...


