


SP1100SF/Aficio SP1100SF
- 60 -
Maintenance
Service
General information
To ensure that your machine is kept in the best
conditions, it is recommended that you periodically clean
the inner parts.
Please respect the following rules while using this
machine:
- Do not leave the scanner cover open.
- Do not try to lubricate the device.
- Do not close the scanner cover violently or do not
apply vibrations to the machine.
- Do not open the cartridge access cover while printing.
- Do not try to disassemble the machine.
- Do not use paper which would has stayed in the tray
for too long.
Toner cartridge replacement
Three toner cartridge replacement procedures can be
used depending on the
T
ONER
M
ANAGEMENT
setting.
•
T
ONER
M
ANAGEMENT
setting set to
W
ITH
[0-10%]
:
the
replacement of the cartridge can be perfomed only
when the message
Toner near end
is displayed. At
the end of replacement, validation with the smart card
is required.
•
T
ONER
M
ANAGEMENT
setting set to
W
ITH
[0-100%]
:
the replacement of the cartridge can be perfomed at
any time. At the end of replacement, validation with the
smart card is required.
•
T
ONER
M
ANAGEMENT
setting set to
W
ITHOUT
:
the
replacement of the cartridge can be perfomed at any
time and no validation with the smart card is
necessary. When set to
W
ITHOUT
, the screen displays
T
ONER
? %.
To set the
T
ONER
M
ANAGEMENT
setting, select 6
2979 -
SETUP / TECHNICALS / TONER MANAGEMENT
and
choose the setting
.
Your machine comes with a current consumable
management system. It tells you if your toner cartridge is
close to its end of cycle. The following message will
appear on your machine screen.
To quit this screen, press
OK
.
To replace the toner cartridge, proceed as shown below.
When the following message is displayed on the screen:
1
Press
OK
.
2
Stand in front of the device.
3
Push on the left and right sides of the cover and pull
it towards you.
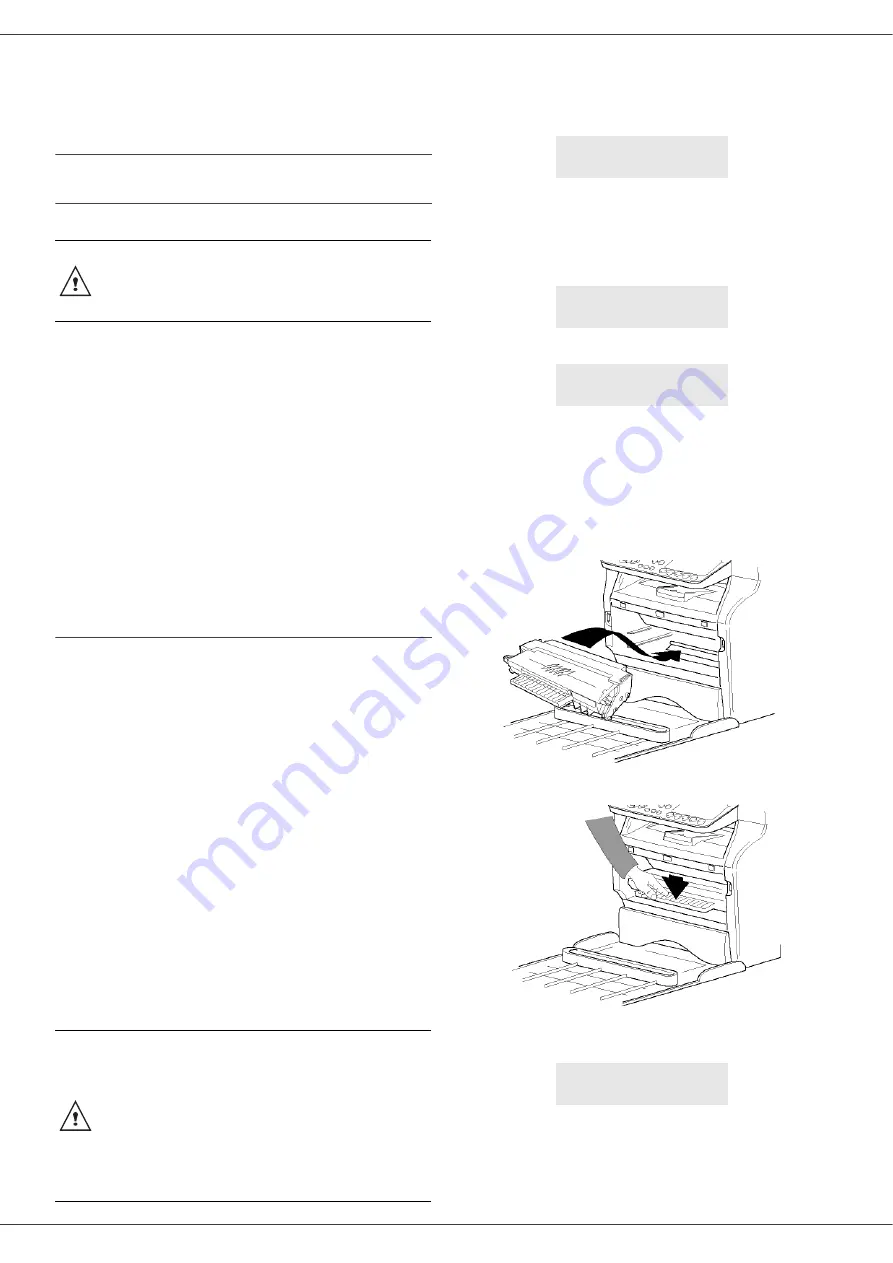
4
Raise and remove the toner cartridge from the
machine.
5
Unpack the new cartridge and insert it into the slot
as indicated in the diagram below.
6
Close the cover.
The following message appears:
7
Press
OK
.
CAUTION
For your safety, it is imperative to
refer to the safety information
presented in chapter
CAUTION
This procedure applies when the
setting
T
ONER
M
ANAGEMENT
is set to
W
ITH
[0-10%]
.
When set to With [0-100%], follow the
procedure from step 2.
When set to
W
ITHOUT
, follow the
procedure from step 2 to step 7.
TONER NEAR
END
TONER EMPTY
REPLACE <OK>
OPEN FRONT COVER
REPLACE TONER
HAVE YOU CHANGED
THE TONER? <OK>