Rice Lake DMC-782 Скачать руководство пользователя страница 11

Installation

7

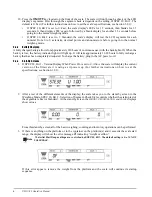
seconds. It then displays 888’s again followed by a blank display for another 1.5 seconds before 

going into the normal weighing mode.

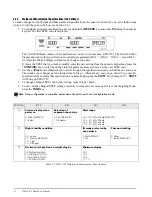
If SPEC 20, Bit 2 is set to 1: Standard, the scale’s display will test the LCD segments for each 

numeral from 0 to 9, asterisks, decimal points and annunciators before going into the normal 

weighing mode.

4. Once the scale is on, the time interval before the scale will automatically power itself off, if there no key 

is pressed and no weight is placed on the platter, is determined by SPEC 00- Auto Power-Off Function. 

The default is 0000: Disabled. (For further instructions on how to set the scale’s specifications, see 

Section 3.2.1)

2.4.2

DC Battery Pack Replacement/Installation

An optional DC battery pack (PN 108516) for the DMC-782 is available and can be purchased from RLWS to 

ship with the scale or retrofit in the field. The rechargeable 6V 5.0 AH battery pack allows for up to 380 hours of 

scale use without an AC power supply (with the backlight off). It is located in the bottom of the scale base. Use 

the following procedure to install or replace the battery pack.

1. Unplug the scale from power source.
2. Place scale its left side. 

Important

Do not turn the scale upside down. Always work with the scale on its side. Damage to the load cell can 
occur if the scale is turned upside down.

3. Unscrew the thumb screw (4 below) holding the battery compartment door (5 below) closed.
4. Unscrew the two screws (3 below) holding on the battery holding bracket (2 below) and remove the 

bracket.

Figure 2-3. Installing the Battery

5. If you are removing a battery previously installed, remove the battery from its compartment, then 

disconnect the black (-) and red (+) electrical leads from the battery (6 above). If you are installing a new 

battery, go to step 6.

6. Attach the red lead to the positive (+) terminal of the new DC battery pack, and the black lead to the 

negative (-) terminal. Place new DC battery pack in battery compartment.

7. Replace the battery holding bracket (2 above) and fasten it with its two screws (3 above).
8. Replace the battery compartment door (5 above) and fasten it with its thumb screw (4 above).
9. Put the scale back upright on its feet.

Содержание DMC-782

Страница 1: ...111781 DMC 782 Counting Scale Operation Manual Coin Counting Scale Version 1 00...

Страница 2: ......

Страница 3: ...o the Full Capacity of the Scale 16 4 2 Calibration Using a Test Weight of Less Than the Full Capacity of the Scale 17 5 0 Scale Operations 19 5 1 Entering Recalling and Adding Subtracting Tare Weight...

Страница 4: ...nd Unit Weight Where the Unit Weight is Unknown 26 6 4 Program a Preset Tare Weight to a Key 26 6 5 Delete Preset Coin Data from Memory 27 7 0 Appendix 28 7 1 DMC 782 Specifications 28 7 2 DMC 782 Err...

Страница 5: ...Safety Signal Definitions CAUTION Important CAUTION Indicates a potentially hazardous situation that if not avoided may result in minor to moderate injury Indicates information about procedures that...

Страница 6: ...operations take place Programming Mode where item data can be programmed into the memory of the scale The display will show ProG to indicate that you are the Programming Mode Maintenance Mode where yo...

Страница 7: ...ric entry batt Battery warning when weak and needs charging blinks while charging QTY On when the quantity is being displayed rather than the value 1 5 3 Key Functions The DMC 782 features many functi...

Страница 8: ...utputting data to a PC if one is connected Programming Mode Used to navigate to the previous specification when programming SPEC codes Plus key Weighing Mode Used to accumulate data Also prompts outpu...

Страница 9: ...AC power cord Operation manual 3 Remove the bag protecting the scale and the protective film covering the front panel and platter 4 Seat the stainless steel platter on the platter supports 5 After en...

Страница 10: ...e scale is turned upside down To power up the DMC 782 using the AC power cord 1 Connect the AC power cord under the scale base as shown in Figure 2 2 Figure 2 2 AC Plug in Location on Underside of DMC...

Страница 11: ...he backlight off It is located in the bottom of the scale base Use the following procedure to install or replace the battery pack 1 Unplug the scale from power source 2 Place scale its left side Impor...

Страница 12: ...to fully recharge a battery that has been completely dissipated To charge the battery plug in the AC power cord 2 4 4 Start Up Screens 1 If SPEC 20 Bit 3 Version Display When Power On is set to 0 Allo...

Страница 13: ...perating manual 109241 Adhesive display window overlay DMC 782 109242 Keyboard underlay DMC 782 73524 Weighing platter DMC 782 112263 Overlay display window DMC 782 112264 Overlay keyboard DMC 782 109...

Страница 14: ...82 Operation Manual 2 6 Block Diagram of Electrical Connections The following block diagram shown in Figure 2 4 illustrates the electrical connections Figure 2 4 Block Diagram Illustrating Wiring Conn...

Страница 15: ...Installation 11 2 7 Physical Layout of Electrical Connections Figure 2 5 illustrates the actual layout of the electrical connections Figure 2 5 Layout of Electrical Connections...

Страница 16: ...figuring Specification 141 and 142 Settings from the Scale Keyboard The following tables list the DMC 782 specifications their corresponding default values and the other possible values to which they...

Страница 17: ...IFT will bring up SPEC 11 3 To change another SPEC code before exiting repeat Steps 1 and 2 4 To save all the changed SPEC settings currently in temporary memory and exit to the Weighing Mode press th...

Страница 18: ...your changes per the instructions in Step 1 Alternatively you can go directly to a specific specification by entering that specification s number and pressing the SHIFT key Example 25 SHIFT will brin...

Страница 19: ...ght and denomination auto clear 0 Allow 1 Inhibit DEFAULT Auto clear condition 0 Gross 21e Net 5e DEFAULT 1 Net 1e Quantity Not 0 Net Gross multi interval 0 Gross 1 Net DEFAULT 28 Accumulation 0 Allow...

Страница 20: ...ian come in and check their units with certified test weights four times a year If you are ISO certified you will want to check to see if your certification specifies more stringent requirements in or...

Страница 21: ...ation power down your DMC 782 scale To exit the Maintenance Mode and return to the Weighing Mode without saving your calibration press the TARE key 4 2 Calibration Using a Test Weight of Less Than the...

Страница 22: ...e calibration settings 8 The display will flash briefly again as the span settings for calibration of the scale are being temporarily saved Then the display will return to the weighing mode with the c...

Страница 23: ...O TARE CLEAR WHEN REZERO Bit 0 takes place or not SPEC 26 controls whether the scale allows DIGITAL TARE entry Bit 3 whether the scale can do ACCUMULATION WHEN TARE Bit 2 if there will be ZERO TRACKIN...

Страница 24: ...ry Note SPEC 25 Bits 2 and 1 must be set to 00 to enable Tare Accumulation and Tare Subtraction For further instructions on how to set the specifications see Section 3 2 1 1 Place the cash drawer coin...

Страница 25: ...container on the scale platform The display will show the weight denomination and total value of the coins or tokens on the scale To switch the display to show the number of coins or tokens rather tha...

Страница 26: ...y mode instead of AMT mode you will hear an error beep because a quantity cannot be accumulated Switch the display back to visualizing total value by pressing the QTY AMT key and then pressing the key...

Страница 27: ...t total If a PC is connected to the DMC 782 pressing the CONFIRM key again will output the data to the PC and clear the current total The Memory indicator will no longer be illuminated 5 3 Counting Co...

Страница 28: ...be displayed in the Value window on the display 11 When done press the CLEAR key and the CONFIRM key to clear the total value from the accumulator You are now ready for the next cash drawer or to carr...

Страница 29: ...very accurate coin unit weights using the procedure described in Section 6 2 below 6 2 Program a Value and Unit Weight Where the Unit Weight is Known The DMC 782 has the capacity to store information...

Страница 30: ...n press the PCS key If the sample size is large enough to calculate an accurate unit weight that unit weight will be displayed in the Value display and the number of coins on the platform in the Amoun...

Страница 31: ...Mode The display will show ProG 2 Press the preset key number for the coin data that you want to delete The key number will appear on the display for you to confirm that it is the correct key and the...

Страница 32: ...ing rechargeable battery Charging Conditions for rechargeable battery only Battery Power DC 6V 5Ah rechargeable battery optional Power Source AC117 100V Charge Current 800 mA Charge Time 12 14 hours A...

Страница 33: ...when the power is on Remove the item on the platter U F When the negative weight exceeds the display limit Rezero the scale or power the on off button again ERROR When an error occurs in maintenance...

Страница 34: ...used by accident misuse neglect alteration improper installation improper repair or improper testing RLWS shall be the sole judge of all alleged non conformities Such equipment has not been modified a...

Страница 35: ......

Страница 36: ...2013 Rice Lake Weighing Systems PN 111781 01 13...

Отзывы: