background image

24

Touch


Screen


User

'

s


Manual

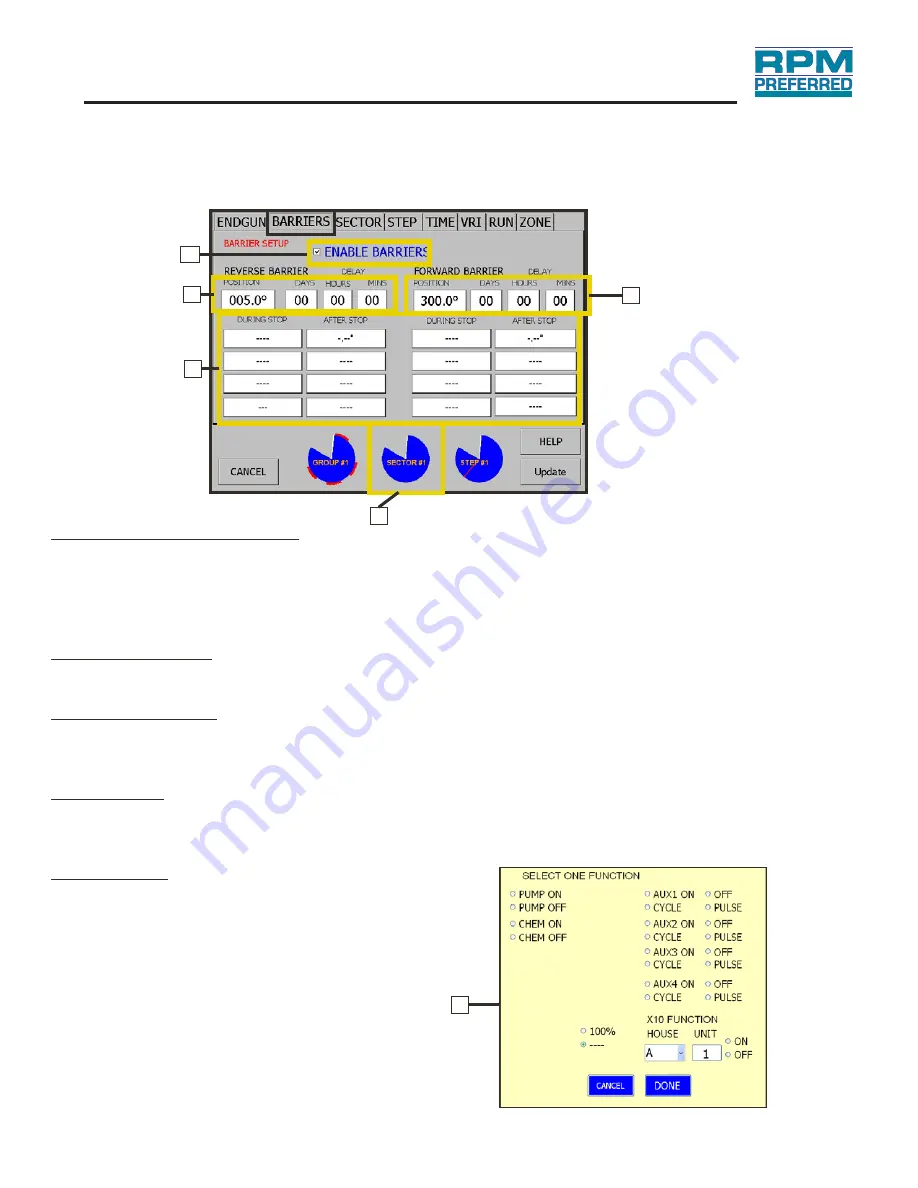
2.   Barriers:

Programming

WITH TOUCH TECHNOLOGY

WITH TOUCH TECHNOLOGY

b.

a.

c.

d.

e.

a. “Enable Barriers” Check Box

This box must be checked in order for the barriers to be present. The box can be unchecked to turn

off the barriers without deleting the current barrier settings.

NO

TE

: 10 is t

h

e minimum distance allo

w

ed 

b

et

w

een 

b

arriers, unless

°

“Part Circle” is selected, from system type on t

h

e “

S

ystem 

S

et

-

up” screen.

S

electin

g

 Part Circle 

w

ill allo

w

 a 5 minimum 

b

et

w

een 

b

arriers.

°

b. “Reverse Barrier”

“Reverse Barrier” position is entered here in degrees. Enter the amount of delay in, days, hours and
minutes, when the system reaches the reverse barrier.

c. “Forward Barrier”

“Forward Barrier” position is entered here in degrees. Enter the amount of delay, in days hours and
minutes, when the system reaches the forward barrier.

d. “Functions”

Used with forward & reverse barriers during stop, select the desired operations for the pivot once it
reaches the barrier from the popup menu. Then select the desired operations from the popup menu
for the pivot to run after the delay.

e. “Pie Charts”

The grey area of the pie charts at the bottom of the
page will show the location of the entered
barriers.

d.

Содержание RPM Preferred

Страница 1: ...RPM Preferred with Touch Technology Operators Manual RPM Preferred With VRI Operation Manual ...

Страница 2: ......

Страница 3: ...Our mission to exceed our customers expectations of quality service and innovation Revision D 01 15 Touch Screen P N 117112 1 0 Operation Manual WITH TOUCH TECHNOLOGY ...

Страница 4: ......

Страница 5: ...t Setup 19 Auxiliary Output Setup 20 Temperature setup 21 Program Options 22 29 Navigation 22 End Gun Program 23 Barrier Program 24 25 Sector Program 26 Step Program 27 Time Program 28 Program Run Selections 29 VRI Interface 30 38 Getting Started with VRI 30 Downloading the Prescription 31 35 Zone Tab 36 Review the VRI Settings 37 38 In Field Update 39 Pivoting Lateral Setup and Programming 40 52 ...

Страница 6: ...Pivoting Lateral Setup and Programming Continued Building Stages in Filed Designer 47 48 Programming Stages within Field Designer 49 52 NEW End Stage Programming 51 NEW Strip Programming 52 ...

Страница 7: ...features remain intact This also ensures system remains compliant with the national electric code and the manufacturers specifications Replace all protective guards and shields before restoring power to the system Do not allow anyone to ride or climb on the System unless they are qualified and required to doso formaintenancepurposes The towersteps havebeenprovidedforaccess to the tower control box...

Страница 8: ... it is unlawful to spray water on state and county roadways This is a serious hazardandmust notbeallowed If your System is equipped with any Auto Stop or Auto Reverse Mechanism make sure they are working correctly and a Tower Barricade is properly installed as per this manual Reinke disclaims any and all liability including any liability created pursuant to the Irrigation SystemsWarranty with rega...

Страница 9: ...Safety Decals located on Main Control Panel III System Safety WITH TOUCH TECHNOLOGY ...

Страница 10: ...t attempt to perform maintenance procedure until the main control panel any disconnect switch and all pump and other disconnect switches are in the locked OFF position System Safety IV WITH TOUCH TECHNOLOGY ...

Страница 11: ...lorforthefullpivotdiagram Speed Control Depth Selecttheamountofwatertoapplyininches Speed Selectthespeedtorunthesystemasapercentage 100 beingfullspeed Note a signnext tothepercentageindicateswhentheendtowerismoving andpercenttimer outputisenergized Touch Screen User s Manual a Pressing the depth button will open the keypad allowing the application rate in inches to be entered Note The SET H R butt...

Страница 12: ... between the FORWARD and REVERSE buttons has several functions It can show GPS signal resolver signal position sensor number of satellites whether or not you have WAAS dead reckoning or tell you when something is wrong When something is wrong the background color will change from white to yellow Note GPS users system will enter forced dead reckoning after 5 minutes if no GPS signal is found Touch ...

Страница 13: ...hesetupscreen Ifthesystemisrunning youwillonlybe allowedtoviewthecurrentsetup Tochangethesystemsetupyoumustfirststopthe system Setup Screen Moredetailaboutsettingupthesystemcanbefoundinalatersectionofthemanual Setup pages9 21 Touch Screen User s Manual 3 WITH TOUCH TECHNOLOGY ...

Страница 14: ...ain Screen WITH TOUCH TECHNOLOGY ProgramScreen Moredetailaboutprogrammingthesystemcanbefoundinalatersectionofthemanual ProgrammingOptions pages22 30 PROGRAMButton Pressing thePROGRAM buttonwilltakeyoutotheprogramscreenasshown below ...

Страница 15: ... park position entered pressing the park button again will turn off the park position LOGS Button Press the LOGS button to access the data that has been logged by the system An example of the Logs screen is shown on the opposite page This button is only active when the system is stopped Touch Screen User s Manual 5 Main Screen WITH TOUCH TECHNOLOGY ...

Страница 16: ...individually For example if June and July data are required to be saved then first select June from the drop down menu then save to USB Next select July and then save to USB The GRAPHING button shows graphs of the data collected shown below Use the buttons located at the top of the Graphing Screen to navigate through the available graphs Similar to the logs screen each graph only displays one mont...

Страница 17: ...ons of the system see screen below c Output Control Buttons Checking any of these boxes allows the user to manually control output of the systems pump chemical end gun and all auxiliaries Clicking the output turns them on and off If the option is on then it will be highlighted and a check will appear in the box next to the option as shown above a c b Touch Screen User s Manual 7 Main Screen WITH T...

Страница 18: ... NEXT button scrolls forward through the tab pages d Percent Timer The 30sec and 60sec radial buttons allow the operator to set the Base Percent Timer cycle e Back Button The BACK button is used to scroll backward through the tab pages f Check Boxes for Options The check boxes add additional options to the system setup g Update Button The UPDATE button saves all settings and exits to the main scre...

Страница 19: ...y year Also length measurements will be in meters and depths in mm c Position Sensor This option will not appear with Pivoting Lateral selected The Position Sensor drop down menu allows selection of GPS resolver or dead reckoning d Current Position Set after field design is complete for Pivoting Lateral Current Position shows the current position of the system e Change Password The change password...

Страница 20: ...ateral depending upon what stage is currently selected Is the time it takes the system to travel a full circle at 100 using hours and minutes Refer to chart located inside the main panel as shown below for this value Keep in mind that it makes no difference that the system is only moving 270 the time entered is based on 360 n Pivoting Lateral Systems Only Pivoting Lateral Machines have different o...

Страница 21: ... box to check the use jpg background the using the drop down menu to select a background for the main screen Note pixel size of the jpg must be 320 x 320 to fit d Update Version The software may be updated by using the USB jump drive with a current NK BIN file loaded to the jump drive by the dealer then pressing the UPDATE VERSION button Further instruction can be found on the last page of this ma...

Страница 22: ...re this time will allow the system to continue to run for set time allowing the pressure to rebuild C Shutdown Pressure should be set according to the type of pressure transducer selected c Pump Delay Build In Pump Delay Build enter the number of seconds to allow the pump to operate to build up pressure When the pump is started or restarted by automatic restart the pump will be allowed to operate ...

Страница 23: ...start Note that if all attempts fail the pump and system will be shut down c GPM Enter the rate in gallons per minute for the pump being used d Enable Run Dry Switch Check this box to add a RUN DRY button to the main screen This will allow the pump to run and ignore the pressure switch or transducer NOTE This is only used to when pump run dry generator are on the same power unit This is controlled...

Страница 24: ...selected function once the switch sees pressure c Voltage Settings Low Voltage Set this voltage to the minimum allowable voltage for normal system operation High Voltage Set this voltage to the maximum allowable voltage for normal system operation Voltage Scale Controls input voltage If voltage reads 470 but is actually 480 enter 1 02 to calibrate closer to the actual voltage on system Voltage Off...

Страница 25: ...rse contactor overriding the limit circuit The maximum value is 15 seconds but 2 seconds is recommended for most systems c Clear Sequence Clear the current start sequence d Alway Use Start Sequence Check the box for Always Use Start Sequence only if you want this sequence used every time the system starts This disables the start sequence button on main screen Warning Safety Limit circuit will be o...

Страница 26: ...than the speeds entered Select the Disable End Gun check box to turn the end gun off during high winds c Rain Gauge Check Box c Check box to enable the rain options Select an operation to run from the popup menu when the amount of rain reaches the amount entered then enter the hours of dry weather before the selected operation can run NOTE The increment setting must be set by the dealer only durin...

Страница 27: ... When Flow Settings Enter the number of gallons per pulse for the flow meter that is installed Enter the Low and High flow values d Gallons per Pulse This setting must be set by the dealer only during set up and must be set according to installed flow meter for calibration e Then Function Settings Select the system function for the set flow values from the popup menu Touch Screen User s Manual 17 ...

Страница 28: ...x see item D c Baud Rate Select the Baud Rate from the drop down menu 1200 2400 4800 9600 or 19200 9600 is the most standard ensure that each communication device is set to same baud rate d Send Command Select a send command to send to the remote system then enter system number under pivot ID this is only allowed when using open comm selection e When this System Select the operations that will tri...

Страница 29: ...for when they switch from OFF to ON For example when Alarm 1 switches from OFF to ON AUX1 will turn on in the example to the right Many different commands can be controlled by using alarms c Alarm 3 Alarm 3 INC Position this alarm is only used on Linear systems Enter the number of feet the Linear system should increment per pulse This defaults to 1 but is generally set using a wheel counter switch...

Страница 30: ... specified only Cycled For Auxiliary 1 4 if Cycled use the popup menu to enter the time in seconds in which the output should remain both on and off This is used for applications such as running an agitator in the chemicals as needed to keep them mixed for application Note This will cycle on and off until turned off Note This page is setup only To use these functions the operator must go to a prog...

Страница 31: ...ction from the popup menu to run when the set temps are met Note Temperature Switch is only used when retrofitting a RAMS panel with a Touch Screen and the RAMS had an existing Temperature Switch The temperature is preset new switches are not available c Low Temp With the Analog Sensor enter the low and high temperatures and then select the function from the popup menu to run when the set temps ar...

Страница 32: ...ng WITH TOUCH TECHNOLOGY b a a Program Button From the main screen select the program button to begin the programming of the system b Programming Tabs Tabs will bring up pages for programming the end gun barriers sector step time VRI run and zone functions ...

Страница 33: ...te the end gun or another output b Show Group Select the End Gun program group that you are wanting to change or add There are 4 program groups available on the Touch Screen Beside each group number is the output to which that group is tied to The output type can be changed under the run tab c Graphics for End Gun Settings As positions are entered for the end gun the graphic diagram below will sho...

Страница 34: ...rrier Reverse Barrier position is entered here in degrees Enter the amount of delay in days hours and minutes when the system reaches the reverse barrier c Forward Barrier Forward Barrier position is entered here in degrees Enter the amount of delay in days hours and minutes when the system reaches the forward barrier d Functions Used with forward reverse barriers during stop select the desired op...

Страница 35: ...gle through each setting one at a time ASTOP ASTOP Stops thesystematforwardbarrierlimitsandreversebarrier Barrierlinesshown onthescreenwillbothbered AREV AREV Autoreversefromforwardtoreverseorreversetoforwardatbarrierlimits Bothbarrierlinesshown onthescreenwillbegreen AREV ASTOP Autoreversewhensystematreversebarrierandautostopatforwardbarrier Reversebarrierlinewillbegreenandforwardbarrierlinewillb...

Страница 36: ... 25 sectors Only one sector program can be run at a time c Moving Forward Reverse Depth Enter the depth in inches and functions from the popup menu that should run while moving in the forward or reverse direction respectively in the selected sector See the pie chart below to determine which sector is being programmed For instance if the sector shown needs an auxiliary pump to turn on then you woul...

Страница 37: ... Select the program number from the drop down menu Up to three programs can be saved but only one program can be ran at a time d At Location Enter the amount of Delay if any when the pivot hits the location for the selected step in days hours and minutes e Action drop down Choose and action for when the system reaches the location for the selected step f Function popup Choose and function for when...

Страница 38: ... to add up to 25 time slots to a program Select the time program from the drop down menu Up to three programs can be saved to the computer but only one program can be ran at a given time c Day of the Week Select the days of the week that the selected time slot should run or select the Check All button to select every day d Time Graphic The program running and stopped times will be displayed graphi...

Страница 39: ...ected choose the step that the pivot should start at Last select a Time Program from the drop down menu Note All of these are optional c Auto Switch Prescriptions This is a New option for VRI only that allows the user to run a separate prescription in each direction To use this function check the Auto Switch Prescription box Then select which prescription from the hard drive to run while system is...

Страница 40: ...ve into the panel using the USB Port Press the Program button on the main screen Step 2 Step 3 Select the VRI tab at the top of the screen A list of all prescriptions available on the thumb drive will appear Step 4 under the Prescription Files window If no box appears that means you have no loaded prescriptions Step 5 I Getting Started with VRI WITH TOUCH TECHNOLOGY ...

Страница 41: ...escription downloads Please the screen while downloading is in progress Step 4 Do Not Touch Step 1 Select a prescription by clicking on it Press the Load button to begin the download Step 2 II Downloading the VRI Precription Touch Screen User s Manual 31 WITH TOUCH TECHNOLOGY ...

Страница 42: ...oaded prescription needs its zones re assigned then proceed to step 9 Otherwise skip to step 16 Step 5 When download is complete A diagram of the loaded prescription will appear If the system is using Sector VRI Prescription skip to Step 6 Step 16 If the system is using Zone VRI Prescription proceed to Step 7 Step 8 WITH TOUCH TECHNOLOGY ...

Страница 43: ...step 15 the system Step 11 If it is determined that AUTO cannot be used for zone set up then create an address for each zone House refers to the valve box s and Relay refers to the control relays Step 12 typically 6 in each box House A Relay 1 would be closest to the pivot center and House A Relay 6 Step 13 would be the furthest from the pivot center This is true for each House valve box on the sy...

Страница 44: ...used This requires skipping some of the relays that would normally be set up in AUTO mode After completing the zone addresses whether entered manually or using the Step 15 AUTO function select DONE all drop down menus have to be closed to select this Select Run tab at the top right hand side of the screen Step 16 Step 17 To use the loaded VRI program select the drop down next to the title Sector P...

Страница 45: ...ese VRI options Select UPDATE button at the bottom right hand side of the screen Step 19 Step 20 The VRI prescription map will be displayed on the Main Screen now Congratulations you have completed setting up the VRI prescription for this system Note This warning sign will appear if the prescription downloaded does not match the Rrx file s description of the mechanical abilities of the system Syst...

Страница 46: ...ed Select the alpha and numeric character for that zone using the drop downs and check the box to turn on this function Note This area of the Zone tab will show blank if the prescription does not match the RRx file for the system A caution symbol will also display on the main screen See diagram bottom of facing page III Zone tab VRI Interface WITH TOUCH TECHNOLOGY 36 Touch Screen User s Manual ...

Страница 47: ...system cannot match the desired depth If the numbers are blue the system is performing as desired Step 2 In this instance the system is in a sector of the prescription that was set to 50 of the base water rate So for this sector the machine adjusts speed to put 0 48 of water or 50 of the base depth of 1 00 and subsequently must travel at 30 or twice the base speed of 15 to achieve this IV Review o...

Страница 48: ...ep 3 When the system is running in the Zone VRI mode the operator can view the rate of watering in each zone at the pivot s current location by pressing the program button and looking under the VRI tab This rate of watering will be a percentage 100 or less of the desired base water depth entered on the SETUP PUMP screen VRI Interface WITH TOUCH TECHNOLOGY 38 Touch Screen User s Manual ...

Страница 49: ... are updating to a newer version Press YES to update NO to exit You will be prompted to reset the power after the file is copied Step 4 After the file is copied exit back to the main screen and restart the sytem by turning the disconnect OFF then ON Pressing the SETUP key will show the current version you have updated Example NK V09 177 10 This means the NK operating system was built in the year 0...

Страница 50: ...egrees REV US LFT Reverse direction underspan left in degrees FWD OS RGT Forward direction overspan right in degrees REV OS RGT Reverse direction overspan right in degrees FWD US RGT Forward direction underspan right in degrees REV US RGT Reverse direction underspan right in degrees b ID and Second Timer Unique field identifier Second percent timer A percent of the main percent timer which slows t...

Страница 51: ...on Select CART or MID SYSTEM depending upon where guidance is placed on the system g Pivot Positioning RSLVR is the default selection and is recommended DED REK should only be used if Resolver is not functioning h Field Designer Select tab now to start Field Designer All other programming and setup will be completed under this tab for pivoting lateral machines f g h Pivot Lateral Setup WITH TOUCH ...

Страница 52: ...created and put on a USB flash drive and the flash drive is in the touchscreen it will appear in the Load from USB window ii If there is a field design program already saved to the hard drive of the touch screen it will appear in the Load Saved window iii If there there is nothing preprogrammed both windows will be blank as shown in graphic above Before starting into field design gathering as much...

Страница 53: ... program e Delete Select this button to delete a field design that is no longer required for the system Caution this will permanently delete the selected program from the touchscreen hard drive f Export to USB Use this button to export a file to a flash drive that has been inserted into the touchscreen this is an optional step g Edit This will allow editing of the currently loaded field design ...

Страница 54: ... the create new or load buttons c Setting the Background Optional but recommended for new systems If a background is desired so that actual field can assist in the design a jpg or png file must have been previously uploaded to a flash drive and that flash drive must then be inserted into the touchscreen Note Picture must be 575 x 575 or less pixels to fit into the graphics window 1 Select the drop...

Страница 55: ...he Confirm button Go to step 3 2 If the picture scale is not known but a distance has been measured in field select the first field reference point then the second field reference point to set the scale of the picture Fine tune line created if necessary by using the direction buttons Up Down Right and Left Once the line is accurate select the Confirm button 3 The confirm button will bring up an En...

Страница 56: ...n the picture graphics window to locate the cart s starting position 3 Click on a second point to show the direction the cart will move in stage 1 4 After fine tuning cart direction using the direction buttons click Confirm 5 Locate the main control panel MCP in relationship to the cart by clicking on the side of the path where the MCP is located The green dot that appears is the cart s starting l...

Страница 57: ...on c System direction stage 1 Select which side of the path the system is on Be mindful of how the MCP is located on the cart in relation to the system In this instance a click on the left side of the red line would indicate an overspan system position i e the MCP is under the system This can be seen in the top right NOT diagram On the other hand clicking on the right side of the red line would in...

Страница 58: ...e the end of system will be after pivoting c Fine tune By selecting the Rel Angle box and entering the desired sweep angle press Done or by using the or buttons Congratulations stage 2 is now complete Continue to add stages until field design is complete d The Undo button will undo one stage at a time beginning with the last stage completed e Save Exit button is used to save a program to the hard ...

Страница 59: ...Previous Stage or Next Stage to navigate between stages c Programming Screens Depending upon which stage is being programmed different tab options and slightly different information will be shown dependant upon whether in pivot stage or lateral stage Differences are highlighted below a b IV Programming Stages within Field Designer Lateral Stage Pivot Stage ...

Страница 60: ... stage can be programmed anytime the program button is available ENDGUN Refer to page 23 of this manual Refer to next page ENDSTAGE Refer to page 26 SECTOR Only used with pivot stages STRIP Refer to page 52 Only used with lateral stages STEP Refer to page 27 Refer to page 28 TIME Refer to page 29 RUN ...

Страница 61: ...system or stop the system These options are selectable in the drop down box above and can be different from when the system is running forward to when it is running in reverse It is also allowed to set a delay time in days hors and seconds The delay will take place before the system reverses or continues but has no relation to when the system stops Note Continue is not an option for both the first...

Страница 62: ... system can will hold up to 3 strip programs and each strip program can hold up to 25 strips Only one strip program can be run at a time c Moving Forward Reverse Depth Enter the depth in inches and functions from the popup menu that should run while moving in the forward or reverse direction respectively in the selected strip For instance if the strip needs an auxiliary pump to turn on then you wo...

Страница 63: ......

Страница 64: ... Company may periodically decide it is most beneficial to our customers to make updates or changes to various products and options without delay These changes may not always be fully reflected in the photographs information and or specifications presented in this brochure Your local Reinke dealer continues to be your best source for the most current information Reinke Manufacturing Company Inc res...

Отзывы: