background image

15

Routine Maintenance

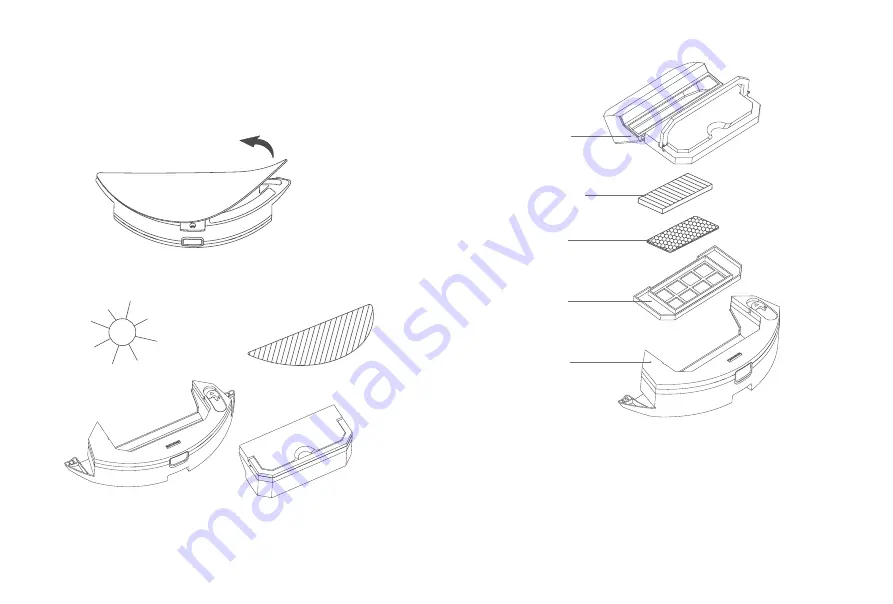
Detachable 2-in-1 Water Tank 

(Clean After Each Use)

Dust Bin Components

1.  Remove the cleaning mop and pour out all 

remaining water from the tank.

2.  Wash the cleaning mop, and then dry the water 

tank and the mop to prepare for the next use.

Lift the handle, take the dust bin out of the water tank, pour out any 
excess water, and then dry the water tank.

HEPA Filter

Filter Foam

Filter Net

Water Tank Components

Battery

•  The body of the device is equipped with a high-performance lithium-ion 

battery pack. To ensure optimal battery performance, keep the device 
charged.

•  If you do not intend to use the device for a long period of time, turn it off 

and store it in a safe place. Charge the device at least once every 3 

months to prevent over-discharge damage to the battery.


Содержание TechLife RMH2101

Страница 1: ...realme TechLife Robot Vacuum User Manual Read this user manual carefully before using the product and store it in a safe place ...

Страница 2: ...English 1 22 čeština 23 44 Deutsche 45 66 Español 67 88 Français 89 110 Italiano 111 132 Nederlands 133 154 Polski 155 176 Contents ...

Страница 3: ... Children shall not play with the appliance Cleaning and user maintenance shall not be made by children without supervision Please keep main brush and other cleaning tools out of reach of children Please do not place objects including children and pets on a stationary or moving machine Please keep hair fingers and other parts of human body or pets away from the suction inlet when the machine is wo...

Страница 4: ...charging base arbitratily Please keep the charging base away from heat source such as heating plate Please do not wipe or clean the charging base shrapnel using wet cloth or wet hand Please do not abandon used batteries arbitrarily Used batteries should be disposed of by professional recycling agency If power line is damaged or broken please disuse it immediately and replace it through official ch...

Страница 5: ...ects Removing the Battery 1 Ensuring that the robot is not touching the charging base keep the product running until it uses up all of is battery and shuts down 2 Remove the screws from the battery cover 3 Remove the battery cover pull out the battery plug and then remove the battery Laser Safety lnformation LiDAR of the product complies with the standard for class1 laser products of lEC60825 and ...

Страница 6: ... not put the battery in a high temperature environment or expose it to the sun doing so could cause it to explode 4 Please do not continue to use the product if the battery appears to be swollen 5 Please dispose of the battery in accordance with local regulations Do not dispose of the battery as household refuse 6 Please do not attempt to repair disassemble or modify the battery Replacing battery ...

Страница 7: ... Introduction Scope of Delivery Charging Base x1 Cleaning Brush x1 Adapter x1 L Side Brush x1 R Side Brush x1 Washable Mop Pad x 2 Optional Disposable Mop Pad x 10 Optional Detachable 2 in 1 Water Tank Optional ...

Страница 8: ...r Cover Dust Bin Button TOF Wall Sensor Cliff Sensor LiDAR Recharge Sensor Bumper Sensor Charging Contact Omni Wheel Side Brush Primary Wheel Main Brush LiDAR Collision Detection Sensor Obstacle Detection Sensor Main Brush Cover Buckle ...

Страница 9: ... recharge pause Press and hold to start partial cleaning Indicator Reset Wi Fi Recharge Partial Clean Pause Power Indicator Cover Emitter External Cable Compartment Power Connector Cable Reel Clasp Compartment Wireless Power Receiver Press to start pause cleaning Press and hold for 3 seconds to turn the device on off When an error has occurred press and hold for 15 seconds to force shutdown ...

Страница 10: ...ry power Place the device on the charging base and it will automatically turn on when it has enough power The device can work normally only when the battery is 20 charged As shown in the figure the front of the device should face the charging base so that the charging contact of the robot is touching the wireless power receiver The distance between the front of the device and the charging base sho...

Страница 11: ...he water tank Open the lid fill the tank with water and then fasten the lid Place the dust bin in the water box and ensure the handle is flat Install the cleaning mop Affix the mop smoothly across the bottom of the water tank Do not use the water tank when no one is at home To ensure safety remove the water tank while it is not in use and when the device is charging Do not use the mopping function...

Страница 12: ...erform a firmware upgrade It is recommended to place the device on the charging base during a firmware upgrade Reset Wi Fi If your phone can no longer connect to your device due to changes in router configuration password or other reasons press and hold the and buttons at the same time for 3 seconds You should hear Wi Fi has been reset Add Device Open the mobile app and tap the button on the homep...

Страница 13: ...the device scans the area generates a map and then intelligently partitions the map into zones The device first cleans each zone along the walls and then cleans the rest of the zone in a bow shape Each zone is cleaned one by one in an orderly efficient and comprehensive manner Once the cleaning process is complete the device will automatically return to the charging base Once the device has turned...

Страница 14: ...e it is done Use the mobile app to select between the quite normal turbo or max vacuum modes The default mode is normal Use the mobile app to select between the dry low mid or high water modes The default mode is high If you cannot control the device through the mobile app instead move it manually to the area that needs to be cleaned and then press and hold the key for 3 seconds The device will ce...

Страница 15: ...ush any dust stuck in the main brush cavities and any objects entangled in the main brush 3 Reinstall the main brush press down on the main brush cover and secure the buckle Side Brush 1 Flip the device over and pull out the side brush vertically 2 Reinstall the brush after removing any entangled hair and dirt 3 Align the left and right brushes with the corresponding markings on the bottom cover a...

Страница 16: ...ops after rinsing and then wait until the filters and dust bin have completely dried 4 After thoroughly drying reinstall the filters in the following order filter net filter foam HEPA filter 2 Open the dust bin and empty it into the trash Dust Bin Button Filter Cover Filter Foam HEPA Filter Note Rinse with clean water Do not add any detergents Do not use a brush or your fingers to clean the filter...

Страница 17: ...in out of the water tank pour out any excess water and then dry the water tank HEPA Filter Filter Foam Filter Net Water Tank Components Battery The body of the device is equipped with a high performance lithium ion battery pack To ensure optimal battery performance keep the device charged If you do not intend to use the device for a long period of time turn it off and store it in a safe place Char...

Страница 18: ...of the robot 2 The cliff sensor on the bottom of the robot 3 The obstacle detection sensor on the front of the robot 4 The LiDAR Collision Detection Sensor on the top of the robot 5 The charging contact on the bottom of the robot and the wireless power receiver on the charging base turn off the power before cleaning 6 The charging base emitter Cliff Sensor Charging Contact TOF Wall Sensor Model Di...

Страница 19: ... is dirty or has become obstructed Wipe the obstacle detection sensor with a soft dry cloth The LiDAR Collision Detection Sensor is dirty or has become obstructed Wipe the top LiDAR Collision Detection Sensor with a soft dry cloth The edge or bumper sensor is stuck Move the front bumper left and right to check for a jam Clean the dust bin and filter or replace the filter Clean the dust bin and fil...

Страница 20: ...Check the main brush and remove any foreign objects The side brush has become entangled or stuck Check the side brush and remove any foreign objects If the device says that the charging base is not found or not plugged in check whether the charging base indicator is on or move the device back to the charging base This error is caused by an unknown fault Restart the product Restart the product If t...

Страница 21: ...emperature is within this range The dust bin is full and needs to be cleaned The filter is clogged and needs to be cleaned or replaced The main brush is entangled with a foreign object and needs to be cleaned The Wi Fi signal is poor Make sure the product is in an area with good Wi Fi coverage A Wi Fi connection error has occurred Please reset the Wi Fi connection download the latest version of th...

Страница 22: ...ěly hrát se zařízením Děti by bez dohledu neměly provádět čištění a uživatelskou údržbu Hlavní kartáč a další čisticí nástroje udržujte mimo dosah dětí Na stojící nebo pohybující se přístroj nedávejte žádné předměty včetně dětí a domácích zvířat Když přístroj pracuje udržujte vlasy nehty a další části těla lidí nebo domácích zvířat mimo sací ventil Výrobek nepoužívejte k uklízení hořících předmětů...

Страница 23: ...oj tepla jako jsou např topné desky Kovovou část napájecího konektoru nabíjecí základny nečistěte ani neumývejte mokrým hadříkem ani mokrou rukou Použité baterie nenechávejte svévolně opuštěné Použité baterie by měla zlikvidovat profesionální recyklační firma Pokud je elektrický kabel poškozený nebo zlomený ihned ho přestaňte používat a vyměňte ho pomocí oficiálních kanálů Zkontrolujte že je robot...

Страница 24: ...aterie 1 Zkontrolujte že robot se nedotýká nabíjecí základny Výrobek nechte běžet dokud úplně nevybije baterii a nevypne se 2 Odšroubujte šrouby z krytu baterie 3 Sejměte kryt baterie vytáhněte zástrčku baterie a poté baterii vyjměte Bezpečnostní informace o laseru LiDAR výrobku splňuje standard pro třídu 1 laserových výrobků lEC60825 a nevytváří nebezpečné laserové záření Laserová třída lEC 60825...

Страница 25: ...avé kapaliny nebo plynu 3 Baterii neumisťujte do prostředí s vysokou teplotou ani ji nevystavujte slunci Mohlo by to způsobit explozi 4 Pokud se zdá že se baterie nafoukla přestaňte výrobek používat 5 Baterii zlikvidujte podle místních nařízení Baterii nevyhazujte do směsného odpadu 6 Baterii se nepokoušejte opravovat rozmontovávat ani upravovat Výměna baterie za nesprávný typ může způsobit exploz...

Страница 26: ...učení Nabíjecí základna x1 Úklidový kartáč x1 Adaptér x1 Levý boční kartáč x1 Pravý boční kartáč x1 Omyvatelná destička mopu x 2 volitelné Jednorázová destička mopu x 10 volitelné Odnímatelná nádržka na vodu typu dva v jednom volitelné ...

Страница 27: ...čítko nádoby na prach TOF senzor zdí Senzor srázu LiDAR Senzor dobíjení Senzor nárazů Kontakt pro nabíjení Všesměrové kolo Boční kartáč Hlavní kolo Hlavní kartáč LiDAR detekční senzor kolizí Detekční senzor překážek Přezka krytu hlavního kartáče ...

Страница 28: ...pozastavíte Stisknutím a podržením zahájíte částečný úklid Kontrolka Resetování Wi Fi Dobíjení Částečný úklid Pozastavení Kontrolka napájení Kryt Vysílač Přihrádka na externí kabely Konektor napájení Kotouč na kabel Přihrádka na přezky Bezdrátový přijímač napájení Stisknutím spustíte pozastavíte úklid Stiskněte a držte po dobu 3 sekund pro zapnutí vypnutí zařízení Pokud dojde k chybě stisknutím a ...

Страница 29: ...oveň baterie alespoň 20 Přední část zařízení by měla být čelem k nabíjecí základně aby se kontakt pro nabíjení robota dotýkal bezdrátového přijímače napájení Viz obrázek Vzdálenost mezi přední částí zařízení a nabíjecí základnou by měla být zhruba 2 cm Poznámka Zkontrolujte že nabíjecí základna má alespoň 0 5 m volného prostoru po obou stranách a alespoň 1 5 m volného prostoru před sebou Během ins...

Страница 30: ...víko do nádržky nalijte vodu a poté víko utáhněte Nádobu na prach umístěte do krabice s vodou a zkontrolujte že rukojeť je rovně Vložení úklidového mopu do zařízení Mop upevněte vyrovnaně k dolní části nádržky na vodu Nádržku na vodu nepoužívejte pokud nikdo není doma Když zařízení nepoužíváte nebo když se nabíjí vyjměte kvůli bezpečnosti nádržku na vodu Funkci mopování nepoužívejte na koberce Pom...

Страница 31: ...být alespoň 50 aby bylo možné provést aktualizaci firmwaru Doporučujeme vám abyste zařízení během aktualizace firmwaru umístili do nabíjecí základny Resetování Wi Fi Pokud se telefon kvůli změně konfigurace směrovače hesla nebo z jiných důvodů již nemůže připojit k zařízení stiskněte najednou tlačítka a a držte je po dobu 3 sekund Měli byste uslyšet Wi Fi byla resetována Přidání zařízení Otevřete ...

Страница 32: ...apy na zóny Zařízení nejprve každou zónu uklidí podél zdí a poté v obloukovém tvaru uklidí zbývající část zóny Postupně se uspořádaným efektivním a úplným způsobem uklidí každá zóna Jakmile zařízení dokončí úklid automaticky se vrátí do nabíjecí základny Oblast úklidu Oblast úklidu Aktuální oblast úklidu Poznámka Zařízení během chodu svévolně nebo často nepřesunujte Zařízení po přesunutí umístěte ...

Страница 33: ... do nabíjecí základny Pomocí mobilní aplikace si vyberte z následujících režimů vysávání tichý standardní silný ultra Výchozí režim je standardní Pomocí mobilní aplikace si vyberte z následujících vodních režimů suchý nízký střední vysoký Výchozí režim je vysoký Pokud zařízení nemůžete ovládat pomocí mobilní aplikace přesuňte ho do oblasti úklidu ručně a poté stiskněte tlačítko a držte ho po dobu ...

Страница 34: ...artáče nebo jakýchkoliv předmětů které se zamotaly do hlavního kartáče použijte příslušný nástroj 3 Hlavní kartáč znovu vložte do zařízení kryt hlavního kartáče zatlačte dolů a zajistěte přezku Boční kartáč 1 Zařízení obraťte vzhůru nohama a svisle vytáhněte boční kartáč 2 Odstraňte všechny zamotané vlasy a nečistoty a kartáč znovu vložte do zařízení 3 Zarovnejte levé a pravé kartáče s příslušnými...

Страница 35: ...e všechny kapky vody a poté počkejte dokud filtry a nádoba na prach úplně nevyschnou 4 Po důkladném vysušení znovu vložte filtry do zařízení v následujícím pořadí filtrační síť filtrační pěna HEPA filtr 2 Otevřete nádobu na prach a vyprázdněte ji do odpadkového koše Tlačítko nádoby na prach Kryt filtru Filtrační pěna HEPA filtr Poznámka Vypláchněte čistou vodou Nepřidávejte žádné čisticí prostředk...

Страница 36: ...bu na prach vytáhněte z nádržky na vodu vylijte všechnu nadbytečnou vodu a poté nádobu na vodu nechte vyschnout HEPA filtr Filtrační pěna Filtrační síť Součásti nádržky na vodu Baterie Tělo zařízení obsahuje balíček lithium iontových baterií s vysokým výkonem Pro zajištění optimálního výkonu baterie udržujte zařízení nabité Pokud zařízení nebudete dlouhou dobu používat vypněte ho a uschovejte ho n...

Страница 37: ...ravé části robota 2 Senzor srázu v dolní části robota 3 Detekční senzor překážek v přední části robota 4 LiDAR detekční senzor kolizí v horní části robota 5 Kontakt pro nabíjení v dolní části robota a bezdrátový přijímač napájení na nabíjecí základně Před čištěním odpojte zařízení od elektřiny 6 Vysílač nabíjecí základny Senzor srázu Kontakt pro nabíjení TOF senzor zdí Model Rozměry Hmotnost Bater...

Страница 38: ...enzor překážek je zašpiněný nebo mu něco překáží Detekční senzor překážek očistěte pomocí suchého měkkého hadříku LiDAR detekční senzor kolizí je zašpiněný nebo mu něco překáží LiDAR detekční senzor kolizí očistěte pomocí suchého měkkého hadříku Zasekl se senzor rohů nebo nárazů Zkontrolujte ucpání tak že přední nárazník posunete doleva a doprava Vyčistěte nádobu na prach a filtr nebo filtr vyměňt...

Страница 39: ... Pokud zařízení říká že nabíjecí základna nebyla nalezena nebo není zapojena zkontrolujte že svítí kontrolka nabíjecí základny nebo zařízení přesuňte zpět do nabíjecí základny Tuto chybu způsobila neznámá závada Výrobek restartujte Výrobek restartujte Pokud problém přetrvává obraťte se na poprodejní podporu Výrobek umístěte do nabíjecí základny Chyba 17 Ale ne V programu došlo k chybě Restartujte ...

Страница 40: ... s teplotou v tomto rozsahu Nádoba na prach je plná Musíte ji vyčistit Filtr je ucpaný a musíte ho vyčistit nebo vyměnit Do hlavního kartáče se zapletl cizí předmět Musíte ho vyčistit Signál Wi Fi je slabý Ujistěte se že výrobek je v oblasti s dobrým pokrytím sítě Wi Fi Došlo k chybě s připojením Wi Fi Resetujte připojení Wi Fi stáhněte si nejnovější verzi mobilního klienta a zkuste to znovu Zadan...

Страница 41: ... Kinder dürfen nicht mit dem Gerät spielen Die Reinigung und Benutzerwartung darf nicht von Kindern ohne Aufsicht durchgeführt werden Die Hauptbürste und andere Reinigungswerkzeuge außerhalb der Reichweite von Kindern aufbewahren Keine Gegenstände auch keine Kinder und Haustiere auf ein stehendes oder sich bewegendes Gerät platzieren Haare Finger und andere menschliche Körperteile oder Haustiere v...

Страница 42: ...ernhalten Die Ladestation nicht mit einem nassen Tuch oder mit nassen Händen abwischen oder reinigen Verbrauchte Akkus nicht willkürlich entsorgen Verbrauchte Akkus sind durch professionelle Recycling Unternehmen zu entsorgen Wenn ein Stromkabel beschädigt oder gerissen ist dieses sofort nicht mehr verwenden und auf offiziellem Weg ersetzen Sicherstellen dass der Roboter während des Transports her...

Страница 43: ... 1 Sicherstellen dass der Roboter die Ladestation nicht berührt und das Produkt laufen lassen bis der Akku vollständig entleert ist und sich abschaltet 2 Die Schrauben von der Akkuabdeckung entfernen 3 Die Akkuabdeckung entfernen den Akkustecker abziehen und dann den Akku entfernen Laser Sicherheitsinformationen Der LiDAR des Produkts entspricht der Norm für Laserprodukte der Klasse 1 der lEC60825...

Страница 44: ...ühren 3 Den Akku nicht in eine Umgebung mit hohen Temperaturen legen oder ihn nicht der Sonne aussetzen dies könnte zu einer Explosion führen 4 Das Produkt nicht weiter verwenden wenn der Akku aufgebläht zu sein scheint 5 Den Akku entsprechend den örtlichen Vorschriften entsorgen Den Akku nicht im Hausmüll entsorgen 6 Nicht versuchen den Akku zu reparieren zu zerlegen oder zu modifizieren Das Erse...

Страница 45: ...kteinführung Lieferumfang Ladestation x1 Reinigungsbürste x1 Adapter x1 L Seitenbürste x1 R Seitenbürste x1 Waschbares Mopp Pad x 2 optional Wegwerf Mopp Pad x 10 optional Abnehmbarer 2 in 1 Wassertank optional ...

Страница 46: ...Staubbehälter Taste TOF Wandsensor Klippensensor LiDAR Ladesensor Stoßleistensensor Ladekontakt Omnidirektionalrad Seitenbürste Primärrad Hauptbürste LiDAR Kollisions Erkennungssensor Hindernis Erkennungssensor Hauptbürsten abdeckungs Verriegelung ...

Страница 47: ...m Starten der teilweisen Reinigung drücken und gedrückt halten Anzeige WLAN Reset Laden Teilweise Reinigen Pause Betriebsanzeige Abdeckung Emitter Fach für externes Kabel Stromanschluss Kabelrolle Klammerraum Drahtloser Stromabnehmer Drücken um die Reinigung zu starten pausieren Drücken und 3 Sekunden lang gedrückt halten um das Gerät ein auszuschalten Wenn ein Fehler aufgetreten ist 15 Sekunden l...

Страница 48: ...ku 20 geladen ist Wie in der Abbildung gezeigt sollte die Vorderseite des Geräts der Ladestation zugewandt sein so dass der Ladekontakt des Roboters den drahtlosen Stromabnehmer berührt Der Abstand zwischen der Vorderseite des Geräts und der Ladestation sollte etwa 2 cm betragen Hinweis Sicherstellen dass die Ladestation an beiden Seiten mindestens 0 5 m und vorne 1 5 m Freiraum hat Während der In...

Страница 49: ...n Den Deckel öffnen den Tank mit Wasser füllen und dann den Deckel schließen Den Staubbehälter in den Wasserkasten einsetzen und sicherstellen dass der Griff bündig ist Den Wischmopp installieren Den Mopp gleichmäßig über den Boden des Wassertanks anbringen Den Wassertank nicht verwenden wenn niemand zu Hause ist Aus Sicherheitsgründen den Wassertank entfernen wenn er nicht benutzt wird und wenn d...

Страница 50: ... Es wird empfohlen das Gerät während einer Firmware Aktualisierung an die Ladestation zu stellen WLAN Reset Wenn Ihr Telefon aufgrund von Änderungen der Routerkonfiguration des Passworts oder aus anderen Gründen keine Verbindung mehr zu Ihrem Gerät herstellen kann die Tasten und gleichzeitig 3 Sekunden lang gedrückt halten Sie sollten WLAN wurde zurückgesetzt hören Gerät hinzufügen Die mobile App ...

Страница 51: ...zuerst jede Zone entlang der Wände und dann den Rest der Zone in einer Bogenform Jede Zone wird nacheinander auf geordnete effiziente und umfassende Weise gereinigt Wenn der Reinigungsvorgang beendet ist kehrt das Gerät automatisch zur Ladestation zurück Gereinigter Bereich Gereinigter Bereich Aktueller Reinigungsbereich Hinweis Das Gerät während des Betriebs nicht willkürlich oder häufig bewegen ...

Страница 52: ...tion zurück Die mobile App verwenden um zwischen den Saugmodi Leise Standard stark oder Ultra auszuwählen Der Standardmodus ist Standard Die mobile App verwenden um zwischen den Modi Trocken wenig mittel oder viel Wasser zu wählen Der Standardmodus ist viel Wenn das Gerät nicht über die mobile App gesteuert werden kann es stattdessen manuell zu dem Bereich bewegen der gereinigt werden soll und dan...

Страница 53: ...stgesetzt hat und alle Objekte die sich in der Hauptbürste verfangen haben zu reinigen 3 Die Hauptbürste wieder einsetzen die Abdeckung der Hauptbürste nach unten drücken und die Verriegelung befestigen Seitenbürste 1 Das Gerät umdrehen und die Seitenbürste vertikal herausziehen 2 Die Bürste nach dem Entfernen von aufgewickelten Haaren oder Schmutz wieder einsetzen 3 Die linke und rechte Bürste an...

Страница 54: ...hütteln und dann warten bis die Filter und der Staubbehälter vollständig abgetrocknet sind 4 Nach sorgfältiger Trocknung die Filter in folgender Reihenfolge wieder einsetzen Filternetz Filterschaum HEPA Filter 2 Den Staubbehälter öffnen und ihn in den Abfall entleeren Staubbehälter Taste Filterabdeckung Filterschaum HEPA Filter Hinweis Mit sauberem Wasser spülen Keine Reinigungsmittel hinzufügen D...

Страница 55: ...em Wassertank nehmen überschüssiges Wasser ausgießen und dann den Wassertank trocknen HEPA Filter Filterschaum Filternetz Wassertank Komponenten Akku Das Gehäuse des Geräts ist mit einem Lithium Ionen HochleistungsAkkupack ausgestattet Um eine optimale Akkuleistung zu gewährleisten das Gerät geladen halten Wenn das Gerät über einen längeren Zeitraum nicht benutzt werden soll es ausschalten und an ...

Страница 56: ...ensor rechts am Roboter 2 Der Klippensensor an der Unterseite des Roboters 3 Den Hindernis Erkennungssensor vorne am Roboter 4 Den LiDAR Kollisions Erkennungssensor oben am Roboter 5 Den Ladekontakt am Boden des Roboters und den drahtlosen Stromabnehmer an der Ladestation vor dem Reinigen den Strom abschalten 6 Den Emitter der Ladestation Klippensensor Ladekontakt TOF Wandsensor Modell Abmessungen...

Страница 57: ...rschmutzt oder wurde blockiert Den Hindernis Erkennungssensor mit einem weichen trockenen Tuch abwischen Der LiDAR Kollisions Erkennungssensor ist verschmutzt oder wurde blockiert Den LiDAR Kollisions Erkennungssensor mit einem weichen trockenen Tuch abwischen Der Kanten oder Stoßleistensensor steckt fest Die vordere Stoßleiste nach links und rechts bewegen und auf eine Blockierung prüfen Staubbeh...

Страница 58: ...n nicht gefunden oder nicht eingesteckt ist prüfen ob die Anzeige der Ladestation an ist oder das Gerät wieder an die Ladestation stellen Dieser Fehler wird durch einen unbekannten Fehler hervorgerufen Das Produkt neu starten Das Produkt neu starten Wenn das Problem weiterhin besteht den Kundendienst kontaktieren Das Produkt an der Ladestation platzieren Fehler 17 Oh nein Ich habe einem Programmfe...

Страница 59: ...t nur in Umgebungen verwenden in denen die Umgebungstemperatur innerhalb dieses Bereichs liegt Der Staubbehälter ist voll und muss entleert werden Der Filter ist verstopft und muss gereinigte oder ersetzt werden Die Hauptbürste ist mit einem Fremdkörper verheddert und muss gereinigt werden Das WLAN Signal ist schlecht Sicherstellen dass sich das Produkt in einem Bereich mit guter WLAN Abdeckung be...

Страница 60: ... con el dispositivo ni realizar tareas de limpieza ni mantenimiento sin supervisión Mantenga el cepillo principal y otras herramientas de limpieza fuera del alcance de los niños No coloque objetos tampoco niños ni mascotas sobre el dispositivo fijo o en movimiento Mantenga el pelo los dedos y otras partes del cuerpo así como a sus mascotas lejos de la entrada de succión cuando el dispositivo esté ...

Страница 61: ...ntenga la base de carga alejada de una fuente de calor como una placa calefactora No limpie la base de carga con un paño húmedo o con las manos mojadas No deseche las baterías usadas de forma arbitraria Las baterías usadas deben ser desechadas por una agencia de reciclaje profesional Si el cable eléctrico está dañado o roto deje de utilizarlo inmediatamente y reemplácelo a través de los canales of...

Страница 62: ...gúrese de que el robot no toque la base de carga y mantenga el producto en funcionamiento hasta que se agote toda la batería y se apague 2 Quite los tornillos de la cubierta de la batería 3 Retire la cubierta de la batería quite el enchufe de la batería y extraiga la batería Información de seguridad láser LiDAR del producto cumple con el estándar para productos láser de clase 1 de lEC60825 y no pr...

Страница 63: ... la fuga de líquido o gas inflamable 3 No coloque la batería en un entorno de alta temperatura ni la exponga al sol Si lo hace podría explotar 4 No siga utilizando el producto si la batería parece estar hinchada 5 Deseche la batería de acuerdo con las normativas locales No deseche la batería como basura doméstica 6 No intente reparar desmontar o modificar la batería Reemplazar la batería por un ti...

Страница 64: ...ucto Paquete de entrega 1 base de carga 1 cepillo de limpieza 1 adaptador 1 cepillo lateral izquierdo 1 cepillo lateral derecho 2 paños lavables opcional 10 paños desechables opcional Depósito de agua extraíble 2 en 1 opcional ...

Страница 65: ...Sensor de pared TOF Sensor de desnivel LiDAR Sensor de recarga Sensor de protector Contactos de carga Rueda omnidireccional Cepillo lateral Rueda principal Cepillo principal Sensor de detección de golpes LiDAR Sensor de detección de obstáculos Cierre de la cubierta del cepillo principal ...

Страница 66: ...ado para iniciar la limpieza parcial Indicador Restablecer wifi Recarga Limpieza parcial Pausa Indicador de encendido Cubierta Emisor Compartimento de cable externo Conector eléctrico Carrete de cable Compartimento de cierre Receptor eléctrico inalámbrico Pulse para iniciar pausar la limpieza Mantenga pulsado durante 3 segundos para encender apagar el dispositivo Cuando se produzca un error manten...

Страница 67: ...omo se muestra en la figura la parte delantera del dispositivo debe mirar hacia la base de carga para que el contacto de carga del robot toque el receptor eléctrico inalámbrico La distancia entre la parte delantera del dispositivo y la base de carga debe ser de unos 2 cm Nota Asegúrese de que la base de carga tenga al menos 0 5 m de espacio libre en ambos lados y 1 5 m de espacio libre en la parte...

Страница 68: ...l depósito con agua y cierre la tapa Coloque el depósito de suciedad en el depósito de agua y asegúrese de que el asa esté plegada Coloque el paño de fregado coloque el paño con suavidad en la parte inferior del depósito de agua No utilice el depósito de agua cuando no haya nadie en casa Para garantizar la seguridad extraiga el depósito de agua cuando no esté en uso y cuando el dispositivo se esté...

Страница 69: ...zación de firmware Se recomienda colocar el dispositivo en la base de carga durante una actualización de firmware Restablecer wifi Si su teléfono ya no puede conectarse al dispositivo debido a cambios en la configuración del router la contraseña u otros motivos mantenga pulsados los botones y al mismo tiempo durante 3 segundos Debería escuchar Se ha restablecido la conexión wifi Añadir dispositivo...

Страница 70: ...na a lo largo de las paredes y luego limpia el resto de la zona en forma de arco Las zonas se limpian una por una de manera ordenada eficiente y completa Cuando haya finalizado el proceso de limpieza el dispositivo volverá automáticamente a la base de carga Área limpia Área limpia Área de limpieza actual Nota No mueva el dispositivo de forma arbitraria o frecuente durante su funcionamiento Tras mo...

Страница 71: ... terminado Utilice la aplicación móvil para seleccionar entre los modos de aspirado silencioso estándar fuerte o ultrafuerte El modo predeterminado es estándar Utilice la aplicación móvil para seleccionar entre los modos de nivel de agua seco bajo medio o alto El modo predeterminado es alto Si no puede controlar el dispositivo a través de la aplicación móvil muévalo manualmente al área que debe li...

Страница 72: ...uierdo y derecho con las marcas correspondientes en la cubierta inferior y presione hacia abajo para colocarlos R cepillo derecho L cepillo izquierdo 1 Gire el dispositivo y presione en el cierre de la cubierta del cepillo principal para sacarlo 2 Utilice la herramienta correspondiente para limpiar la suciedad atascada en las cavidades del cepillo principal y cualquier objeto enredado en él 3 Vuel...

Страница 73: ...del enjuague y espere hasta que los filtros y el depósito de suciedad se hayan secado por completo 4 Después de que se hayan secado por completo vuelva a colocar los filtros en el siguiente orden red del filtro espuma del filtro filtro HEPA 2 Abra el depósito de suciedad y vacíelo en la basura Botón del depósito de suciedad Cubierta del filtro Espuma del filtro Filtro HEPA Nota Enjuague con agua l...

Страница 74: ... del depósito de agua vierta el exceso de agua y seque el agua del depósito Filtro HEPA Espuma del filtro Red del filtro Componentes del depósito de agua Batería El dispositivo está equipado con una batería de iones de litio de alto rendimiento Para garantizar un rendimiento óptimo de la batería mantenga el dispositivo cargado Si no va a utilizarse el dispositivo durante un periodo prolongado apág...

Страница 75: ...enzor srázu v dolní části robota 3 El sensor de detección de obstáculos en la parte delantera del robot 4 El sensor de detección de golpes LiDAR en la parte superior del robot 5 Los contactos de carga en la parte inferior del robot y el receptor eléctrico inalámbrico en la base de carga apague el suministro eléctrico antes de limpiar 6 El emisor de la base de carga Sensor de desnivel Contactos de ...

Страница 76: ... se ha obstruido Limpie el sensor de detección de obstáculos con un paño suave y seco El sensor de detección de golpes LiDAR está sucio o se ha obstruido Limpie el sensor de detección de golpes LiDAR superior con un paño suave y seco El sensor de protector o bordes está atascado Mueva el protector delantero hacia la izquierda y hacia la derecha para ver si hay un atasco Limpie el depósito de sucie...

Страница 77: ...positivo indica que la base de carga no se encuentra o no está conectada verifique si el indicador de la base de carga está encendido o mueva el dispositivo a la base de carga Este error está causado por un fallo desconocido Reinicie el dispositivo Reinicie el dispositivo Si el problema persiste póngase en contacto con el servicio posventa Coloque el dispositivo en la base de carga Error 17 vaya s...

Страница 78: ...tre dentro de este rango El depósito de suciedad está lleno y debe limpiarse El filtro está obstruido y debe limpiarse o reemplazarse El cepillo principal está enredado con un objeto extraño y debe limpiarse La señal wifi es deficiente Asegúrese de que el dispositivo esté en un área con buena cobertura wifi Se ha producido un error de conexión wifi Restablezca la conexión wifi descargue la última ...

Страница 79: ...la maintenance de l appareil ne doivent pas être effectués par des enfants laissés sans surveillance Merci de conserver la brosse principale et les autres outils de nettoyage hors de portée des enfants Merci de ne pas placer d objets ni d enfants ou d animaux de compagnie sur l appareil à l arrêt ou en mouvement Merci de tenir éloignés de la bouche d aspiration cheveux doigts et autres parties du ...

Страница 80: ...rci de tenir le socle de charge à l écart de toute source de chaleur comme une plaque chauffante Merci de ne pas nettoyer les fragments du socle de charge avec un chiffon humide ou les mains mouillées Merci de ne pas jeter la batterie usée arbitrairement Les batteries usées doivent être traitées par des organismes de recyclage professionnels Si le câble d alimentation est endommagé ou cassé cessez...

Страница 81: ... que le robot ne soit pas sur le socle de charge laissez le fonctionner jusqu à son extinction due à l épuisement de la batterie 2 Retirez les vis de la protection de la batterie 3 Enlevez la protection de la batterie débranchez la prise de la batterie puis retirez la lnformations de sécurité liées au laser Le LiDAR de l appareil est conforme à la norme lEC60825 concernant les produits laser de ca...

Страница 82: ...ttre la batterie à de fortes températures ou de l exposer au soleil Cela pourrait entraîner son explosion 4 Merci de cesser d utiliser le produit si la batterie semble avoir gonflé 5 Merci de jeter la batterie en respectant les lois locales en vigueur Ne la jetez pas dans votre poubelle domestique 6 Merci de ne pas tenter de réparer démonter ou modifier la batterie Remplacer la batterie par une ba...

Страница 83: ...u de l emballage 1 socle de charge 1 brosse de nettoyage 1 adaptateur secteur 1 brosse latérale L 1 brosse latérale R 2 serpillères lavables facultatives 10 serpillères jetables facultatives Réservoir d eau détachable 2 en 1 facultatif ...

Страница 84: ...al TOF Capteur de vide LiDAR Capteur de recharge Capteur du pare choc Contact pour le rechargement Roue omnidirectionnelle Brosse latérale Roue principale Brosse principale Capteur de détection de collision LiDAR Capteur de détection d obstacle Attache de la protection de la brosse principale ...

Страница 85: ...ncer un nettoyage partiel Témoin Réinitialisation du Wi Fi Recharge nettoyage partiel pause Témoin d alimentation Protection Émetteur Compartiment à câbles Connecteur d alimentation Enrouleur de câble Compartiment à fermoir Réceptacle d alimentation sans fil Appuyez sur ce bouton pour démarrer mettre en pause le nettoyage Maintenez ce bouton appuyé durant 3 secondes pour allumer éteindre l apparei...

Страница 86: ...eil doit être orienté vers le socle de charge pour que le contact de rechargement du robot touche le réceptacle d alimentation sans fil La distance entre l avant de l appareil et le socle de charge devrait avoisiner 2 cm Remarque Assurez vous que le socle de charge bénéficie d au moins 0 5 m d espace libre de chaque côté et d au moins 1 5 m d espace libre devant lui Pendant l installation ne laiss...

Страница 87: ...l eau puis refermez le couvercle Placez le bac à poussière dans le réservoir d eau et assurez vous que la poignée soit à plat Installation de la serpillère fixez la serpillère de manière uniforme sur toute la longueur du réservoir d eau N utilisez pas le réservoir d eau s il n y a personne à la maison Pour des raisons de sécurité retirez le réservoir d eau pendant la charge et si vous ne l utilise...

Страница 88: ...à 50 de charge Il est recommandé de placer l appareil sur le socle de charge pendant une mise à jour du firmware Réinitialisation du Wi Fi Si votre téléphone ne parvient plus à se connecter à votre appareil parce que la configuration du routeur a changé le mot de passe a été modifié ou toute autre raison maintenez les boutons et appuyés pendant 3 secondes Vous devriez entendre Le Wi Fi a été réini...

Страница 89: ...rs L appareil commence par nettoyer chaque secteur situé le long des murs puis nettoie le reste du secteur en suivant une trajectoire en forme d arc Chaque zone est nettoyée une par une de manière ordonnée efficace et exhaustive Une fois le nettoyage terminé l appareil retourne automatiquement au socle de charge Zone nettoyée Zone nettoyée Zone de nettoyage actuelle Remarque Ne pas déplacer arbitr...

Страница 90: ...bile pour choisir entre les modes d aspiration silencieuse standard forte ou ultra Le mode par défaut est aspiration standard Utilisez l appli mobile pour choisir entre les modes de nettoyage sec ou à humidification faible moyenne ou élevée Le mode par défaut est humidification élevée Si vous n arrivez pas à contrôler l appareil via l appli mobile placez le manuellement dans la zone à nettoyer pui...

Страница 91: ...osse principale retirez la poussière coincée dans les cavités et tout corps étranger emmêlé 3 Remettez en place la brosse principale appuyez sur la protection et refermez l attache Brosse latérale 1 Retournez l appareil et retirez la brosse latérale à la verticale 2 Enlevez les cheveux et la poussière dessus puis remettez la brosse en place 3 Alignez les brosses droite et gauche avec les marques c...

Страница 92: ... Secouez les bien pour enlever les gouttes d eau puis laissez les sécher entièrement 4 Une fois bien secs réinstallez les filtres dans l ordre suivant grille du filtre mousse du filtre filtre HEPA 2 Ouvrez le bac à poussière et videz le dans votre poubelle Bouton du bac à poussière Protection du filtre Mousse du filtre Filtre HEPA Remarque Rincez à l eau claire N ajoutez pas de détergent Ne nettoy...

Страница 93: ...c à poussière du réservoir d eau videz l eau puis séchez le réservoir Filtre HEPA Mousse du filtre Grille du filtre Éléments du réservoir d eau Batterie Le châssis de l appareil renferme une batterie lithium ion haute performance Afin de garantir des performances optimales maintenez votre appareil chargé Si vous ne comptez pas utiliser l appareil durant une longue période éteignez le et entreposez...

Страница 94: ...pteurs de prévention de chute situés en dessous du robot 3 Le capteur de détection d obstacle à l avant du robot 4 Le capteur de détection de collision LiDAR au dessus du robot 5 Le contact de rechargement sous le robot et le réceptacle d alimentation sans fil sur le socle de charge éteindre l appareil avant de le nettoyer 6 L émetteur du socle de charge Capteur de vide Contact pour le rechargemen...

Страница 95: ...ué Essuyez le haut du capteur de détection d obstacle avec un chiffon sec et doux Le capteur de détection de collision LiDAR est sale ou est obstrué Essuyez le haut du capteur de détection de collision LiDAR avec un chiffon sec et doux Le pare choc ou le capteur du pare choc est coincé Déplacez le pare choc avant de gauche à droite pour voir s il est coincé Nettoyez le filtre et le bac à poussière...

Страница 96: ...ndique que le socle de charge est introuvable ou n est pas branché vérifiez si le témoin lumineux du socle de charge est allumé ou replacez l appareil sur le socle de charge Cette erreur provient d un défaut non identifié Redémarrez l appareil Redémarrez l appareil Si le problème persiste contactez le service après vente Placez l appareil sur le socle de charge Erreur 17 oh non Mon programme a ren...

Страница 97: ... lorsque la température ambiante se trouve dans cette fenêtre Le bac à poussière est plein et doit être vidé Le filtre est bouché et doit être nettoyé ou remplacé La brosse principale est emmêlée à un corps étranger et doit être nettoyée Le signal Wi Fi est mauvais Assurez vous que le produit soit placé dans une zone bénéficiant d une bonne couverture Wi Fi Une erreur de connexion Wi Fi s est prod...

Страница 98: ...li interventi di pulizia e manutenzione non devono essere condotti da bambini senza supervisione Tenere la spazzola principale e gli altri strumenti per la pulizia lontano dalla portata dei bambini Non collocare oggetti inclusi bambini e animali domestici sul dispositivo che sia spento o in movimento Tenere i capelli le dita e qualunque altra parte del corpo o i propri animali domestici lontano da...

Страница 99: ...rica Tenere la base di ricarica lontana da fonti di calore ad esempio una piastra riscaldante Non spolverare o pulire la parte metallica del connettore di alimentazione della base di ricarica con un panno umido o con le mani bagnate Non buttare arbitrariamente le batterie esaurite Le batterie usate devono essere smaltite da un ente preposto al riciclaggio professionale Nel caso in cui la linea ele...

Страница 100: ...ria 1 Lasciare il dispositivo in funzione fino al consumo totale della batteria e al suo arresto assicurandosi al contempo che il robot non tocchi la base di ricarica 2 Rimuovere le viti sul coperchio della batteria 3 Rimuovere il coperchio della batteria estrarne la spina quindi rimuovere la batteria Informazioni sulla sicurezza del laser Il sensore LiDAR è conforme allo standard lEC60825 applica...

Страница 101: ...liquide o gassose infiammabili 3 Non collocare la batteria in un ambiente caratterizzato da una temperatura elevata e non esporla alla luce del sole onde evitare che esploda 4 Interrompere l utilizzo del prodotto qualora si presenti rigonfio 5 Smaltire la batteria in conformità alle disposizioni locali Non smaltire la batteria come rifiuto domestico 6 Non tentare di riparare disassemblare o modifi...

Страница 102: ...nuto della confezione Base di ricarica x 1 Scovolino di pulizia x 1 Adattatore x 1 Spazzola laterale L x 1 Spazzola laterale R x 1 Panno lavabile x 2 opzionale Panno monouso x 10 opzionale Serbatoio dell acqua 2 in 1 estraibile opzionale ...

Страница 103: ...re di prossimità ToF Sensore di dislivello LiDAR Sensore di ricarica Sensore del paraurti Contatto di ricarica Ruota omnidirezionale Spazzola laterale Ruota principale Spazzola principale Sensore di rilevamento collisione LiDAR Sensore di rilevamento ostacoli Fermo del coperchio della spazzola principale ...

Страница 104: ...remuto per avviare una pulizia parziale Indicatore Reimpostazione del Wi Fi Ricarica Pulizia parziale Sospensione Indicatore di alimentazione Coperchio Emettitore Vano del cavo esterno Connettore di alimentazione Avvolgicavo Vano di chiusura Ricevitore di alimentazione wireless Premere per avviare sospendere il ciclo di pulizia Tenere premuto per 3 secondi per accendere spegnere il dispositivo Se ...

Страница 105: ... anteriore del dispositivo dovrebbe essere rivolta verso la base di ricarica così che il contatto di ricarica del robot tocchi il ricevitore di alimentazione wireless La distanza tra la parte anteriore del dispositivo e la base di ricarica dovrebbe essere di almeno 2 cm Note Assicurarsi che su entrambi i lati della base di ricarica vi sia uno spazio di almeno 0 5 m e che di fronte vi sia uno spazi...

Страница 106: ...coperchio Collocare la vaschetta raccoglipolvere nel serbatoio dell acqua assicurandosi che la maniglia sia piatta Installare il panno fissare il panno uniformemente lungo la parte inferiore del serbatoio dell acqua Non utilizzare il serbatoio dell acqua quando non c è nessuno in casa Per garantire la sicurezza rimuovere il serbatoio dell acqua quando il dispositivo non è in uso o quando è sotto c...

Страница 107: ...lla base di ricarica durante l aggiornamento del firmware Reimpostazione del Wi Fi Nel caso in cui non si riesca a eseguire la connessione al dispositivo con il proprio telefono a causa di modifiche apportate alla configurazione del router alla password o per altri motivi tenere premuti contemporaneamente i pulsanti e per 3 secondi A questo punto si dovrebbe sentire il messaggio acustico Wi Fi rei...

Страница 108: ...Il dispositivo pulisce ciascuna zona dapprima lungo le pareti poi le parti restanti formando una sorta di arco Le singole zone vengono pulite a una a una in modo ordinato efficiente e approfondito Al termine del processo di pulizia il dispositivo tornerà automaticamente alla base di ricarica Area pulita Area pulita Area di pulizia attuale Note Non muovere il dispositivo in maniera arbitraria o fre...

Страница 109: ...i mobili per selezionare una modalità di aspirazione tra Silenzioso Normale Turbo e Max La modalità predefinita è Standard Utilizzare l app per dispositivi mobili per selezionare una modalità di pulizia tra A secco Ad acqua getto minimo Ad acqua getto medio e Ad acqua getto forte La modalità predefinita è Ad acqua getto forte Qualora non si riesca a comandare il dispositivo dall app per dispositiv...

Страница 110: ...polvere bloccata tra le sue cavità e i corpi estranei rimasti impigliati 3 Reinstallare la spazzola principale premere il coperchio e chiudere il fermo Spazzola laterale 1 Capovolgere il dispositivo ed estrarre verticalmente la spazzola laterale 2 Reinstallare la spazzola dopo aver rimosso tutto lo sporco e i capelli eventualmente impigliatisi 3 Allineare la spazzola destra e sinistra ai contrasse...

Страница 111: ...a dopo il risciacquo quindi attendere che i filtri e la vaschetta raccoglipolvere siano completamente asciutti 4 Dopo averli accuratamente lasciati asciugare reinstallare i filtri nell ordine seguente rete filtrante schiuma filtrante filtro HEPA 2 Aprire la vaschetta raccoglipolvere e svuotarla nel cestino dell immondizia Pulsante della vaschetta raccoglipolvere Coperchio del filtro Schiuma filtra...

Страница 112: ...io dell acqua rimuovere l acqua in eccesso quindi lasciare asciugare il serbatoio Filtro HEPA Schiuma filtrante Rete filtrante Componenti del serbatoio dell acqua Batteria Il corpo del dispositivo è dotato di un pacco batteria agli ioni di litio ad alte prestazioni Mantenere il dispositivo carico per garantire prestazioni ottimali della batteria Qualora non si intenda utilizzare il dispositivo per...

Страница 113: ...eriore del robot 3 Il sensore di rilevamento ostacoli sulla parte anteriore del robot 4 Il sensore di rilevamento collisione LiDAR sulla parte superiore del robot 5 Il contatto di ricarica sulla parte inferiore del robot e il ricevitore di alimentazione wireless sulla base di ricarica scollegare il dispositivo dalla presa di corrente prima della pulizia 6 L emettitore della base di ricarica Sensor...

Страница 114: ...o presenta un ostruzione Pulire il sensore di rilevamento ostacoli usando un panno morbido e asciutto Il sensore di rilevamento collisione LiDAR è sporco o presenta un ostruzione Pulire la parte superiore del sensore di rilevamento collisione LiDAR usando un panno morbido e asciutto Il sensore di rilevamento bordi o paraurti è bloccato Muovere il paraurti anteriore a destra e a sinistra per verifi...

Страница 115: ...ivo segnala che la base di ricarica non è stata trovata o non è collegata verificare che l indicatore sulla base di ricarica sia acceso oppure spostare di nuovo il dispositivo verso la base Errore causato da un problema sconosciuto Riavviare il dispositivo Riavviare il dispositivo Se il problema persiste contattare il servizio di assistenza post vendita Posizionare il dispositivo sulla base di ric...

Страница 116: ...intervallo La vaschetta raccoglipolvere è piena e deve essere pulita Il filtro è ostruito e deve essere pulito o sostituito La spazzola principale si è impigliata a un corpo estraneo e deve essere pulita Il segnale Wi Fi è debole Assicurarsi che il dispositivo si trovi in un area con una buona copertura della rete Wi Fi Si è verificato un errore della connessione alla rete Wi Fi Ripristinare la co...

Страница 117: ...egrijpen Kleine kinderen mogen niet met het apparaat spelen Schoonmaken en onderhoud mag niet worden uitgevoerd door kinderen zonder toezicht Houd de hoofdborstel en andere schoonmaakmiddelen buiten het bereik van kinderen Plaats geen voorwerpen met inbegrip van kinderen en huisdieren op een stilstaande of bewegende machine Houd haar vingers en andere lichaamsdelen of huisdieren uit de buurt van d...

Страница 118: ...adstation uit de buurt van warmtebronnen zoals een verwarmingsplaat Geen onderdelen van het laadstation afvegen of schoonmaken met een natte doek of natte handen Gooi gebruikte batterijen niet willekeurig weg Gebruikte batterijen moeten door een professionele recyclingfirma worden ingezameld Als het netsnoer is beschadigd of gebroken stop dan onmiddellijk met het gebruik en laat het vervangen via ...

Страница 119: ...ation niet raakt en houd het product in werking tot de batterij volledig leeg is en het product uitschakelt 2 Draai de schroeven uit het deksel van het batterijcompartiment 3 Verwijder het deksel van het batterijcompartiment trek de batterijstekker uit en verwijder daarna de batterij Veiligheidsinformatie van de laser LiDAR van het product is conform de norm voor klasse 1 laserproducten van lEC608...

Страница 120: ...eistof of gas lekken 3 Plaats de batterij niet in een omgeving met hoge temperatuur of stel de batterij niet bloot aan de zon dit kan de batterij laten ontploffen 4 Stop met het gebruiken van het product als de batterij opgezwollen lijkt 5 Verwijder de batterij overeenkomstig de lokale regelgeving De batterij niet verwijderen met huishoudelijk afval 6 Probeer de batterij niet te repareren ontmante...

Страница 121: ...het product Omvang van levering Laadstation x1 Schoonmaakborstel x1 Adapter x1 L Zijborstel x1 R Zijborstel x1 Afwasbaar dweilpad x 2 Optioneel Wegwerpbaar dweilpad x 10 Optioneel Verwijderbare 2 in 1 watertank Optioneel ...

Страница 122: ...bot Filterdeksel Knop stofbak TOF muursensor Afgrondsensor LiDAR Laadsensor Bumpersensor Laadcontact Omni wiel Zijborstel Primair wiel Hoofdborstel LiDAR Collision Detection sensor Sensor voor obstakeldetectie Gesp deksel hoofdborstel ...

Страница 123: ... schoonmaken te beginnen Indicatielampje Reset Wi Fi Opladen Gedeeltelijk schoonmaken Pauzeren Aan uit indicatielampje Deksel Zender Extern kabelcompartiment Voedingsaansluiting Kabelhaspel Gesp compartiment Draadloze voedingsontvanger Druk om het schoonmaken te starten pauzeren Houd de knop 3 seconden ingedrukt om het apparaat aan uit te schakelen Als er zich een fout heeft voorgedaan houd u de k...

Страница 124: ...De voorkant van het apparaat moet naar het laadstation gericht zijn zoals wordt weergegeven op de afbeelding zodat het laadcontact van de robot de draadloze voedingsontvanger raakt De afstand tussen de voorkant van het apparaat en het laadstation moet ongeveer 2 cm zijn Opmerking Zorg ervoor dat het laadstation een vrije ruimte van minimaal 0 5 m heeft aan beide kanten en 1 5 m vooraan Houd het ne...

Страница 125: ...t water en zet daarna het deksel vast Plaats de stofbak in de waterbak en zorg ervoor dat de handgreep plat ligt De dweil installeren Bevestig de dweil moeiteloos aan de onderkant van de watertank Gebruik de watertank niet als er niemand thuis is Verwijder om de veiligheid te verzekeren de watertank wanneer deze niet in gebruik is en het apparaat wordt opgeladen Gebruik de dweilfunctie niet op tap...

Страница 126: ... Het wordt aanbevolen om het apparaat op het laadstation te plaatsen tijdens een firmware upgrade Reset Wi Fi Als uw telefoon geen verbinding meer kan maken met uw apparaat als gevolg van wijzigingen van de routerinstellingen het wachtwoord of om andere redenen houd de knoppen en dan samen gedurende 3 seconden ingedrukt U zou Wi Fi is gereset moeten horen Apparaat toevoegen Open de mobiele app en ...

Страница 127: ...kt eerst elke zone langs de muren schoon en maakt daarna de rest van de zone schoon in een boog Elke zone wordt achter elkaar schoongemaakt op een ordelijke efficiënte en samenhangende manier Zodra het schoonmaakproces is voltooid keert het apparaat terug naar het laadstation Schoongemaakt gebied Schoongemaakt gebied Huidige schoonmaakgebied Opmerking Het apparaat niet willekeurig of frequent verp...

Страница 128: ...station terugkeren Gebruik de mobiele app om te wisselen tussen de modi stil standaard sterk of ultra zuigkracht De standaard modus is standaard Gebruik de mobiele app om te wisselen tussen de modi droog gemiddeld of veel water De standaard modus is veel Als u het apparaat bedient via de mobiele app verplaats het dan handmatig naar het gebied dat schoongemaakt moet worden en houd de toets 3 second...

Страница 129: ...de openingen van de hoofdborstel achtergebleven stof en verstrengelde voorwerpen te verwijderen 3 Installeer de borstel opnieuw druk het deksel van de hoofdborstel omlaag en zet de gesp vast Zijborstel 1 Draai het apparaat om en trek de zijborstel verticaal uit het apparaat 2 Plaats de borstel opnieuw na het verwijderen van verstrengeld haar en vuil 3 Lijn de linker en rechter borstels uit met de ...

Страница 130: ...nd water 3 Schud de waterdruppels weg na het spoelen en wacht tot de filters en de stofbak volledig droog zijn 4 Plaats na grondige spoeling de filters opnieuw in volgende volgorde filtergaas filterschuim HEPA filter 2 Open de stofbak en maak deze leeg Knop stofbak Filterdeksel Filterschuim HEPA filter Opmerking Spoelen met schoon water Geen schoonmaakmiddelen toevoegen Het filter niet schoonmaken...

Страница 131: ...lig water weg en droog de tank HEPA filter Filterschuim Filtergaas Onderdelen van de watertank Batterij De behuizing van het apparaat is uitgerust met een hoogwaardig lithium ion batterijpakket Houd het apparaat opgeladen om te zorgen voor optimale batterijprestaties Als u van plan bent om het apparaat gedurende lange tijd niet te gebruiken zet het dan uit en bewaar het op een veilige plaats Laad ...

Страница 132: ...ant van de robot 2 De afgrondsensor op de onderkant van de robot 3 De sensor voor obstakeldetectie op de voorkant van de robot 4 The LiDAR Collision Detection sensor op de bovenkant van de robot 5 Het laadcontact op de onderkant van de robot en de draadloze voedingsontvanger op het laadstation zet de voeding uit vóór het schoonmaken 6 De zender van het laadstation Afgrondsensor Laadcontact TOF muu...

Страница 133: ...d Veeg de sensor voor obstakeldetectie schoon met een zachte droge doek The LiDAR Collision Detection sensor is vuil of wordt belemmerd Veeg de bovenkant van de LiDAR Collision Detection sensor schoon met een zachte droge doek De rand van de bumpersensor zit vast Beweeg de voorbumper naar links en naar rechts om te controleren of deze vast zit Reinig de stofbak en het filter of vervang het filter ...

Страница 134: ...at het laadstation niet gevonden kan worden of geen voeding heeft controleer dan of het aan uit indicatielampje brandt of plaats het apparaat terug op het laadstation Deze storing wordt veroorzaakt door een onbekende fout Start het product opnieuw op Start het product opnieuw Neem contact om met de dienst na verkoop als het probleem aanhoudt Plaats het product op het laadstation Fout 17 Oh nee Ik ...

Страница 135: ...ar de omgevingstemperatuur zich binnen dit bereik bevindt De stofbak is vol en moet schoongemaakt worden Het filter is verstopt en moet worden schoongemaakt of vervangen De hoofdborstel is verstrengeld met een vreemd voorwerp en moet schoongemaakt worden Het Wi Fi signaal is zwak Zorg ervoor dat het product zich in een gebied met goed Wi Fi bereik bevindt Er heeft zich een fout met de Wi Fi verbin...

Страница 136: ...urządzenia jako zabawki dla dzieci jest zabronione Czyszczenie i czynności konserwacyjne użytkownika nie mogą być wykonywane przez dzieci bez nadzoru Szczotkę główną i pozostałe elementy czyszczące przechowywać poza zasięgiem dzieci Nie umieszczać przedmiotów dzieci ani zwierząt na nieruchomym lub ruchomym urządzeniu Trzymać włosy palce i inne części ciała oraz zwierzęta z dala od wlotu ssącego pr...

Страница 137: ...adującą trzymaj z dala od źródeł ciepła na przykład płyt grzewczych Nie przecieraj ani nie czyść wypustów podstawki ładującej wilgotną ściereczką ani mokrymi dłońmi Nie wyrzucaj zużytego akumulatora z odpadami komunalnymi Zużyty akumulator należy oddać do utylizacji w przeznaczonym do tego punkcie Jeśli linia zasilająca jest uszkodzona lub przerwana nie korzystaj z niej Zleć wymianę odpowiedniemu ...

Страница 138: ...e robot nie styka się z podstawką ładującą i pozostaw urządzenie włączone aż do całkowitego rozładowania akumulatora 2 Odkręć śruby pokrywy akumulatora 3 Zdejmij pokrywę akumulatora usuń zatyczkę akumulatora a następnie wyjmij akumulator Informacje dotyczące bezpieczeństwa urządzeń laserowych Czujnik LiDAR zastosowany w produkcie spełnia wymogi normy lEC60825 dla laserów klasy 1 i nie jest źródłem...

Страница 139: ... do wycieku palnej cieczy bądź gazu 3 Trzymać akumulator z dala od miejsc występowania wysokich temperatur i bezpośredniego działania słońca Ryzyko wybuchu akumulatora 4 Przestać użytkować produkt jeśli akumulator wydaje się napęczniały 5 Akumulator wyrzucać zgodnie z obowiązującymi przepisami krajowymi Nie wyrzucać akumulatora razem z odpadami komunalnymi 6 Nie naprawiać demontować ani nie modyfi...

Страница 140: ...awka ładująca x 1 Szczotka do czyszczenia x 1 Zasilacz x 1 Lewa szczotka boczna L x 1 Prawa szczotka boczna R x 1 Podkładka pod mop nadająca się do mycia x 2 opcjonalna Jednorazowa podkładka pod mop x 10 opcjonalna Zdejmowany zbiornik na wodę 2 w 1 opcjonalny ...

Страница 141: ...tra Przycisk pojemnika na kurz Czujnik ToF ściany Czujnik spadku LiDAR Czujnik ładowania Czujnik zderzaka Styk ładujący Koło Omni Szczotka boczna Koło główne Szczotka główna Czujnik kolizji LiDAR Czujnik wykrywania przeszkód Klamra pokrywy szczotki głównej ...

Страница 142: ...y naładować wstrzymać Naciśnij i przytrzymaj aby rozpocząć sprzątanie obszaru Wskaźnik Resetowanie Wi Fi Ładowanie sprzątanie obszaru wstrzymanie Wskaźnik zasilania Pokrywa Emiter Zewnętrzny schowek na kabel Złącze zasilania Szpula na kabel Wpust na zatrzask Bezprzewodowy odbiornik zasilania Naciśnij aby rozpocząć wstrzymać sprzątanie Naciśnij i przytrzymaj przez 3 sekundy aby włączyć wyłączyć urz...

Страница 143: ... urządzenie powinno być skierowane przodem w stronę podstawki ładującej aby styk ładujący robota dotykał bezprzewodowego odbiornika zasilania Odległość pomiędzy przodem urządzenia a podstawką ładującą powinna wynosić około 2 cm Uwaga Upewnij się że po obu stronach podstawki ładującej jest przynajmniej 0 5 m a z przodu podstawi przynajmniej 1 5 m wolnej przestrzeni Dopilnuj aby podczas montażu prze...

Страница 144: ...ę napełnij zbiornik na wodę i zamknij pokrywę W pojemniku na wodę umieść pojemnik na kurz upewniając się że uchwyt leży płasko Zakładanie mopa płynnym ruchem przymocuj mop do spodu zbiornika na wodę Nie używać zbiornika na wodę jeśli nikogo nie ma w domu W celu zachowania bezpieczeństwa należy wyjmować zbiornik na wodę gdy nie jest używany i na czas ładowania urządzenia Nie używać funkcji mopa na ...

Страница 145: ...oziom naładowania akumulatora musi wynosić co najmniej 50 Zalecamy umieszczenie urządzenia na podstawce ładującej na czas aktualizowania oprogramowania sprzętowego Resetowanie Wi Fi Po utraceniu łączności między telefonem a urządzeniem w wyniku zmiany konfiguracji routera hasła lub z innych przyczyn jednocześnie naciśnij przyciski oraz i przytrzymaj je przez 3 sekundy Rozlegnie się komunikat Wi Fi...

Страница 146: ...a strefy Najpierw urządzenie odkurza strefę wzdłuż ścian a następnie jej pozostałą część podążając po drodze złożonej z łuków Każda strefa jest sprzątana w zorganizowany wydajny i kompleksowy sposób Po zakończeniu sprzątania urządzenie automatycznie wraca do podstawki ładującej Sprzątany obszar Sprzątany obszar Aktualnie sprzątany obszar Uwaga Nie przemieszczać pracującego urządzenia często lub we...

Страница 147: ... tryb odkurzania Cichy Standardowe Silne albo Max Ustawienie domyślne to odkurzanie standardowe W aplikacji mobilnej możesz wybrać tryb Suchy albo Z Małą Średnią lub Dużą ilością wody Ustawienie domyślne to duża ilość wody Jeśli sterowanie urządzeniem za pomocą aplikacji mobilnej jest niemożliwe należy przenieść je ręcznie na docelowy obszar a następnie nacisnąć przycisk i przytrzymać przez 3 seku...

Страница 148: ...łówną usuwając ewentualne zanieczyszczenia w jej wgłębieniach i wszelkie zaplątane przedmioty 3 Ponownie załóż szczotkę główną dociśnij pokrywę i przymocuj klamrę Szczotka boczna 1 Odwróć urządzenie i pionowym ruchem wyciągnij szczotkę boczną 2 Usuń zaplątane włosy i zabrudzenia i ponownie załóż szczotkę 3 Wyrównaj lewą i prawą szczotkę z oznaczeniami na pokrywie spodu i dociśnij aby przymocować R...

Страница 149: ...nij pozostałości wody i poczekaj na całkowite wyschnięcie filtrów i pojemnika na kurz 4 Po całkowitym wyschnięciu ponownie załóż filtry w następującej kolejności siatka filtra pianka filtra filtr HEPA 2 Otwórz pojemnik na kurz i opróżnij jego zawartość do kosza na śmieci Przycisk pojemnika na kurz Pokrywa filtra Pianka filtra Filtr HEPA Uwaga Płukać czystą wodą Nie dodawać detergentów Nie czyścić ...

Страница 150: ...a wodę wylej nadmiar wody i wysusz pojemnik na wodę Filtr HEPA Pianka filtra Siatka filtra Elementy zbiornika na wodę Akumulator Wewnątrz obudowy urządzenia znajduje się wydajny akumulator litowo jonowy Urządzenie powinno być regularnie ładowane aby zachować optymalną sprawność akumulatora Jeśli urządzenie nie będzie użytkowane przez dłuższy czas należy je wyłączyć i przechowywać w bezpiecznym mie...

Страница 151: ...rawej stronie robota 2 Czujnik spadku na spodniej stronie robota 3 Czujnik wykrywania przeszkód z przodu robota 4 Czujnik kolizji LiDAR u góry robota 5 Styk ładujący na spodzie robota i bezprzewodowy odbiornik zasilania na podstawce ładującej wyłączyć zasilanie przed przystąpieniem do czyszczenia 6 Emiter podstawki ładującej Czujnik spadku Styk ładujący Czujnik ToF ściany Model Wymiary Masa Akumul...

Страница 152: ...eszkód jest zabrudzony albo zasłonięty Przetrzyj czujnik wykrywania przeszkód miękką suchą ściereczką Czujnik kolizji LiDAR jest zabrudzony albo zasłonięty Przetrzyj górny czujnik kolizji LiDAR miękką suchą ściereczką Czujnik krawędzi lub czujnik zderzaka się zablokował Przesuń przedni zderzak w lewo i w prawo aby sprawdzić czy coś go blokuje Wyczyść pojemnik na kurz i filtr albo wymień filtr Wycz...

Страница 153: ...je że podstawka ładująca nie została znaleziona lub nie jest podłączona sprawdź czy wskaźnik podstawki ładującej się świeci albo umieść urządzenie z powrotem na podstawce ładującej Błąd spowodowany nieznaną usterką Zrestartuj urządzenie Zrestartuj urządzenie Jeśli problem nadal występuje skontaktuj się z serwisem Umieść urządzenie na podstawce ładującej Błąd 17 O nie Wystąpił błąd programu Zrestar...

Страница 154: ...ować tylko w miejscach w których temperatura otoczenia mieści się w tym przedziale Pojemnik na kurz jest pełny Wyczyść pojemnik Filtr jest niedrożny Wyczyść lub wymień filtr W szczotkę główną wplątało się ciało obce Wyczyść szczotkę główną Jakość sygnału Wi Fi jest niedostateczna Upewnij się że urządzenie pracuje na obszarze objętym odpowiednim zasięgiem Wi Fi Wystąpił błąd połączenia Wi Fi Zreset...

Страница 155: ...lme Chongqing Mobile Telecommunications Corp Ltd No 178 Yulong Avenue Yufengshan Yubei District Chongqing China Representative in Europe Baradine Invest S L U c Príncipe de Vergara 112 4 28002 Madrid Spain ...

Отзывы: